Here's the short answer: buy a full-spectrum LED bar or panel light rated for your grow area, hang it 12 to 24 inches above your plants depending on species, plug it into a timer set for 12 to 16 hours per day, and adjust height or duration based on how your plants respond over the next two weeks. That's the whole setup in one sentence. Everything below is just filling in the details so you get it right the first time.
Grow Light Setup for Indoor Plants: Step-by-Step Guide

Marcus Tillman
3 Apr 2026
How to choose the right grow lights for houseplants
The lighting market is genuinely confusing right now, so let me cut through it. For houseplants and indoor growing in 2026, full-spectrum LED is the right choice for almost everyone. LED panels and bars run cooler than fluorescent or HID alternatives, use significantly less electricity, and last tens of thousands of hours. A good LED setup designed for a 2x2 foot grow area typically draws 40 to 100 watts from the wall, enough to support most houseplants, herbs, or a small seed-starting tray without a big electricity bill.
When you're shopping, look for lights that specify a full spectrum output (roughly 380 to 700 nanometers, covering blue and red wavelengths plants actually use). Avoid cheap 'blurple' lights that emit only red and blue bands, they work, but modern white-spectrum LEDs outperform them and won't turn your living room an unsettling shade of purple. Also look for products that carry UL listing or comply with UL 8800, which is the first standardized safety standard specifically written for horticultural lighting equipment. UL 8800 is also required for products to appear on the DesignLights Consortium (DLC) horticultural Qualified Products List, so a DLC-listed product is a solid shortcut to filtering out junk. Energy Star's grow-light guidance echoes this: only use products actually intended and rated for horticultural use, not repurposed work lights or cheap imports with no safety certification.
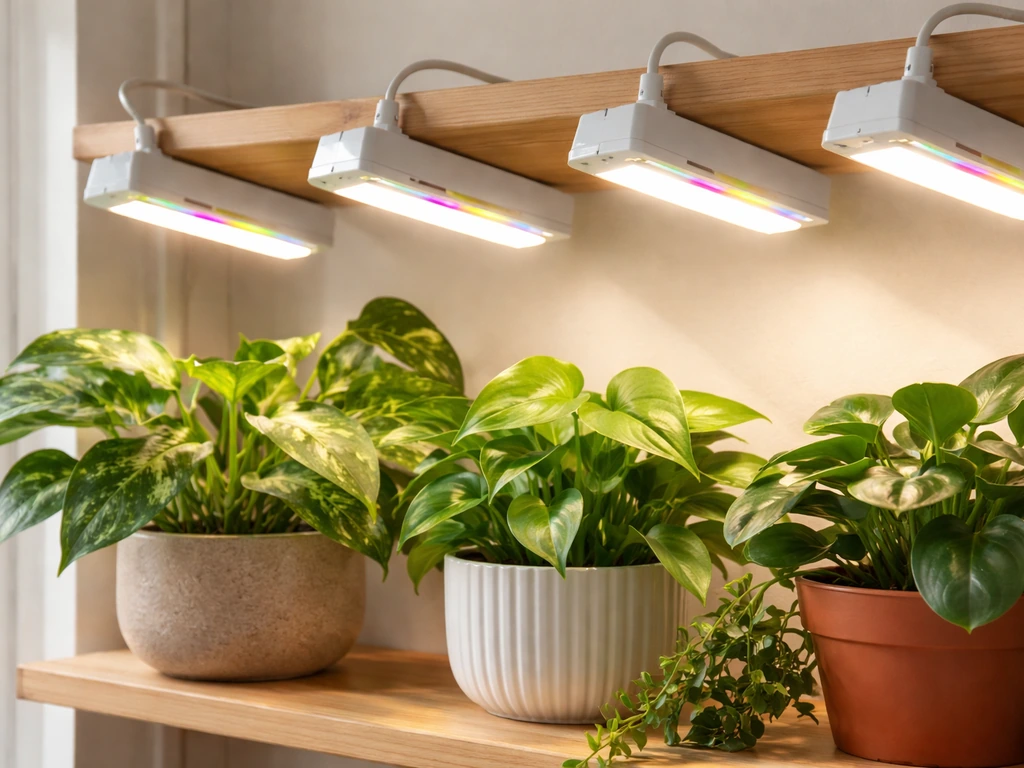
For light type specifically: LED bars (long, thin strips mounted on a rack or frame) work best for shelves and seed-starting trays. LED panels (square or rectangular boards) work better for standalone plant clusters or small grow tents. Single-bulb screw-in grow light bulbs are fine for one or two potted plants on a windowsill. Pick the form factor that matches your physical setup, not the one with the flashiest marketing.
Selecting the setup type and essential hardware
Before you order anything, decide which type of setup you're building. Three common configurations cover most home grower situations:
- Single lamp over a few pots: one LED bar or bulb on an adjustable gooseneck stand or clamp, ideal for a small corner or windowsill supplemental light
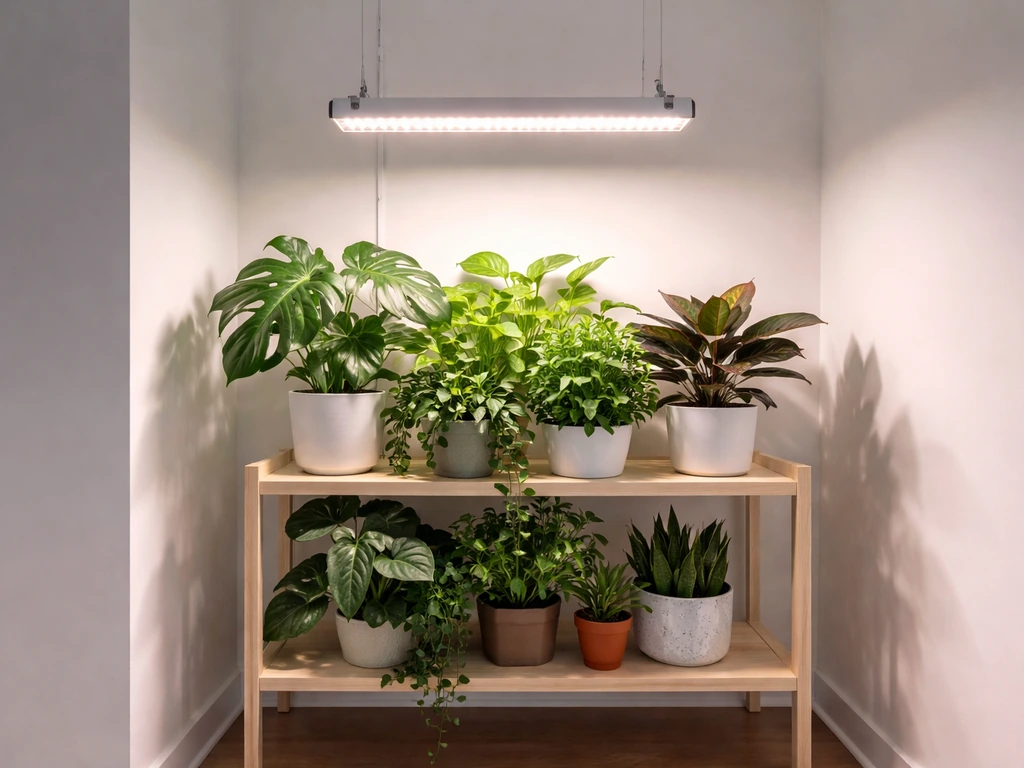
- Multi-plant panel or bar array: one or two LED bars or a mid-size panel mounted above a cluster of plants or a grow tent, covering 2x2 to 4x4 feet
- Seed-starting or propagation shelf: a wire shelving unit with one LED bar per shelf level, perfect for starting seeds or rooting cuttings year-round
Beyond the light itself, here's the hardware you actually need. A grow lamp setup that works reliably requires: the light fixture or bulb, a mounting solution (ratchet hangers for panels, wire hooks or zip ties for bars on shelving), a mechanical or digital outlet timer, and an extension cord rated for the wattage you're running. Reflectors are optional for most houseplant setups, they matter more in grow tents where you want to bounce every photon back toward your plants. If you're working inside a grow tent, the mylar lining already acts as a reflector, so you don't need to buy extra material. If you're working in open space, a simple white or foil-lined surface behind your plants can improve coverage by 10 to 20 percent without spending anything.
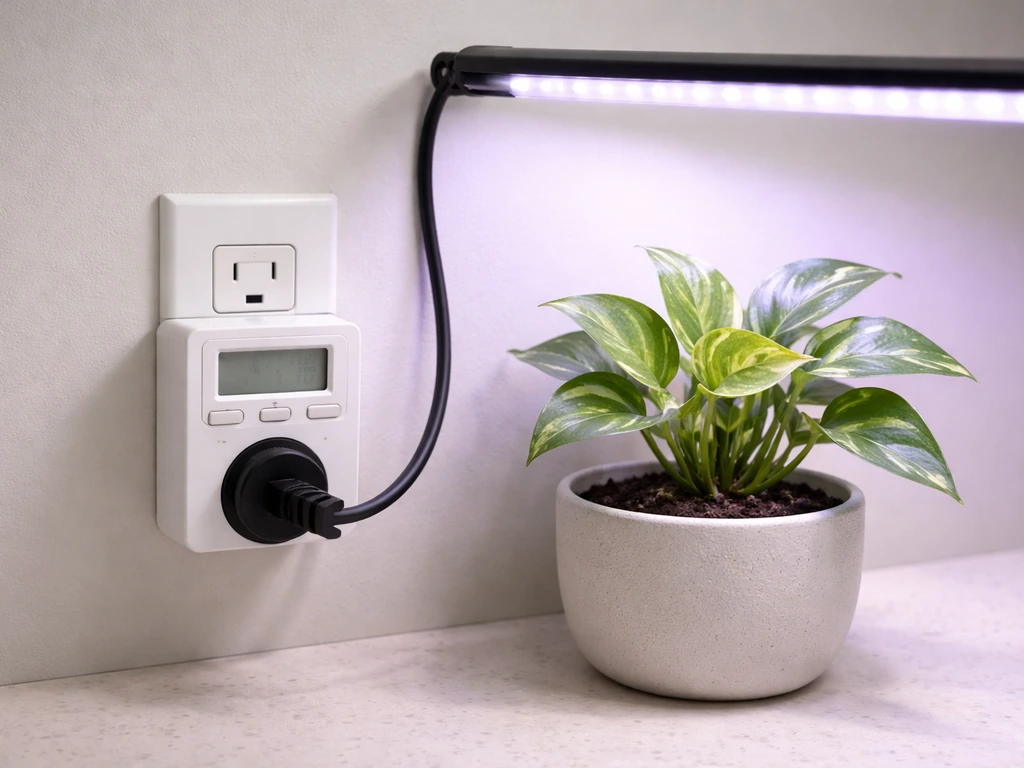
Timers are non-negotiable. A basic mechanical outlet timer costs about five dollars and will do the job fine. If you want to run multiple shelves or zones on independent schedules, a digital multi-outlet timer gives you more control. Don't skip the timer and try to remember to turn the light on and off manually, inconsistent photoperiods stress plants and will undo a lot of what you're trying to achieve.
Placement and height: getting distance and coverage right

Height is the most common thing people get wrong, and it's easy to fix once you understand why it matters. Light intensity drops off very quickly as distance increases, this is the inverse square law in practice, and it means that moving a light from 12 inches to 24 inches above your plant doesn't halve the intensity, it reduces it to about one quarter. So height has a huge impact on how much light your plants actually receive.
Here are practical starting heights for different situations, based on typical LED output levels:
| Plant Type | Recommended Starting Height | Notes |
|---|---|---|
| Seedlings and cuttings | 4 to 6 inches | Seedlings need intensity but burn easily — watch closely for the first 3 days |
| Low-light houseplants (pothos, snake plant, peace lily) | 18 to 24 inches | These plants evolved under a canopy; too close causes bleaching |
| Medium-light houseplants (monstera, philodendron, ferns) | 12 to 18 inches | Good starting point; adjust based on new leaf size and color |
| High-light plants (succulents, herbs, peppers) | 8 to 12 inches | These want intensity — but acclimate slowly over 1 to 2 weeks |
| Vegetable seedlings and starts | 6 to 10 inches | Keep checking for heat stress; compact growth indicates good light level |
For coverage, the goal is even light distribution across all your plants. A single bar or panel will have a hot spot directly underneath it, with intensity falling off toward the edges. If you have a wide plant cluster, either use two overlapping light sources, mount the light higher (accepting some intensity loss), or rotate your pots every few days so all sides get equal exposure. If you're setting up a grow light shelf setup, stagger pots so taller plants aren't blocking shorter ones, and make sure each shelf has its own dedicated light rather than trying to let one fixture cover two levels.
One underrated tip: measure height from the canopy (top of the plant), not from the floor or the pot rim. As plants grow taller, the light gets relatively closer, so you'll need to raise the fixture as your plants mature. Ratchet-style rope hangers make this adjustment take about 10 seconds.
Sizing the system: watts, lumens, PPFD, and knowing if it's enough
You don't need to memorize the science, but a basic understanding of how light is measured will help you buy the right product and diagnose problems later. The most useful metric for grow lights is PPFD (Photosynthetic Photon Flux Density), measured in micromoles per square meter per second (µmol/m²/s). Think of it as a count of how many photons useful to plants are hitting a square meter of surface every second. Most houseplants do well in the 100 to 300 µmol/m²/s range. Seedlings and high-light plants like herbs or vegetables want 300 to 600 µmol/m²/s or higher.
Good LED grow light manufacturers publish PPFD maps for their products, showing intensity at specific heights across the coverage area. If a manufacturer doesn't publish this data, that's a red flag. As a rough rule, a quality LED panel drawing 50 watts from the wall can cover a 2x2 foot area adequately for most houseplants. Stepping up to 100 watts covers a 3x3 foot area. For a broader look at how to size a system for specific vegetable crops, a grow light setup for vegetables requires higher PPFD targets and more wattage per square foot than houseplants typically need.
If you can't find PPFD data and just need a practical check: hold your hand under the light at plant canopy height. It should feel warm but not hot after 30 seconds. Your plants should show compact new growth (not stretching toward the light) and maintain their normal leaf color. Those two visual cues are the simplest real-world intensity checks you have.
Lumens are less useful for grow lights than PPFD because lumens measure brightness as humans perceive it, not the wavelengths plants absorb. A light can be blindingly bright to your eyes and still be relatively ineffective for plant photosynthesis. Use PPFD when you can, and treat lumen ratings as a secondary data point only.
Scheduling and light timing
Most houseplants do well with 12 to 16 hours of light per day under artificial grow lights. The exact number depends on the plant and the intensity of your light. A dimmer light (lower PPFD) benefits from a longer photoperiod to compensate; a brighter light can get away with a shorter on-time. Start at 12 hours and observe your plants for two weeks before adjusting.
Seedlings are the exception. Young seedlings starting from seed need 16 to 18 hours of light per day because they're in a growth sprint and typically under lights with lower intensity than a full sun environment. Foliage houseplants like pothos or philodendrons that you're just trying to keep healthy through winter are fine at 12 to 14 hours. Flowering plants and fruiting vegetables often need a 12/12 split (12 hours light, 12 hours dark) to trigger blooming, but that's a separate topic from general houseplant maintenance.
Always give plants a true dark period. Continuous light (24 hours) stresses most plants and can cause leaf curl, pale coloration, and stunted growth over time. Plants need darkness to complete parts of their metabolic cycle, so even if you think 'more is better,' it isn't. Set your timer for lights-on during hours you're home or active so you can monitor the setup, and let lights go off overnight.
If you're working with a tight budget and can't afford a high-output LED right now, compensating with a slightly longer photoperiod (14 to 16 hours instead of 12) is a reasonable workaround. A budget grow light setup can still produce good results when you dial in timing carefully to make up for lower intensity.
Step-by-step installation for a working home system
This is a general installation sequence that works whether you're mounting a single bar over a shelf or hanging a panel above a plant cluster. Adjust based on your specific hardware.
- Decide on your coverage area: measure the footprint of your plant group or shelf. This determines what wattage and fixture size you need before you buy anything.
- Choose and purchase your light: a full-spectrum LED bar or panel rated for your coverage area, with PPFD data published and UL/DLC safety listing confirmed.
- Set up your mounting point: for shelving, attach hooks or wire clips to the shelf above. For open-space mounting, use a freestanding light stand or ceiling hook with ratchet hangers. Make sure the mount is rated for the fixture weight.
- Hang the light at your target starting height (refer to the height table above) and measure from the canopy with a tape measure — don't eyeball it.
- Plug the light into your timer first, then plug the timer into the wall outlet. Set the timer for your target photoperiod (12 to 16 hours on, the rest off).
- Run the light for one full cycle before placing plants underneath, and hold your hand at canopy height to check for excessive heat.
- Place your plants under the light, centering the most light-hungry plants directly beneath the fixture.
- Check plants after 3 days and again after 7 days. Look for new growth direction, leaf color changes, and stem elongation as your first feedback signals.
- Adjust height or timer duration based on what you see. Raise the light if leaves look bleached or curled; lower it (or extend photoperiod) if plants are stretching toward the light.
For a broader overview of how all these components fit together into a complete system, the general grow lights setup guide on this site covers additional configuration options and equipment recommendations worth reading before your first purchase.
Troubleshooting common problems after you install
Almost every problem you'll encounter in the first few weeks falls into one of these categories. Here's how to read the symptoms and fix them.
Stretching and leggy growth
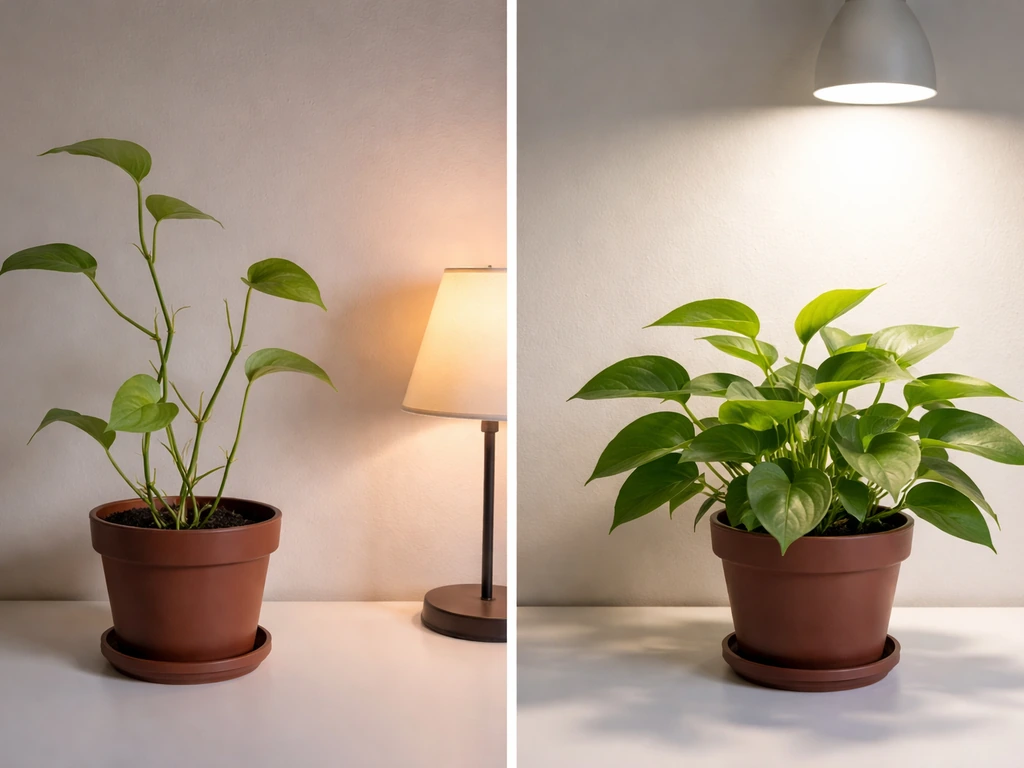
Stems getting long and weak, leaves spaced far apart, plant leaning toward the light, these are all signs your plants aren't getting enough light intensity. Either the light is too far away, the photoperiod is too short, or the fixture just isn't powerful enough for your space. Try lowering the light by 2 to 4 inches and see if new growth comes in more compact over the next week. If the plant is already stretched, you can't fix what's done, but you can stop the problem from progressing.
Pale or yellowing leaves
Pale new leaves with intact green older leaves often signal light deficiency (though it can also be a nutrient issue, so rule that out). Yellowing across the whole plant with no particular pattern is more likely a watering or nutrient problem. If the paleness is concentrated in new growth and your light is mounted high or running fewer than 12 hours, try increasing light exposure before assuming a nutrient deficiency.
Scorched or bleached leaf tips
Crispy, bleached, or brown patches on leaves closest to the light mean the fixture is too close or running too hot. Raise the light by 3 to 6 inches immediately. Check the temperature at leaf level with a simple thermometer, it should be below 85°F (29°C) for most houseplants. High-output LEDs run cooler than HID lights but can still overheat a small enclosed space.
Uneven development across the plant group
Plants at the edges of your setup growing slower or leggier than plants directly under the light means your coverage area is too small for the plant group, or the fixture is mounted too high. Either add a second light source to cover the edges, or rotate pots every few days so each plant spends time in the high-intensity zone. Real-world home growers discuss creative solutions to this exact problem all the time, checking out what people do in a grow light setup reddit thread can be surprisingly useful for low-cost coverage hacks.
Heat buildup in an enclosed space
If you're growing in a closet, cabinet, or small grow tent and temperatures are climbing above 85°F, add a small USB or clip fan to circulate air. Don't rely on the grow light's built-in fan (if it has one) to cool the space, that fan cools the driver and diodes, not your plants. A small oscillating fan also strengthens stems by simulating air movement, which is a bonus.
Flickering or light behavior issues
A new light that flickers immediately is usually a driver issue or a loose connection, check all connections first, then contact the manufacturer. A light that dims over months is normal (LED output degrades gradually over thousands of hours) but shouldn't be noticeable in the first year of use. If your mechanical timer is causing the light to flicker when switching on and off, the timer may not be rated for the inductive load of the LED driver, switch to a digital timer rated for LED fixtures. Photobiological safety is also worth keeping in mind: avoid staring directly into any grow light, especially high-output bars or panels. The UL 8800 standard that covers horticultural lighting specifically addresses photobiological effects on eyes and skin, and products carrying this certification have been evaluated against those risks, another reason to buy certified products rather than uncertified alternatives.
Glare bothering you or your household
Grow lights are bright, and if you're running them in a living space for 14 hours a day, the glare gets old fast. Position the light so it shines down into the plant canopy rather than outward at eye level. A simple cardboard or foam board shield on the sides facing your seating area can cut glare significantly without affecting the plants. Alternatively, place the setup in a corner so two walls already block most of the light spread.
The first setup you build won't be perfect, and that's completely normal. Most successful indoor growers have gone through at least one round of 'everything's dying, what did I do wrong' before they dialed things in. Check your plants every few days, make one change at a time, and give each adjustment a week to show results before making the next one. That methodical approach is what separates growers who succeed from those who give up after the first attempt.
FAQ
Can I use a grow light setup without a timer if I only turn it on “most days” at the same time?
It usually backfires. Even small day-to-day timing drift changes your plants' daily photoperiod, which can show up as slow growth or light-stress patterns over 2 to 3 weeks. If you do not want a digital controller, at least use a plug-in timer and verify it switches reliably at the wall outlet you are using.
How do I know the PPFD is right if the manufacturer does not publish PPFD maps?
Use a practical consistency check at canopy height. After running the light at your starting height for a week, look for compact new growth and stable leaf color, not stretching toward the fixture. If you can, also compare growth rate to the same plant group without changing anything else, then adjust height or timer by small steps (about 2 to 4 inches or 1 to 2 hours) rather than large jumps.
What happens if my light is too close, but I cannot raise it because of my shelf height?
If you cannot raise the fixture, reduce exposure instead. Lowering photoperiod by 1 to 2 hours or using a dimmer if your driver supports it can prevent bleached or brown leaf patches. As a last resort, add distance optically by widening coverage (for example, an additional overlapping fixture) so no single plant is sitting in the highest intensity hotspot.
Should I measure light height from the pot rim, the floor, or the plant canopy?
Measure from the canopy (top of active growth). A fixture that is perfect at setup can become too close as plants grow, which is why regular height checks are important. Ratchet hangers make it easy to re-adjust quickly as the canopy rises.
Is 12 hours of light enough for all indoor plants year-round?
For many foliage houseplants it is a good baseline, but winter conditions can change your results. If your plants sit in a colder room or receive less natural window light, you may need to run closer to 14 to 16 hours to keep growth steady. For flowering or fruiting crops, the correct schedule is often different and should be treated as a separate goal.
Can I run the lights 18 to 20 hours per day to speed up growth?
Longer photoperiods do not automatically mean faster growth, because plants still need a real dark period to complete metabolic cycles. If you extend past typical ranges, you may get pale leaves, leaf stress, or stunting even though the plant looks “brightly lit.” Use adjustments in small increments and watch for consistent symptoms over 7 to 14 days.
Do lumens matter at all for a grow light setup?
They are mainly useful for human brightness, not plant energy. A lamp can look very bright but still deliver low usable photon levels. If the product lists PPFD, prefer that. If only lumens are provided, treat it as weak information and rely on canopy-height performance cues and symptom-based adjustments.
How many plants can one LED panel or bar support?
It depends on your coverage width, not just total wattage. If the plant group is wider than the light’s effective PPFD area, edge plants will lag or stretch. Plan for either an overlapping second light, pot rotation every few days, or choosing a larger fixture that better matches your surface area.
Is a reflector always necessary in a grow tent?
In many tent setups it is not. If your tent has mylar lining, it already reflects light back toward the canopy, improving usable coverage. If you are growing in open space with no reflective sides, adding a simple white or foil-lined backing behind the plants can improve coverage meaningfully without buying more expensive lighting.
What fan should I use for cooling, and where should it blow?
Use a small clip or oscillating fan for air movement around the plants, not just near the driver. The goal is to prevent leaf-level temperatures from crossing your safe comfort range and to keep airflow steady. A good rule is to position the airflow so it moves across the canopy gently, then confirm with a thermometer placed at leaf height.
My LED light flickers when turning on, is it always a bad sign?
Flicker right at startup often points to an electrical or driver issue, loose connections, or a timer mismatch. If the flicker happens because the timer switches under load, switch to a timer specifically rated for LED fixtures. If flicker persists after that, contact the manufacturer rather than troubleshooting indefinitely.
Are UL-listed grow lights worth the extra cost?
They are, especially when you will run the light for many hours a day in a closet, tent, or near flammable materials. Certification helps ensure safety testing for horticultural lighting hardware and photobiological risks. If a product has no safety certification and no horticulture rating, it is usually safer to replace it than to “make it work.”
How often should I adjust the light height during a grow cycle?
Check every few days at first, then at least weekly as plants start to grow more quickly. The reason is that fixture-to-canopy distance changes as plants mature, and intensity can drop dramatically with distance. A practical approach is to adjust when you see new growth changes, like faster stretching or signs of being too close or too far.
Next Article
Grow Lights Setup for a Grow Room: Step by Step LED Guide
Step-by-step LED grow lights setup for a grow room: layout, mounting height, intensity, wiring, timers, and troubleshoot
