To set up a Vogek LED grow light correctly, hang it 24 to 36 inches above seedlings, 18 to 24 inches above vegetative plants, and 12 to 18 inches above flowering plants. Start at 50% brightness and run it 16 hours on / 8 hours off for seedlings, 14 to 16 hours for veg, and 12 hours for flowering. The built-in LCD timer on most Vogek models (especially the SP312 family) lets you set run time anywhere from 10 minutes to 23 hours 50 minutes, and the 10 brightness levels let you step from 10% up to 100% using the + and - buttons. If your light won't come on or is flickering, nine times out of ten it's a loose power connection or a dimmer/timer conflict, not a dead unit.
Vogek Grow Light Instructions: Setup, Placement, Dimming, Troubleshooting

Marcus Tillman
28 Apr 2026
How to confirm your exact Vogek model
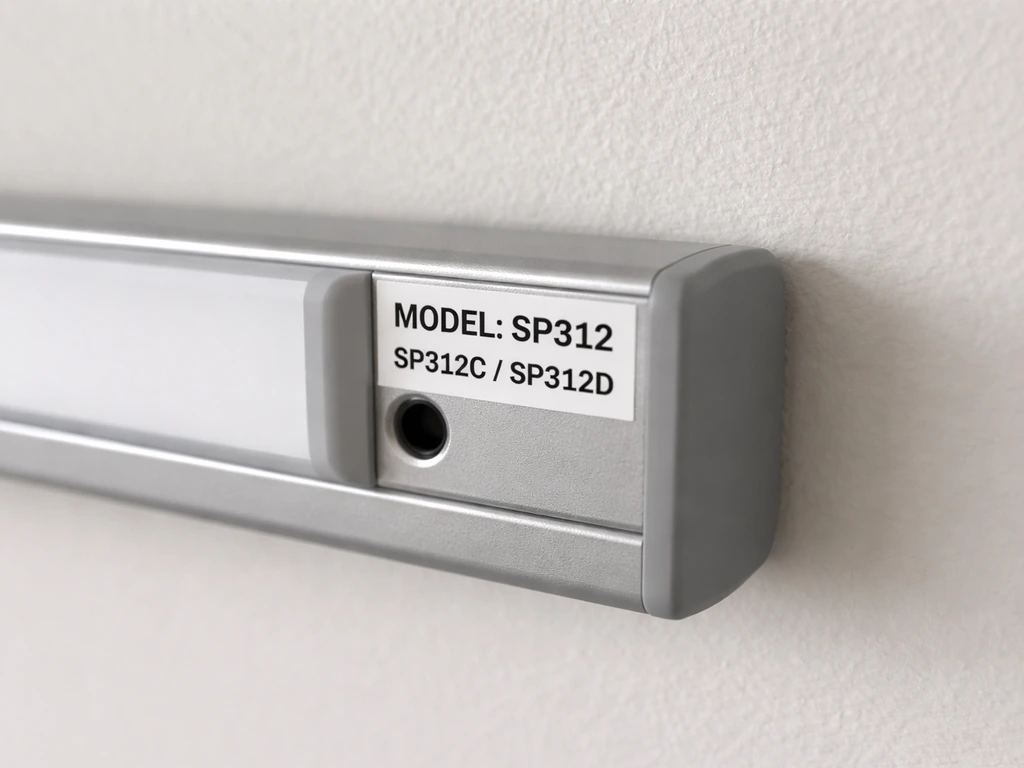
Before you do anything else, find out which Vogek light you have. The most commonly sold versions are in the SP312 family, with variants like SP312C and SP312D. The differences between them are mostly in wattage, LED count, and whether the control panel is a basic dial or the full LCD timer panel. Here's how to pin down your exact model:
- Check the product label on the back or side of the light bar or fixture. The model number is usually printed there in small text.
- Look at the original packaging. The box should show the model code, wattage, and LED count prominently.
- Check your Amazon or retailer order history. The product listing title almost always includes the model code.
- Look at the control panel. If you see an LCD screen with time remaining displayed, you have one of the newer SP312-series variants with the built-in timer and 10-level dimmer. If you only see a rotary dial, you have an older or simpler version.
- Count the LEDs if you want a quick cross-check. The popular ~66W household/desk version uses 144 LEDs. If yours matches that count and wattage, you're in the SP312C/D territory.
Why does the model matter? Because Vogek sells both a compact clip/desk lamp style and larger panel/bar-style lights, and the mounting method, coverage area, and timer controls differ between them. The guidance in this article applies most directly to the bar/panel SP312-family units with the LCD timer, but the placement and scheduling principles apply across all Vogek models.
What's in the box and what you'll need
Vogek doesn't publish a single universal kit list, but based on what ships with the SP312-series lights, here's what you should find when you open the box:
- The grow light bar or panel itself
- Hanging hardware: adjustable ratchet rope hangers or a steel hanging cable (usually two)
- Power cord with the control box or LCD timer unit attached
- Any included desk stand or clip mount if you bought the desktop variant
- A brief quick-start card or folded instruction sheet (not always a full manual)
You won't need many tools. A tape measure is the most important thing to have on hand so you can set correct hanging height. A pencil and something to hook the hangers over (a grow tent bar, a ceiling hook, a shelf edge) is all you need for mounting. Before you plug in, do these safety checks: make sure your outlet is grounded (3-prong), confirm the power cord shows no visible damage or kinks, and verify your hanging point can hold at least 5 lbs safely. Don't run the cord under a rug or through a door gap.
Step-by-step installation and controller setup
Mounting the light
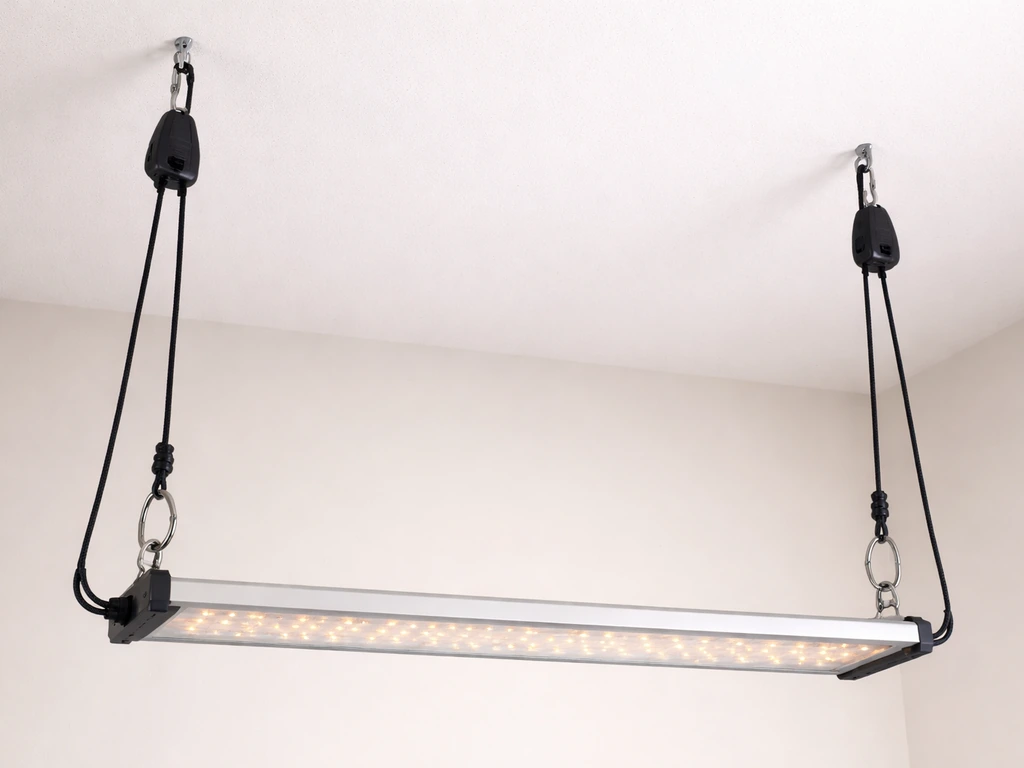
- Thread the ratchet rope hangers through the hanging holes or hooks at each end of the light bar. Pull the cord through until the light hangs level.
- Hook the top loops of the ratchet hangers over your grow tent crossbar, a ceiling hook, or an S-hook on a sturdy shelf frame.
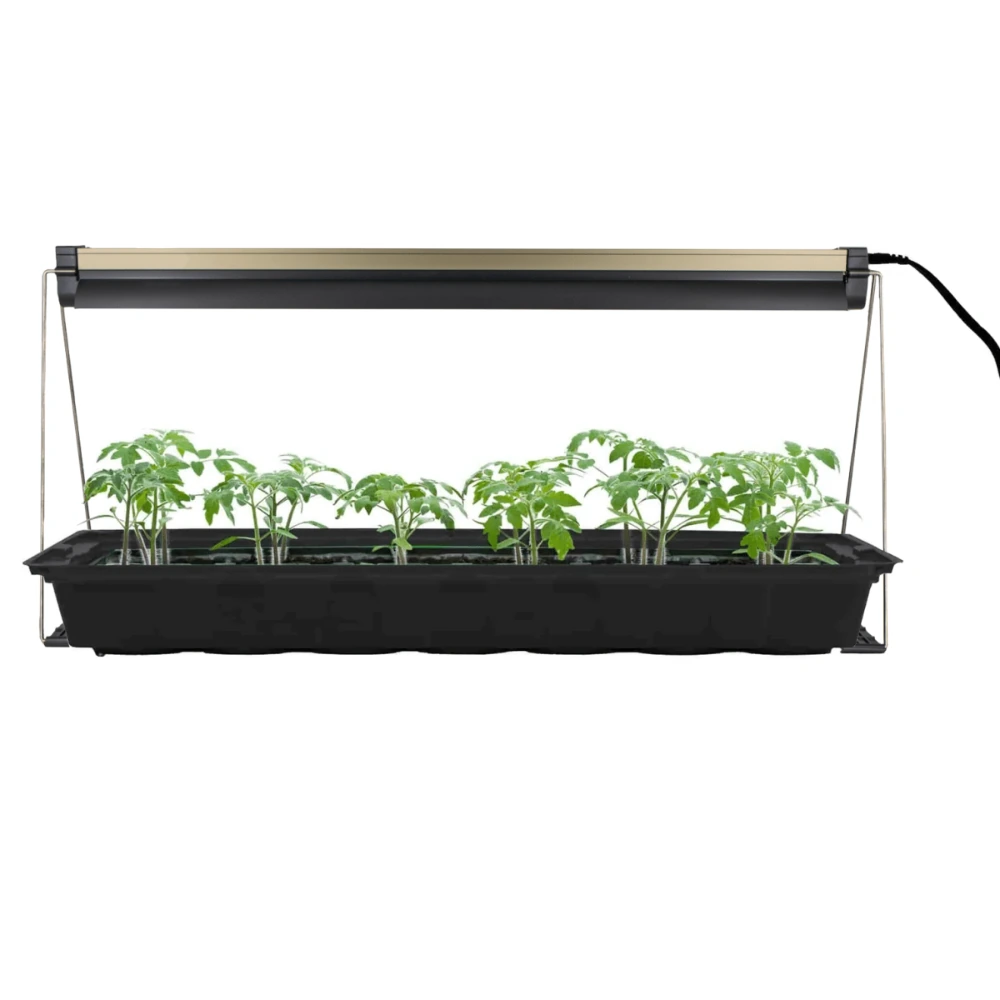
- Use your tape measure to set the initial hanging height. For a first setup with unknown plants, start at 24 inches above the canopy (top of the plants or the pot lip if they haven't sprouted yet).
- Squeeze the release tab on each ratchet hanger to raise or lower the light independently until it's level. Both ends should be at the same height.
- For desk or clip-style Vogek units, clamp the base to the pot rim or a shelf edge and angle the head so it points directly down at the plant canopy.
Powering up and setting the controller
- Plug the power cord into a grounded outlet. The LCD panel (if present) should illuminate immediately.
- On the SP312-series LCD controller, press the power button to turn the light on. The display will show current brightness level and time remaining.
- To set brightness: press the + button to increase output in 10% increments, or the - button to decrease. Start at 50% (level 5 of 10) for your first session.
- To set the timer: press and hold the timer button until the hour digits flash, then use + or - to set the hours. Press the timer button again to move to minutes, set them the same way, then press once more to confirm. The unit will count down from your chosen duration and shut off automatically. You can set any duration from 00:10 to 23:50.
- After the timer is set, the display shows the remaining run time. When it hits zero, the light shuts off and will not restart automatically unless you have it on a cyclic setting or plug it into a separate mechanical outlet timer for repeat daily cycles.
- If your unit doesn't have an LCD timer, plug it into a standard mechanical outlet timer (the $8 kind from any hardware store) and set that to your desired on/off schedule.
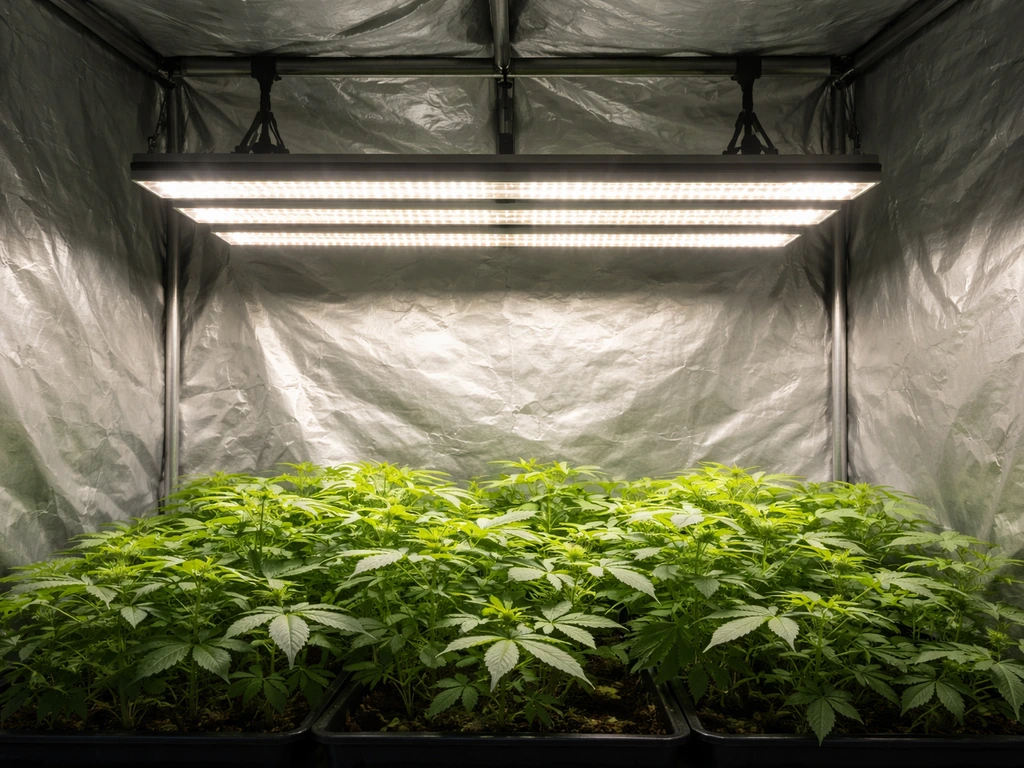
Where to position the light
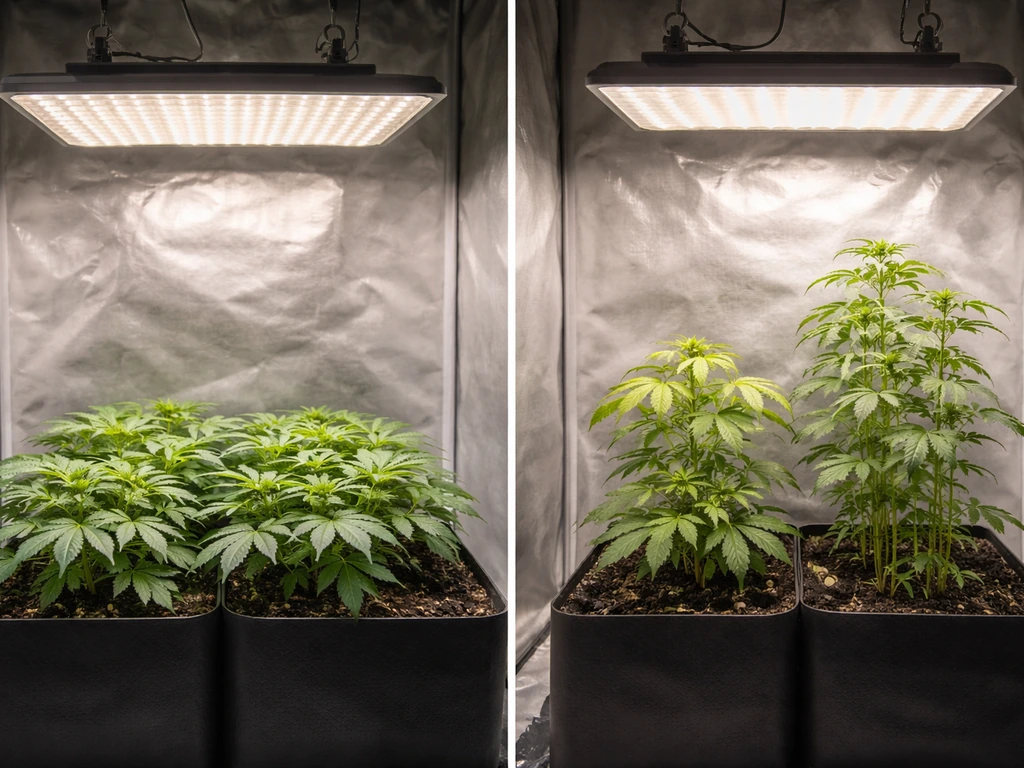
Hanging height is where most beginners make their first mistake. Too close and you get light burn (bleached, yellowing leaf tips). Too far and plants stretch out spindly, reaching for light they're not getting. Height should always be measured from the light panel down to the top of the plant canopy, not to the pot or the floor.
| Plant Stage | Recommended Height Above Canopy | Coverage Area Tip |
|---|---|---|
| Seedlings / clones | 24 to 36 inches | Spread light across the full tray; overlap is fine at this stage |
| Vegetative growth | 18 to 24 inches | Center the light over the plant group; adjust as plants grow taller |
| Flowering / fruiting | 12 to 18 inches | Bring light closer to maximize intensity; watch for heat stress |
| General houseplants | 20 to 30 inches | Consistent height is more important than exact number here |
For coverage area, a single Vogek SP312-class bar light at ~66W covers roughly a 2x2 foot area effectively at 24 inches. If you're running a wider grow space, you'll need multiple units or to accept reduced intensity at the edges. Don't try to stretch one bar light over a 3x3 space and expect full coverage.
For spacing when using multiple bars side by side, leave 6 to 8 inches between bars so light patterns overlap gently rather than creating a hot streak down the middle.
Dialing in intensity: dimmer settings and distance rules
The 10-level dimmer on Vogek SP312-series lights gives you a lot of flexibility, but the key is not to run at 100% straight away. Plants need time to acclimate to artificial light, especially seedlings and any plant recently moved from a lower-light spot.
A simple intensity ramp-up approach that works well:
- Week 1: 40 to 50% brightness, light at maximum recommended height for the stage. Watch for any curling, bleaching, or wilting.
- Week 2: Increase to 60 to 70% if plants look healthy and show no stress signs.
- Week 3 onward: Push to 80 to 100% for vegetative and flowering stages. Keep an eye on the top leaves closest to the light.
The interaction between brightness and distance is what really matters. Running at 100% from 36 inches is roughly equivalent to running at 50% from 18 inches. p23s0 lordem grow light instructions (related option). If you want a quick starting point, follow the led plant grow light instructions for both distance and brightness so your plants acclimate smoothly.
For the full steps, use these fecida <a data-article-id="3E0E3645-6831-4E9C-B24B-B027883C3264">grow light instructions</a> to match your exact model’s distance, brightness, and timer setup. To match your exact model's settings, you can also compare the timer approach in ferry-morse grow light instructions for similar fixtures. So if you can't lower the light (say, your grow tent has limited headroom), bump up the brightness instead, and vice versa.
If you need more detail on stage-based brightness and timing, follow these grow light instructions as well. Use the table in the previous section as your distance baseline, then fine-tune intensity based on what you observe in the plants.
Signs of too much intensity (light burn): pale yellow or white patches on the top leaves, especially on the leaf surface directly facing the light. The edges of leaves may curl upward. Fix: raise the light 4 to 6 inches or drop one brightness level and wait 48 hours to reassess.
Signs of too little intensity: plants stretching upward with long, thin stems between leaf nodes (called etiolation). Lower leaves yellowing from lack of light. Fix: lower the light 4 to 6 inches or increase brightness by one or two levels.
Light schedules by plant stage
How many hours per day your plants need depends entirely on what stage they're in and what type of plant you're growing. Here are the schedules that work across the board with a Vogek LED unit: If you want led plant grow light instructions that match your schedule, follow these light schedules by plant stage for seedlings, veg, and flowering.
| Plant Type / Stage | Hours of Light Per Day | Hours of Dark Per Day | Notes |
|---|---|---|---|
| Seedlings (all types) | 14 to 16 hours | 8 to 10 hours | Consistent schedule helps establish root systems quickly |
| Vegetative / leafy growth | 14 to 16 hours | 8 to 10 hours | More light = faster growth, but don't exceed 18 hours |
| Flowering / fruiting plants | 12 hours | 12 hours | Many flowering plants need the 12-hour dark trigger |
| General houseplants | 12 to 14 hours | 10 to 12 hours | Match to your home's seasonal light rhythm if possible |
| Succulents and cacti | 10 to 12 hours | 12 to 14 hours | These prefer a shorter photoperiod; overlight causes etiolation |
The most common mistake with scheduling is inconsistency. Plants respond to the rhythm of the light cycle as much as to the duration. If you're using the built-in Vogek timer, remember that it counts down from a set time and shuts off but won't automatically restart the next day on its own.
If you set the timer on an SP312-family Vogek, the timer can be set to particular run times in ten steps, and some guidance also describes limiting operation to certain day-lengths the built-in Vogek timer counts down from a set time and shuts off. Either reset it manually each morning, or plug the whole unit into a cheap mechanical outlet timer set to a 24-hour repeat cycle, which handles the daily schedule for you automatically.
Adjust your schedule over time based on plant response. If seedlings are leggy after two weeks at 14 hours, push to 16. If flowering plants aren't setting buds after a month on 14 hours, drop to 12 and be patient. Plants don't read the same timetable every time.
Troubleshooting common Vogek grow light problems
Light won't turn on
Start simple: check that the power cord is fully seated at both ends, the outlet is live (plug in a phone charger to test it), and the timer isn't set to an off window. On the SP312 LCD panel, if the timer countdown reached zero and shut the light off, you need to press the power button again to restart it. If none of that works, try a different outlet on a different circuit.
Flickering or unstable light output
Flickering on LED grow lights is almost always a dimmer or driver issue, not the LEDs themselves. If your Vogek flickers at low brightness settings (especially below 30%), try bumping brightness up to 50% or higher and see if it stabilizes.
If it flickers at all brightness levels, unplug the control module and plug the light directly into the outlet (bypassing the dimmer/timer if your wiring setup allows it) to determine whether the fault is in the control unit or the driver.
If flicker disappears when the dimmer is removed or bypassed, it strongly indicates the dimmer is the source, so also confirm the driver is dimmable and the dimmer is compatible unplug the control module and plug the light directly into the outlet (bypassing the dimmer/timer if your wiring setup allows it). A driver fault usually means the unit needs to be replaced.
A control module fault sometimes resolves by doing a full power cycle: unplug completely for 30 seconds, then power back on.
Plants not growing well under the light
Weak growth is almost always a placement or timing issue, not a defective light. Run through this checklist before assuming the light is bad: Is the light close enough (within the recommended height range)? Is it running long enough each day (at least 12 hours for most plants)? Is the schedule consistent every day? Is the light spectrum appropriate for your plant type (most Vogek LEDs use a full-spectrum or red/blue-heavy spectrum good for general growth, but some desk-style units lean heavily into the red/blue visible range).
Buzzing or humming noise
A faint hum from the driver is normal and harmless in most LED grow lights, including Vogek units. If the buzzing is loud enough to be disruptive, check that the light is hung securely and not vibrating against a surface. Also check that no hanging hardware is loose. If the sound is coming from inside the unit and sounds like electrical buzzing (not vibration), that can signal a driver issue and the light should not be left unattended.
Hot spots or uneven light distribution
If some plants under the light are growing faster than others in the same tray, you likely have an uneven hang (one end lower than the other) or the light is positioned off-center. Use your tape measure to confirm both ends of the bar are at the same height, and that the center of the light is directly over the center of your plant area. Rotating pots or trays 180 degrees every few days also compensates for minor distribution variation.
Wrong-looking spectrum or color
Vogek LEDs often produce a pinkish-purple glow because they combine red and blue wavelengths. Some models include white LEDs for a more balanced full-spectrum output. The color of the light itself doesn't tell you whether it's working correctly. If the light is on and you can see it's illuminated, the spectrum is doing its job even if it looks weird to your eyes. Don't try to judge plant-friendliness by what the light looks like to a human.
Common setup mistakes to avoid
- Starting at 100% brightness on day one, especially with seedlings
- Hanging the light too high and then wondering why plants are stretching
- Relying on the built-in countdown timer for daily scheduling without setting up a repeat cycle
- Running the light 24 hours to 'give plants more light,' which actually stresses most plant types
- Placing the light at an angle instead of directly overhead, creating one-sided growth
When to contact support or consider a return
Contact Vogek support or the retailer you purchased from if: the light never turns on despite testing on multiple outlets; the LCD panel displays no digits or behaves erratically after a full power cycle; the driver emits a loud buzzing sound that persists; or the light gets hot to the touch on the LED surface (warm is normal, hot enough to be uncomfortable to a brief touch is not). Most Vogek units sold on Amazon fall under Amazon's return window or the seller's warranty, so act within 30 days of noticing a hardware fault. Keep your original packaging if there's any doubt about the unit's performance.
If you've worked through all of the above and things still aren't clicking, it's worth comparing your setup against guidance for similar budget LED brands. Many of the placement, scheduling, and troubleshooting principles covered here apply just as directly to Fecida, Lordem, and Feit Electric grow lights, since they use similar LED driver designs and control schemes. The core logic of height, intensity, and photoperiod doesn't change much across the category.
FAQ
Can I run my Vogek grow light 24/7 instead of using the day and night schedule?
It is usually not a good idea. Even with the correct brightness and height, continuous light can stress plants and slow healthy development, especially for flowering. If you need longer daily light due to space limits, extend the photoperiod gradually (for example add 30 to 60 minutes every few days) rather than switching to nonstop lighting.
How do I tell whether I should measure distance from the canopy or the top of the tallest leaves?
Measure from the highest point of the plant canopy you want to manage, not from the floor or pot. If your tray has uneven height, the safest approach is to set the light based on the tallest plants, then correct uneven growth (rotate the tray, improve spacing, or use multiple fixtures) so shorter plants do not get underlit.
What should I do if my tent has heat issues or the light feels warm to the touch?
Normal warmth is fine, but check airflow and placement. Keep the hanging hardware secure, ensure the cord is not touching hot surfaces, and make sure the light is not mounted so tightly that air cannot circulate around the driver/control area. If the LED surface becomes uncomfortable to touch quickly, stop using it and test for driver or control module problems before continuing.
Why do my seedlings look pale even though I started at 50% brightness and the correct distance?
Two common causes are a too-fast ramp and inconsistent timing. If the plants were previously under weak natural light or a low-intensity lamp, ramp brightness more slowly over several days. Also verify your timer is truly repeating daily, not just counting down once, because a missed day can stall early recovery.
My SP312 LCD timer shows an on-time but the light still turns off early, what’s going on?
On timer-driven models, some settings behave like a single countdown rather than a daily repeat. Confirm whether the unit is configured for the intended run duration and whether it requires a restart after the countdown hits zero. If you want guaranteed daily repeat, plug the entire fixture into a separate 24-hour repeat outlet timer.
Can I use the Vogek dimmer while also using an external outlet timer?
Yes, but avoid conflicts. Use the outlet timer only to control the daily on and off window, then use the Vogek dimmer for intensity during its on window. Do not try to “schedule” different brightness levels with the outlet timer unless your setup clearly isolates brightness from power interruption.
Is it safe to keep the grow light on a power strip or extension cord?
Use caution. If you must extend reach, use a heavy-duty extension cord rated for the load and keep connections off the floor where moisture can occur. For reliability, plug directly into a grounded wall outlet when possible, especially if you notice flickering or intermittent behavior.
What should I do if the light flickers mainly at low brightness but works fine at higher levels?
This pattern often points to dimmer or driver behavior at the low end. Try raising brightness to 50% or above and keep the fixture at the recommended height instead of operating in the lowest dim levels for long periods. If it flickers at all brightness settings, bypass the dimmer/control briefly by plugging directly into the outlet (only if your wiring allows it) to isolate the fault.
How can I correct uneven growth across the bar light area?
First, check that both ends of the bar are at the same height and that the center is aligned over the center of the plant area. Then rotate the tray every few days to average out any distribution differences. If plants on one side consistently lag, consider adding a second bar or shifting the fixture slightly rather than only changing height.
Does the pinkish-purple color of Vogek LEDs indicate a problem or wrong spectrum?
Not necessarily. The visible color depends on how red and blue LEDs are mixed and whether the model includes white diodes. What matters is plant response and stable output, so focus on the canopy and leaf-color signs (burn or etiolation), not how the light looks to your eyes.
When is it reasonable to contact support instead of trying more troubleshooting?
Contact support if the unit fails to operate on multiple confirmed working outlets, the LCD timer remains blank or behaves erratically after a full unplug power cycle, the buzzing is loud or persistent from the driver area, or the LED housing gets hot enough to be uncomfortable to touch briefly. Keep the original packaging and act promptly within the retailer or Amazon return window if available.
Should I clean or wipe the LEDs, and could dust cause performance issues?
If you need cleaning, unplug first and use a dry, non-abrasive approach. Dust buildup can reduce effective light output over time and may trap heat around the housing. Avoid wet cleaners on the LED board or driver area, and do not open the unit unless the manufacturer instructs you to.
Next Article
Ferry-Morse Grow Light Instructions: Setup, Height, Timer
Step-by-step Ferry-Morse grow light setup: mounting height, spacing, timer settings, and fixes for stretching or leaf bu