Building a T5 grow light setup means assembling a fluorescent (or LED-replacement) T5 fixture with the right bulbs, a reflector, a ballast or driver, and a timer, then mounting it at the correct height for your plants. You can have a working system in a few hours with basic tools, a $30-80 parts list, and no prior electrical experience, as long as you match your bulbs to your ballast, use proper wire connections, and follow a few non-negotiable safety steps.
How to Build a T5 Grow Light From Parts to Testing

Marcus Tillman
22 May 2026
What a T5 grow light actually is (and what 'build' really means)
T5 refers to the diameter of the fluorescent tube: 5/8 of an inch. These tubes come in standard lengths, the most common being 2-foot and 4-foot. A 4-foot T5HO (high-output) tube runs at 54 watts, uses a G5 miniature bi-pin base, and maxes out at 46 inches end to end. When people say they want to 'build' a T5 grow light, they usually mean one of two things: assembling a complete fixture from individual components (sockets, ballast, reflector housing, wiring), or taking a bare-strip commercial T5 fixture and upgrading or customizing it with a better reflector, more tubes, or adjustable mounting hardware. Both approaches are totally valid. Most beginners are better off starting with a commercial T5HO strip light and adding a quality reflector and a proper mounting system, rather than wiring from absolute scratch. If you want to combine lighting with a plant stand, focus on sturdy mounting so the fixture can be adjusted without wobble commercial T5HO strip light. Either way, the core system is the same: tubes, a ballast that matches those tubes, sockets to hold them, a reflector to direct light downward, and a timer.
One thing worth knowing up front: if you already have a T8 fixture lying around, you cannot just swap in T5 tubes. A T8 ballast is not compatible with T5 lamps. The ballast must match the lamp type, both in terms of the tube format and the wattage. Mixing them up means the fixture either won't start or will operate unsafely. This is the single most common mistake in DIY fluorescent builds, so get this locked in before you buy anything.
Choosing the right T5 bulbs and fixtures for your plants
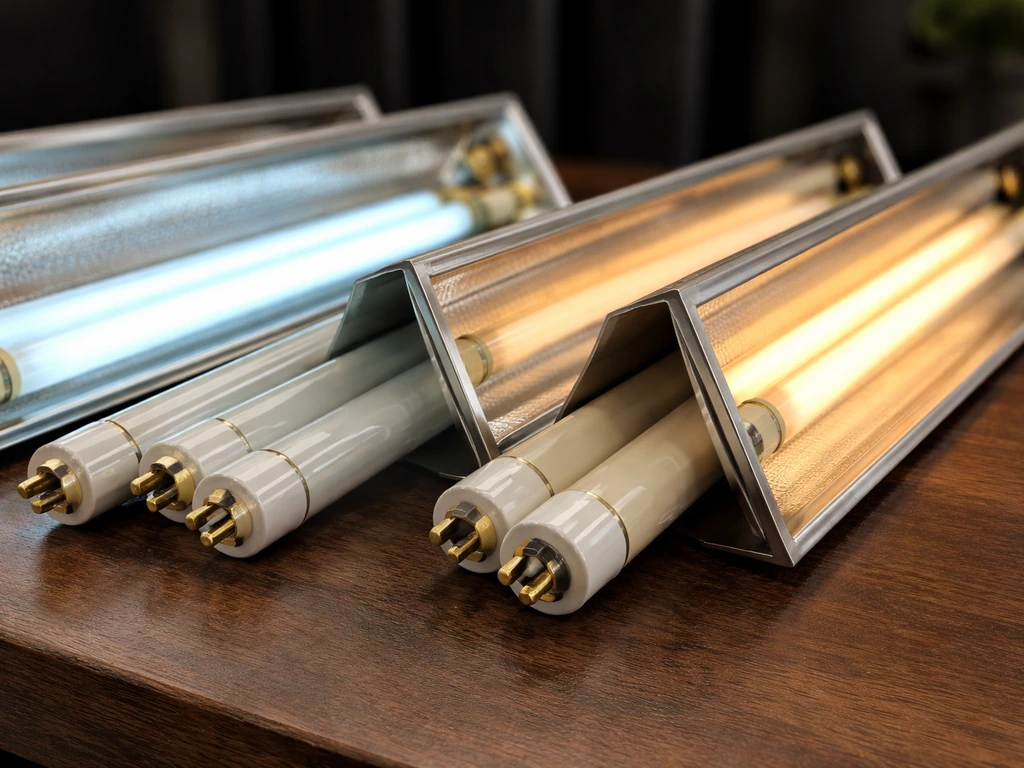
T5HO tubes come in different color temperatures, and that matters a lot for plant growth. For seedlings and vegetative growth, you want 6500K bulbs, labeled 'Cool White' or sometimes 'Daylight.' The Howard Lighting F54T5/865/HO is a good example: 54W, 6500K, CRI of 85, and it's a widely available 4-foot HO tube. For flowering and fruiting plants, swap to 3000K tubes (labeled 'Warm White') to shift the spectrum toward red wavelengths. Many growers run a mix, half 6500K and half 3000K, during the transition phase.
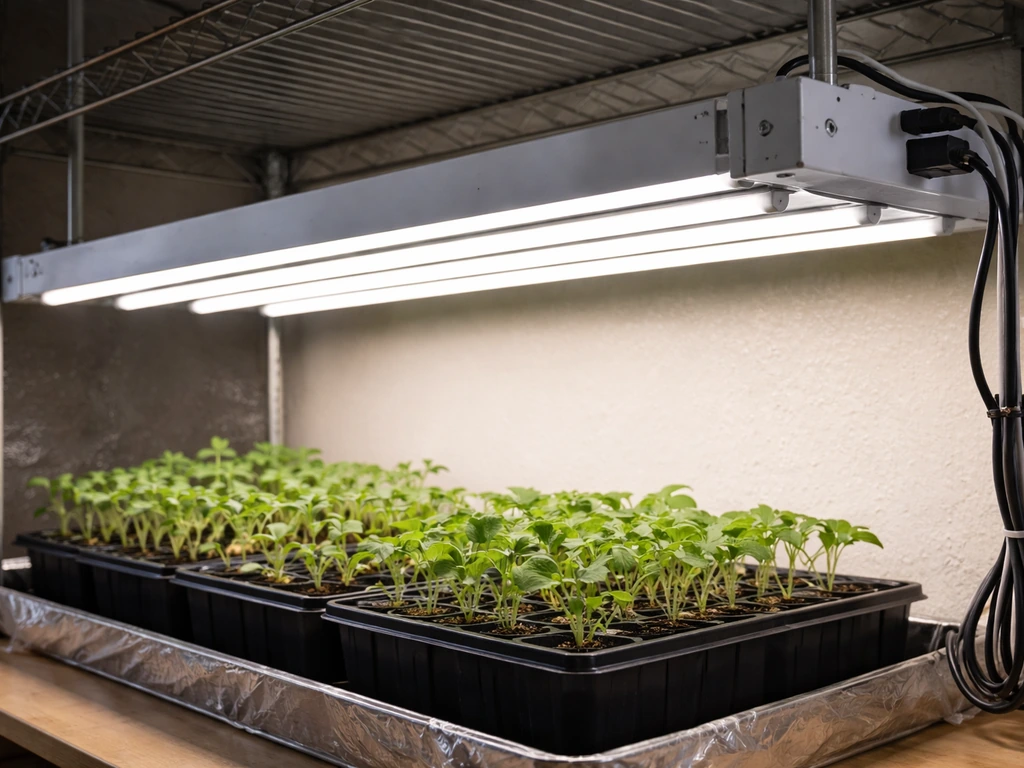
For the fixture itself, decide on tube count based on your growing area. A single 4-foot, 1-lamp strip covers roughly a 4x1-foot footprint adequately for seedlings. A 4-lamp fixture covers a 4x2-foot area and is far more useful for a real vegetative setup. An 8-lamp T5HO fixture is what serious propagators and clone rooms use. You don't need to overbuy: match fixture width to your bench or shelf space, and match lamp count to the light-intensity demands of your plants. Seedlings are forgiving; fruiting plants are not.
| Plant Stage | Recommended Color Temp | Tube Count (4-ft) | Coverage Area |
|---|---|---|---|
| Seedlings / Propagation | 6500K | 1 to 2 lamps | 4x1 to 4x2 ft |
| Vegetative Growth | 6500K | 4 lamps | 4x2 ft |
| Flowering / Fruiting | 3000K (or mixed) | 4 to 8 lamps | 4x2 to 4x4 ft |
| Mixed Veg + Flower | Mix of 6500K and 3000K | 4 to 8 lamps | 4x2 to 4x4 ft |
Shopping list: everything you need before you start building
Here's what a complete DIY T5 build requires. If you're building from a commercial strip fixture, some of these items come pre-installed, so check what's already included before buying duplicates.
- T5HO strip fixture or bare housing (2-foot or 4-foot, 1-lamp to 8-lamp depending on grow space)
- T5HO fluorescent tubes matching the fixture's lamp count and ballast spec (54W/6500K for most veg builds)
- Compatible T5 ballast, if not included in the fixture (must match lamp wattage and tube count exactly)
- G5 bi-pin lamp holders/sockets, if building from scratch (one pair per tube)
- Reflector: a NanoTech-style diffusing reflector (like SunBlaster's) dramatically improves coverage uniformity and eliminates the need to rotate plants
- Ratchet rope hangers or adjustable steel cable with hooks (for height adjustment without tools)
- Digital outlet timer (7-day programmable, 15A rated)
- 18 AWG solid or tinned stranded wire for socket connections (if wiring from scratch)
- Wire connectors (wire nuts or push-in connectors), electrical tape, strain relief clamps
- Power cord with grounded 3-prong plug (if not included with fixture)
- Mounting hardware: crossbar, S-hooks, or ceiling anchors appropriate for your space
On budget: a 4-lamp 4-foot T5HO strip fixture typically runs $40-70. Add $10-15 for a reflector upgrade, $10 for a timer, and $15-20 for hangers and mounting hardware. You can build a solid, adjustable setup for under $100. If you're going from scratch with individual components, budget an extra $20-30 for sockets and a separate ballast, but honestly the pre-wired strip route is faster, cleaner, and not meaningfully more expensive.
Step-by-step assembly and mounting
Assembling the fixture
- Unbox the strip fixture and lay it on a flat surface. Do not plug it in yet.
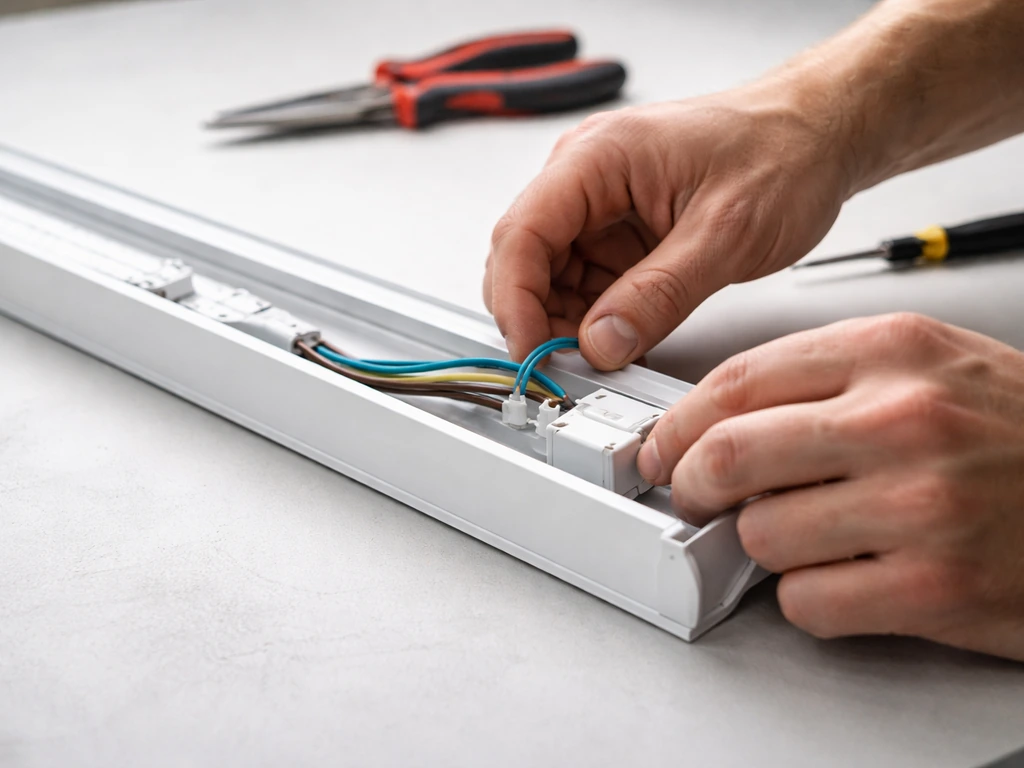
- If your fixture came with sockets already wired to a ballast, skip to step 5. If you're wiring sockets from scratch, feed 18 AWG wire from each socket to the ballast terminals following the wiring diagram printed on the ballast label or its installation sheet. Match wire colors: typically blue and red leads go to lamp-end sockets as indicated in the diagram.
- Attach the reflector to the top of the fixture housing. Most clip-on or screw-mount reflectors fit universal T5 strip housings. Snap it into place so it sits flush and doesn't block the lamp sockets.
- Insert T5HO tubes into the G5 sockets by aligning the two pins with the socket slots, pushing in, and rotating 90 degrees until they click and seat firmly. Do not force them.
- Attach a strain relief clamp to the power cord entry point on the housing so the cord cannot pull free of its connections inside.
- Double-check that all socket connections are secure and no bare wire is exposed outside of a connector or terminal.
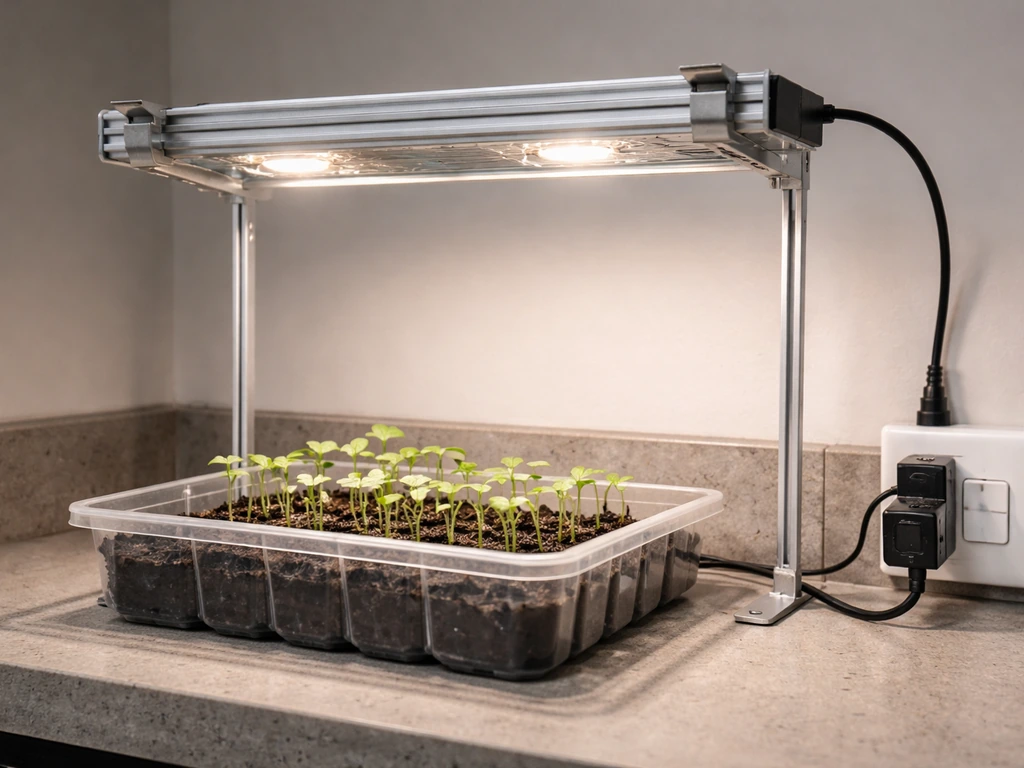
Mounting on a bench, shelf, or in a closet
- Decide on your mounting point: a wire shelf, a closet rod, a wooden crossbar screwed into wall studs, or a grow tent's top bar. Make sure it can hold at least 3x the fixture weight.
- Attach ratchet rope hangers or cable hooks to the mounting point, spaced to match the hanger holes on your fixture ends.
- Clip the fixture to the hangers. Most 4-foot T5 strip lights have a hook point at each end.
- Set the initial height using the ratchet adjustment: start at 4-6 inches above your plant canopy for seedlings, or 6-12 inches for established vegetative plants. You'll fine-tune this later.
- Route the power cord safely to the outlet or timer: keep it off the floor where it can get wet, use cable clips or ties to run it along the wall or shelf edge, and leave enough slack that adjusting fixture height doesn't strain the cord.
- Plug into the timer (not directly into the wall), set your schedule, then plug the timer into a grounded outlet.
For closet setups, a simple 2x2 or 2x4 lumber crossbar screwed between the side walls works well and costs almost nothing. Follow the T5 grow light assembly guidance that includes setting the fixture under a crossbar and pulling down hanger cables for proper mounting and height adjustment T5 grow light assembly steps. Drill the screws into wall studs, not just drywall. If you're mounting above a water source like a propagation tray, keep all electrical connections at least 12 inches horizontally away from standing water, and always use GFCI-protected outlets in wet areas.
Wiring, power, and safety checks before you plug in
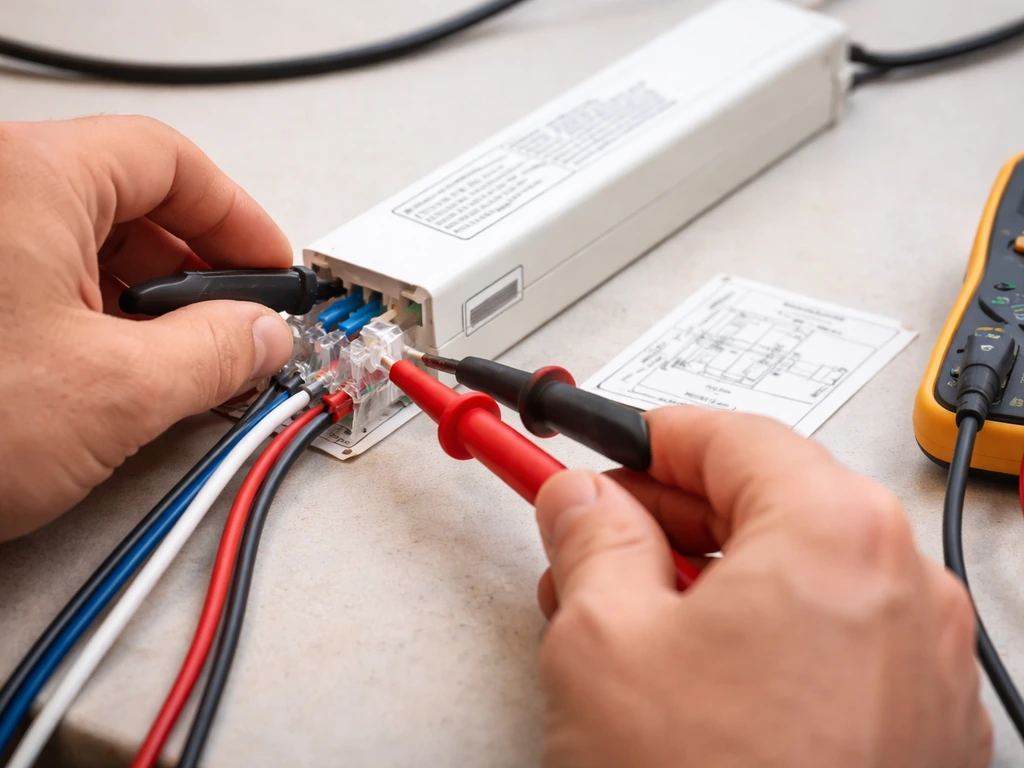
This section matters more than any other. T5 fluorescent ballasts operate at high voltage internally, and a wiring mistake that looks fine visually can still cause a shock, a fire, or premature equipment failure. None of this is scary if you're methodical about it.
Wiring basics
Every ballast has a wiring diagram either printed on the label or included in its installation sheet. Follow that diagram exactly, including the specific lamp positions for multi-lamp ballasts. A 2-lamp ballast wires differently than a 4-lamp ballast even if they look similar. Don't wing it. If you're using 18 AWG wire for socket connections (as specified in standard fluorescent wiring guidelines), make sure you're not exceeding the lead-length limits shown in the ballast documentation, because overly long lamp-to-ballast wiring can cause startup problems and reduce tube life.
The pre-power safety checklist
- Ballast and tubes match: confirm the ballast label matches your tube wattage (54W for T5HO) and lamp count
- All wire connections are inside connectors or terminals, no bare copper exposed
- Strain relief is installed on the power cord entry point so the cord can't be yanked loose
- The fixture housing is grounded: the green or bare wire from the power cord connects to the fixture chassis ground terminal
- The power cord has a 3-prong grounded plug, and the outlet it connects to is grounded
- No wiring runs across sharp metal edges inside the fixture housing
- Reflector is fully seated and not pressing against any lamp or socket
- Fixture is hanging level so tubes don't sag or rest against the housing
- Outlet or timer is GFCI-protected if the setup is in a humid or wet area
Once you've checked every item, plug the timer into the outlet, set it to 'on,' and plug the fixture cord into the timer. Stand back and watch: all tubes should light up within 1-2 seconds, show a consistent brightness with no flickering, and the ballast should be warm but not hot to the touch after 10 minutes. If anything seems off, unplug immediately and go to the troubleshooting section below.
Placement, distance, and intensity by plant type
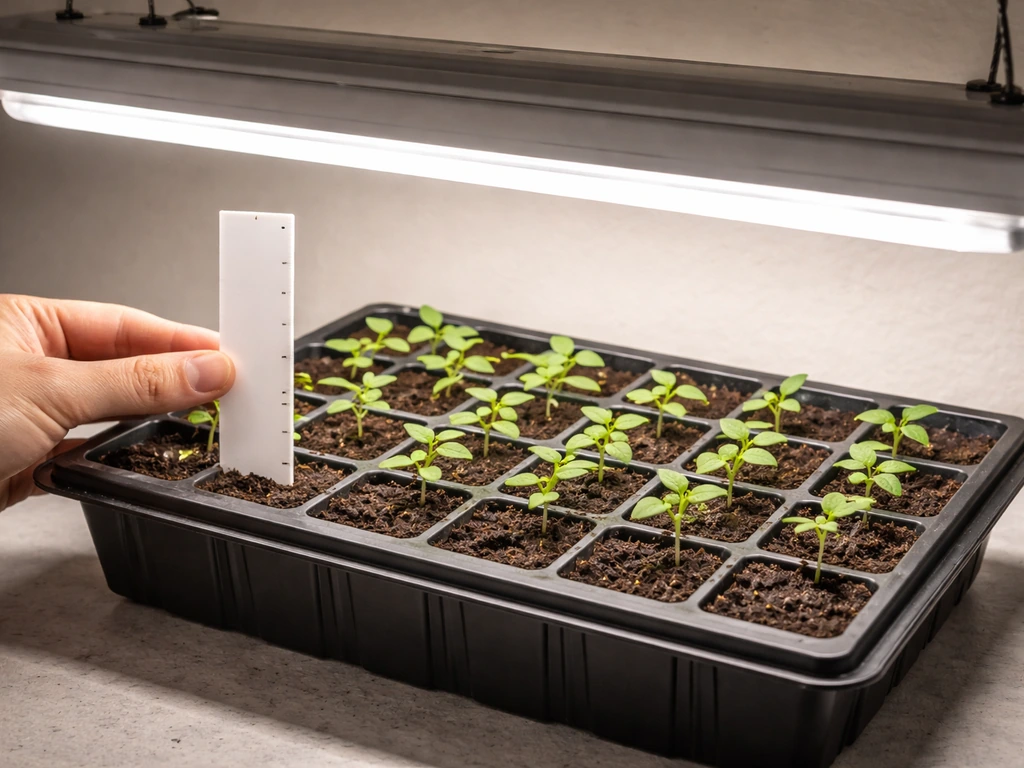
T5 fluorescent output drops off quickly with distance, which is actually useful: you can dial in intensity just by adjusting height. Here's how to set it by stage.
Seedlings and propagation
Keep the fixture 4 to 6 inches above the seedling canopy. University of Minnesota Extension specifically recommends this range and notes that you should move the light up regularly as seedlings grow. UNH Extension goes further: for high-light-demand seedlings, keeping lights less than one foot away and running them for up to 22 hours is what it takes to hit a sufficient daily light integral. That's not typical, but it tells you that T5 output is modest and distance matters enormously. If seedlings are leggy and stretching, the light is too far away. Move it closer before you assume you need more fixtures.
Vegetative growth
For established plants in the vegetative stage, start at 6 to 12 inches from the canopy and adjust based on plant response. Leaves should look healthy and deep green, not pale or bleached. If the nearest leaves show yellowing or bleaching, the light is too close. If lower leaves are reaching upward and internodes are long and stretched, raise the light or add more intensity.
Flowering and fruiting
T5 fluorescents are not the strongest option for flowering, but they work for smaller or shorter plants. Keep the fixture 6 to 10 inches from the canopy and switch to 3000K tubes. Because T5 output is spread across a wide beam angle, a good reflector becomes more important here to concentrate light at the canopy rather than losing it sideways. Once you have the right reflector for your setup, you can position it to concentrate more T5 light onto the canopy and reduce hot spots reflector becomes more important. A NanoTech-style reflector improves light spread and diffusion enough that plants across the full width of the fixture receive even intensity, which means you don't have to rotate plants to compensate for hotspots near the tube center.
| Plant Stage | Fixture Height Above Canopy | Spectrum | Notes |
|---|---|---|---|
| Seedlings | 4 to 6 inches | 6500K | Raise weekly as plants grow |
| Vegetative | 6 to 12 inches | 6500K | Watch for stretch as indicator of insufficient light |
| Flowering | 6 to 10 inches | 3000K or mixed | Use reflector; T5 is better for compact plants |
| Clones / Cuttings | 4 to 8 inches | 6500K | Lower intensity prevents wilting while roots establish |
Scheduling and tuning: how long to run your T5s
Set a consistent daily schedule using your outlet timer and stick to it. For example, GrowWeedEasy.com’s basics stage overview uses an 18-6 vegetative lighting schedule, meaning 18 hours of light followed by 6 hours of dark. Plants respond poorly to erratic light cycles.
- Seedlings: 16 to 18 hours of light per day. Both University of Minnesota and University of Maine Extension specifically recommend 16 hours as the standard for seed-starting with fluorescent lights.
- Vegetative growth: 18 hours on, 6 hours off (the classic 18/6 schedule). This keeps plants in active growth mode without triggering flowering in photoperiod-sensitive species.
- Flowering (photoperiod plants): 12 hours on, 12 hours off. This triggers and maintains the flowering stage for most photoperiod plants.
- Flowering (auto-flowering or non-photoperiod plants): 18 hours on, 6 hours off, or even 20/4.
After your first week, look at your plants and adjust. If seedlings are pale and thin, either lower the fixture or add an hour or two to the schedule. If leaves on vegetative plants look bleached or show 'light burn' (white or yellowing patches on the tops of leaves closest to the fixture), raise the fixture by 2-3 inches. Make one change at a time and give plants 3-5 days to respond before making another adjustment. This is the actual tuning process, and it takes patience but isn't complicated.
One more thing: T5HO tubes degrade over time. After about 10,000-15,000 hours of use, output drops noticeably even if the tubes still light up. If your plants start underperforming despite a good schedule and correct distance, and your tubes are 1-2 years old with heavy use, replacing the bulbs is the first thing to try.
Troubleshooting: flickering, dim output, hot spots, and uneven coverage
Tubes flickering or not starting
If one or more tubes flicker or won't light at startup, first check that all tubes are fully seated in their sockets: remove each tube and reinstall it, making sure both pins engage. If a tube still flickers after reseating, swap it with a known-good tube from a different position to find out if the problem follows the tube (bad tube) or stays in the socket (bad socket or ballast wiring issue). A flickering tube that's more than 18 months old is probably just dying; replace it. If brand-new tubes flicker immediately, recheck the ballast wiring against the diagram and confirm the ballast matches the tube wattage.
Dim output despite new bulbs
If the light looks noticeably dim compared to what you expected, the most common culprits are a mismatched ballast (running tubes at a lower ballast factor than rated), a reflector that's missing or oriented wrong, or tubes that are running cold in a cool environment (fluorescents lose significant output below 50°F). Check that your ballast is rated for the same wattage as your tubes. If you're building in an unheated garage or basement in winter, add a small space heater to keep the grow area above 60°F.
Hot spots and uneven coverage
If plants directly under the center of each tube look great but plants near the edges are stretching or pale, you have a coverage problem. The fix is almost always a better reflector. A diffusing reflector like SunBlaster's NanoTech style spreads light across the full canopy width so you don't get the 'bright stripe, dark stripe' pattern that bare strip fixtures create. If you can't add a reflector immediately, raising the fixture slightly (to 8-10 inches) spreads the footprint but reduces total intensity, which is a trade-off. You can also paint the walls and surfaces around your grow area with flat white paint to bounce light back into the canopy from all sides.
Fixture or ballast running too hot
T5HO ballasts get warm during normal operation, but they shouldn't be hot enough to be painful to touch after a few minutes. If your ballast is very hot, check for blocked airflow around the fixture housing: T5 strip lights need a few inches of clearance above them for heat to escape. Never mount a T5 fixture flush against a ceiling or wooden board. If the ballast is still running hot after clearing the airflow, check that the tube count and wattage match what the ballast is rated for. An overloaded ballast runs hot and fails early.
If you're looking to push your DIY lighting further, building a COB LED grow light is a natural next step for higher-intensity grows, and making a custom grow light reflector is another upgrade that compounds the efficiency gains from any T5 fixture you build. The fundamentals you've learned here, matching components, safe wiring, and systematic tuning by plant response, transfer directly to those builds as well. That same idea applies when you build a light trap for a grow box to prevent stray light leaks and keep the reflector doing its job. Those same principles are what make a DIY table top grow light work reliably matching components, safe wiring, and systematic tuning.
FAQ
Can I use T5 grow tubes in a fixture that originally came with T8 tubes, as long as the sockets fit?
No. The tube base may be similar, but the ballast must be designed for the T5 lamp type and wattage. If the ballast is for T8, the lamp can fail to start or run unsafely, so confirm the ballast label explicitly lists the same lamp wattage and configuration you plan to install.
What ballast should I buy if I want a 2-lamp fixture instead of a 4-lamp one?
You must match the ballast to the exact lamp count and wiring diagram. A ballast rated for 4-lamp operation cannot be used on a 2-lamp setup unless the manufacturer documentation explicitly allows that configuration.
Do I need an electronic ballast, or will a magnetic ballast work for a DIY T5 grow light?
Electronic ballasts are typically easier to tune and tend to perform more consistently for fluorescent operation. If you use a magnetic ballast, verify the lamp type and wattage match exactly, and expect different startup behavior, brightness response, and potentially more audible noise.
Can I wire multiple tubes in series or use spare lamp holders to add extra lamps?
Do not. T5 fluorescent systems require specific parallel wiring and ballast-to-lamp position mapping, especially on multi-lamp ballasts. Using improvised wiring can prevent proper starting, cause overheating, or shorten tube life.
Is it safe to mount a T5 grow light above a humid propagation tray if I use a timer?
A timer does not protect against shock. Use GFCI protection in wet areas, keep all connections and cord entries well away from splash zones, and route the wiring so any condensation cannot drip toward the ballast or socket terminals.
How can I tell if the reflector is installed correctly, not just present?
Check the reflector orientation so it faces the canopy as intended, then observe coverage. If you see a bright stripe directly under the tubes and dim edges, the reflector is likely missing, reversed, or not seated properly. A correct reflector should reduce the edge fade without requiring major bulb movement.
What’s the fastest way to troubleshoot if one tube won’t light but the others do?
Reseat the non-working tube first, then swap it with a known-good tube from a working position. If the problem follows the tube, replace it. If the problem stays in the same socket position, you likely have a socket contact or ballast wiring issue for that channel.
Why do my new T5 tubes flicker immediately, even though everything seems wired right?
Immediate flicker usually means an incorrect ballast match, incorrect lamp positioning on a multi-lamp ballast, or a wiring connection that does not match the diagram. Recheck the ballast label for lamp wattage and lamp count, then verify every socket lead is on the correct ballast terminal as specified.
What temperature problems can reduce T5 output in winter?
Fluorescent output drops significantly in cold conditions. If the grow area stays below about 50°F, expect weaker performance even with the correct bulbs. A small controlled heater and insulating the enclosure helps keep output stable.
How do I adjust light without constantly changing both height and schedule?
Make one change at a time. For example, adjust height first (in small increments), then hold it steady and only change the timer after plants have had 3 to 5 days to respond. This prevents confusing causes, like distinguishing height effects from photoperiod effects.
Is 3000K always better for flowering if I already have 6500K tubes?
Not always. Many growers use a mix, half 6500K and half 3000K during transition, then shift more toward 3000K for later stages. Also ensure your reflector and distance are tuned, because bulb color alone cannot compensate for insufficient intensity or poor coverage.
How do I know when to replace aging T5HO tubes if they still light up?
If plants underperform despite correct distance, schedule, and reflector setup, and your tubes are around 1 to 2 years into heavy use, replace them first. Flicker is not required for aging output loss, so look for gradual underperformance rather than assuming only dying tubes cause the issue.
My ballast runs warm, but how hot is too hot?
Warm is normal, but it should not be painful to touch after the fixture has been running for a few minutes. If the ballast or housing is very hot, check airflow clearance (do not mount flush), confirm tube count and wattage match the ballast rating, and make sure nothing is blocking ventilation around the housing.
Can I use flat white paint or reflective surfaces to improve results without changing the fixture?
Yes. If your issue is edge under-lighting, adding flat white surfaces around the grow area can bounce stray light back toward the canopy. This often helps when you cannot add or upgrade the reflector immediately, though it will not replace a correctly sized reflector for full coverage.
Next Article
DIY Table Top Grow Light: Build, Mount, and Tune It Safely
Build and safely tune a DIY table top grow light for seedlings and herbs: parts, mounting, wiring, settings, troubleshoo