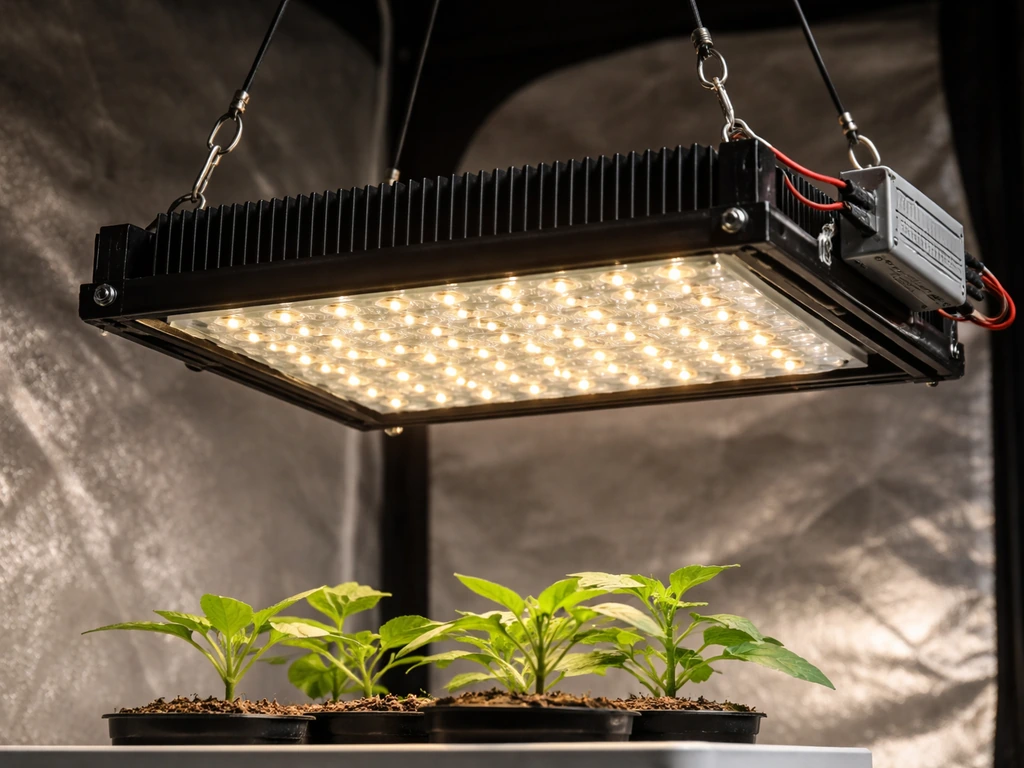
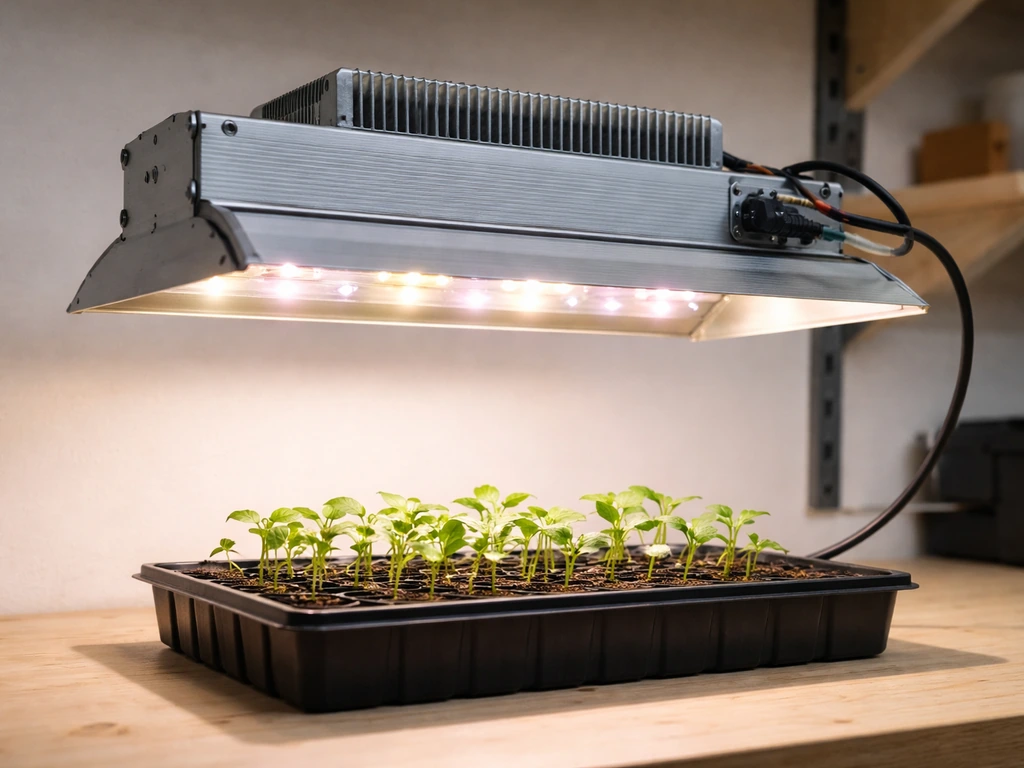
You can build a functional DIY LED grow light for under $50 to $150 depending on your setup size, and it will outperform most cheap strip lights you'd buy off a shelf. This DIY table top grow light approach works well for seedlings and small plants when you keep the distance and runtime tuned to the PPFD and DLI targets. The basic recipe: grab a full-spectrum LED strip or a COB LED chip rated for the correct wattage, wire it to a matching constant-current driver, mount it in a ventilated housing, hang it at the right distance above your plants, and run it on a timer. That's it. The rest of this guide walks you through every step so you don't fry your plants, burn out your driver, or waste money on underpowered components.
How to Make a Grow Light for Plants Step by Step

Marcus Tillman
3 May 2026
Decide what you're growing and what 'good' looks like
Before you buy a single component, figure out what you're actually trying to light. The reason this matters: a seedling tray needs very different light intensity than a mature tomato plant pushing into flower. If you build for the wrong use case, you'll either stunt your plants with too little light or bleach them with too much.
The two numbers you need to understand are PPFD and DLI. PPFD (photosynthetic photon flux density) measures how much usable light hits your plant surface per second, in micromoles per square meter per second (µmol/m²/s). DLI (daily light integral) is the total amount of that light your plants receive over a full day. Think of PPFD as your shower pressure and DLI as how long you stayed in. You control DLI by adjusting either the PPFD output of your light or how many hours you run it.
| Plant Type / Stage | Target PPFD (µmol/m²/s) | Target DLI (mol/m²/day) | Typical Light Hours |
|---|---|---|---|
| Seedlings and clones | 100–200 | 13–19 | 16–18 hrs |
| Leafy greens and herbs | 150–250 | 17–25 | 14–16 hrs |
| Vegetative houseplants | 200–400 | 20–30 | 14–16 hrs |
| Flowering and fruiting plants | 400–600+ | 30–45 | 12 hrs |
You don't need a $300 quantum sensor to hit these targets. A cheap PAR meter app on your phone (like Photone) gets you close enough for a DIY build. Just use it to verify once you've built and mounted your light, then adjust distance or runtime from there.
Choose the DIY approach and the right LED spectrum
There are three main DIY approaches, and they suit different skill levels and budgets. LED strips are the easiest entry point, COB LEDs give you more punch per fixture, and a custom panel build with multiple COBs or quantum board-style chips is the most powerful but also the most involved. If you want the step-by-step for a full cob led setup, including parts, wiring, and safe mounting, follow the cob-specific build guidance how to build a cob led grow light. If this is your first build, start with LED strips or a single COB setup.
| Approach | Best For | Skill Level | Typical Cost | Notes |
|---|---|---|---|---|
| LED grow strips | Small shelves, seedlings, herb gardens | Beginner | $20–$60 | Easy to mount, low heat, limited intensity |
| COB LED chip | Single plant, medium canopy, veg to flower | Intermediate | $40–$100 | More wiring, needs heatsink and driver |
| Multi-COB or QB panel | Full tent, multiple plants, all stages | Intermediate–Advanced | $80–$200+ | Most flexibility, most assembly time |
For spectrum, you want full-spectrum white LEDs in the 3000K to 4000K color temperature range, ideally supplemented with some deep red (660nm). Avoid the old purple-pink "blurple" strips that only emit red and blue. Modern full-spectrum white LEDs include those wavelengths plus the green range that actually matters for plant health and canopy penetration. If you're building a COB setup, look for chips labeled "full spectrum" or "sunlike" with a CRI above 80. Adding a dedicated 660nm red channel helps push flowering plants, but it's optional for a first build.
Samsung LM301B and LM301H chips are the gold standard for DIY quantum board-style builds and what most commercial budget grow lights use too. Bridgelux Vero and Citizen CLU048 are solid COB choices. For strips, Samsung 561C or 301B strip boards sold through horticultural suppliers give real output, not marketing specs.
Parts list and power/driver requirements
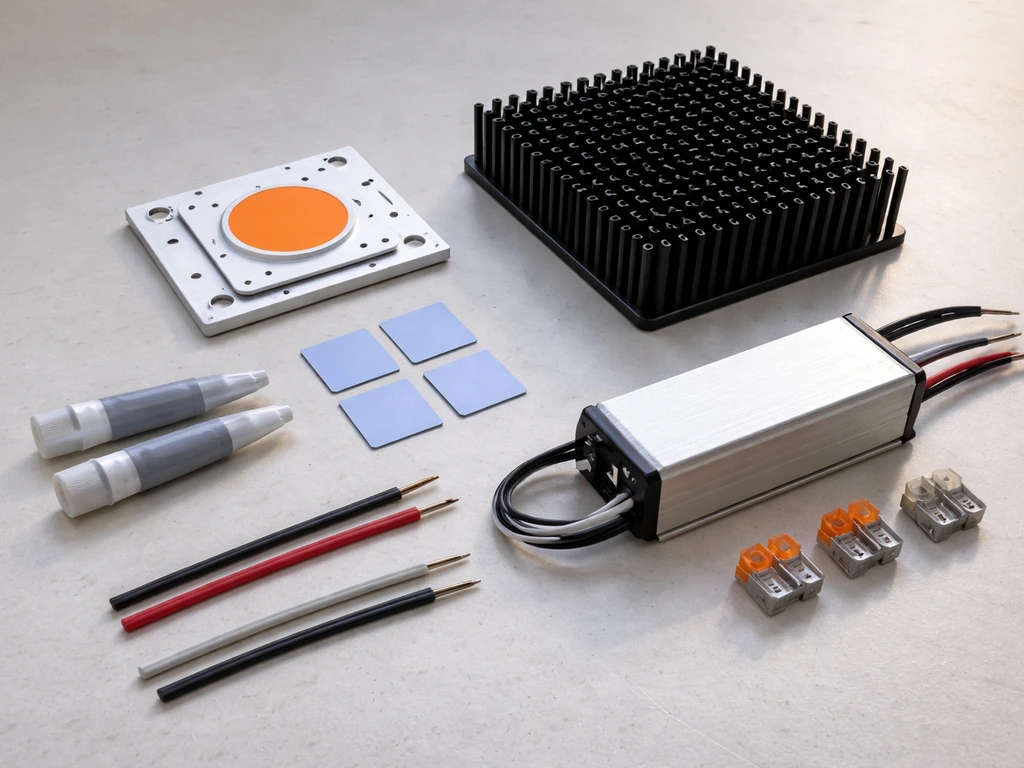
Here's what you need for a single-COB or strip-based build that covers a 2x2 foot area, which is the most common first-time DIY grow light project.
- LED chip or strip: One 50W COB (e.g., Bridgelux Vero 29) or four 1-meter Samsung 301B strips rated at 12–24V
- LED driver: Constant-current driver matched to your LED's forward voltage and current (see below)
- Heatsink: Aluminum heatsink large enough to keep your COB under 60°C — for a 50W COB, at least 100x100mm with fins
- Thermal paste: Arctic MX-4 or equivalent, to bond COB to heatsink
- Enclosure or frame: Aluminum channel, a short piece of slotted aluminum angle, or a simple wooden batten for strip builds
- Wire: 18 AWG or 16 AWG stranded copper wire, rated for the driver's output voltage
- Wire connectors: Wago 221 lever connectors or solder + heat shrink (no bare wire nuts)
- Timer: Mechanical or digital outlet timer, $8–15
- Mounting hardware: Rope ratchets or adjustable hanger clips
- Optional: Reflective mylar or white-painted board to improve coverage efficiency
Matching your driver to your LED
This is where most beginners go wrong. Your LED driver must match your LED's forward voltage (Vf) and forward current (If). The Mean Well ELG datasheet lists voltage/current operating regions for ELG constant-current/constant-voltage drivers, which can help you match your LED forward voltage and current to the driver’s usable output range blank" rel="noopener noreferrer">Mean Well ELG datasheet lists ELG voltage and current operating regions. EDN explains that whether you need a constant-current or constant-voltage LED driver depends on the LED or LED system you are powering blank" rel="noopener noreferrer">match your LED's forward voltage (Vf) and forward current (If). A 50W COB like the Bridgelux Vero 29 typically runs at around 36–37V forward voltage at 1400mA. So you need a driver with an output range that covers 36V and a current output of 1400mA (1.4A). Mean Well drivers (ELG or HLG series) are the go-to for DIY builds because they're reliable, dimmable versions are widely available, and they're safe. For a 50W COB, the Mean Well ELG-50-36 is a near-perfect match. For LED strips running at 24V, use a constant-voltage Mean Well driver at the correct wattage. Always buy a driver rated for at least 10–20% more wattage than your LED's actual draw to avoid running it at the edge of its capacity.
Quick wattage formula: multiply your LED's forward voltage by its operating current. For a COB at 36V x 1.4A = 50.4W actual draw. Get a driver rated for at least 55–60W. Never run a driver at 100% of its rated wattage continuously.
Step-by-step assembly, wiring, and safe mounting
Work on a dry, non-conductive surface. Unplug everything before touching any wiring. This build is low-voltage DC on the LED side (the safe side), but the AC input to the driver is mains voltage and genuinely dangerous if mishandled.
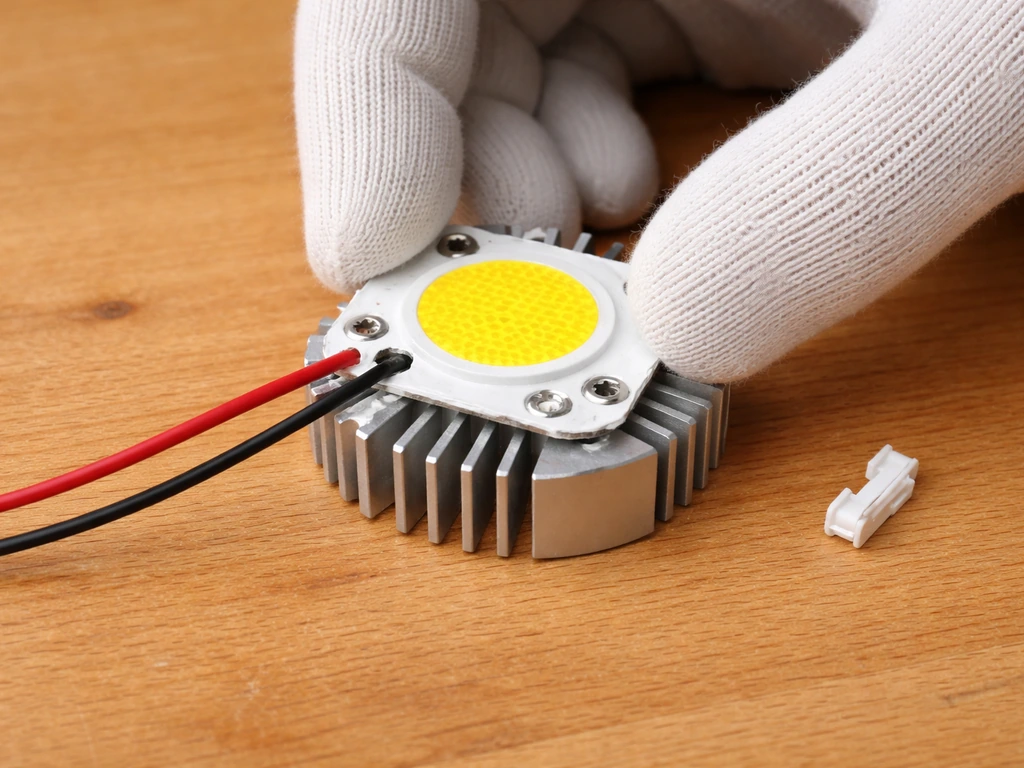
- Apply a thin, even layer of thermal paste to the base of your COB chip. Mount it to the heatsink with the included screws, pressing evenly so the paste spreads across the full contact area. Wipe any squeeze-out. For strips, peel the adhesive backing and press firmly along your aluminum channel.
- Connect your LED's positive and negative pads to the driver's output terminals. COB chips have clearly marked + and - pads. Use 18 AWG wire, keep runs short (under 2 feet if possible), and secure connections with Wago connectors or soldered joints covered in heat shrink. No exposed copper anywhere.
- Wire the AC input side of your driver: Line (L) to hot (black wire in North America), Neutral (N) to neutral (white wire), and Ground to ground (green/bare). If you're not confident with mains wiring, buy a pre-wired AC cord with a standard plug that you simply connect to the driver's screw terminals — this is the safest approach for beginners.
- Before mounting, do a bench test: plug in the driver briefly and check that your LED lights up. Touch the heatsink after 5 minutes — it should be warm but not painfully hot. If it's too hot to touch (above 60°C), you need a larger heatsink or better thermal paste application.
- Mount the heatsink or strip assembly to your frame. For a single COB, a simple U-bracket bolted through the heatsink fins works well. For strips, the aluminum channel itself is your mounting surface.
- Attach rope ratchets to your frame so you can adjust height easily as plants grow. Route the driver's power cord safely away from the heat source and any water sources.
- Plug into your timer, set your schedule (see the run schedule section below), and hang the light at your starting distance.
Electrical safety non-negotiables
- Never leave a bare AC wire exposed — all mains connections must be inside the driver's enclosed terminal block or in a properly rated junction box
- Use only wire rated for the current you're running — 18 AWG handles up to 5A on the DC side, which covers most single-COB builds
- Keep the driver outside your grow space if humidity is high — moisture and mains voltage is a fatal combination
- Secure all wiring so it can't shift, sag into the light, or be pinched
- If anything smells like burning plastic during the first test, cut power immediately and inspect all connections
How to place, distance, and cover your plants
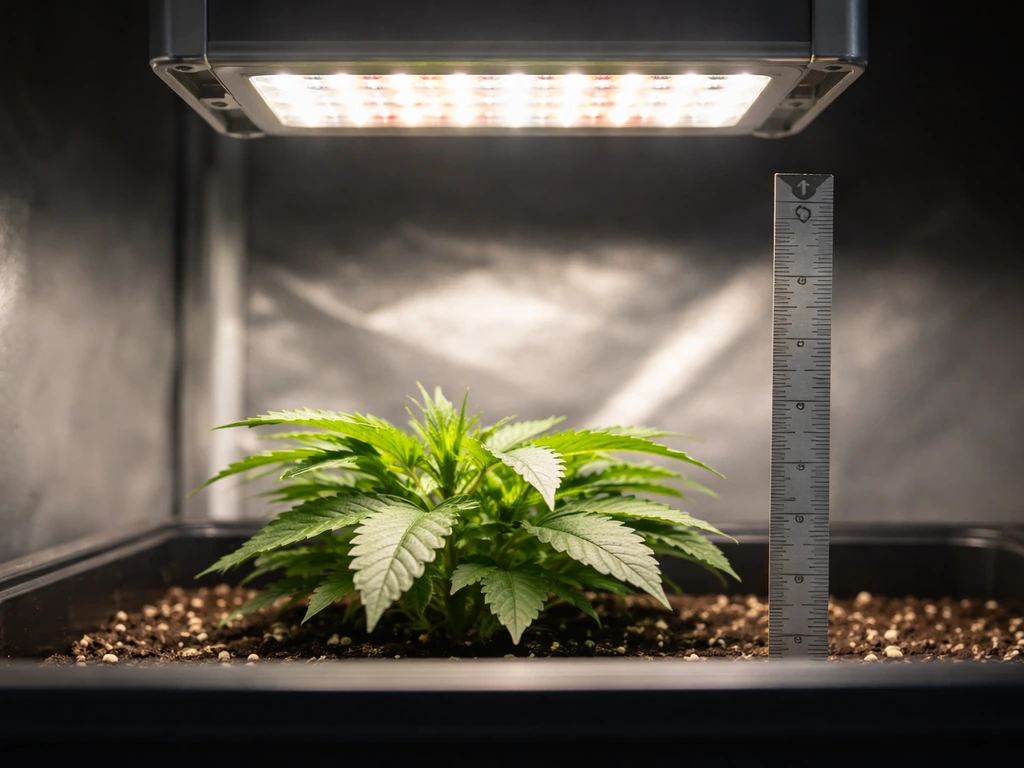
Distance is the easiest variable you have to control PPFD. Moving a light closer increases intensity dramatically, PPFD roughly follows the inverse square law, so halving the distance quadruples the intensity. This cuts both ways: if your light is too close, you'll bleach leaves or cause heat stress. Too far and your plants stretch, go pale, and don't photosynthesize efficiently.
These are solid starting distances to work from: seedlings and clones typically do well with the light 4 to 6 inches away. Lettuce and herbs generally land in the 6 to 12 inch range. Vegetative houseplants and larger leafy plants usually need 12 to 24 inches depending on the light's actual output. Flowering plants at high intensity often end up 18 to 30 inches out. These are starting points, not fixed rules. Use your PAR meter app after hanging the light to confirm you're in the right PPFD range for your plant stage, then adjust.
Coverage matters as much as distance. A single 50W COB covers roughly a 2x2 foot canopy at useful intensity. Beyond that footprint, intensity drops off fast at the edges. If you're growing across a 4x4 area, plan for two to four COBs or a longer strip array. Lining the inside of your grow space with white paint or reflective mylar bounces lost photons back toward your plants and meaningfully improves edge coverage without adding any wattage.
If you want to go deeper on reflector design to shape your light's coverage pattern, that's worth exploring separately, as a well-designed reflector can extend the usable footprint of a single COB considerably.
Run schedule and intensity adjustments over time
Plants don't just need light, they need the right amount of light over time, which is what DLI captures. You control DLI by adjusting hours on (photoperiod) and light intensity (PPFD). If your light isn't dimmable, you control DLI purely through your timer. If your driver is dimmable (Mean Well ELG-D versions or similar), you have both levers available.
For seedlings, start at 16 hours on, 8 hours off. This hits the 13 to 19 mol/m²/day DLI target if your PPFD at canopy is around 200 to 250 µmol/m²/s. As plants move into vegetative growth, you can stay at 16 hours or drop to 14 hours if you've bumped intensity by moving the light closer. Flowering plants that are photoperiod-sensitive (like cannabis or certain tomato varieties) need a strict 12 hours on, 12 hours off schedule to trigger flower. Day-neutral plants like lettuce and herbs are flexible, and keeping them at 14 to 16 hours is usually optimal.
Raise intensity gradually. Start new seedlings or recently transplanted cuttings at the lower end of the PPFD range and ramp up over 5 to 7 days. Jumping straight to full intensity stresses plants that aren't acclimated, especially coming from low-light conditions. If you see leaf curl, bleaching, or crispy edges within the first week, raise the light 2 to 4 inches and reassess after 48 hours.
Adjust your schedule seasonally too. If your grow space gets natural light through a window, your supplemental light hours can be reduced. If it's a fully light-sealed space, your artificial light is the only input and DLI planning becomes more critical. A cheap digital timer (not a mechanical dial timer) is worth it for consistency, off-by-one-hour schedules over weeks add up to real DLI variation.
Troubleshooting common DIY grow light problems
Plants are stretching or pale
This is the most common sign that your light intensity is too low at the canopy. First check your distance, if you're more than 12 inches away with a 50W COB, you've likely dropped below the useful PPFD threshold for most plants. Lower the light and recheck after 48 to 72 hours. If the plant was already stretched before you built the light, it won't un-stretch, but new growth should come in tighter. If lowering the light doesn't help, you may have an underpowered build and need more LEDs or a higher-wattage COB.
Leaves are bleaching or burning
Light burn shows up as bleached white or yellow patches on the tops of leaves closest to the light, with the rest of the leaf staying green. Heat stress looks similar but the leaves will also curl upward (taco-style) and feel warm. Hold your hand at canopy height, if it's uncomfortable after 30 seconds, the light is too close or the room temperature is already high. Raise the light 3 to 4 inches at a time until symptoms stop.
Uneven coverage across the canopy
Plants directly under a single COB thrive while edge plants stretch or stay small. Add a second light source, move to a strip array that covers the full width of your grow area, or line your space with white reflective material to bounce edge light back. Rotating plants weekly also helps if you're not ready to add hardware.
The light is flickering
Flickering almost always means a driver problem or a loose connection. Check all wiring connections first, a partially seated Wago connector or a wire that's barely making contact will cause intermittent flicker. If connections are solid, the driver may be overloaded or failing. Verify that your LED's actual wattage draw isn't exceeding the driver's rated output. If the driver is running hot (above 70°C at its case), it's working too hard and may be dying. Replace it with a correctly rated unit.
Overheating heatsink
If your heatsink is painfully hot to touch after 10 to 15 minutes of operation, you have a thermal problem. First check your thermal paste application, uneven coverage or too little paste dramatically reduces heat transfer. Remove the COB, clean both surfaces with isopropyl alcohol, and reapply a thin, even layer. If that doesn't bring temps down, your heatsink is undersized. For a 50W COB you need at least 0.5°C/W thermal resistance, which usually means a heatsink with a significant fin area. Adding a small 80mm fan blowing across the fins drops temperatures by 15 to 25°C on a passive heatsink that's borderline for the wattage.
Driver not powering on
Check the AC input wiring first. Mean Well drivers have a specific terminal layout (L, N, ground), and a swapped Line and Neutral connection will prevent startup on some models. Also check that the driver's output voltage range overlaps with your LED's forward voltage, a driver with a 24V max cannot run a 36V COB. If wiring and spec matching check out and the driver still doesn't power on, test with a multimeter on the output terminals. If you read correct voltage but the LED doesn't light, the problem is in your LED connections or the LED itself.
Pre-flight checklist before you plug in your completed build
- Driver wattage is at least 10% higher than your LED's actual watt draw
- Driver output voltage range matches your LED's forward voltage
- All AC connections are inside the driver terminal block with no exposed wire
- All DC connections are secure — tug test each wire after connecting
- Thermal paste is applied and COB is firmly mounted to heatsink
- Heatsink passed the 5-minute warm (not burning) touch test
- Light is hung at correct starting distance for your plant stage
- Timer is set and confirmed by watching one full on/off cycle
- Driver and wiring are away from water, condensation, and plant contact
- PAR meter reading at canopy matches your target PPFD range
FAQ
Can I use a grow light app on my phone to set the right light level every time, or do I need to re-measure?
A phone PAR app is good for initial calibration, but the reading can drift because apps vary by phone camera and angle. After you first build and hang the light, use the app to set your starting distance, then keep it consistent. If you change the distance, swap LEDs, or rotate the fixture, recheck once to avoid unintended PPFD and DLI changes.
What driver should I choose if my COB’s forward voltage is higher or lower than the driver’s listed range?
Match overlap, not averages. Your driver’s output voltage range must include your COB’s forward voltage at the target current. If the COB’s Vf sits near the top of the driver range, it may current-limit or run out of regulation, which can reduce actual light output and cause instability. If you are unsure, confirm Vf at your operating current from the COB datasheet or measure with a multimeter during a test. Do not guess.
How do I prevent light leaks and hotspots when using a reflector or white lining?
White paint and reflective mylar work best when you cover surfaces uniformly and avoid wrinkled gaps that create glare patterns. Keep the fixture centered under the reflective area and ensure the reflector edges are not blocking airflow to the LEDs and driver. If you see extremely bright spots on leaves directly under the COB, increase distance slightly or diffuse with a suitable diffuser rather than adding more wattage.
Is it safer to wire multiple COBs/strips in parallel or series on a DIY build?
For most DIY LED strips and constant-current COB drivers, parallel wiring is typically safer and more predictable so each branch receives the driver’s intended current, especially when components differ slightly. Series wiring can work in specific designs but is less forgiving because one LED failure or mismatch can affect the whole string. If you are using a constant-voltage driver for 24V strips, parallel is often required by design. If you are not following a tested schematic, stick to the wiring approach recommended for your exact driver and LED type.
Can I run the DIY grow light 24 hours a day?
In general, no. Plants use different day length to regulate growth and stress responses, and DLI typically targets specific ranges rather than maximum exposure. For most seedlings and day-neutral greens, an 18-hour or 16-hour photoperiod can be reasonable starting points, but 24 hours commonly increases stress and can encourage abnormal growth. Only consider very long photoperiods if you have a specific crop target and you are actively measuring PPFD and DLI.
What should I do if my seedlings look healthy but they suddenly stop growing after I adjust distance?
First suspect DLI changes from timing or distance. If you moved the light closer, leaves may have bleached slightly or the plant may have experienced heat stress, causing a slowdown even if the damage is not obvious. Check leaf color (look for faint whitening), feel leaf and heatsink temperatures (should be warm but not scorching), and confirm your timer program. Then reduce intensity by raising the light 2 to 4 inches and wait 48 to 72 hours before increasing again.
How can I tell whether my problem is too much light versus too much heat?
Too much light often shows as bleaching or white/yellow patches on the parts closest to the fixture while the rest stays green. Heat stress often includes upward curling, taco-like leaves, and leaves feel warm quickly. A quick check is to hold your hand at canopy height, if it is uncomfortable after about 30 seconds, raise the light and improve airflow. If symptoms persist at a safer temperature, then revisit PPFD using the app or your measured distance.
Will reflective paint or mylar raise the light level enough to change my target distance?
Yes, it can. Reflective materials increase usable light reaching edges and can raise effective canopy intensity, so your starting distance may become slightly too aggressive. If you line the grow space, re-measure PPFD at the canopy once after the space is fully set up, then adjust distance or photoperiod to bring DLI back into your target range.
What is the easiest way to increase coverage across a larger grow area without redesigning everything?
Use multiple smaller fixtures or extend the strip length, and keep each fixture’s distance and aiming consistent. A single 50W COB usually cannot maintain strong PPFD across a 4x4 area, so plan for two to four COBs or a longer strip array aligned to the canopy. Rotating plants weekly also helps, but multiple fixtures generally gives more uniform results than rotation alone.
My light flickers. What parts should I troubleshoot first to avoid damaging the driver?
Check connections first, loose or partially seated terminals can cause flicker. Then verify driver output compatibility with the LED forward voltage and confirm the driver is not overheating. If flicker continues, test with a multimeter at the driver output while it is powered (carefully, with proper insulation and technique). If you cannot confirm stable output voltage/current, stop using it and replace the driver rather than continuing to troubleshoot in the dark.
How do I know whether my heatsink and thermal paste are adequate for a 50W-class COB?
After 10 to 15 minutes, the heatsink should get warm, but not painfully hot. If it is painful to touch quickly, you likely have poor thermal contact or insufficient heatsink area. Remove the COB, clean surfaces, reapply a thin even layer of thermal paste, and ensure the COB is fully seated. If temps stay high, upgrade to a larger heatsink with enough fin area, and consider adding an 80 mm fan directed across the fins.
What timer should I use to keep DLI consistent over weeks?
Use a digital timer that does not rely on a manual dial, and program it with the exact on and off hours you want. Mechanical timers can drift, and small “off by one hour” mistakes compound DLI variation across long schedules. Also avoid power outages without timer recovery, if possible use a timer that retains settings or add a simple power protection plan.
Next Article
How to Build a COB LED Grow Light Step by Step
Step-by-step DIY COB LED grow light build with correct COB choice, driver wiring, heatsink cooling, mounting and safe te