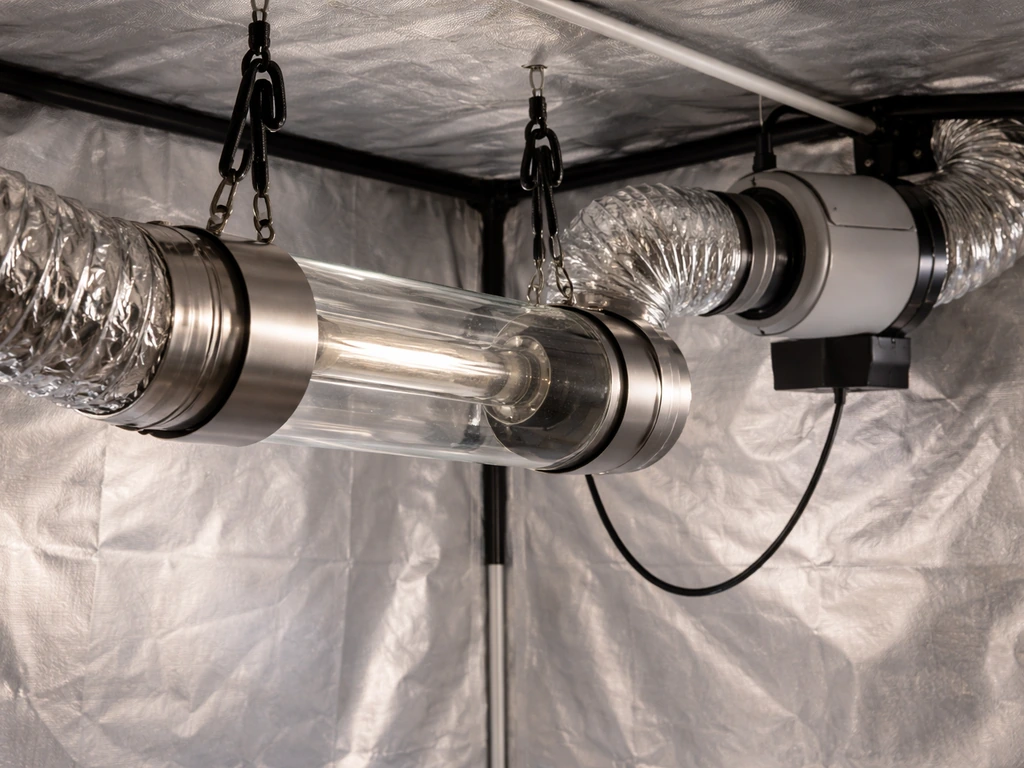
A cool tube grow light setup is one of the most practical ways to run a high-intensity HID bulb indoors without cooking your plants or turning your grow space into a sauna. If you've been searching for how to pull it all together, here's the short answer: a cool tube is an air-cooled tubular glass reflector that seals around your HPS or metal halide bulb and uses ducted airflow to pull the heat away from the bulb before it ever reaches your canopy. The result is that you can hang your light closer to your plants, maintain better temperatures, and get more usable light without the heat stress.
Cool Tube Grow Light Setup Guide: Build, Mount, and Tune

Marcus Tillman
21 Apr 2026
What a cool tube grow light setup actually is (and when it makes sense)
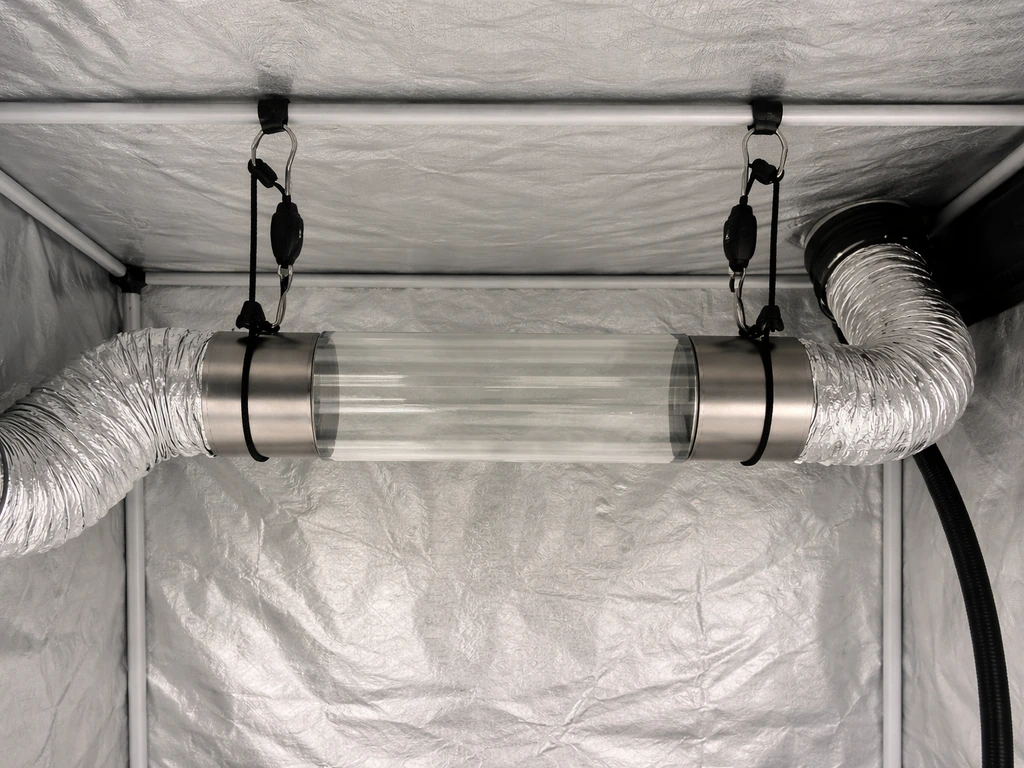
A standard HID reflector radiates heat downward into the grow space. A cool tube is different: it's a sealed glass tube with a reflective hood, and a fan is connected to one or both ends via ducting so that air is continuously pulled through the tube and exhausted out of the room. The heat-resistant glass (like the kind used in the Prima Klima cool tube reflectors) keeps the bulb's radiant heat contained, and the moving air captures and removes that heat before it builds up. The result can drop canopy temperatures by several degrees compared to running an open reflector.
Cool tubes are best used when you're running a 400W, 600W, or 1000W HPS or metal halide bulb in a small or enclosed space like a grow tent, closet, or dedicated grow room where heat is your main problem. If you're already running LEDs, a separate air-cooled reflector setup doesn't apply to you directly, though the ducting and fan logic is similar to other ventilated setups.
A led grow setup can also benefit from the same airflow and temperature-control habits so you avoid heat spikes and keep conditions stable. If you're deciding between a cool tube versus an air cooled grow light setup, the key comparison is whether you want HID heat removed with ducting instead of relying on room airflow.
That same idea is useful when planning a led grow setup, since you still need smart ventilation and stable temperatures for best results air-cooled reflector setup. For cannabis growers especially, this setup is popular during the flowering stage when you want intense light close to the canopy without heat stress. If you want a complete cannabis grow light setup, focus on matching the right reflector, bulb, ballast, and ventilation so the temperature stays stable under intense light.
If you're working with seedlings or low-wattage situations, a cool tube may be overkill, but it still works well as long as you dial in your hanging height correctly. For seedlings, a seedling grow light setup can be tailored with lower output and careful placement to avoid heat stress and light burn.
Parts checklist and compatibility before you buy anything
Getting the parts right before you start is honestly the most important step. The most common beginner mistake is buying a reflector, a bulb, and a ballast that don't all match each other, and then wondering why the light flickers, runs hot, or won't start at all. Here's what you need and what to watch for with each piece.
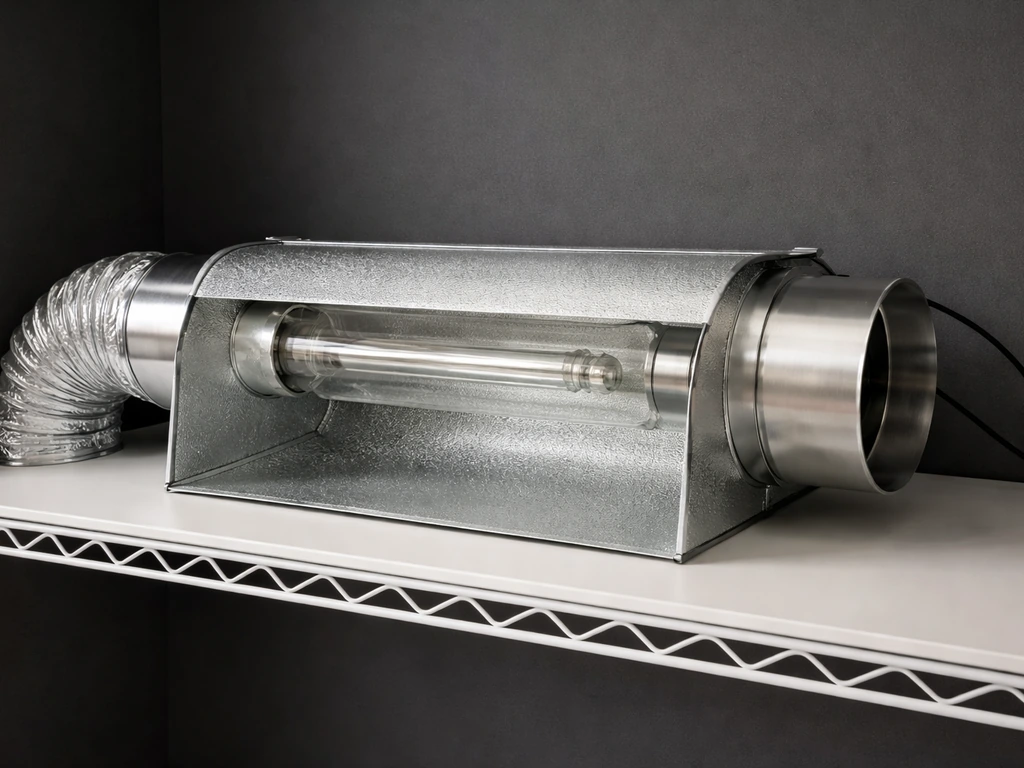
Cool tube reflector (hood)
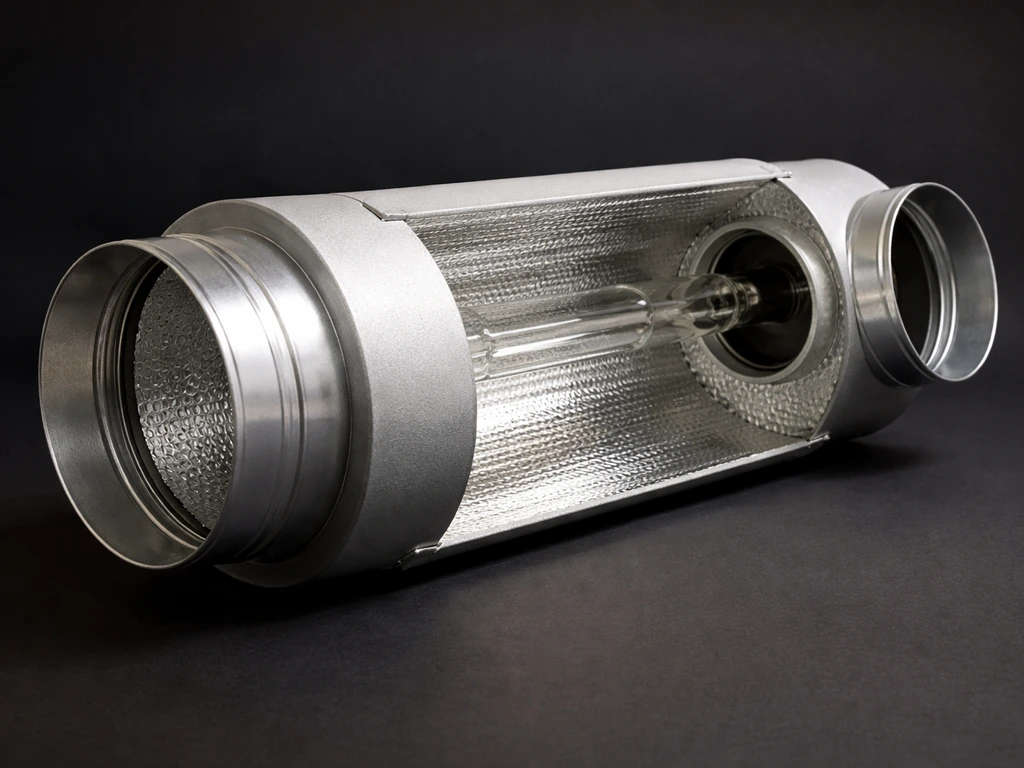
Cool tube reflectors come in a few sizes, but the most common for home growers is the 6-inch diameter duct version. For example, the Hydro Crunch 6-inch XXL cool tube measures about 26.4 x 25.2 x 7.1 inches and is rated for 250W, 400W, 600W, and 1000W MH/HPS bulbs. Some reflectors include add-on wings that spread light over a wider footprint, which helps if you have a wider canopy. Look for heat-resistant glass (sometimes called borosilicate or tempered grow glass) since standard glass can crack from bulb heat.
Bulb and ballast compatibility
This is where most people get tripped up. Your ballast must match your bulb type (HPS or MH) and your bulb wattage exactly. A 600W HPS ballast runs at approximately 110V lamp voltage and 6. 1A lamp current.
A 1000W ballast has completely different operating parameters. Some ballasts are switchable between voltage settings (like the Sun System 902650 which uses a power pointer selector for 120V or 240V operation), but switchable doesn't mean they can run any bulb type interchangeably without correct setup. If your lamp requires a higher starting voltage, like pulse-start metal halide lamps, you need a ballast specifically designed for pulse-start operation, not a standard probe-start ballast.
A mismatched ballast either won't start the lamp or will shorten its life significantly. Kits like the Yield Lab 400W HPS+MH cool tube kit bundle a reflector, electronic ballast, and bulbs together, which removes the compatibility guesswork if you're just starting out.
Ducting and inline fan
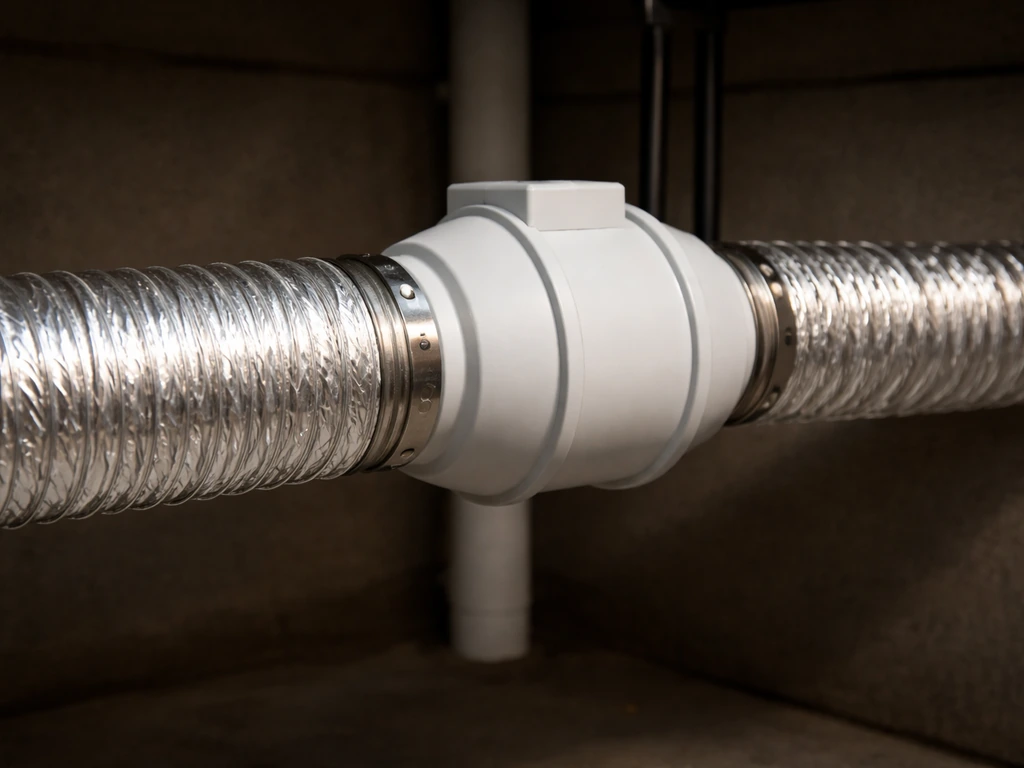
For a 6-inch cool tube, you need 6-inch flexible aluminum ducting and a 6-inch inline fan. The ducting connects to the ports on both ends of the cool tube and runs to your exhaust point (usually out of the tent or room). For fan sizing, use this rule of thumb: a minimum of 300 CFM of airflow per 1000W of HID bulb. So for a 600W setup, a fan in the 300 to 400 CFM range is plenty.
The AC Infinity Cloudline T6 (402 CFM, 32 dBA) and Spider Farmer 6-inch inline fan (402 CFM) are both popular, reliable choices at that range. The Hydrofarm Aero Fan 6-inch runs 360 CFM. All of these work. When comparing fans, don't just look at max CFM, also check the static pressure rating, because the fan has to push air through the tube, the ducting bends, and potentially a carbon filter.
A fan rated at 394 Pa static pressure (like the AC Infinity filtration kit fan) handles real-world duct resistance much better than a cheap fan with no static pressure spec.
| Fan Model | Duct Size | Airflow (CFM) | Noise | Static Pressure |
|---|---|---|---|---|
| AC Infinity Cloudline T6 | 6 inch | 402 CFM | 32 dBA | 394 Pa (kit) |
| Spider Farmer 6" with GGS Controller | 6 inch | 402 CFM | Not specified | Includes temp/humidity controller |
| Hydrofarm Aero Fan 6" | 6 inch | 360 CFM | Not specified | Not specified |
| Grainger IP44 Inline Fan | 6 inch | 300 CFM max | Not specified | 70W input |
Quick compatibility checklist
- Cool tube reflector: 6-inch duct ports, heat-resistant glass, reflective interior
- Bulb: HPS or MH, matching wattage to ballast (250W, 400W, 600W, or 1000W)
- Ballast: matches bulb type (HPS vs. MH), wattage, and starting method (standard vs. pulse-start)
- Inline fan: 6-inch, at least 300 CFM for 1000W (proportionally less for lower wattage), with a static pressure rating
- Ducting: 6-inch flexible aluminum, enough length to reach your exhaust point with minimal sharp bends
- Duct clamps or tape: foil tape or spring clamps to seal every duct connection
- Timer: mechanical or digital, rated for the ballast's amperage draw
- Optional: carbon filter for odor control, temperature/humidity controller for automated fan speed
Mounting, placement, and designing your airflow path
Before you hang anything, map out your airflow path on paper. Air enters the cool tube from one end, passes over the bulb, picks up heat, and exits the other end into the ducting and out of the space. Ideally the exhaust goes directly outside the tent or room, not just into the same room where it will recirculate. The simplest and most effective layout: fan pulls air in from inside the grow space (or from a cooler area), through the cool tube, and exhausts it outside the tent or room through a single run of ducting. Fewer bends in the duct means less airflow resistance and better performance from your fan.
Mount the cool tube horizontally across the tent or room using heavy-duty rope ratchets or adjustable light hangers. These let you raise and lower the light easily as your plants grow, which you'll be doing often. The tube should be level, not angled, so the airflow is even across the whole bulb. Position it centered over your canopy for even coverage. If you have add-on wings on the reflector, orient them to push light toward the edges of your canopy, not just straight down to the center.
Keep your ducting runs as short and straight as possible. Every 90-degree bend in flexible ducting reduces effective airflow by roughly the equivalent of several feet of straight duct. If you need to make turns, use gradual curves rather than sharp kinks. Seal every connection between the duct and the cool tube ports with foil tape or a tight duct clamp, because leaks mean hot air escaping back into your grow space.
Step-by-step installation: wiring, ducting, ventilation, and safety
- Mount your rope ratchets or light hangers to your tent's top rail or ceiling anchor points. Use at least two ratchets for stability, positioned at each end of the cool tube.
- Hang the cool tube reflector at a rough starting height (24 to 30 inches above where your plants will be is a safe starting point for most wattages).
- Install the bulb: with the ballast unplugged and the power off, screw or twist the HPS or MH bulb into the cool tube's socket. Handle the bulb with a clean cloth or gloves so skin oils don't create hot spots on the glass. Make sure it's fully seated and locked.
- Connect the ballast to the cool tube lamp cord. If your cool tube came pre-wired (like the Hydro Crunch model with its 15-foot cord), plug the reflector cord into the matching output port on the ballast. Double-check that the ballast is set to the correct voltage (120V or 240V) if it has a selector switch.
- Plug the ballast into your timer, and plug the timer into a properly rated outlet. Never plug a 1000W ballast directly into a standard household extension cord without checking its amperage rating first.
- Attach 6-inch flexible ducting to one port on the cool tube using a duct clamp or foil tape. Run this duct to your inline fan's intake. Attach a second duct run from the fan's exhaust port to your exit point (tent duct port, window insert, etc.). Seal all connections with foil tape.
- If you're using a carbon filter for odor control, position it on the intake side of the fan (between the grow space air and the fan inlet) per standard installation guidance. This protects the fan motor and maximizes odor scrubbing.
- Power on the inline fan first, confirm airflow is moving through the cool tube and exhausting properly, then power on the ballast. HID bulbs take 3 to 5 minutes to reach full output, so don't judge brightness immediately at startup.
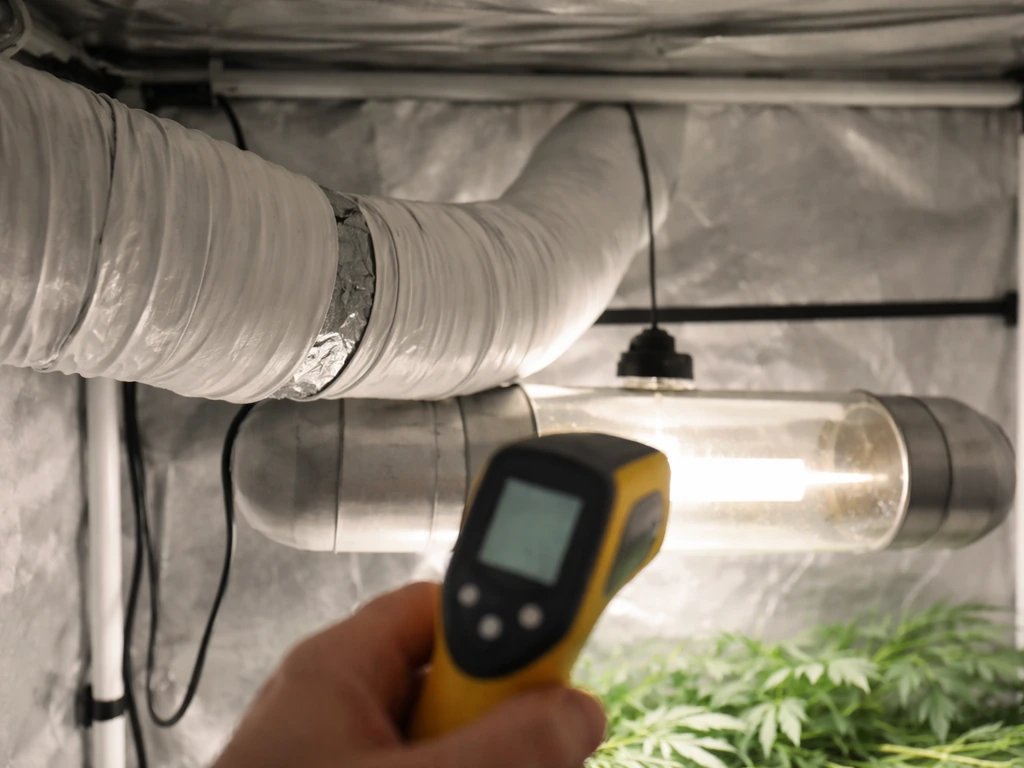
- After 15 to 20 minutes of operation, use a thermometer to check the temperature at canopy level and at the cool tube glass surface. The glass should be warm but not hot enough to burn your hand. If canopy temps are above 82°F (28°C), increase fan speed or adjust the duct path.
A few safety notes worth being direct about: HID ballasts generate significant heat and should not be placed directly on carpet or enclosed in tight spaces without ventilation. Never leave a running HID setup unattended for extended periods until you've confirmed the temperatures are stable. Make sure your timer is rated for the ballast's full amperage draw, not just the wattage, because inrush current at startup can trip a lightly-rated timer. Venture Lighting also emphasizes using safe circuit-loading practices, including applying a de-rating factor such as 1.2× rated current when planning ballast electrical loading timer is rated for the ballast's full amperage draw, not just the wattage.
Dialing in height, coverage, and intensity for each growth stage
The right hanging height isn't one fixed number. It changes based on your bulb wattage, the growth stage your plants are in, and what the plants are actually telling you. The goal is to deliver the right intensity of light (measured in PPFD, or micromoles per square meter per second) without causing heat stress or light burn. If you grow alocasia indoors, you’ll want to match your grow light intensity and distance to its needs, and often use a higher-output setup with careful adjustment alocasia grow light requirements. Here are practical starting points based on growth stage:
| Growth Stage | Hanging Height (from canopy) | Light Schedule | Target PPFD |
|---|---|---|---|
| Seedlings | 24–30 inches | 16–18 hours/day | 150–250 µmol/m²/s |
| Vegetative | 18–24 inches | 14–16 hours/day | 300–600 µmol/m²/s |
| Flowering/Bloom | 12–18 inches | 12–14 hours/day | 700–900+ µmol/m²/s |
For a 1000W HPS bulb, the recommended range is roughly 12 to 35 inches from the canopy depending on plant tolerance and growth stage, which is a wide range on purpose. Start higher and work your way down as plants mature and demonstrate they can handle more intensity. For lower wattages like 400W or 600W, you'll generally end up closer to the shorter end of that range during flowering.
Coverage is the other thing to think about. A 600W HPS in a standard cool tube reflector with wings covers a reasonable footprint of about 3x3 to 4x4 feet effectively. A 1000W extends that to roughly 4x4 to 5x5 feet. If your canopy is wider than your reflector's coverage zone, the edges will be underlit. In that case, you can add reflective wall material (Mylar or white panda film) to bounce light back toward the edges, or consider adding a second light rather than trying to stretch one beyond its useful range.
A practical trick: hold the back of your hand at canopy level for 30 seconds after the light has been running for at least 20 minutes. If it's uncomfortable, the light is too close or the canopy is too hot. If you can hold your hand there comfortably but your plants are showing pale, bleached spots, that's light intensity (not heat) and you need to raise the light or reduce wattage. These two problems look similar but have different fixes.
Scheduling, power management, and keeping temps under control
Use a mechanical or digital outlet timer to automate your light schedule. Digital timers with 15-minute increment programming give you more flexibility and are worth the small extra cost over basic mechanical ones. Set your timer according to the stage targets in the table above, and don't skip the dark period for flowering plants (12 hours dark is essential for triggering and maintaining bloom in photoperiod-sensitive plants).
Run your inline fan continuously, even during dark periods. The cool tube needs airflow whenever the bulb is on, obviously, but running the fan 24/7 also helps stabilize humidity and prevents heat from stratifying in the space. If noise is a concern at night, pairing your fan with a temperature/humidity controller (like the Spider Farmer GGS controller or the AC Infinity Cloudline's built-in controller) lets you set the fan to run at low speed during dark periods and ramp up automatically when temps rise during the light cycle.
On the power side, calculate your total draw before committing to an outlet. A 600W ballast at 120V pulls around 6.1A for the lamp alone, plus whatever your fan draws (typically 1 to 2A for a 6-inch inline fan). If you're also running a carbon filter, water pump, or other equipment on the same circuit, add those up. Most standard 15A household circuits can handle a 600W setup with ventilation, but a 1000W ballast pushing close to 10A will need a dedicated 20A circuit, especially at 120V.
Keep your grow space temperature between 70 and 82°F (21 to 28°C) with the lights on. A cool tube setup running a properly sized fan should keep you in that range even in a small tent during warmer months. If you're fighting high ambient room temperatures (above 85°F outside the tent), no amount of cool tube airflow will fully compensate. In that case, you need to address the room temperature with air conditioning before expecting your cool tube to do the heavy lifting.
Troubleshooting common problems and knowing when to upgrade
Overheating at the canopy
If canopy temps are above 82°F even with the fan running, check your ducting first. Disconnected joints, kinked flex duct, or a duct run that's too long with too many bends will strangle your fan's effective CFM. Straighten the duct path, re-seal connections with foil tape, and re-measure. If that doesn't fix it, your fan is undersized for the setup. Move up to a higher CFM fan (e.g., swap a 300 CFM fan for a 402 CFM model) or add a second fan in line.
Uneven light coverage
If your outer plants are growing slower or stretching more than the center plants, your light isn't covering the full canopy. First, raise the light slightly (a higher position spreads light over a wider area, though at lower intensity). Then check whether your reflector wings are angled correctly to spread light sideways. Adding reflective side walls makes a noticeable difference here. If you've already done all of that and the edges are still underlit, the honest answer is that one light isn't enough for your canopy footprint.
Condensation on the cool tube glass
Condensation on the outside of the glass tube usually means your incoming air is significantly colder and more humid than the air inside the tube. This most often happens when you're pulling air from a cold basement or an air-conditioned space in summer. It can also happen during the cool-down period right after lights-off when warm, humid air hits the still-cooling glass. The fix is to either warm the incoming air slightly (by adjusting where the fan intake draws from) or to run the fan for 15 to 20 minutes after lights-off to fully cool and equalize the tube before the temperature differential gets too large.
Light won't start or flickers
If the bulb flickers, doesn't strike, or takes an unusually long time to reach full brightness, the most common culprits are a ballast-bulb mismatch (check that wattage and bulb type match exactly), a loose bulb socket connection (re-seat the bulb with power off), or an aging bulb (HPS and MH bulbs lose efficiency and starting reliability after roughly 10,000 to 12,000 hours of use and should be replaced annually in most setups).
Poor plant growth response
Slow growth despite correct temperatures and light schedule usually points to light intensity being too low. Measure PPFD at canopy level if you have a meter. If you don't have a meter, lower the light by 2 to 3 inches and watch for response over the next 5 to 7 days. If plants stretch toward the light, intensity is too low. If leaf edges curl or bleach appears on the tops, intensity is too high. Adjust from there in small increments.
Upgrade paths worth considering
Once your basic cool tube setup is dialed in, the most impactful upgrades are: adding a temperature and humidity controller so your fan speed adjusts automatically instead of running flat-out all day, upgrading to a digital or electronic dimmable ballast if you're on a magnetic ballast (digital ballasts run quieter, cooler, and more efficiently), and adding a quality carbon filter if odor is an issue. If you eventually want to move away from HID entirely, transitioning to a high-output LED setup eliminates the cool tube and ballast complexity while still giving you full-spectrum control, though the upfront cost is higher. For growers specifically interested in cannabis, seedlings, or succulents, the core ventilation and intensity-management principles from this guide translate directly to those specialized setups as well. A well-planned succulent grow light setup can use the same cooling and ventilation approach to keep plants comfortable while you dial in intensity.
FAQ
Do I need the cool tube fan running 24/7, or can it run only when the light is on?
You can run it only during the light cycle, the tube will stay cooler that way. Running the fan continuously still helps stabilize humidity and reduces warm, humid air stratification, especially in tents. If you choose light-only operation, allow an extra cooldown period (for example 15 to 20 minutes after lights-off) so the tube temperature equalizes before you shut airflow down.
How do I know if my ballast is truly compatible, not just the right wattage?
Match bulb type (HPS vs MH), wattage, and lamp starting method. Pulse-start metal halide lamps require a pulse-start ballast, while some probe-start bulbs will not reliably start on the wrong ballast. Also confirm the ballast’s input voltage (120V vs 240V) and make sure the timer and wiring handle the full current draw, not only the bulb watt rating.
Can I use the same cool tube reflector and just swap bulbs to change wattage (like 400W to 600W)?
Only if the entire system supports that wattage, including the bulb and ballast pairing. A cool tube reflector may be physically rated for a wattage range, but the ballast may not be. If you increase wattage, you also need to revisit airflow sizing, hanging height, and heat management, because the real-world canopy temperature and duct resistance change.
What should I do if canopy temperatures are fine, but plants show light stress or bleaching?
That usually indicates intensity is too high, not heat. Raise the light in small increments (for example 1 to 2 inches), and if you have adjustable wings, re-angle them to spread toward the canopy edges instead of concentrating the center. If you have a PPFD meter, re-check at canopy level because comfortable temperatures can still coincide with excessive PPFD.
Why does my cool tube system reduce temperature, but the tent still feels humid or causes leaf issues?
Cool tubes remove heat at the bulb, but humidity depends on overall air exchange, plant transpiration, and how much moisture your exhaust system is actually carrying out. If humidity climbs, consider improving exhaust effectiveness, adding intake airflow (fresh air source), and verify the fan is not losing performance due to kinked ducting or an undersized fan.
Should I vent the exhaust outside the tent/room, or can I exhaust back into the same space?
For best results, exhaust outside the tent or room so heat and humidity do not recirculate. Recirculating may still lower canopy temperature, but it often undermines humidity control and can make the overall room harder to cool. If you must recirculate, you will need extra temperature and dehumidification management elsewhere.
How important is static pressure when buying an inline fan for a cool tube?
It is critical. Max CFM ratings are measured under ideal conditions with no restriction. A cool tube, flexible duct, bends, and optional carbon filters add resistance, so use the fan’s static pressure spec to estimate real airflow. If your system is underperforming, upgrading to a fan with higher static pressure often fixes it even if the max CFM looks similar.
What causes condensation on the outside of the cool tube glass, and is it dangerous?
Condensation typically happens when incoming air is much colder and more humid than the tube environment, or right after lights-off during cooldown equalization. It is usually not a fire hazard, but it can increase corrosion risk on nearby hardware and suggests airflow source or timing needs adjustment. Warm the intake air slightly or run airflow briefly after lights-off to reduce the temperature differential.
My lamp flickers or takes a long time to strike. What is the fastest troubleshooting order?
First check ballast-bulb match (type and wattage), then inspect and reseat the bulb in the socket with power fully off. Next, check that the wiring connections are tight and that you do not have a damaged igniter component if applicable. Finally, test with a known-good bulb, since bulbs can lose starting reliability after extensive hours.
How do I prevent hot air leaks from the cool tube ports?
Use duct clamps or proper port connections, then seal any gaps with foil tape where applicable. Leaks reduce how much air actually passes through the tube, which can increase canopy temps and noise from turbulence. After installation, run the system and feel for air leaks around joints (with power on and surfaces cool enough to touch safely).
What intake setup should I use so the fan is not pulling from the wrong place?
Provide a dedicated, unrestricted intake path so the fan draws enough cool air to the tube. Ideally, intake air should come from a cooler area than the grow space, and duct the intake if the ambient room is hot. If intake is restricted, the inline fan may still spin, but actual airflow through the tube can drop, causing temperature spikes.
Do I need to measure PPFD, or can I rely on hanging height and plant response?
If you can measure PPFD, it is the most accurate for setting intensity, because different reflectors and bulbs produce different results at the same distance. Without a meter, you can still dial in using a consistent approach: adjust height in small steps and watch for both stress signs (bleaching) and stretch behavior (plants reaching up). Avoid changing multiple variables at once so you can identify the real cause.
Is it normal that exhaust noise increases after I connect carbon filtration?
Yes, carbon filters add resistance, which can make the fan sound louder and can reduce actual duct airflow if the fan is borderline. If noise is much higher and temperatures rise, confirm ducting is straight and sealed, then consider increasing fan static pressure capacity or airflow, rather than only increasing fan speed.
When upgrading a cool tube system, what is the most cost-effective first change?
Usually a temperature and humidity controller (to automate fan speed) provides the biggest practical improvement because it maintains stability and reduces unnecessary airflow noise and energy use. After that, prioritize fan and duct quality and only then consider ballast upgrades, since a poorly matched fan or restricted duct path can prevent the ballast and reflector from performing as intended.
Next Article
Air Cooled Grow Light Setup: Step-by-Step Guide
Step-by-step air cooled grow light setup: choose parts, mount, wire safely, optimize airflow, coverage, temps, and troub
