An air-cooled grow light setup solves one of the most frustrating problems in indoor growing: keeping your plants close enough to a powerful light for good growth without cooking them from the heat that light produces. Here is the short version of how it works, and then we will walk through every step of setting one up correctly.
Air Cooled Grow Light Setup: Step-by-Step Guide
Marcus Tillman
21 Apr 2026
What an air-cooled grow light setup is (and why you need it)
A standard grow light dumps most of its waste heat directly into your grow space. An air-cooled setup puts that light inside a sealed glass-faced hood or reflector that is connected to ducting on both ends. An inline fan pulls air through the hood, picks up the heat the bulb generates, and exhausts it out of the space entirely before it ever touches your canopy. The glass face lets light through to the plants while the airstream carries the heat away. The glass face lets light through to the plants while the airstream carries the heat away, which is a key principle in any succulent grow light setup too.
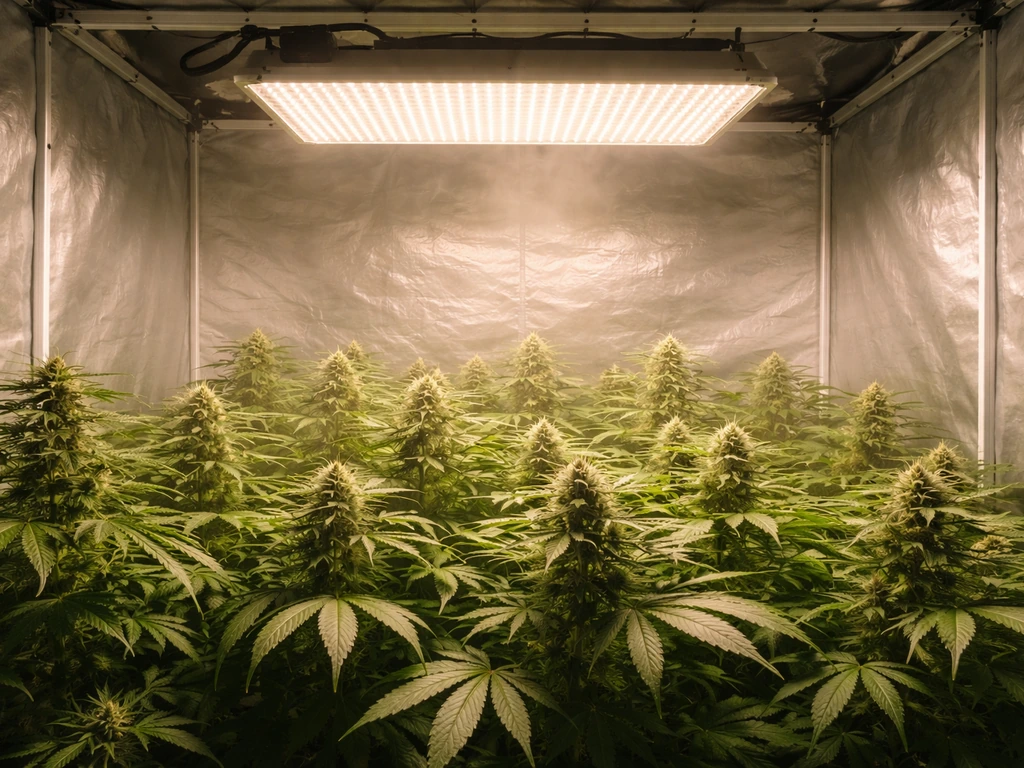
This matters more than people expect. A single 600-watt HID lamp can raise a small tent's ambient temperature by 10 to 15 degrees Fahrenheit without active cooling. With a properly ducted air-cooled hood, estimates from real-world installations put the heat removal contribution of the reflector cooling loop at around 25 to 30 percent of total thermal load, which is often the difference between a tent sitting at 78°F and one sitting at 90°F. That gap directly affects plant health, vapor pressure deficit, and how close you can hang the light.
You need an air-cooled setup any time you are running a high-output HID (HPS or MH) lamp in a confined space, particularly tents or small rooms where ambient heat builds fast. If you are running lower-heat LED fixtures, the need is reduced, but the principle of active air management still applies to your overall tent ventilation strategy. The cool tube grow light setup is a related approach worth knowing about, using a cylindrical tube reflector instead of a classic hood, but the ducting and fan logic is identical. A cool tube grow light setup uses a cylindrical tube reflector, but it still relies on the same ducting and fan airflow logic as standard air-cooled hoods.
Choosing the right air-cooled components for your grow
Before you buy anything, nail down three numbers: your grow space footprint in square feet, your target wattage (which determines how much heat you need to move), and your duct run length (how far the air has to travel from hood to exhaust point). Every component choice flows from those three.
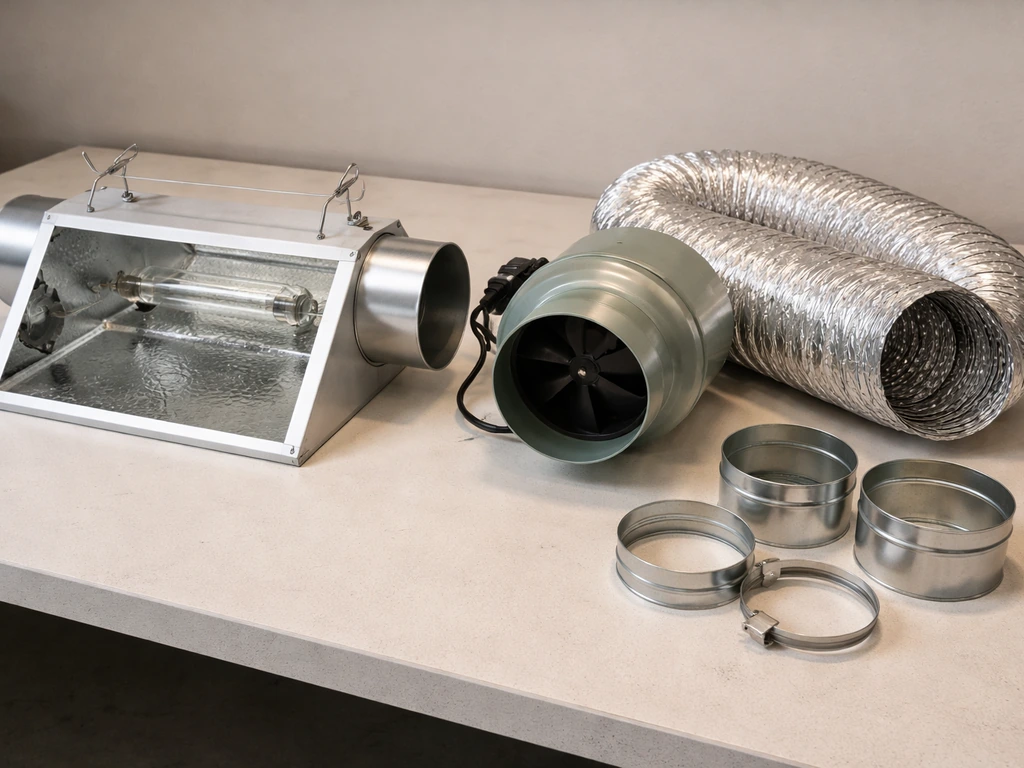
Hood and reflector styles
The most common air-cooled hoods come in three styles. A standard air-cooled wing reflector (also called a cooltube-style hood) has a wide reflective surface and two 6-inch duct ports. A compact air-cooled hood trades some spread for a smaller footprint. A sealed glass-face hood with a removable panel gives you the best thermal isolation because the glass completely separates the light environment from the air-cooling loop. For a 4x4 tent running a 600W or 1000W lamp, a 6-inch ported glass-face hood is the standard starting point. For 2x4 or smaller spaces running up to 400W, a 4-inch ported hood typically handles the load.
Inline fans
Your inline fan is the heart of the system. Size it by CFM (cubic feet per minute) relative to your duct diameter and run length. For a 6-inch duct cooling a 1000W lamp with a 10-foot duct run and one or two elbows, a fan rated at 400 to 500 CFM is appropriate. OSHA's ventilation guidance makes a useful practical point here: duct length and the number of elbows both reduce effective airflow, so always factor those in when sizing. A fan with a built-in speed controller, such as the AC Infinity Cloudline series with its 10-speed controller and 746 Pa static pressure rating, gives you room to dial back noise during lights-off and ramp up during peak heat. Variable speed control is worth every penny on a long-term grow.
Ducting and connectors
Use 4-inch aluminum flex duct for hoods up to 400W and 6-inch for 600W and above. Keep runs as short and straight as possible. Each 90-degree elbow costs you roughly 15 to 20 percent of fan efficiency. Rigid aluminum duct sections are quieter and more efficient than flex for long runs, but flex is fine for most home setups under 15 feet total. Seal every connection with foil HVAC tape, not duct tape, which fails at elevated temperatures over time.
Quick component comparison
| Component | 4x4 Tent / Up to 600W | 5x5 Tent / 600–1000W |
|---|---|---|
| Hood duct port size | 4–6 inch | 6 inch |
| Inline fan CFM target | 200–350 CFM | 400–500 CFM |
| Duct diameter | 4–6 inch | 6 inch |
| Carbon filter (optional) | 4 inch x 12 inch | 6 inch x 24 inch |
| Speed controller | Recommended | Required |
Planning placement and canopy height for effective coverage
Light coverage is determined by three things: the reflector's spread angle, the hang height above the canopy, and the wattage. Get the hang height wrong and you either bleach the tops of your plants or waste most of the light on the floor and walls. Here are the starting hang heights that match what most growers actually see in practice:
| Growth Stage | Target PPFD (µmol/m²/s) | Starting Hang Height Above Canopy |
|---|---|---|
| Propagation / Seedlings | 100–300 | 18–24 inches |
| Vegetative | 300–600 | 12–18 inches |
| Flowering / Fruiting | 700–1,200 | 8–14 inches |
These numbers assume a 600W HPS or equivalent output. If you are running a 1000W lamp, add 4 to 6 inches to each range as a starting point, then adjust based on actual canopy temperature. For seedlings specifically, the 18-hour light cycle at 150 to 200 µmol/m²/s is a well-established starting point that prevents stretching without stressing young plants.
For coverage footprint, a 600W lamp with a quality wide-body reflector covers roughly a 4x4 foot area evenly. A 1000W lamp covers 5x5 feet well. If your canopy is larger than that, you need either a second light or a light mover. Do not try to stretch a single lamp over a 5x5 or 6x6 with one fixture; the edges will be dramatically underpowered. If you are setting up a seedling-specific area, a dedicated lower-wattage setup or T5 fluorescent bank is more efficient at that stage than trying to dim a large HID lamp. A seedling grow light setup is usually lower-intensity and positioned closer to the tray to prevent stretching while keeping heat in check seedling-specific area.
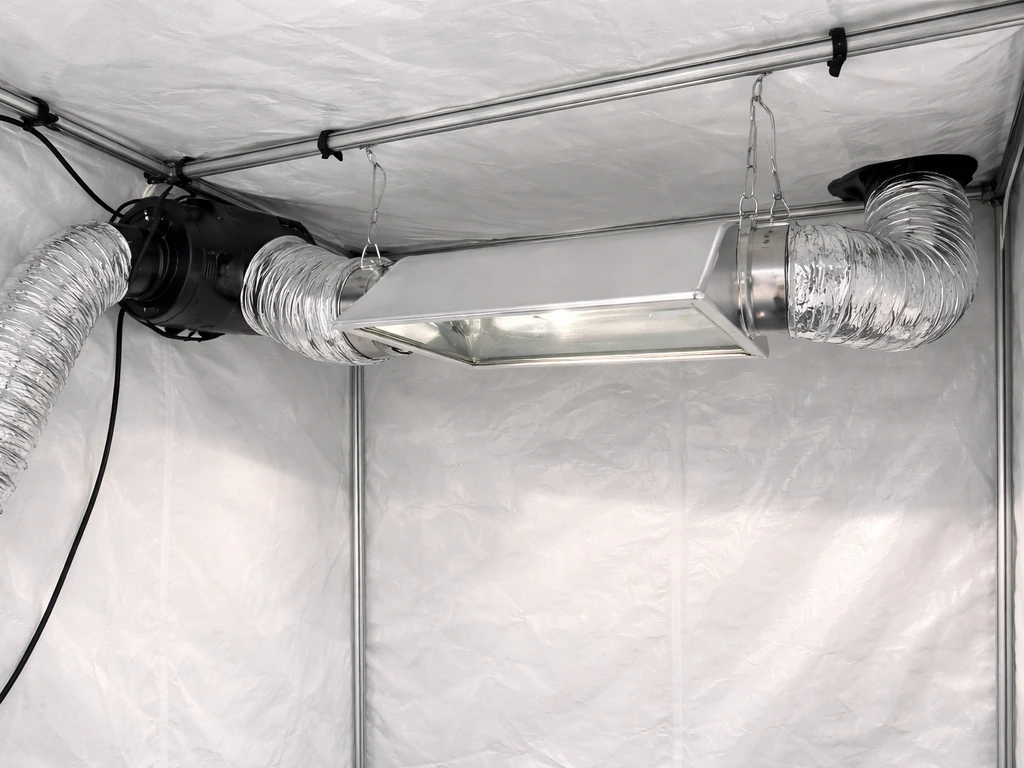
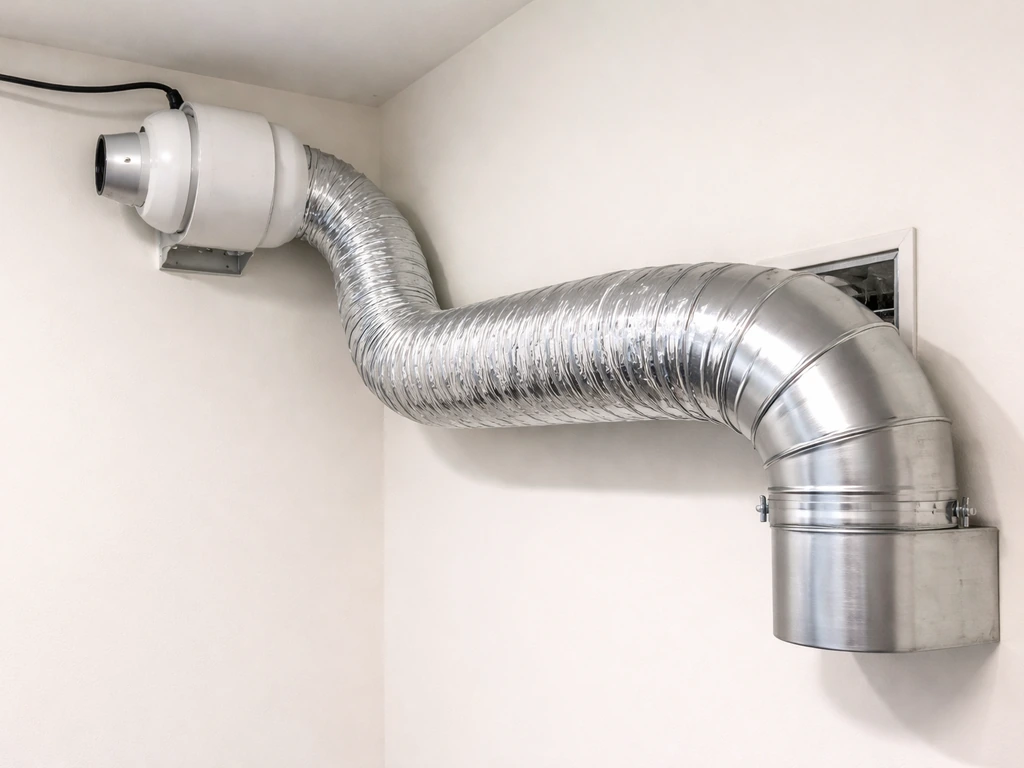
Installing and mounting: hood, ducting, and fan placement
This is where most beginners make mistakes, so work through this in order rather than piecing it together as you go.
- Hang the hood first. Use heavy-duty ratchet hangers rated for at least twice the weight of your fixture. Most air-cooled hoods with a 600W or 1000W lamp weigh 15 to 25 pounds total. Attach hanger hooks to the tent's top crossbars, not to the ducting connection points.
- Attach ducting to the hood's intake port (the port air enters). Run a straight section horizontally toward the intake side of your tent, or directly toward your passive intake vent. Keep this section as short as possible.
- Run ducting from the hood's exhaust port toward your inline fan. Place the fan near the exhaust vent of your tent, not next to the hood. Pulling air through the hood (fan at the exhaust end) is more efficient than pushing it through.
- Connect the fan's exhaust side to your exit ducting, which routes outside the tent. If you are adding a carbon filter, place it on the exhaust line after the fan, not between the hood and fan.
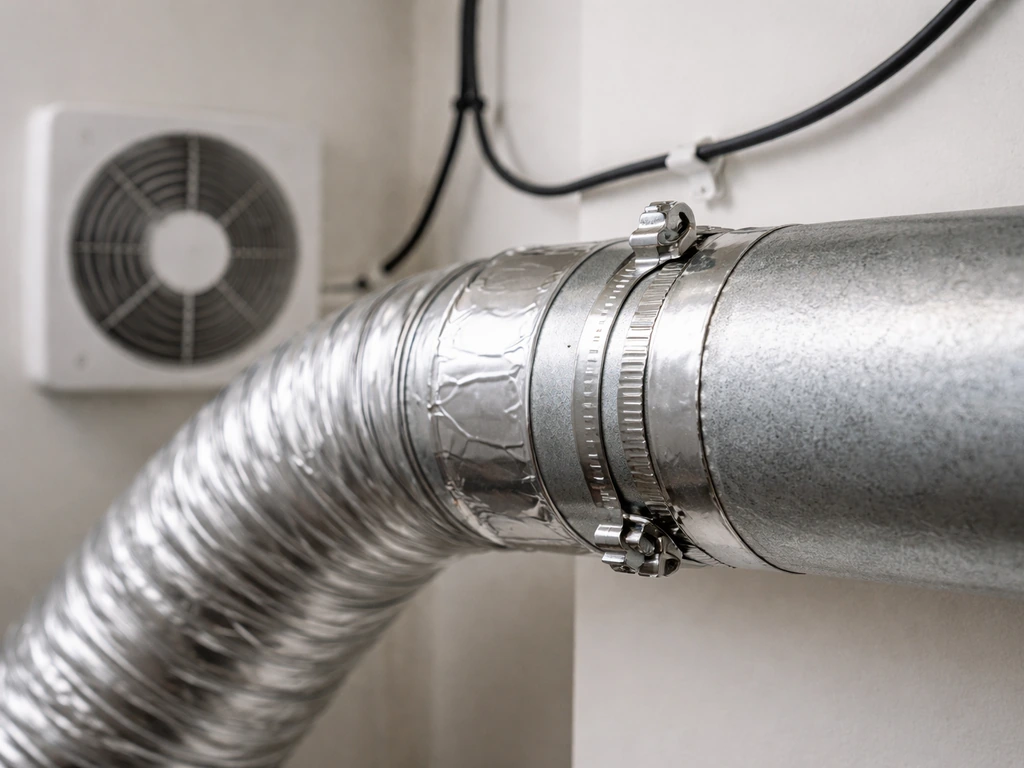
- Secure all duct connections with foil HVAC tape and a hose clamp where possible. A loose connection at the hood port is the number-one cause of heat leaking back into the grow space.
- Plug the fan into your speed controller. Run a quick test before hanging the light: hold your hand near each duct joint and feel for air leaks while the fan runs at full speed.
- Install the lamp in the hood only after all ducting is secured, so you are not working around a hot or fragile bulb during the physical setup.
One thing worth repeating: always pull air through the hood rather than push it. Pushing air (fan before the hood) reduces static pressure efficiency and can cause back-pressure issues that make your fan work harder and run louder. The fan belongs at the exhaust end of the run.
Airflow and temperature control: venting out vs recirculating
Once your hood cooling loop is running, you still need to manage the ambient air inside the tent separately. The hood loop removes heat from the lamp, but your ballast, your plants' transpiration, and any supplemental lighting all still add heat and humidity to the tent environment. You need a second airflow loop for that.
The standard approach is a passive intake low on the tent (bottom vents left open) with a second inline fan exhausting through a carbon filter out the top. Hot air rises, so exhausting from the top is most efficient. The AC Infinity CloudLab tent system formalizes this by separating the carbon filter exhaust fan from the main hood cooling fan, often on separate controller ports so you can run them at different speeds or link them to temperature triggers.
Venting outdoors
If you can run exhaust ducting through a wall, window, or ceiling, do it. Exhausting hot air completely out of the room keeps your ambient room temperature lower, which makes the tent easier to cool. This is the preferred option for anyone in a basement or utility room with an exterior wall accessible. Dimlux's extraction guidelines make a firm point on this: the air temperature inside the reflector duct must not exceed 60°C (140°F), which means if your exhaust is backing up or recirculating hot air, you risk both equipment damage and fire hazard.
Recirculating within a room
If outdoor venting is not possible, you can exhaust tent air back into the room and use a room air conditioner to manage temperature. This works, but it adds cost and complexity. You will need an A/C unit sized for your total heat output (the lamp's wattage is your starting estimate in BTUs, approximately 3.41 BTU per watt). A 600W lamp produces roughly 2,050 BTU/hour of heat, so a 5,000 BTU window unit handles one or two such lamps. If you are also considering an LED grow setup, the recirculation math becomes more forgiving because modern LEDs generate significantly less radiant heat.
Target temperature and humidity ranges
- Canopy temperature (leaf surface): 75–82°F during lights-on
- Air temperature at canopy level: 72–80°F
- Lights-off air temperature: 60–70°F (no more than 10–15°F drop from lights-on)
- Relative humidity: 60–70% for seedlings, 40–60% for vegetative, 40–50% for flowering
Power, safety, and airflow troubleshooting checklist
Before your first powered run with everything connected, go through this checklist. Most problems with air-cooled setups show up in the first 48 hours of operation when connections loosen and heat cycles stress the system.
- Verify all duct connections are foil-taped and hose-clamped. Run the fan at full speed and check every joint by feel.
- Confirm the fan pulls air through the hood in the correct direction. The airflow arrow on the fan housing points toward the exhaust duct, away from the hood.
- Check that the hood's glass face is installed and seated flush. Even a small gap lets heat escape into the grow space.
- Confirm the ballast (for HID) is placed outside the tent or in a well-ventilated position. Ballasts produce significant heat and should not sit on the tent floor without airflow around them.
- Verify that your electrical circuit can handle the load: a 1000W HPS ballast draws roughly 9.5 amps at 120V, so it needs its own 15-amp circuit with nothing else on it. A 600W ballast draws about 6 amps.
- Test your temperature sensors. Place a thermometer at canopy level and let the system run for 30 minutes before introducing plants. If canopy temperature exceeds 82°F, raise the hood or increase fan speed before proceeding.
- Listen for vibration noise from the fan and ducting. Excess noise usually means a loose hanger clamp on the fan, an unsupported duct section vibrating against the tent wall, or a fan speed that needs to be reduced slightly.
- If airflow feels weak at the hood outlet, check for kinked flex duct, too many elbows, or a duct that is too long. OSHA's ventilation guidance is directly applicable here: long runs and multiple bends compound resistance and reduce effective CFM significantly.
- Check for heat hot spots by moving a handheld thermometer in a grid pattern 2 inches above your canopy. Readings above 85°F in any zone indicate the hood is too close or airflow is insufficient in that area.
- If using a 0-10V dimming controller on an LED or compatible ballast, confirm the two low-voltage control wires are connected separately from the AC power leads, and verify the driver's minimum dim level so you do not accidentally bottom out below its operating threshold.
Common problems and fast fixes
| Problem | Most Likely Cause | Fix |
|---|---|---|
| Canopy temp above 85°F | Fan too slow or duct kinked | Increase fan speed; straighten or shorten duct |
| Loud vibration from ducting | Unsupported duct or loose clamp | Add duct hanger midspan; tighten clamp |
| Heat leaking into tent at hood connection | Loose duct connection or no foil tape | Reseal with foil HVAC tape and clamp |
| Weak airflow even on max fan speed | Too many elbows or undersized duct | Reduce elbow count; upsize to 6-inch duct |
| Humidity spiking during lights-off | Exhaust fan off during dark period | Keep exhaust fan running at low speed all 24 hours |
| Uneven canopy coverage (bright center, dim edges) | Hood too close or too small a reflector | Raise hood 4–6 inches; verify reflector coverage spec |
Dialing in light intensity and schedules for every stage
Once your physical setup is stable and temperatures are in range, the last step is matching your light schedule and intensity to what your plants actually need at each stage. Getting this wrong is one of the most common reasons for slow growth, stretching, or tip burn, and it is also one of the easiest things to fix once you know the targets.
Seedlings and clones
Start seedlings and fresh clones at a PPFD of 100 to 300 µmol/m²/s with the light running 18 hours on and 6 hours off. At this stage, the seedling's root system cannot support aggressive photosynthesis, so more light just causes stress. Keep the hood at 18 to 24 inches above the tray. If you see seedlings stretching toward the light (etiolation), lower the light or increase intensity slightly. If you see the cotyledons cupping downward, raise the light or reduce intensity. This same guidance applies whether you are working on a cannabis grow light setup or starting tomatoes and herbs. This same approach works well as a cannabis grow light setup too, as long as you keep the PPFD and hood height appropriate for seedlings. For a dedicated seedling grow light setup, lower-output T5 or LED bars at these PPFD levels are often more practical than running a full HID at extreme hang heights.
Vegetative growth
Once plants have established root systems and are actively putting on foliage, step intensity up to 300 to 600 µmol/m²/s. Most fast-growing vegetables and cannabis-type plants do well at 18 hours on and 6 hours off during this phase. Keep the hood at 12 to 18 inches above the top of the canopy and raise it as plants grow taller rather than waiting until heat stress becomes visible. A good habit is to check canopy height every 2 days and adjust the hood accordingly.
Flowering and fruiting
Flowering plants need significantly more light energy: 700 to 1,200 µmol/m²/s depending on species. Most flowering crops also require a photoperiod shift to 12 hours on and 12 hours off to trigger and sustain bloom. At this stage your air-cooled setup is working hardest because you are running maximum intensity and the nights are longer, meaning the temperature swing between lights-on and lights-off increases. Keep that swing under 15°F to avoid stress. Run your exhaust fan at a low speed during the dark period to maintain humidity control even when the main cooling demand drops.
Light schedule summary
| Stage | PPFD Target (µmol/m²/s) | Light Hours On | Hood Height Above Canopy |
|---|---|---|---|
| Seedling / Clone | 100–300 | 18 hours | 18–24 inches |
| Vegetative | 300–600 | 18 hours | 12–18 inches |
| Flowering / Fruiting | 700–1,200 | 12 hours | 8–14 inches |
One practical tip: if your ballast or LED driver supports dimming, use it. Running at 75 percent power during the first week of each new stage and ramping up to full over 5 to 7 days gives plants time to acclimate without shock. It also extends lamp and driver life. For 0-10V dimmable drivers, just remember that the control signal runs on separate low-voltage wires from the main power, and always check the driver's minimum dim threshold before turning it all the way down.
With your ducting sealed, your fan sized and pulling the right direction, your hang heights matched to growth stage, and your schedules dialed in, you have the core of a <a data-article-id="98F62A34-982E-4251-A3C6-900FA9AE8468">reliable air-cooled grow light setup</a>. The system is not complicated once you understand the logic: remove heat at the source before it reaches the plants, keep airflow continuous, and adjust intensity as plants grow rather than setting and forgetting. Check canopy temperature weekly, re-tape any duct joints that show signs of loosening every few months, and replace the lamp per manufacturer intervals (typically every 10,000 hours for HPS). That is the whole maintenance picture.
FAQ
How do I know my air-cooled setup is sized correctly before I buy, and not just “close”?
Use duct diameter and run length to estimate fan static pressure needs, then sanity-check with an airflow target (CFM) for your hood and elbows. If you can, model the total equivalent duct length, and aim for enough fan headroom to keep canopy temperature stable when the carbon filter is installed.
What happens if I oversize the inline fan for my air-cooled grow light setup?
You can usually run an oversized fan slower, but watch that you do not bypass useful control. If the fan is too high at your chosen speed, your hood can create excessive air turbulence that cools the bulb area unevenly, which may reduce lamp efficiency and make temperatures harder to stabilize.
Should I use more elbows to “fit” the ducting, or is there a better layout?
Minimize elbows because each one reduces effective airflow, roughly 15 to 20 percent of fan efficiency. Prefer gradual bends or longer-radius fittings, keep the run straight when possible, and place the exhaust fan near the highest-heat section to reduce back-pressure.
Can I daisy-chain ducting between multiple hoods with one air-cooled fan?
It is usually not ideal. Mixing airflow paths can cause one hood to steal CFM from another, leading to uneven temperatures. If you must combine, use a manifold with balancing dampers per hood, and measure canopy temps under each reflector to confirm performance.
How do I measure whether the air-cooled hood is actually preventing heat stress?
Do not rely on room temperature alone. Measure canopy surface temperature (or a near-canopy air temp) at several points under the reflector and compare lights-on versus lights-off. If canopy temps climb quickly during lights-on, you likely need more CFM, shorter ducting, or fewer restrictions.
Do I need a carbon filter if I am only air-cooling the light and not dealing with odor?
If odor control is not required, you can omit it, which often improves airflow and cooling. If odor control is required, remember the carbon filter adds resistance, so you may need a higher CFM or more static pressure than you would for hood cooling alone.
What’s the safest way to position the exhaust fan relative to the tent and outside venting?
Exhausting from the top is generally most efficient, but the key is keeping duct runs from sagging and preventing heat recirculation. Seal all joints, keep the duct sloped where appropriate so condensation does not pool, and avoid any place where hot air could flow back toward the tent.
Can I use duct tape instead of foil HVAC tape on my air-cooled grow light setup?
Duct tape tends to fail over time with heat cycling and elevated temperatures. Use foil HVAC tape for duct connections, then recheck joints after the first few heat cycles and again periodically, since micro-leaks can reduce CFM and raise canopy temps.
How do I keep the hood loop from overheating when my exhaust backs up or my room is hot?
Treat exhaust restrictions as a real risk. Make sure the exterior vent path is open, protect against blocked intakes, and consider adding an external thermometer or temperature switch. Also verify you are not recirculating hot air back into the tent or duct intake.
What should I do if my seedlings are stretching even though I set a reasonable PPFD?
Confirm the actual light intensity at the canopy and confirm hang height. Stretching can also come from photoperiod mismatch, airflow that is too weak (higher humidity and lower transpiration), or nutrient issues. Start by raising the intensity slightly and lowering the hood, but avoid overheating the tray.
Is it okay to run the same hang height and intensity for veg and flowering?
Usually no. Flowering typically needs higher PPFD and often longer or different temperature management because the lights-off period changes humidity and heat swing. Adjust hang height upward as plants grow, then fine-tune intensity stage by stage based on canopy temperature and plant response.
How do I maintain stable humidity and temperature without making the setup too complex?
Use two loops: one dedicated to removing heat from the lamp hood, and a separate tent exhaust loop for humidity control. During lights-off, reduce exhaust speed to maintain humidity, but keep enough airflow that condensation does not form on ducting or the tent interior.
When should I adjust intensity using a dimmable ballast or driver, and what mistake should I avoid?
Ramp power gradually when changing growth stages, for example over several days, instead of making a sudden jump. Avoid turning dimmers all the way down without checking the driver’s minimum dim threshold, because below that point output can become unstable or the driver may not behave as expected.
How often should I replace the lamp in an air-cooled grow light setup, and what if I use a mix of bulbs?
Follow the manufacturer interval for HPS and replace based on rated hours, not just when it “stops working.” If you run different bulbs on different schedules, track which reflector received which lamp, because output can drift differently and create uneven canopy performance.
What maintenance can prevent performance drops after several months?
Most performance loss comes from airflow leaks, clogged or failing carbon, and duct sagging. Re-tape any duct joints that loosen, inspect the inline fan for dust buildup, and check carbon filter condition by monitoring airflow and comparing canopy temperatures at the same intensity.
Next Article
Cannabis Grow Light Setup: Step by Step Indoor Guide
Step-by-step cannabis grow light setup: choose LED wattage, mount height, placement, intensity schedule, and safe heat v