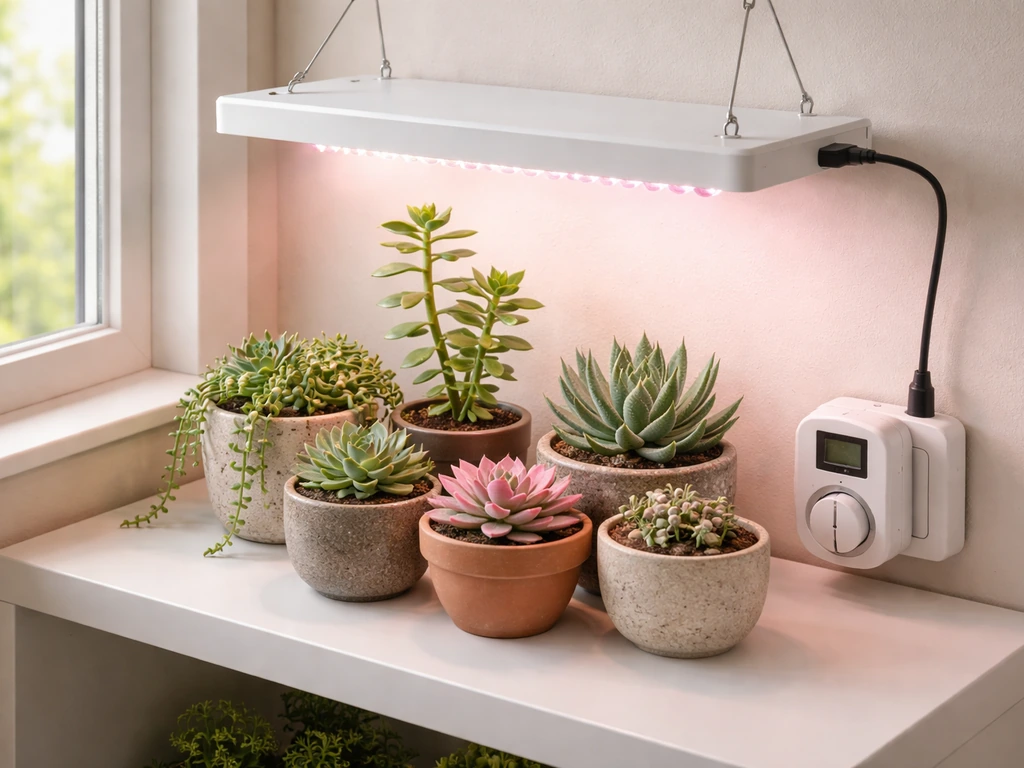
Setting up a cannabis grow light correctly from day one saves you weeks of troubleshooting and protects plants that took real time and money to grow. UCSF’s DLI notes that PPFD (photosynthetic photon flux density) is the key metric for light intensity relevant to photosynthesis and is often more useful than relying on bulb wattage blank" rel="noopener noreferrer">light intensity decisions are often better guided by PPFD than by bulb “wattage” alone. The short answer: for most home grows in a 2x4 or 4x4 tent, a quality LED in the 200–400 watt range (actual draw, not 'equivalent') hung at the right height, dialed to the right intensity, and run on a proper schedule will get you strong, healthy plants through veg and flower. The rest of this guide walks you through every step of that process, from picking the light to adjusting it week by week as your canopy fills out. If you want to fine-tune that process, a succulent grow light setup is a useful comparison point for how distance, intensity, and schedules affect plant health.
Cannabis Grow Light Setup: Step by Step Indoor Guide

Pick the right grow light for your space
LED grow lights are the go-to choice for the vast majority of home cannabis growers right now, and for good reason. They run cooler than HPS or CMH, draw less power for the same output, and modern quantum board or bar-style LEDs produce a full spectrum that works across both veg and flower. High-pressure sodium (HPS) still produces excellent results and is worth considering if you already have the equipment or your grow space runs cold, since HPS adds meaningful heat. CMH (ceramic metal halide) is a solid middle-ground option for small tents because it delivers a broad spectrum in a single compact unit. If you are still deciding between heat-generating systems and cooler options, an air cooled grow light setup can be a useful adjacent comparison to HPS and CMH in small tents. If you are still deciding between heat-generating systems and cooler options, a cool tube grow light setup can be a useful adjacent comparison to HPS and CMH in small tents. For most beginners setting up today, a quality LED is the simplest and most forgiving starting point.
When sizing a light, ignore the inflated 'equivalent wattage' numbers on the box and focus on actual power draw at the wall. A reliable rule of thumb for cannabis is 30–50 actual watts per square foot of canopy. That means a 2x4 tent (8 sq ft) needs roughly 240–400 actual watts, a 4x4 tent (16 sq ft) needs 480–800 actual watts, and a 2x2 tent (4 sq ft) is well covered by a 120–200 watt fixture. For a 4x4, a single 480–600 watt quantum board LED or two 240–300 watt bars side by side will both work well. If you are running a smaller seedling or clone station, you can get away with far less intensity since young plants do not need full power.
| Light Type | Actual Watts Needed (4x4) | Heat Output | Spectrum | Best For |
|---|---|---|---|---|
| LED (Quantum Board/Bar) | 480–600W | Low–Medium | Full spectrum | Most grows, beginners, heat-sensitive spaces |
| HPS | 600–1000W | High | Red-heavy, good for flower | Cold rooms, growers with existing gear |
| CMH / LEC | 315–630W | Medium | Broad, natural-ish | Small tents, veg-to-flower single light setups |
| T5 / CFL | Under 200W | Very low | Blue-heavy | Seedlings, clones, tight spaces only |
If your budget is tight, a mid-range LED from a reputable brand like Mars Hydro, Spider Farmer, or HLG will serve you better than a cheap blurple panel with inflated specs. Look for Samsung LM301 or LM281 diodes, a dimmable driver, and a measured efficacy of at least 2.0 µmol/J. Those numbers indicate a light that actually performs as advertised.
Measure your grow area and plan your layout
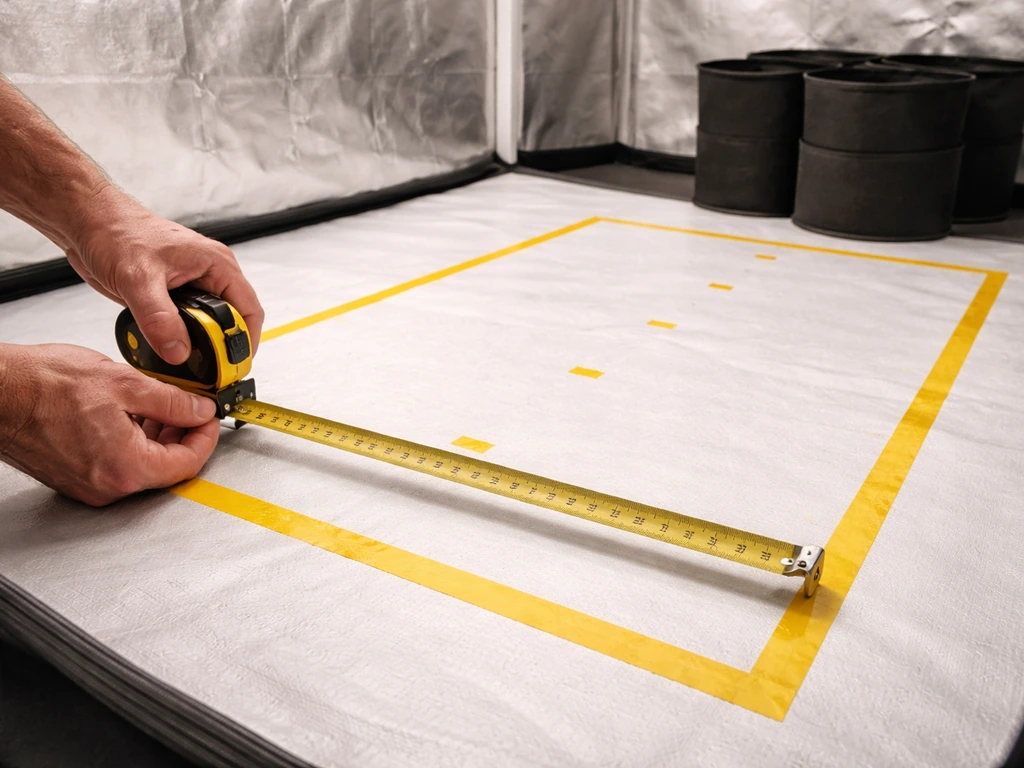
Before you hang anything, tape out your actual grow footprint on the floor and figure out how many plants fit. Cannabis plants in 5-gallon containers need roughly 2–4 square feet each when trained (like with LST or a scrog net) or up to 6 square feet each if grown untopped in larger pots. In a 4x4 tent you can comfortably fit 4 plants in 5-gallon pots with room to work. In a 2x4 you are realistically looking at 2–3 plants. Do not overcrowd: plants competing for light develop uneven canopies that are hard to manage and prone to mold.
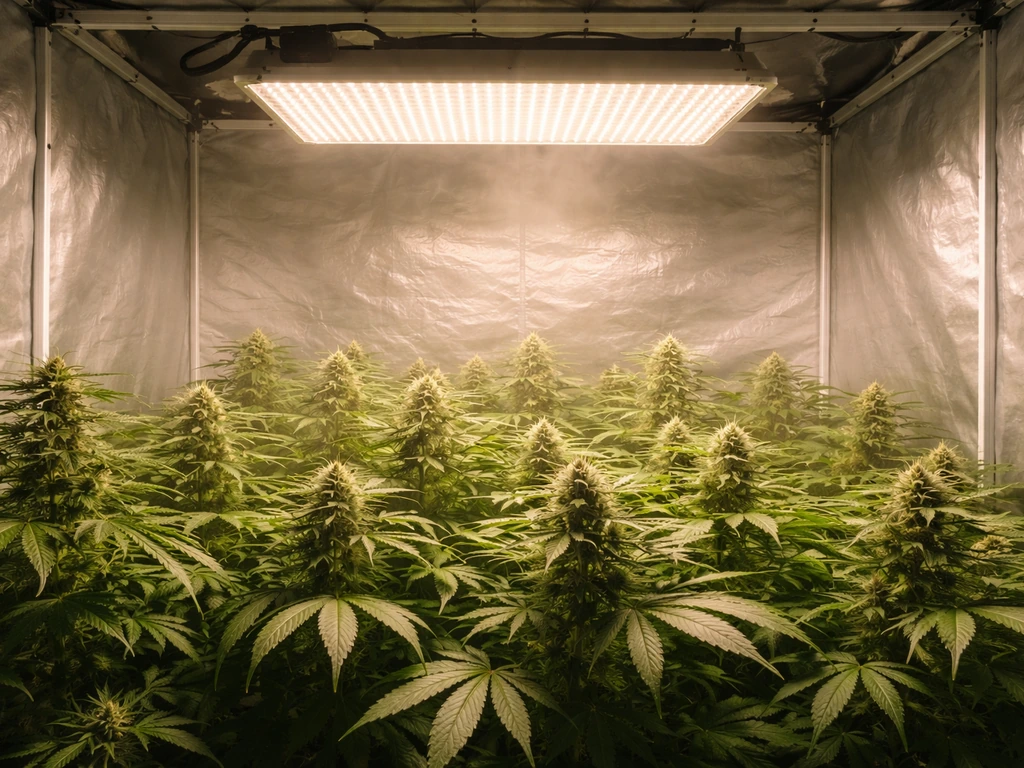
Most single LED fixtures are designed to cover a specific footprint at a stated height. Check the manufacturer's recommended coverage area, but treat that number as optimistic. A light rated for a 4x4 flowering footprint is usually right for exactly a 4x4 and no more. If your tent is a 5x5 or larger, plan for two lights positioned symmetrically rather than trying to stretch one. Mark the center of your tent on the ceiling and plan to hang the light centered over the canopy, not offset toward one wall. Uneven placement is one of the most common causes of hotspots and uneven growth.
Mounting and hanging height: get this right first
Most grow tents come with a crossbar frame rated for 30–60 lbs depending on the brand. Check that rating before you hang a heavy quantum board, since a dropped light can destroy a crop. Use adjustable rope ratchets (the small pulley hangers that come with most lights) and hang the fixture from the tent's top crossbar. These let you raise and lower the light in seconds without untying anything, which matters because you will be adjusting height regularly as plants grow.
Starting height depends on your light type and intensity. For LEDs at full power, the general starting points are 18–24 inches above seedlings, 16–24 inches during veg, and 14–18 inches during flower (as a minimum, not a target, since some lights should stay higher). For a seedling grow light setup, start at lower intensity and hang the LED at the correct height for young plants. For HPS at 600W, start at 24 inches during veg and no closer than 18–20 inches in flower to avoid heat stress. CMH fixtures typically need 18–24 inches in veg and 12–18 inches in flower. If you have a dimmable LED, you can actually hang it lower and reduce intensity rather than raising it sky-high, which gives you more even coverage across the canopy.
One practical check: hold your hand palm-down at canopy level directly under the light. If you feel significant heat within 5–10 seconds, the light is too close or too intense for that stage. It sounds overly simple but it works as a quick gut-check between more careful measurements.
Set and adjust intensity safely
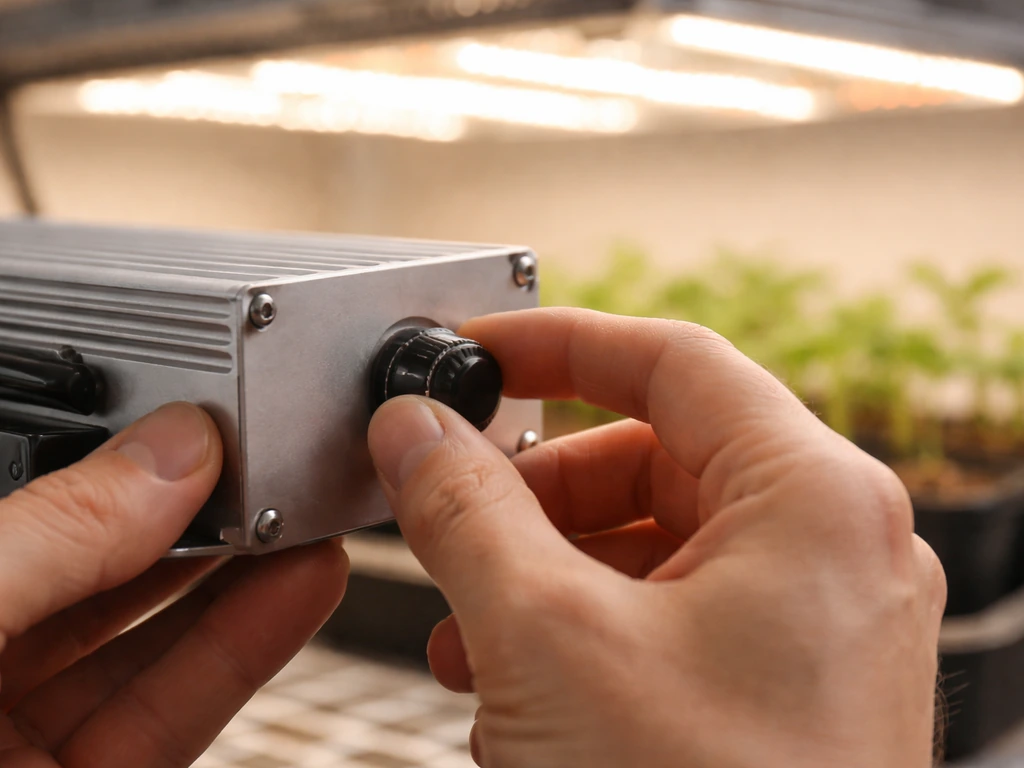
Most modern LEDs have a dimmer knob on the driver, which is one of the most useful features you can have. Do not start seedlings or new transplants at 100% power. Start at 40–50% intensity and raise by 10–15% every 3–5 days as plants adapt. Young plants in weeks 1–2 of veg do not need blinding intensity. Ramping up slowly reduces light stress and is especially important when plants come from a low-light environment like a windowsill.
Once in mid-to-late veg, you can push most LEDs to 75–100% at the recommended hanging height. During flower, run at full power once plants are well established. The key is watching the plants. The first signs that intensity is too high are light green or yellowing leaves at the very top of the plant (closest to the light), slightly curled leaf edges, and leaves that seem to be pulling away from the light source. Catch it early and raise the light 2–4 inches, or reduce the dimmer by 15–20%. Plants usually recover in 1–2 days if caught before the damage progresses.
Lighting schedules for cannabis: veg vs flower
Cannabis is a photoperiod plant, meaning it transitions from vegetative growth to flowering based on the hours of light it receives per day. This is the most important scheduling concept to understand. Get a mechanical or digital outlet timer and set it before you plug in your light. Forgetting to set a timer is the most common beginner mistake, and it will either stall flowering or create hermaphrodite issues if the schedule is inconsistent.
| Growth Stage | Light Schedule | Darkness | Duration |
|---|---|---|---|
| Seedling | 18 hours on / 6 hours off | 6 hours | 2–3 weeks |
| Vegetative | 18 hours on / 6 hours off | 6 hours | 4–8 weeks (grower's choice) |
| Flower (trigger) | 12 hours on / 12 hours off | 12 hours uninterrupted | 8–11 weeks depending on strain |
| Auto-flowering strains | 18–20 hours on regardless of stage | 4–6 hours | Full cycle, 70–90 days total |
The 18/6 veg schedule is the standard default. Some growers run 20/4 for faster growth, but 18/6 is a reliable starting point that gives the plant recovery time and keeps electricity costs reasonable. To trigger flowering, switch to 12/12. The 12 hours of darkness must be completely uninterrupted. Even a brief light leak from a phone screen, a timer indicator LED, or a gap in the tent zipper can disrupt flowering and stress the plant. Check your tent for light leaks by zipping it shut in the daytime and spending 30 seconds inside with your eyes adjusted.
Schedule your lights-on period during the coolest part of the day if your grow space runs warm (more on this in the next section). If heat is not an issue, running lights during the day is fine and makes it easier to check on plants during your normal routine. Use the timer's clock setting to match lights-on to whenever you want, just keep the schedule consistent day after day. A consistent LED grow setup, including the schedule you set, is one of the easiest ways to avoid stress and keep growth predictable.
Heat, airflow, and power safety
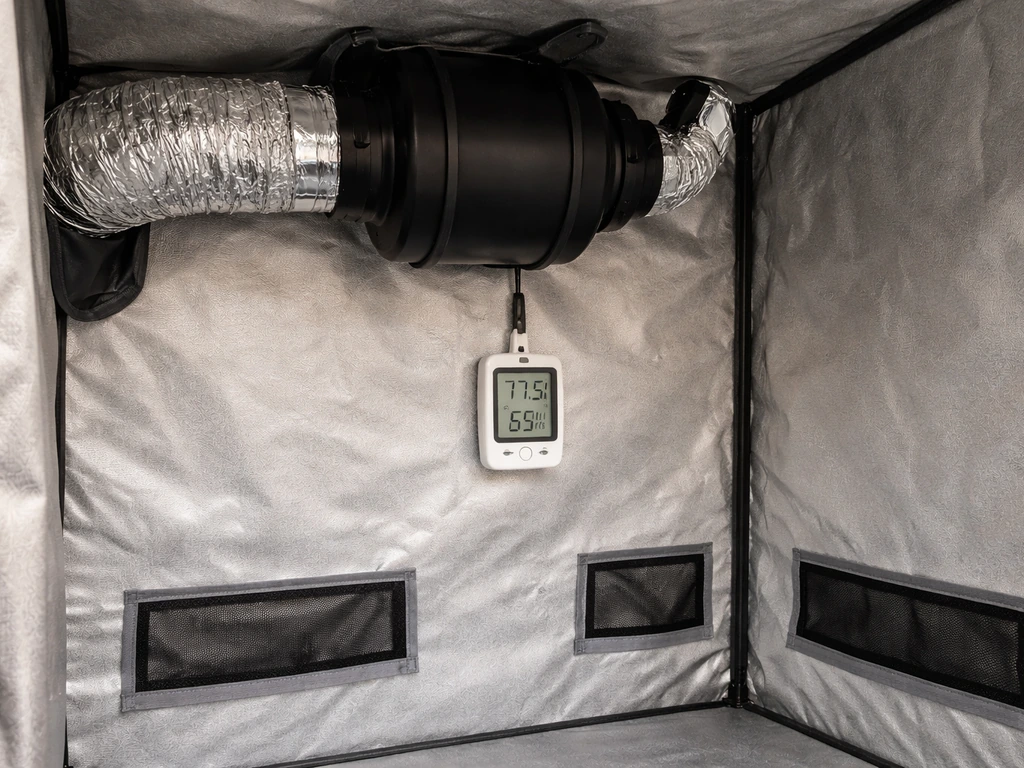
Cannabis grows best at 70–85°F (21–29°C) during the lights-on period. During lights-off, temperatures can drop 10–15°F without causing harm. Above 85°F, growth slows, terpenes degrade, and plants become more susceptible to pests and disease. If your tent is running hot, the first thing to address is airflow, not the light itself. An inline fan drawing air through a carbon filter and exhausting it out of the tent is the most effective solution. Size your inline fan to your tent: a 4-inch fan handles tents up to 2x4, and a 6-inch fan covers most 4x4 and 5x5 tents comfortably.
Passive intake vents at the bottom of the tent bring in fresh air as the inline fan exhausts from the top. Cannabis loves fresh air and CO2, so a complete air exchange every 1–3 minutes is the target. For a 4x4x6.5 tent (roughly 104 cubic feet), a 6-inch fan rated at 200 CFM will exchange air about every 30 seconds, giving you plenty of headroom even if the fan is not running at full speed. Run the fan 24 hours a day during both lights-on and lights-off cycles.
On the electrical side: do not daisy-chain power strips. Plug grow lights directly into a wall outlet or a dedicated surge-protected power strip that is rated for the combined draw of your equipment. A 600-watt LED plus a fan plus a timer plus a dehumidifier on one 15-amp circuit is pushing it. Calculate your total wattage and stay under 80% of the circuit's capacity (12 amps on a 15-amp circuit, or 1,440 watts). If you are running a full 4x4 setup with multiple devices, use a dedicated 20-amp circuit if possible. Never cover or enclose the light's driver, which needs open air to dissipate heat.
Troubleshooting common setup problems
Stretching (plants reaching toward the light)
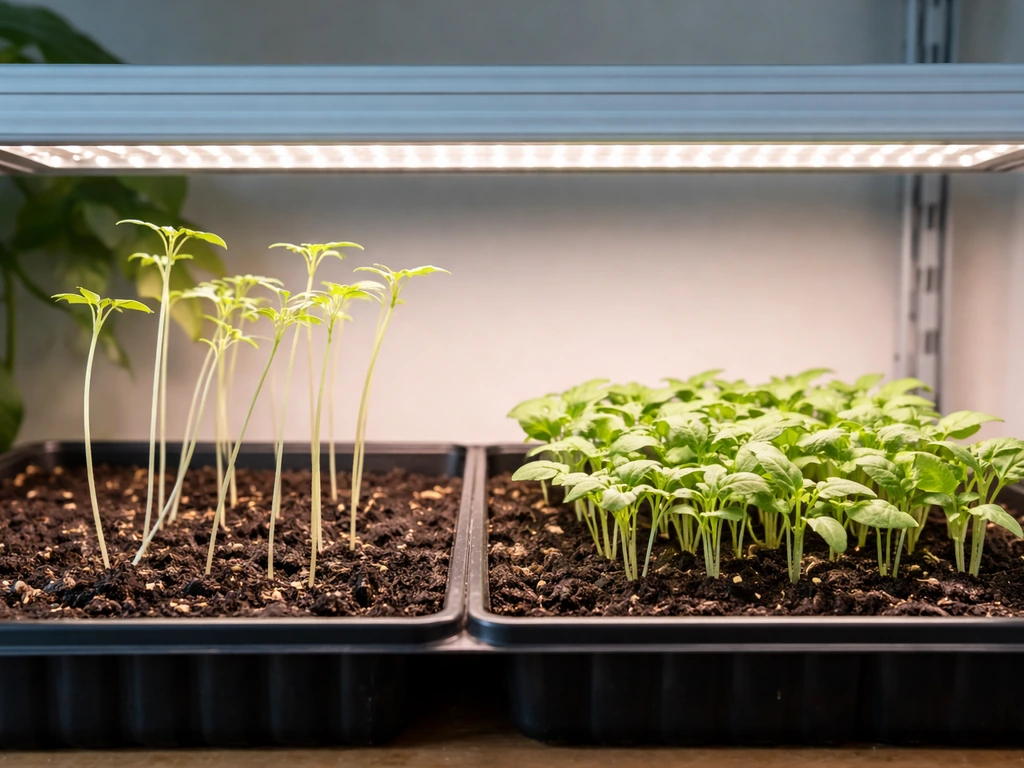
If your seedlings or young veg plants are growing tall and spindly with long gaps between nodes, the light is too far away, too dim, or both. Lower the light 4–6 inches and/or increase the dimmer by 15–20%. Stretching is most common in the first two weeks. Plants that stretch early are harder to train later and are structurally weaker at the stem.
Light bleaching and burn (yellowing at the top)
Leaf bleaching happens when the light is kept too close to the canopy for too long. The leaves closest to the light, usually the top bud sites and surrounding fan leaves, turn pale yellow or white. This is different from a nutrient deficiency because the discoloration starts at the very top of the plant, directly under the light, rather than at the bottom or in a random pattern. Light burn shows up as yellowing at the top of the plant when intensity or proximity is too high. If you see this, raise the light 4–6 inches immediately and do not lower it back until new growth looks healthy. Bleached tissue does not recover, but unaffected growth below it will continue normally.
Hotspots and uneven canopy
If plants directly under the center of the light are growing faster or showing stress while plants near the edges look healthy (or vice versa), you have an uneven intensity distribution. Check that the light is centered over the canopy. For tents with reflective walls, moving the light slightly higher often smooths out the coverage pattern because the beam spreads more before hitting the canopy. If you are running one light in a space that is too large for it, the corners will always be dim. The fix is either a second light, a reflective divider, or accepting a smaller effective grow area.
Flickering, driver issues, and timer problems
Flickering in an LED fixture usually points to a failing driver or a loose connection between the driver and the light board. Check the connection cable first. If the fixture is new and flickering, contact the manufacturer. Mechanical outlet timers are reliable but can lose their programmed cycle if unplugged, so check the setting any time power is interrupted. Digital timers are more accurate and hold their schedule through brief outages. If you notice your flowering plants seem stressed or are showing unusual growth patterns (like re-vegging during flower), check that the timer is actually running the correct 12/12 cycle and that no light leaks are present in the tent.
Ongoing adjustments as your canopy grows
Your grow light setup is not a set-it-and-forget-it system. Cannabis plants change size every week, especially during the first three weeks of flower when many strains undergo a significant stretch (sometimes doubling in height). If you set the light height at the start of flower and never touch it again, you will almost certainly have it too close to the canopy by week four.
Build a simple weekly check into your routine. Every 5–7 days, measure the distance from the light to the top of the canopy and adjust if needed. Keep a sticky note on the tent with the current height and the date you last adjusted. During the flower stretch (weeks 1–4 of 12/12), you may need to raise the light 2–4 inches per week to keep pace with growth. After the stretch slows and buds begin to develop (weeks 5 onward), the canopy height stabilizes and less frequent adjustment is needed.
If you are using training techniques like LST, scrogging, or defoliation to keep the canopy flat, you will have an easier time maintaining an even light-to-canopy distance throughout the grow. A flat canopy means the light can stay at one height and deliver consistent intensity to every bud site, which is the real goal of all this positioning work. Growers who invest a little time in canopy management in veg almost always get better results in flower, and it makes the light setup much simpler to dial in.
The same principles here apply if you later move toward a more specialized setup, like an air-cooled hood for an HPS system or a dedicated LED configuration for seedlings. If you are growing alocasia, you can apply the same distance and intensity logic when choosing your grow light, including matching the right grow light requirements to its needs alocasia grow light requirements. The fundamentals of distance, intensity, schedule, and airflow stay consistent across all of them. Once you dial in one grow, the next one gets faster because you already know what your space needs.
FAQ
How do I confirm my cannabis grow light setup is the right brightness without expensive meters?
You can use practical canopy response. Start by checking the first 1 to 2 inches of new growth after each adjustment, look for “light stress” signs at the top first (curling, paling, leaves pulling away). If you see early yellowing near the light, raise it 4 to 6 inches and reduce intensity 15 to 20%, then reassess in 24 to 48 hours. For a non-meter check, also keep the hand test consistent at the same distance from canopy each time so your “too hot” threshold stays comparable.
What if my tent has reflective walls, and I still get hotspots or uneven growth?
Reflective walls help, but they can also amplify a beam pattern if the light is too low or not centered. First, confirm the fixture is truly centered over the canopy, then raise the light slightly (about 2 to 4 inches) and reduce dimmer a bit to keep overall PPFD similar while smoothing distribution. If the corners are still dim, the problem is usually coverage area, and you will need a second light, a divider to reduce the effective footprint, or training to keep more buds within the beam.
Should I run my light 24/7 during early seedling or cloning, or stick to a schedule?
For most home grows, stick to a photoperiod schedule even early. Instead of constant light, use a reduced-intensity veg-style cycle (for example 18/6) so the plant still experiences a real dark period for normal daily rhythm. Also avoid starting seedlings at maximum intensity, ramp over the first 1 to 2 weeks so new growth can adapt without stretching or bleaching.
How much humidity should I aim for, and does the cannabis grow light setup change that target?
Yes, your light setup affects humidity because heat and airflow change how quickly moisture leaves the tent. When you raise light intensity or lower the fixture closer to the canopy, you often increase evaporation and can drop humidity faster. If you notice humidity falling rapidly during mid veg or early flower, slow down by adjusting fan speed or your dehumidifier so you avoid over-drying, and keep airflow steady rather than on-off cycling.
My plants look fine, but the tips are pale. Is that always light burn?
Not always. Pale tips can be light stress, but they can also come from inconsistent watering, salt buildup, or nutrient imbalance. A key clue is pattern and location: if the discoloration begins right at the top and closest leaves under the fixture, it points more to light intensity or proximity. If pale color appears across different heights or older leaves too, re-check nutrition and runoff management before changing the light height again.
What’s the safest way to adjust light height in flower without shocking the plants?
Make changes gradually and measure from the canopy, not the tent floor. During the stretch, raise 2 to 4 inches per week, but if you must react to stress, do it in smaller steps (like 1 to 2 inches) and wait 24 to 48 hours to confirm improvement. Avoid repeated up-down adjustments in the same week, since the plant never stabilizes and it becomes harder to diagnose whether changes were too aggressive.
Can I enclose the grow light driver in a box or keep it covered to reduce noise?
Avoid enclosing the driver or covering it. Drivers rely on open airflow to dissipate heat, and an enclosure can cause overheating even if the LED board itself seems cool. If you want noise reduction, use airflow-safe methods like relocating the driver within the tent top area with proper ventilation, or using a quieter fan setup rather than sealing the electronics.
Do I need to use a surge-protected power strip, and is it okay to plug the timer into the strip?
Use a surge-protected power strip (or a dedicated outlet) rated for your total load, and do not rely on multiple strips daisy-chained for higher wattage devices. The cleaner wiring approach is to plug the timer into the wall (or a protected dedicated strip), then plug the light into the timer. Avoid stacking adapters that can loosen under vibration from fans, and make sure all connections are snug.
What should I do if my LED fixture flickers, but it’s only occasional?
Occasional flicker can still indicate a loose connection or an unstable driver, not just a “normal” quirk. Check the cable seating between driver and board first, then inspect the driver mounting and strain relief so the cable is not flexing. If flicker correlates with power interruptions or timer events, switch to a digital timer or confirm the timer’s cycle holds during brief outages. If it continues after reseating and inspection, contact the manufacturer if the fixture is under warranty.
How do I prevent light leaks during dark cycle beyond just zipping the tent?
Besides zipping, block all pinhole light sources like indicator LEDs on timers, strips, and power adapters. Cover any external device displays if they face into the tent, and check around cable pass-throughs where small gaps can leak light. A practical test is to do the daytime zip-up check, then spend 30 seconds inside with eyes adjusted, any visible light counts as a risk to consistent 12/12 behavior.
Is it better to oversize the cannabis grow light setup or buy the exact watts for my tent?
For most home setups, choose coverage that matches your footprint rather than wildly oversizing. Oversized lights can be dimmed, but you still may struggle with canopy uniformity and keep the fixture high enough to prevent bleaching, which reduces usable intensity at the canopy edges. If you need more than one light for your space, position them symmetrically so the center and corners get comparable intensity and you avoid permanent corner dimness.
Succulent Grow Light Setup: Step by Step Placement and Schedule
Step-by-step succulent grow light setup: choose LED, place height, set schedule, and fix leggy growth, fading color, hot