Setting up grow lights is simpler than most beginners expect, but the details matter. Get the type, height, and schedule right, and your plants will thrive. Get them wrong, and you'll spend weeks wondering why your seedlings are leggy or your houseplants are refusing to grow. This guide walks you through the whole process, from picking the right fixture to dialing in your light schedule, with real numbers you can actually use.
How to Set Up Grow Lights: Installation, Placement, Setup

Marcus Tillman
5 Apr 2026
Choosing the right grow light type and fixtures
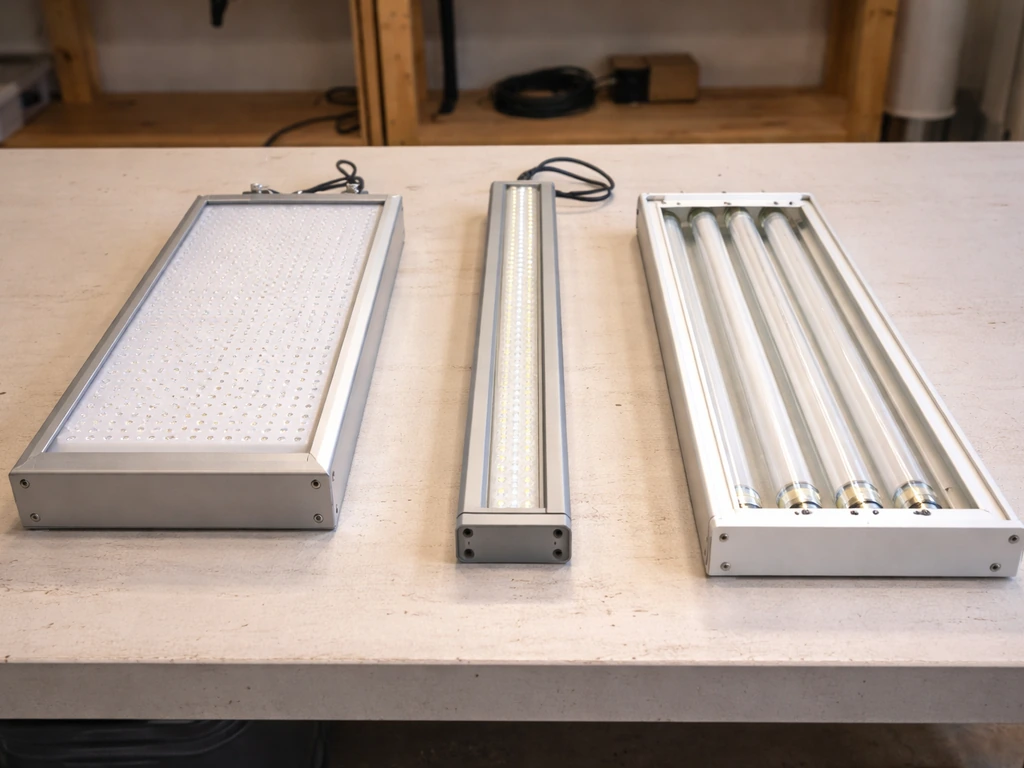
Before you mount anything, you need the right tool for the job. The three types you'll realistically encounter are LED panels, LED bar lights, and T5 fluorescent fixtures. LEDs dominate right now for good reason: they run cooler, last longer (commonly 25,000 to 50,000 hours), and pull less power for the same output. T5 fluorescents are still a solid budget pick for seedlings and low-light houseplants, and many T5 systems are daisy-chainable, meaning you can connect multiple fixtures together to cover a longer shelf or bench without adding extra outlets.
When you're comparing fixtures, ignore raw wattage as your primary metric. The number that actually tells you how much usable light your plants receive is PPFD, or photosynthetic photon flux density, measured in micromoles per square meter per second (μmol/m²/s). A fixture's listed PPFD tells you how many photons are hitting the canopy. For seedlings, you're targeting roughly 200 to 400 μmol/m²/s. Vegetative growth wants 400 to 600, and flowering plants can use 600 to 1,500. Houseplants with lower light needs can often get by below 100 μmol/m²/s. If a manufacturer doesn't publish a PPFD map, that's a red flag.
Also look for fixtures rated to blank" rel="noopener noreferrer">UL 8800, which is the standardized safety standard for horticultural lighting. The National Electrical Code (NEC 2020, Article 410, Section 410.172) actually requires horticultural lighting equipment to be blank" rel="noopener noreferrer">Listed, and UL 8800 also addresses photobiological safety, meaning it evaluates risks to your eyes and skin from the light spectrum. If a fixture is on the DesignLights Consortium (DLC) Qualified Products List, it meets UL 8800 as a baseline requirement. That's worth checking before you buy. Finally, look at the fixture's photon maintenance rating (L90 or L80) rather than just the total lifespan. L90 means the fixture still outputs 90% of its original light after a stated number of hours. That's a far more useful number than a generic lifespan claim.
If you want to go deeper on how different light technologies actually work before you commit to a fixture, understanding how grow lights work is a good place to build that foundation before shopping.
Planning light placement before you hang anything
Spend ten minutes planning before you drill a single hole or hang a single hook. Start by measuring your grow space and sketching out where your plants will live. A common shorthand when PPFD data isn't available is to estimate coverage using watts per square foot, but whenever possible, use the PPFD footprint map from the manufacturer. That map shows you exactly where the light intensity drops off toward the edges, which matters a lot if you're growing plants that need consistent light across a wide tray.
One rule worth knowing: a well-designed fixture should be mounted at a distance of at least five times the maximum dimension of its light-emitting surface to help ensure uniform canopy coverage. So if your LED bar is 12 inches across, you'd want at least 60 inches of clearance to the canopy for the most even spread. In practice, most home growers are working at tighter heights than that, so understanding the tradeoff between intensity and uniformity helps you make smarter adjustments later.
Think about whether you'll need to cover multiple shelves or a wide bench. If you're covering a long row, daisy chaining grow lights can let you run several bar fixtures from a single power connection, which keeps your wiring clean and reduces the number of outlets you need.
Mounting and installation steps
Once you've planned the layout, follow these steps in order. Rushing the installation is where most avoidable problems start.
- Read the manual before touching any hardware. Every fixture is slightly different. Spider Farmer's SF series manuals, for example, explicitly require you to review installation and safety steps before hanging or powering the light. This isn't just legal boilerplate. It tells you the correct hanging hardware to use and weight limits.
- Identify your hanging point. Whether you're using a grow tent's crossbars, ceiling hooks, or a shelving rack, confirm the anchor point can handle the fixture's weight plus some margin. Most LED panels weigh between 5 and 20 pounds.
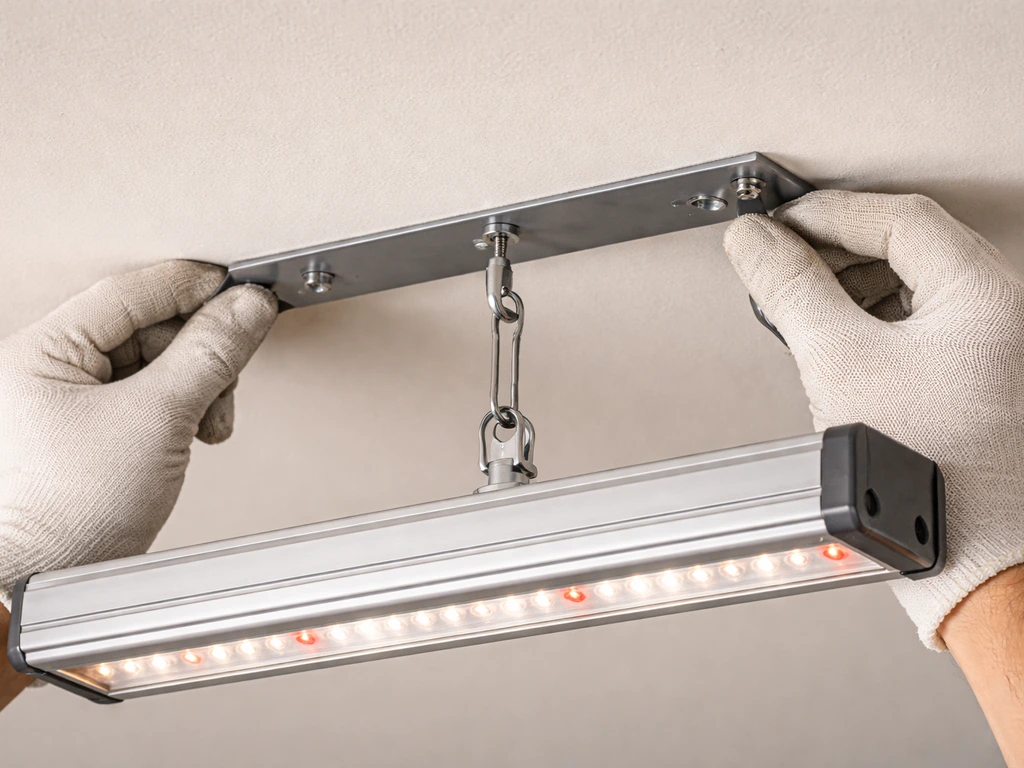
- Attach the hanging hardware to the fixture first while it's still on a flat surface. This is much easier than doing it in the air.
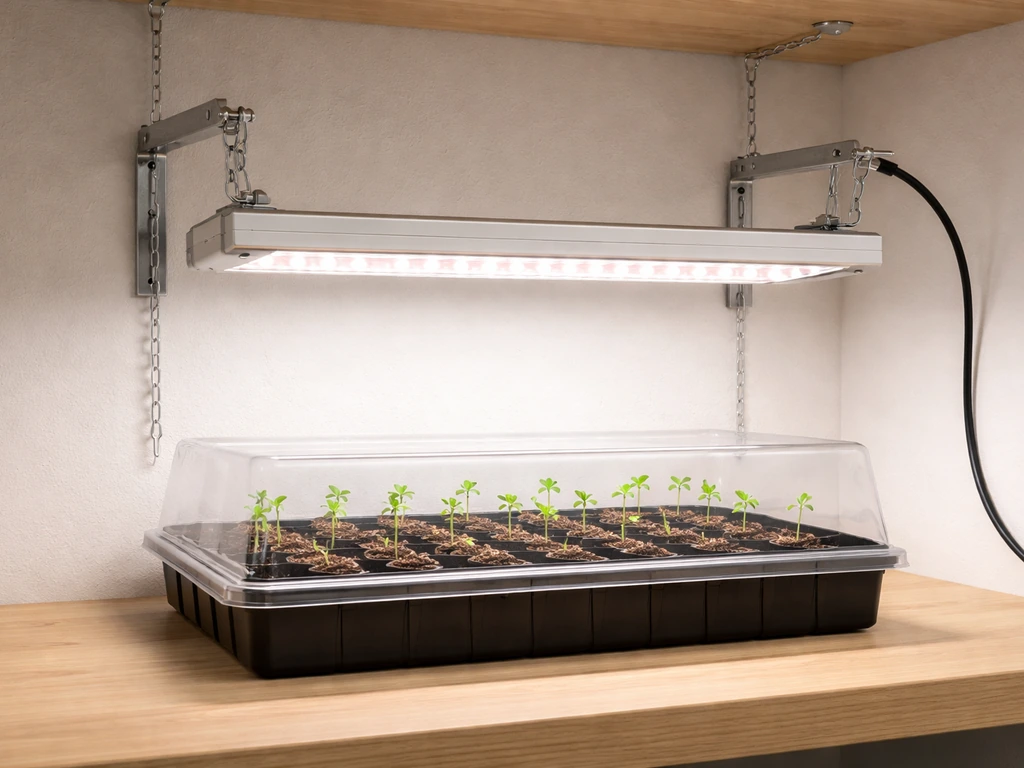
- Hang the fixture at a rough starting height. You'll fine-tune this after you check intensity, but a common starting point for LED panels is 18 to 24 inches above seedlings and 12 to 18 inches for vegetative houseplants.
- Check clearance above the fixture. The Spider Farmer SF series specifies a minimum of 1 inch (2.5 cm) of clearance above the fixture for heat dissipation. Some larger fixtures like the HLG 600 Rspec require a minimum of 15 inches from the ceiling or hanging structure. Check your specific model.
- Plug in and run a quick test before adjusting anything. Confirm the light powers on, the fans (if any) spin, and there are no unusual sounds or smells.
- Make sure the fixture hangs level. An angled light skews the PPFD footprint and can concentrate too much intensity on one side of your canopy.
Getting the height and angle right
Height is the single biggest variable you can adjust after installation, and it changes everything. Hang the light higher and you get softer, more spread-out light. Hang it lower and you get more intense light concentrated in a smaller area. The Spider Farmer SE3000 manual, for example, directly ties hanging height to achieving a specific PPFD level for each growth stage. That relationship is universal: lower height equals higher PPFD, and higher height equals lower PPFD.
A practical example from UNH Extension research on seedling growth: an LED light bar mounted 8 inches above seedlings needed only about 8 hours per day to hit the target daily light dose, but the same fixture mounted 20 inches above needed 16 hours per day to deliver the same total amount of light. That's a doubling of run time just from changing the hang height. So height and schedule are linked, and you need to think about them together.
Most fixtures are designed for straight-down illumination, so angling them is rarely necessary unless you're trying to reach a corner or fill a gap. If you're experimenting with angle, just confirm your PPFD at the canopy with a meter, or watch plant response over 7 to 10 days. For a detailed breakdown of how to approach this adjustment process, how to position grow lights covers the spacing and angle decisions in much more depth.
Power, safety, and basic wiring
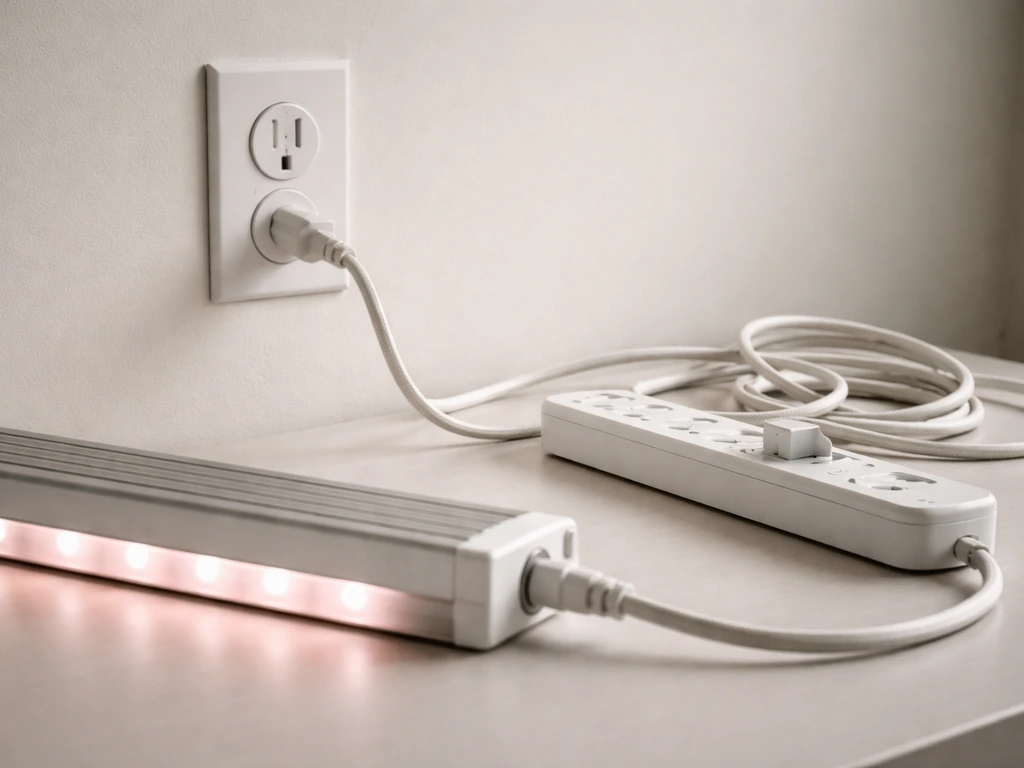
Most home grow lights are plug-and-play. They come with a standard power cord, and you plug them into a grounded outlet or a power strip. That said, there are a few things to get right before you power everything up.
- Use a grounded (three-prong) outlet. Never use an ungrounded adapter with a grow light.
- Don't overload a single circuit. If you're running multiple fixtures, calculate the total wattage and make sure you're under 80% of the circuit's rated capacity (so a 15-amp, 120-volt circuit handles about 1,440 watts safely).
- Keep all connections away from water sources. This is critical in humid grow spaces where misting or watering can splash.
- Use a heavy-duty power strip or outlet timer rated for the total wattage you're running. Cheap timers have melted more than a few setups.
- If you're installing multiple fixtures on a shared hanging system, confirm the combined weight is within the structure's rated load.
- Never leave a brand-new fixture unattended during its first hour of operation. Watch for heat buildup, smell for anything burning, and confirm the fixture is behaving normally before you walk away.
For fixtures with external drivers (the ballast-style box separate from the light bar), the driver can get warm. Give it airflow and don't place it directly on a surface that can trap heat. Most drivers are rated for a specific operating temperature range, usually found on the label.
Tuning intensity and coverage for your plants
Seedlings vs. houseplants: not the same target
Seedlings and houseplants have very different light needs, and treating them the same is one of the most common beginner mistakes. Seedlings want moderate, consistent light, around 200 to 400 μmol/m²/s, with a target daily light integral (DLI) of roughly 15 to 25 mol/m²/day. Too much and you stress them; too little and they stretch. Houseplants vary widely by species, but many common indoor plants need less than 100 μmol/m²/s and would actually be harmed by the intensity meant for seedlings.
| Plant Stage / Type | Target PPFD (μmol/m²/s) | Target DLI (mol/m²/day) | Typical Starting Height Above Canopy |
|---|---|---|---|
| Seedlings / Clones | 200–400 | 15–25 | 18–24 inches |
| Vegetative growth | 400–600 | 20–30 | 12–18 inches |
| Flowering / Fruiting | 600–1,500 | 25–40 | 10–16 inches |
| Low-light houseplants | 50–150 | 5–12 | 24–36 inches or more |
If your fixture has a dimmer, start it at 50 to 75% power for seedlings and work up slowly. If it doesn't have a dimmer, raise the fixture height to reduce intensity, then lower it as plants mature. A MU Extension light planning example uses a PPFD of about 510 μmol/m²/s with a resulting DLI of roughly 16 mol/m²/day as a worked crop production target, which gives you a sense of the math involved when you're trying to hit a specific daily dose.
For houseplants that need softer, more diffuse light rather than the direct intensity used for seedlings, the technique of creating bright indirect light with grow lights is worth understanding, since it can help you replicate the conditions those plants actually prefer.
If you're growing a mix of plants with different needs under one light, position your light-hungry plants at the center (highest intensity) and shade-tolerant plants toward the edges where PPFD naturally drops off. This lets one fixture serve a variety of plants reasonably well.
Scheduling and adjusting duration after setup
Once your light is mounted and the intensity is dialed in, you need a schedule. The daily light integral (DLI) concept connects your PPFD and your run hours: DLI = PPFD × hours × 0.0036. That formula, explained clearly in Virginia Tech Extension's work on growing with grow lights, is the most useful calculation you'll do. It means that if you lower your fixture (raising PPFD), you can run it for fewer hours and hit the same DLI. If you raise it, you run it longer.
For most seedlings and vegetative plants, a starting schedule of 16 hours on and 8 hours off works well. For flowering plants that respond to day length, getting the photoperiod right is critical: short-day plants like certain flowers can be triggered to bloom by about 8 hours of light and 16 hours of dark. Long-day plants are the opposite. If you're growing plants with specific photoperiod requirements, research your species before you set the timer and lock it in.
Use a mechanical or digital outlet timer, not a smart plug alone (though a smart plug can supplement). Set the timer before the light is due to turn on, and confirm it cycles correctly through at least one full on/off sequence before you leave it unattended. After the first week, check your plants for signs of too much or too little light.
What to watch for in the first two weeks
- Leggy, stretched seedlings reaching toward the light: your fixture is too far away or running too few hours. Lower the light or increase duration.
- Bleached, pale, or crispy leaf tips: too much intensity. Raise the fixture or dim it down.
- Slow growth with otherwise healthy appearance: check whether your DLI target is actually being met. Calculate your hours and PPFD and compare to the targets above.
- Wilting despite adequate watering: the fixture may be too close and generating too much heat at the canopy. Use a thermometer at plant level to check.
- Uneven growth across a tray: your light isn't centered over the canopy, or coverage is uneven. Rotate the tray every few days or reposition the fixture.
Once you've nailed the basics of setup and scheduling, you'll find that small adjustments make a noticeable difference within a week. The goal is to build a consistent environment so your plants get the same light dose every day. After that, the bulk of your time is in observation and minor tweaks, not major overhauls. For ongoing guidance on the actual growing process once your system is running, how to grow plants with a grow light picks up right where this setup guide leaves off.
FAQ
How can I tell if my grow lights are too strong without using a PPFD meter?
Watch for consistent, quick responses in the first 7 to 10 days. Signs of too much light include leaf bleaching or scorch, very dark green color, and slowed new growth. If you see stretching plus pale, thin growth, that usually points to too little intensity or too short a daily run. For a more reliable check, keep height and schedule fixed for a week, then adjust only one variable at a time.
What should I do if multiple plants need different PPFD targets under the same light?
Use zoned placement rather than one global schedule. Put the higher-demand plants in the center or directly under the brightest region, and keep lower-light plants on the edges where output drops. Avoid trying to “average” everything by running the timer longer or dimming heavily, because the plants at the edges will get starved or the center plants will be overdriven.
Is it better to adjust light height or the timer to fine-tune DLI?
Prefer adjusting height first, then make smaller schedule changes. Height changes PPFD and usually affects uniformity across the canopy, while timer changes only total dose. If your plants are clearly stretched, raise the PPFD by lowering the fixture, then verify with plant response before you significantly change hours.
Can I run grow lights 24 hours a day for faster growth?
For most indoor plants, nonstop lighting usually backfires. Plants need a dark period to regulate growth and avoid stress responses, and many seedlings do better with a consistent on/off cycle. A common starting point is 16 hours on, 8 hours off for seedlings and vegetative growth, then adjust based on species needs and how they respond over a week.
What’s the safest way to use dimmers with external drivers?
Don’t assume any dimmer will work. Use a dimming method that’s compatible with the driver type, and start at a lower setting like 50 to 75% if your fixture supports it. If you notice flicker, buzzing, or uneven brightness, stop and switch to the manufacturer-recommended dimming approach, since some drivers behave poorly with incompatible controls.
How do I handle light overreach into the room or neighbors?
If glare is a problem, reduce mounting height and increase coverage more evenly rather than just increasing power. Use light fixtures designed for horticulture with better optical control, and consider shielding or positioning so the brightest spill stays within your grow area. Also remember that long photoperiods can disrupt household routines, so keeping consistent timer control matters.
Do I need to worry about heat even though LEDs run cooler?
Yes, mainly around the driver and mounting hardware. Keep any external drivers ventilated, follow the specified operating temperature range on the label, and avoid trapping heat against a shelf surface. If you’re using enclosed shelves or grow tents, plan airflow so the driver stays within its limits, not just the LED heatsink.
What’s a good way to test spacing or multiple fixtures without guessing?
Set up one fixture at the working height, target your PPFD at the canopy, then expand coverage piece by piece. When adding a second or third bar, keep the height consistent across all fixtures and check uniformity across the tray. If you can, use manufacturer PPFD footprint maps to predict overlap, because intensity often drops quickly toward the edges.
Is it okay to angle grow lights to get more coverage, or should I keep them straight?
Generally keep them straight for predictable, downwards uniformity. If you must angle to reach a corner or narrow gap, confirm results at the canopy with a meter if possible, or rely on observable changes over 7 to 10 days. Angling can create hotspots and uneven edges, so avoid “set and forget” if the plants at the edges look different.
How accurate is watts per square foot for planning a setup?
It’s only a rough shortcut, because fixture optics and spectrum can change usable PPFD a lot even at similar wattage. The more reliable method is using published PPFD maps or fixture PPFD specifications. If you must use watts per square foot, treat it as a starting point, then adjust based on plant response or a canopy measurement.
If my fixture doesn’t publish PPFD data, what’s the best next step before buying?
Look for safety listings and performance indicators, then plan for verification after installation. Choose fixtures with credible photobiological safety certification like UL 8800 and check for photon maintenance ratings such as L90 or L80. After mounting, measure at the canopy with a meter if you can, because lack of PPFD mapping makes it harder to hit a specific seedling DLI.
What should I check during the first week after setup?
Verify the timer is cycling through at least one full on/off sequence, then assess plant appearance after a few days. Look for trends, not one-off leaf changes: new growth color and shape are the most informative. If you see consistent stretching, leaf pale or burn patterns, or slow development, make a single change (usually height) and recheck the next week.
Next Article
How to Create Bright Indirect Light With Grow Lights
Step-by-step setup to mimic bright indirect sunlight with grow lights using placement, diffusion, dimming, and troublesh
