Setting up a Lighthouse 2.0 grow tent takes about 2 to 3 hours from unboxing to your first power-on, and the most important thing you can do before touching a single pole is confirm exactly what you received. Hydrofarm's Lighthouse 2.0 line includes tent-only models (like the LHT33 at 3'x3', the LHT44 at 4'x4', the LHT525 at 5'x2.5', and the LHT55 at 5'x5', all at 6.5' tall) as well as full combo kits that bundle the tent with a Sunburst 315W CMh lighting system, an Autopilot analog timer, light risers, and inline booster fans. Your setup flow depends entirely on which version you have, so that's where we start.
Lighthouse 2.0 Grow Tent Instructions Setup Guide

Marcus Tillman
25 Apr 2026
Confirm your exact Lighthouse 2.0 kit and do an inventory check
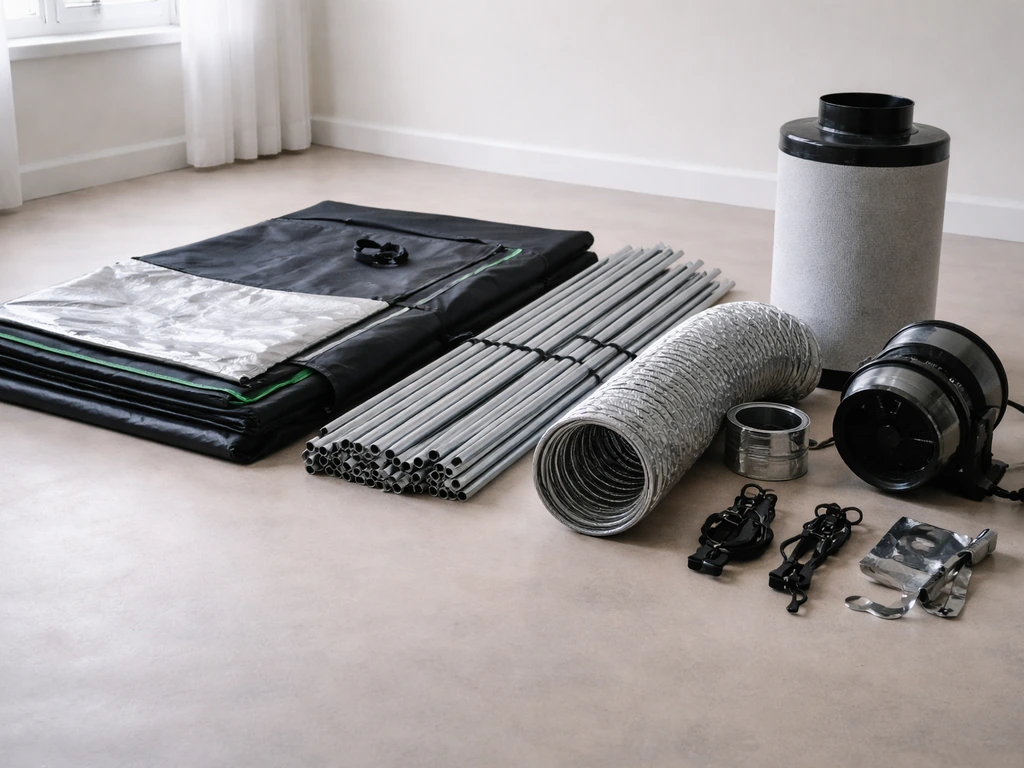
Before you move anything out of its packaging, check the label on the outer carton. If you see a model code like LHT44, LHT55, LHT525, or LHT33, you have a tent-only purchase. If your box or packing slip includes references to a Sunburst 315W CMh 120/240V 3100K all-in-one system, an Autopilot analog grounded timer, light risers, and two 188 CFM Active Air 6-inch inline booster fans, you have a combo kit. These are meaningfully different setups, and the steps for hanging and powering your light will differ.
For the tent portion, lay everything out on a clean floor and cross-check against what should be in the box: the tent fabric body, a full set of metal frame poles (uprights and crossbars), corner connectors, hanging bars across the top, and pole end caps. Tent-only kits do not include a light, fans, or a timer. For combo kits, additionally verify the Sunburst CMh fixture, its included lamp (315W ceramic metal halide, 3100K), reflector hood, power cord, a rope ratchet hanger or light risers, the Autopilot timer, and both inline fans. The official Sunburst CMh Lighting System Instructions (Hydrofarm's own PDF) include a boxed checklist of all included pieces, and that's the document you want open during this step if you have the combo kit.
- Tent fabric shell with zippered doors and duct port covers
- Steel frame poles: uprights, horizontal crossbars, and top hanging bars
- Corner and joint connectors (usually plastic or metal knuckle style)
- End caps for pole tips
- Combo kit only: Sunburst 315W CMh fixture, reflector, and lamp (pre-installed or separate)
- Combo kit only: Autopilot analog grounded timer
- Combo kit only: Two 188 CFM Active Air 6-inch inline booster fans
- Combo kit only: Light risers or rope ratchet hangers
If anything is missing, contact the retailer before you start assembly. It is much easier to flag a missing part before the tent is built than to partially disassemble it later.
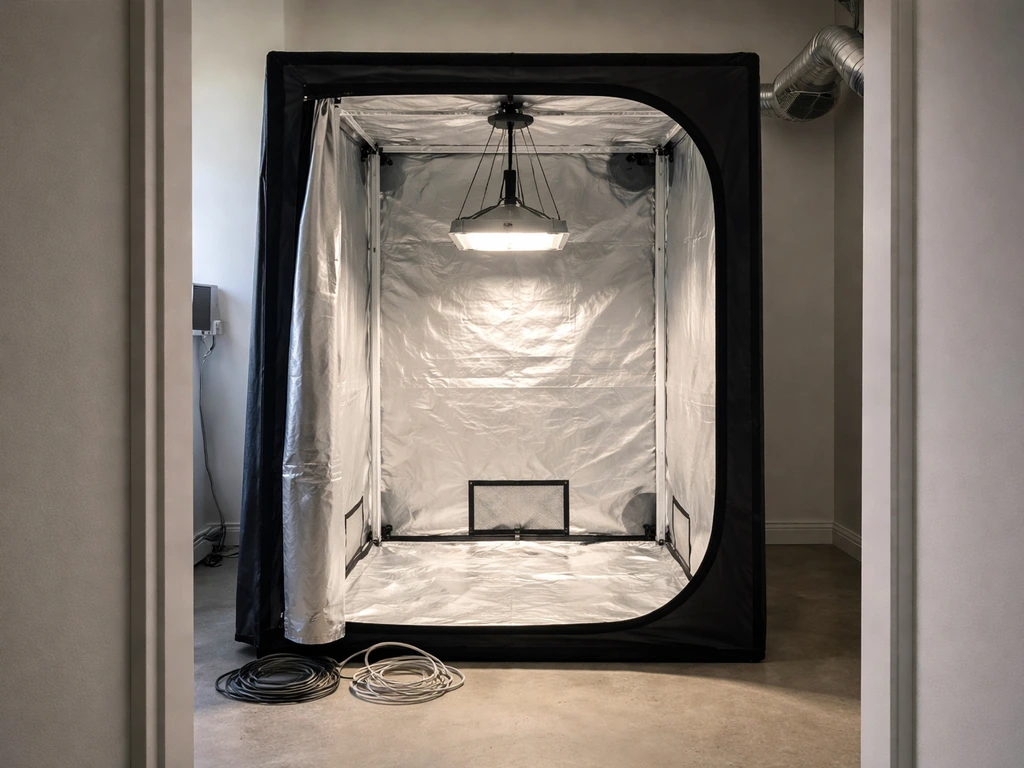
Unbox and assemble the grow tent frame step by step
Pick a room where the assembled tent will actually live, because moving a fully built tent is awkward at best and damaging to the fabric at worst. Clear the floor space with about 2 extra feet on each side for working room. Keep the tent fabric folded and to the side while you build the frame first.
- Sort all poles by length. Uprights (vertical poles) are the longest; horizontal crossbars and top bars are shorter. Group them before you start so you are not guessing mid-build.
- Assemble the base rectangle first. Connect four corner pieces to the four bottom horizontal crossbars, forming a rectangle on the floor that matches your tent's footprint (for example, 4'x4' or 5'x5').
- Insert the vertical uprights into each corner connector. Stand them upright and make sure each one clicks or seats firmly. Wiggle-test each joint before moving on.
- Connect the top horizontal crossbars across the top of the four uprights to form the upper rectangle. The frame should now look like a box skeleton.
- Add any internal top hanging bars. These run across the ceiling of the frame and are what you will hang your light and fan from later. On most Lighthouse 2.0 sizes there are two parallel bars across the top.
- Cap all open pole ends with the included end caps to protect the tent fabric from punctures.
- Drape the tent fabric over the completed frame. Most Lighthouse 2.0 tents unzip from the bottom up or have an access panel that lets you slide the fabric on from one end. Do not force zippers. Work the fabric over the frame gently.
- Zip all doors and port covers closed for now, then do a quick visual inspection of all four corners to confirm the fabric is seated evenly and no poles are pressing outward against the material.
One thing that trips people up: the tent fabric has a shiny Mylar interior and a dark exterior. Make sure the reflective side faces inward before you zip it up. If it looks like the outside of the tent is silvery and bright, the fabric is reversed.
Hang and position the Lighthouse 2.0 light for proper coverage
If you have the combo kit with the Sunburst 315W CMh, this is where the Sunburst CMh Lighting System Instructions PDF becomes your bible. [A second Sunburst CMH Lighting System Instructions PDF](https://www. htgsupply. com/wp-content/uploads/2023/03/Sunburst-CMH-Light-System-Instructions.
pdf) is available from HTG Supply and appears to be the same class of Hydrofarm Sunburst 315W CMH instructions. If you need the exact sequence for hanging and setting up the Sunburst CMh, follow the BSEAH grow light instructions for your specific kit. If you are specifically looking for garland grow light garden instructions, match the wiring, mounting height, and timer settings to your exact garland model before powering up Sunburst CMh Lighting System Instructions.
If you are trying a Purple Reign style grow light instead of the Sunburst CMh, use the purple reign grow light instructions matched to your exact model. If you are trying a different grow light setup than the Sunburst CMh, compare your wiring and hanging distance using these koscheal grow light instructions as a related reference. If you need detailed bionic grow light instructions for setup steps and safety checks, use the guide matched to your kit.
[The fixture is an all-in-one system, meaning the ballast and reflector hood are combined into a single unit. ](https://www. ecoumene. com/wp-content/uploads/2023/06/sunburst-cmh-instructions-2017-jumpstart-hydrofarm.
pdf? srsltid=AfmBOooS2VXM8TrRsx6DDTWuGBNX2kidEw0qwdVUuAxe1-UIXTjQIWI_) Before hanging, install the lamp into the reflector according to those instructions (handle the ceramic metal halide bulb with a cloth or gloves, not bare hands, to avoid oil contamination shortening bulb life).
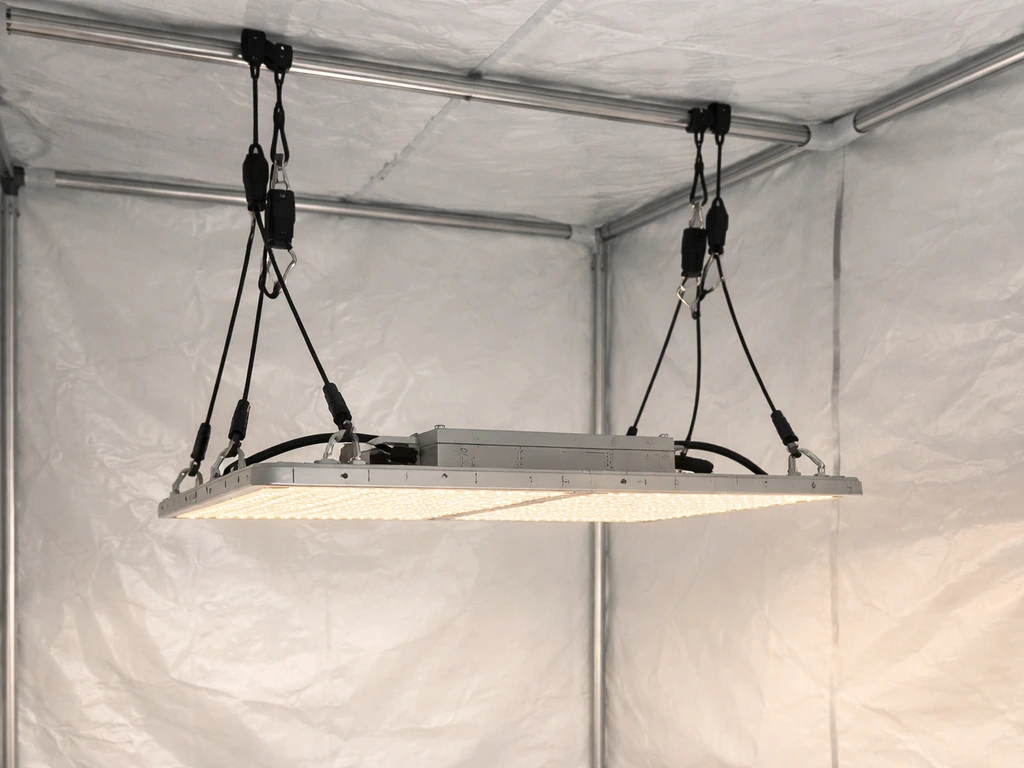
Use the included light risers or rope ratchet hangers to attach the fixture to one of the top hanging bars inside the tent. Center the light over the footprint of the tent as closely as possible. For a 4'x4' tent, that means roughly 24 inches from each wall. For a 5'x5', aim for the geometric center. A fixture that is off-center will create hot spots directly under it and dim corners on the far side, and you will notice that in your plant growth within a week.
Initial hanging height for the Sunburst 315W CMh: start with the reflector 24 to 30 inches above where your seedling or plant canopy will sit. You will dial this in further after your first few days of running the light (covered in the lighting settings section below). If you have a tent-only purchase and are using a different light, check that light's specific manual for its minimum hanging distance, as LED panels and HID fixtures have very different heat profiles and recommended distances.
Route the light's power cord through the tent's designated cord port, not through a duct port or a gap in the zipper. The Lighthouse 2.0 tent has an adjustable power cord port specifically for this purpose. Seal it as tightly as possible around the cord once it is routed.
Ventilation and airflow setup
Good ventilation is what keeps a grow tent from becoming a humid, stale, hot box. Plan your ventilation layout before you start routing anything. Sketch on paper where your exhaust fan will exit, where your intake will be, and where the carbon filter will hang inside the tent. Making this decision before you thread ducting through ports saves a lot of rerouting frustration.
Exhaust and carbon filter placement
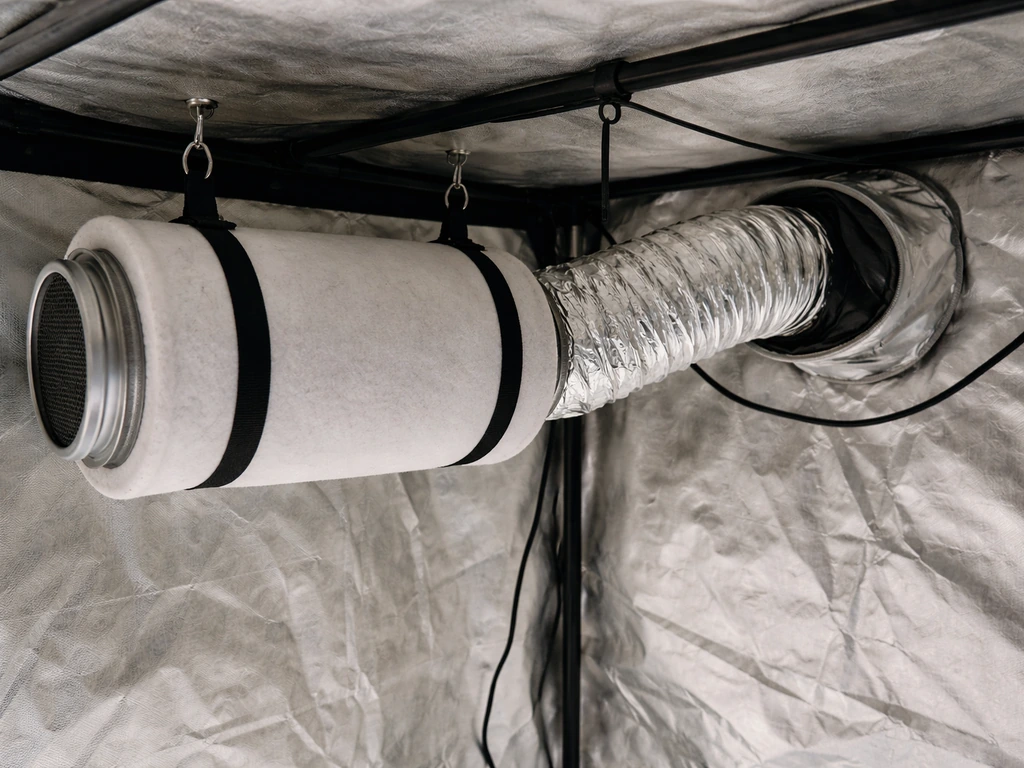
Mount your carbon filter inside the tent at the highest point you can manage, ideally hanging from one of the top crossbars. Heat and odor-laden air rise, so placing the filter at the top captures both before they have a chance to escape.
Connect the carbon filter's output flange to your inline exhaust fan with a short run of ducting, then route the exhaust ducting out through one of the upper duct ports and to wherever you are exhausting (another room, a window, a ceiling cavity, etc. ). In a combo kit, the two 188 CFM Active Air 6-inch inline booster fans can serve as your primary exhaust driver on a tent up to 4'x4'.
For a 5'x5' tent (roughly 162 cubic feet), you ideally want to exchange the air every 1 to 3 minutes, so you need somewhere around 55 to 165 CFM after accounting for resistance from the carbon filter and any bends in the ductwork. Carbon filters typically reduce effective CFM by 20 to 25 percent, and each 90-degree duct bend costs roughly another 10 percent, so size up your fan if you are running a long or winding duct run.
Intake strategy
For most small home tents, passive intake works fine. Open the Lighthouse 2.0's lower duct ports (the mesh-covered ports near the bottom of the tent walls) about halfway and let the negative pressure created by your exhaust fan pull fresh air in naturally. You will know the system is working correctly when the tent walls bow slightly inward under negative pressure. If they bulge outward, your intake is larger than your exhaust, and odors can escape unfiltered. If the walls suck in dramatically, your exhaust may be overpowering your intake and straining the fan motor. Adjust the lower port opening size until you get a gentle, consistent inward bow.
Internal circulation fan
In addition to the exhaust/intake loop, clip a small oscillating fan (4 to 6 inch is enough for a 3'x3' or 4'x4') to one of the lower interior crossbars or a corner pole, angled to move air across the canopy without blasting any single plant directly. This prevents hot spots, strengthens stems, and reduces the risk of mold forming in stagnant pockets between leaves.
Lighting settings: distance, intensity, and daily schedule for each plant stage
The Sunburst 315W CMh is a versatile fixture because its 3100K spectrum supports both vegetative and flowering growth, though it leans slightly toward the flowering end of the spectrum. If you are using a different light (LED panel, HPS, etc. If you are installing Barrina LED grow lights instead of the CMh setup, follow this guide for the right installation steps and safety checks: how to install Barrina LED grow lights.
After you install Barrina LED grow lights, use the specific Barrina grow light instructions for the right hanging distance, intensity, and daily schedule. If you’re using tower garden grow lights, apply the same idea for distance and intensity when you follow the tower garden led grow lights instructions. ) with a tent-only purchase, refer to that light's documentation for distance and intensity guidance. The numbers below are specific to the 315W CMh in the Lighthouse 2.
0 combo kit context.
| Plant Stage | Recommended Light Height Above Canopy | Daily Light Hours (Photoperiod) | Notes |
|---|---|---|---|
| Seedlings / Clones | 30 to 36 inches | 18 hours on / 6 hours off | New growth is heat-sensitive; start high and lower gradually |
| Vegetative growth | 18 to 24 inches | 18 hours on / 6 hours off | Watch for stretching (lower light) or bleaching (raise light) |
| Flowering / fruiting | 18 to 24 inches | 12 hours on / 12 hours off | Strict 12/12 schedule triggers and maintains flowering in photoperiod plants |
| Houseplants / herbs | 24 to 30 inches | 14 to 16 hours on / 8 to 10 hours off | Most houseplants are day-neutral; consistent schedule matters most |
Set your Autopilot analog timer (included in the combo kit) by plugging it into your outlet first, then setting the current time using the dial. Pull up or push down the individual trigger pins around the dial to define your on and off periods. Each pin typically represents 15 or 30 minutes. For an 18/6 schedule, you would pull up pins covering 18 consecutive hours and leave 6 hours of pins down. Plug the light's power cord into the timer's outlet, not directly into the wall. Double-check the timer's operation by watching the light cycle on and off during the first 24 hours.
One important electrical note: the Sunburst 315W CMh is listed as 120/240V compatible. Confirm which voltage your outlet supplies before plugging in. Most North American home outlets are 120V standard. If you are using a 240V outlet, the fixture will need the appropriate plug and cord configuration, which is typically specified in the Sunburst instruction sheet. Do not guess on voltage.
Plant layout inside the tent: height, spacing, and leveling your canopy
The goal of plant layout is to get as much of your canopy at a uniform distance from the light as possible. A plant that is 6 inches taller than its neighbors receives significantly more light intensity, which throws off your whole growing environment.
For a 4'x4' tent running one 315W CMh, a practical starting layout is four plants in a 2x2 grid, each in 3 to 5 gallon containers, spaced evenly. For a 5'x5', you can run six to nine plants depending on container size and training method. Leave at least 6 inches between containers so you can access each plant for watering and inspection without disturbing its neighbors.
Use plant risers, upside-down pots, or wood blocks to bring shorter plants up to the same canopy height as your tallest plant. You want the top of the foliage to be roughly level across the whole tent. Check this by stretching a string horizontally across the tent at canopy height and looking for plants that poke above or dip significantly below it. Even a 4-inch height difference can cause noticeable uneven growth over several weeks.
If you are growing plants that will stretch significantly during flowering (like many cannabis varieties), plan for that vertical growth when you decide how tall to let them get before flipping to a 12/12 schedule. With a 6.5-foot tent ceiling and your light hanging 18 to 24 inches from the canopy, you have roughly 4 to 5 feet of usable plant height. Flip to flowering when plants are about half that target height, since many strains double in height during the stretch phase.
Troubleshooting common setup problems and an adjustment checklist
Even a clean setup will have at least one or two things to tweak in the first week. Here are the most common issues and how to fix them.
Uneven light coverage or bleached spots
If plants directly under the center of the light are much darker green or show white/yellow bleaching on the tops of leaves, the light is too close. Raise it 2 to 4 inches and check again in 24 to 48 hours. If outer plants look significantly paler or are stretching toward the center, the light may be off-center or too high. Re-center it and lower it incrementally. For tent-only setups with a different light brand, similar principles apply, just as they would with other panel-style systems like those covered in other grow light instruction guides.
Condensation or cold spots
Condensation on tent walls or plant leaves in the morning (when the lights go off and temperature drops) signals that your humidity is too high or your nighttime temperature drop is too steep. Add a small dehumidifier inside the tent or increase your exhaust fan speed slightly during the dark period. Cold spots in corners indicate poor air circulation; reposition your internal oscillating fan to push air into those areas.
Odor escaping the tent
If you can smell the grow outside the tent, your carbon filter is either too small for your exhaust volume, bypassed, or the tent has a leak. Check all zipper seams and port covers first. Confirm the carbon filter is actually inline with the exhaust fan and not bypassed. If the filter is more than 12 to 18 months old, the activated carbon may be saturated and need replacement.
Exhaust fan noise or vibration
Inline fans vibrate, and that vibration transfers through rigid ducting into the tent poles, creating a rattling hum. Use flexible rubber ducting or wrap the connection points with foam weather-stripping tape. Hang the fan itself using rope or bungee cord from the crossbar rather than letting it rest on a rigid bracket to decouple its vibration from the frame.
Timer confusion or lights not cycling
If the Autopilot analog timer is not cycling the light correctly, first check that the current time pointer on the dial is actually set to the correct time of day. Then verify the trigger pins: pulled-up pins = on, pushed-down pins = off. Plug a lamp into the timer and watch it cycle manually to confirm operation before plugging in the Sunburst fixture. Also confirm the fixture is set to the correct input voltage (120V vs 240V) before the timer allows power to flow.
Setup adjustment checklist for your first week
- Day 1: Confirm light is centered, timer is cycling correctly, and tent walls bow slightly inward under exhaust negative pressure.
- Day 2 to 3: Check leaf tips for bleaching or curling (too close/too hot) or stretching and pale color (too far/too dim). Adjust light height as needed.
- Day 3 to 4: Measure temperature and humidity. Vegetative target: 70 to 80°F, 50 to 70% relative humidity. Flowering target: 65 to 78°F, 40 to 50% RH. Adjust exhaust speed or add a humidifier/dehumidifier if out of range.
- Day 5 to 7: Check all plants for uniform canopy height. Use risers or low-stress training to level any plants that are significantly above or below the average.
- Day 7: Do a full smell test outside the tent with the exhaust running. If any odor escapes, trace and seal the leak before it becomes a problem.
The Lighthouse 2.0 tent is a solid, purpose-built controlled environment, and once it is dialed in it runs reliably with minimal daily intervention. The first week is the most hands-on part. After that, your main job is monitoring temperature, humidity, and plant height relative to the light, and making small adjustments as the plants grow. Most problems show up in the leaves within a day or two, so check on your plants every morning and you will catch anything early enough to fix it before it sets you back.
FAQ
Can I assemble the Lighthouse 2.0 grow tent without laying out and cross-checking the parts first?
You can, but it increases the risk of realizing a missing pole, connector, or duct port after the tent fabric is already zipped in. Do the inventory check while everything is still on the floor, and if you have a combo kit verify the two inline booster fans match the included fan count and size before you start hanging ducting.
What should I do if the reflective Mylar fabric seems to be on the wrong side after the tent is partly zipped?
Do not force the zipper to close with the fabric reversed. Unzip enough to flip the panel so the shiny interior faces inward, then rezip smoothly starting from the same end each time to prevent zipper misalignment and future gaps at the seams.
How tight should I seal the adjustable power cord port around the cord?
Seal it as snugly as you can without crushing the cord jacket. If the port ring leaves obvious gaps or the cord can move freely through the opening, you are more likely to get light leaks and heat buildup near the power penetration.
If my carbon filter exhaust odor is still noticeable, how can I tell whether it is a leak or an airflow problem?
First inspect zipper seams, port covers, and any duct connection clamps. Then test airflow by feeling for consistent suction at the duct connections and observing the tent fabric behavior under negative pressure. If the tent bows inward gently but odor still leaks, focus on seals, and confirm the filter is not bypassed (air should go through the carbon media, not around it).
Is negative pressure really required, and what does “correct” look like visually?
Correct negative pressure means the lower sidewalls bow slightly inward when the exhaust is running. If the walls puff outward, intake exceeds exhaust. If they suck inward dramatically, your exhaust is likely overpowering, which can strain the fan and reduce odor control efficiency because air moves too fast through the carbon contact time.
Can I use one inline booster fan instead of two in a 5'x5' tent?
Often you will need more than one to hit the intended air exchanges, especially after accounting for carbon filter resistance and duct bends. If you do run a single fan, verify performance by checking tent bowing and, practically, whether humidity and temperature stabilize. If you cannot maintain stable conditions, add the second booster fan or reduce duct resistance (shorten duct runs, use fewer bends).
How do I choose the initial hanging height if my plants are already taller than the planned canopy height?
Start by referencing the current canopy top, not the seedling stage. Use 24 to 30 inches above the current canopy for the 315W CMh as a starting point, then plan to adjust in 2 to 4 inch increments over the next 1 to 2 days based on leaf color and stretch, since tall plants can respond faster than you expect.
What is the safest way to check whether the light is centered correctly?
Before powering on for the day, measure from each wall to the light center and confirm symmetry. Recheck after you hang and before you start routing cords, because moving the fixture a small amount can create a noticeable center hotspot and weaker corner growth within the first week.
My timer cycles the light but the schedule seems wrong, what are the most common mistakes?
The two biggest culprits are the time dial not set to the correct current time and the trigger pins reversed (pins pulled up versus pushed down). Also confirm the lamp power is plugged into the timer outlet side, and as a quick diagnostic, test with a spare lamp for a full cycle window before connecting the Sunburst fixture.
Do I need a different setup if my outlet is 240V instead of 120V?
Yes. The fixture is listed as compatible with 120/240V, but it requires the correct cord and plug configuration for your voltage. Do not assume the included cord matches your outlet, verify the voltage requirements and wiring details on your Sunburst documentation before powering it through the timer.
How much airflow should my oscillating fan provide, and where should I aim it?
Aim for gentle, continuous canopy movement, not a direct blast on leaves. Place the fan so it sweeps across the canopy and helps eliminate corner stagnation, and reposition if you see persistent damp spots in corners or if some plants are noticeably drier or cooler than others.
Can I use a dehumidifier instead of increasing exhaust during lights-off?
Yes, especially if nighttime condensation persists. A dehumidifier can reduce relative humidity directly, but still make sure your exhaust and intake setup can maintain overall airflow. If you rely only on a dehumidifier, you may still get stale air pockets, so keep an eye on corner humidity and plant leaf surface wetness.
What should I do if plants are bleaching or darkening quickly in the first week?
Bleaching or significantly pale tops usually indicate the light is too close, raise the fixture 2 to 4 inches and re-evaluate after 24 to 48 hours. If plants under the center are darker green while outer plants stretch or pale, adjust both hanging height and centering, since off-center placement can mimic “too high” symptoms.
When should I start string checking canopy height, and how often?
Do it immediately after setup, then repeat after major changes such as switching from vegetative to flowering or after you move plants. A simple schedule is once per week, but check more frequently if you are training aggressively, using plant risers, or seeing uneven growth.
How should I plan for flowering stretch with only the 6.5-foot tent height?
Account for the hanging distance plus usable plant height, not just the tent ceiling. Since your effective space is reduced by the light hanging position and hanging hardware, a practical approach is to set your flip date when plants reach roughly half of your final target height, then adjust again after you see the first 3 to 7 days of stretch behavior.
Next Article
How to Install Barrina LED Grow Lights Step by Step
Step-by-step guide to install Barrina LED grow lights: mount, wire, set height, test, and troubleshoot for healthy plant