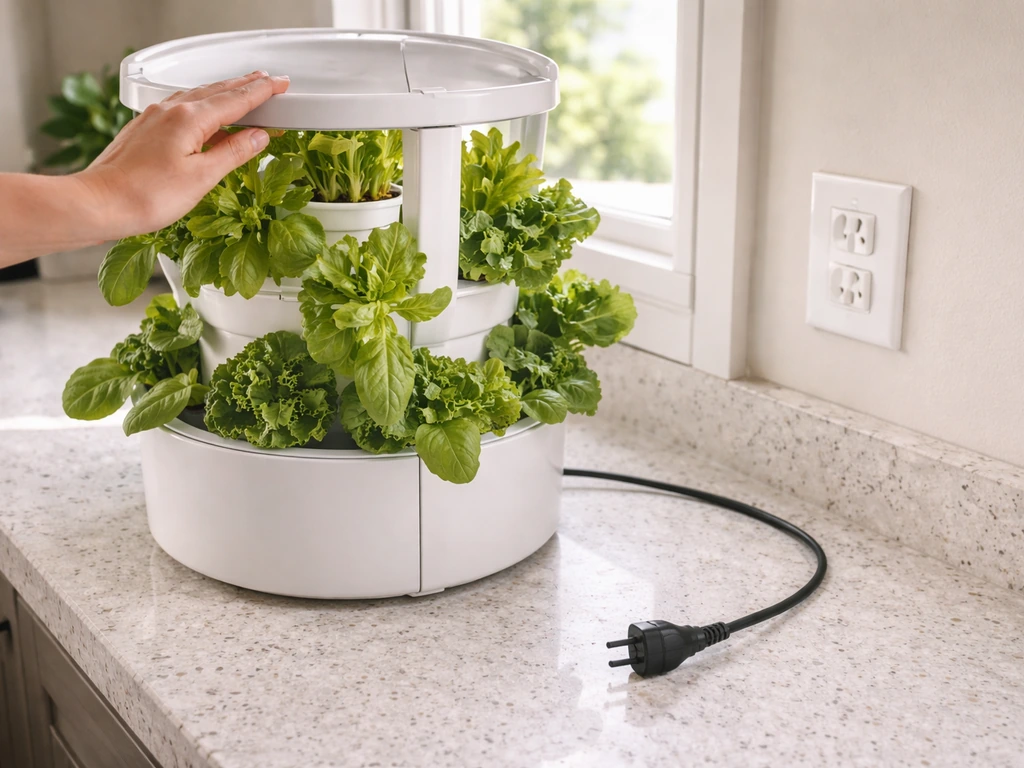
The Tower Garden LED grow lights kit (model GT100) is a purpose-built system for the Tower Garden Flex and Home units. It comes with four adjustable LED fixtures, a built-in 24-hour timer, and a power cord organizer, all designed to drop onto your tower and get you growing indoors year-round.
Tower Garden LED Grow Lights Instructions: Setup Guide

Marcus Tillman
22 Apr 2026
If you just unboxed it and want to go from zero to plants-under-light as fast as possible, this guide walks you through every step: what to check before you start, how to mount and wire it safely, how to set the timer, how to dial in placement for different plant types, and how to fix the most common problems without guessing. If you are setting up a lighthouse 2.
0 grow tent, follow the specific grow tent placement and mounting guidance to get the best light coverage lighthouse 2. 0 grow tent instructions. If you are using a purple reign grow light, these instructions will help you match the right schedule and setup to your plants purple reign grow light instructions. This guide also helps with how to install Barrina LED grow lights if you are switching brands how to mount and wire it safely.
Confirm your model and check the parts before anything else
The official Tower Garden LED grow light kit is the GT100, designed for the Tower Garden Flex and Home systems only. It is not compatible with outdoor setups and should never be used in wet or damp environments. The manual is explicit: indoor use only. Before you touch a single wire, lay everything out and confirm you have all the pieces.
- 1x LED Indoor Grow Light Unit (the central hub/top assembly with built-in 24-hour timer)
- 4x LED light fixtures (the individual arms with bulbs)
- 1x Power Cord Organizer
- Installation sheet (check the revised version dated 05/2023 if you have it)
If anything is missing or a fixture looks cracked or bent from shipping, do not power it on. Contact Tower Garden support first. The kit is rated at 125 watts, 1 amp, 120 VAC/60 Hz, so it needs a standard US household outlet. Note the 3-year limited warranty: do not modify the unit or install it in ways the manual does not describe, or you risk voiding coverage.
Mounting the lights and setting up power safely
This is where most people make small mistakes that cause big headaches later, so go slowly here. The whole assembly sits at the top of your Tower Garden, replacing the shower cap lid.
Step-by-step installation
- Unplug everything and make sure your Tower Garden reservoir is not actively pumping before you start.
- Remove the existing shower cap lid from the top of your Tower Garden.
- Assemble each of the four LED fixtures: connect the wire terminals on each fixture, then insert the base into the lamp housing and snap it together firmly. Do not crimp or pinch any wires during this step.
- Insert the light unit (with fixtures attached) down into the shower cap opening at the top of your Tower Garden. Push it all the way in until it seats fully. A partial fit here will cause water leaks into the electrical assembly.
- Route the power cord down the side of the tower, placing it between the grow pot openings rather than across them. This keeps it out of the way of plants and water spray.
- Position the Power Cord Organizer directly below where the power cord exits the top unit. Clip or attach it to the tower body so the cord runs cleanly down without dangling.
- Before plugging in, double-check that the light unit is seated all the way into the shower cap, no wires are pinched between sections, and the cord is routed between (not over) the grow pots.
- Plug the power cord into a standard 120V outlet. Do not use an extension cord if you can avoid it; if you must, use a heavy-duty rated cord and never daisy-chain power strips.
Safety rules worth repeating
- Always unplug the unit before moving the tower, adjusting fixtures, or replacing any part.
- Pull the plug itself when disconnecting, never yank the cord.
- Keep the light unit and power cord away from standing water. Do not let water pool near the base of the unit.
- Do not look directly into the bulbs when the lights are on or at startup.
- Make sure the room has adequate airflow. Tower Garden recommends a fan for air circulation and specifies keeping room temperature below 35°C (95°F).
- The system runs on 120V only. Do not use it with a different voltage source or a foreign-outlet adapter.
Placement, height, and getting even coverage across the tower
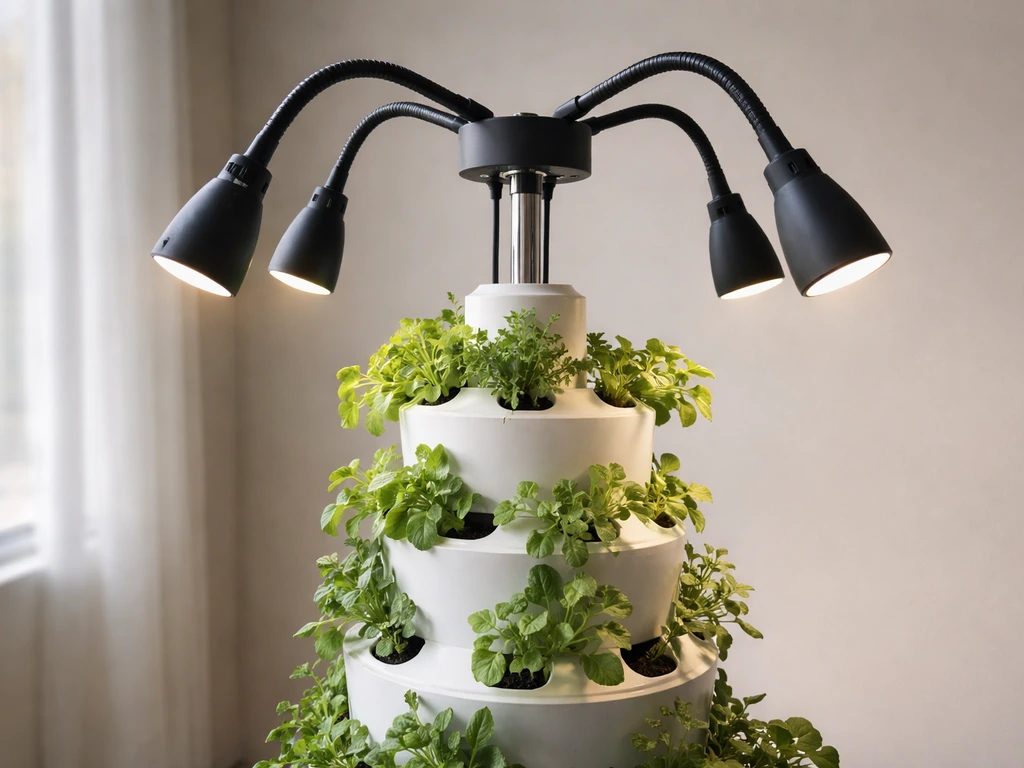
Once the unit is mounted, you need to orient and position the four flexible lamp fixtures correctly. This step directly determines whether your plants thrive or whether half the tower sits in shadow.
Orientation first: all four fixtures must face inward toward the Tower Garden, not outward toward the room. It sounds obvious, but it is an easy mistake when you are assembling in a hurry. Each fixture arm is flexible, so bend them so the light heads point directly at the tower canopy.
Height and distance: aim to position the bulb end of each fixture about 6 inches from the top of your crops. That is close enough to deliver useful light intensity but far enough that leaves do not physically touch the bulbs. As your plants grow taller, readjust. Touching leaves will cause heat stress and browning at the tips even if the room temperature is fine overall.
Even spacing: keep the four fixtures spaced equally around the tower, roughly 90 degrees apart. This gives the whole column a balanced spread of light rather than bright hot spots on two sides and shadow on the others. After your first test run, walk around the tower and look for any section that looks noticeably dimmer. Bend that fixture arm slightly closer or reangle it toward the darker zone.
One thing worth knowing: the GT100 kit is optimized for herbs and leafy greens. The GT100 LED grow lights installation instructions PDF also describes assembling the four LED fixtures for the GT100 kit. It is not designed to support fruiting or flowering plants at the intensity those crops need. If you are growing tomatoes, peppers, or strawberries, manage your expectations or supplement with additional lighting.
Setting your light schedule: timing, duration, and daily cycles
The built-in timer is a 24-hour mechanical dial with 15-minute interval segments. It is straightforward once you understand how it works, but the physical setup trips people up the first time. If you are looking for garland grow light garden instructions, focus on matching the timing and fixture distance to your plants’ growth stage light schedule.
How to set the timer
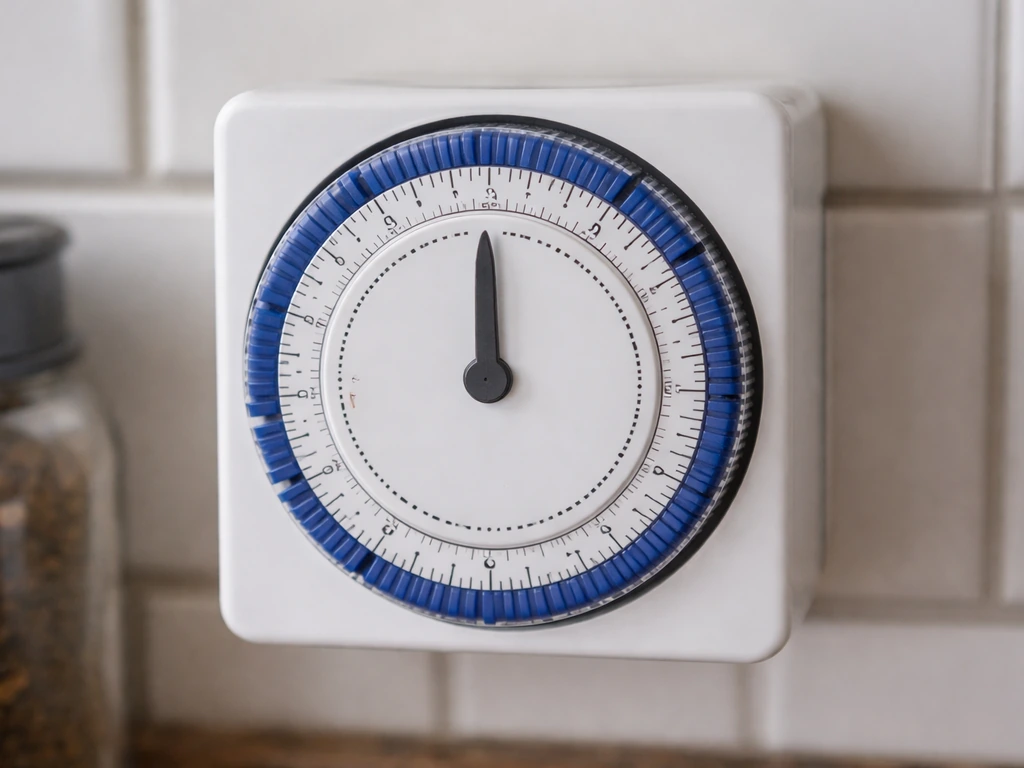
- Rotate the timer dial clockwise until the current time of day aligns with the pointer/indicator mark on the timer housing.
- Look at the outer ring of segments around the dial. Each segment represents 15 minutes of time.
- Push the segments outward (away from center) for every 15-minute block you want the lights to be ON.
- Leave segments in (flush/flat) for every block you want the lights OFF.
- Once set, the timer will repeat this cycle automatically every 24 hours.
How long should the lights run?
The official guidance is 14 to 18 hours on and 6 to 10 hours off per day. The GT100 manual narrows this slightly to 14 to 16 hours on and 8 to 10 hours off as a typical operating range. For most setups, starting at 16 hours on and 8 hours off is a solid default. You can also use these koscheal grow light instructions to fine-tune timing for your specific plants.
If you want a broader checklist for tuning a schedule and height, see bionic grow light instructions as an adjacent reference koscheal grow light instructions. Set the OFF period to happen overnight so you are not fighting the light schedule during the day and so plants get a consistent dark period.
The kit's product page uses a minimum of 14 hours per day as its baseline for energy cost estimates, which gives you a sense of the lower bound. Going below 14 hours for herbs and leafy greens will usually show up as slower, leggier growth within a couple of weeks. If you are switching to Barrina grow lights, use these barrina grow light instructions as a parallel guide for matching the hours and fixture placement to your plants.
Adjusting the schedule as plants develop
Young seedlings and established plants have different needs. Seedlings benefit from the higher end of the range (16 to 18 hours) because they are working hard to establish roots and build early leaf structure. Once plants are mature and actively producing, 14 to 16 hours is usually sufficient. If you notice plants looking pale, stretched, or slow to develop, try bumping up by one hour before making any hardware changes.
Tuning the setup for specific plant types
The GT100 is not a one-size-fits-all intensity tool the way some more expensive rigs are. You do not have a dimmer switch or PPFD readout. What you do have is adjustable fixture positioning and timer control, and those two levers go a long way.
| Plant Type | Recommended Hours On | Fixture Distance from Canopy | Notes |
|---|---|---|---|
| Herbs (basil, mint, cilantro) | 16 hours | 5–6 inches | Keep consistent; herbs bolt quickly if light cycle is irregular |
| Leafy greens (lettuce, spinach, kale) | 14–16 hours | 6 inches | Tolerates the lower end of the range once established |
| Seedlings (any type) | 16–18 hours | 5–6 inches | Move fixtures slightly closer as seedlings stretch toward light |
| Houseplants (foliage types) | 12–14 hours | 6–8 inches | Most houseplants need less intensity; start farther away and observe |
| Fruiting/flowering plants | Not recommended | N/A | GT100 is not optimized for this; supplement if needed |
For houseplants, you have a bit more flexibility. Many foliage plants are adapted to lower light, so starting with the fixtures a bit farther away (closer to 8 inches) and running 12 to 14 hours is a safer entry point. Watch for signs of light stress: bleached or yellowing leaves nearest the bulbs mean you need more distance; dark green, slow-growing, leggy stems mean you need more hours or closer placement.
For seedlings, the most common mistake is starting with too little light and then overcompensating. Set the fixtures at 5 to 6 inches from the moment you germinate, run 16 to 18 hours, and watch the seedlings' stem thickness. Thin, tall stems reaching for the light (etiolation) is the number one sign of insufficient intensity or too few hours. On the other hand, if seedling leaves cup downward or look washed out after the first week, back the fixtures off an inch or two.
If you are comparing this kind of guided setup to what you would do with other brand-specific systems, the principles are largely the same: seedlings want more, established plants want consistency, and the fixture distance is your main dial for intensity since you cannot dim these lights directly.
Troubleshooting: quick fixes for the most common problems
Most issues with the GT100 fall into a handful of predictable categories. Here is how to diagnose and fix each one without overthinking it.
Lights won't turn on
- Check the obvious first: is the power cord fully plugged into the outlet? Is the outlet working? Test it with another device.
- Check the timer. If the timer dial is set so the current time falls in an OFF segment, the lights will not come on even though everything is connected correctly. Rotate the dial or push the current time's segment outward to force an ON period.
- If the outlet is live and the timer is set to ON but nothing happens, check every wire terminal connection on each of the four fixtures. A loose terminal at one fixture can prevent the whole circuit from completing.
- Try a different outlet on a different circuit if you suspect a power fluctuation issue.
Lights flicker or are noticeably dim
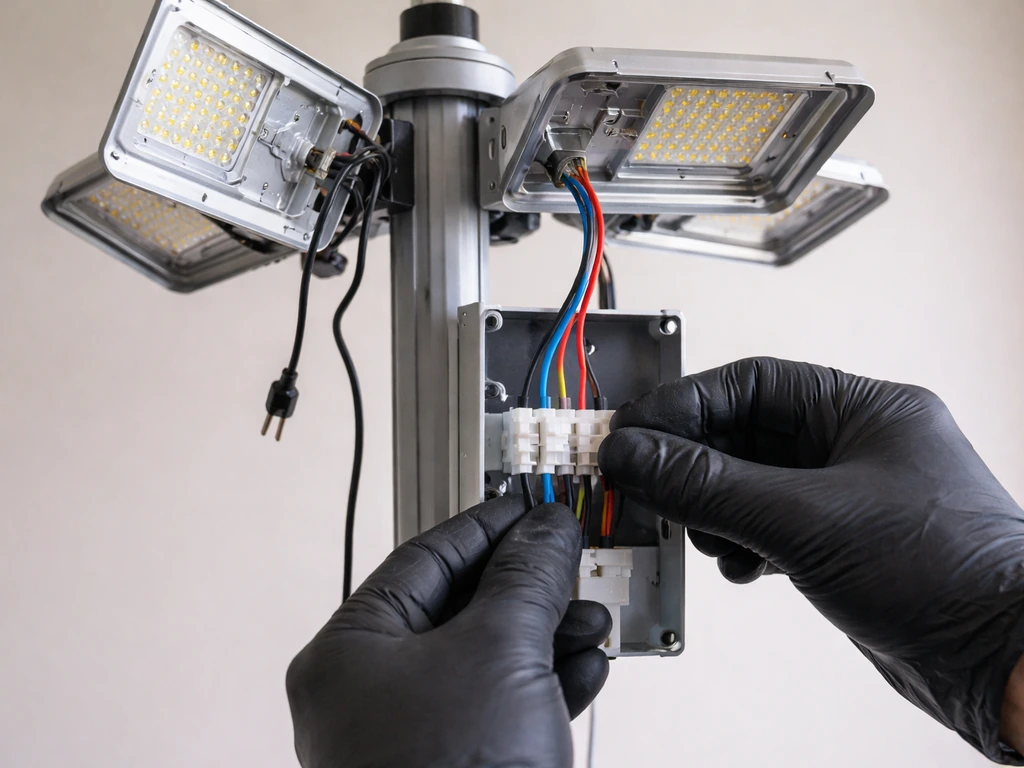
Flickering almost always points to a loose wire connection. Unplug the unit, then go through each of the four fixtures and reseat the wire terminal connections. Snap each fixture housing together firmly. If flickering continues after reconnecting, try a different outlet. Power fluctuations from a shared circuit (especially in older homes) can cause this. Do not use the same circuit as a refrigerator, microwave, or other high-draw appliance.
Uneven coverage: some plants not getting enough light
Walk around the tower with the lights on and look for dark zones. The fix is almost always fixture orientation. Re-bend the arm on the fixture nearest the dark zone so the light head points directly at that area. Also confirm the four fixtures are evenly spaced (roughly 90 degrees apart). If a fixture arm will not hold its position, check that the base is snapped fully into the lamp housing.
Plants showing stress: leaf burn, bleaching, or slow growth
- Leaf burn or bleaching near the top: fixtures are too close. Move them back to at least 6 inches from the canopy and make sure no leaves are touching the bulbs.
- Slow, leggy, pale growth: fixtures may be too far away or the timer is running fewer than 14 hours. Bring fixtures to 5 to 6 inches and confirm your ON segments on the timer add up to at least 14 hours.
- Wilting despite adequate water: check room temperature. If the space exceeds 35°C (95°F), the combination of heat and light is stressing the plants. Improve ventilation or add a small fan.
- Irregular day-to-day behavior: double-check that the timer dial was not accidentally bumped. It is a mechanical dial and can shift if the cord is pulled.
Timer not cycling correctly
If the lights come on or turn off at the wrong times, the most likely culprit is that the dial was not set to the actual current time when you first configured it. Unplug the unit, reset the dial to the current time by rotating clockwise, and re-push your ON segments. Each segment is 15 minutes, so count carefully: 16 hours on requires 64 segments pushed outward. It is tedious to count but worth doing precisely once so you do not have to revisit it.
Your workflow from unboxing to fully dialed in
Here is the full sequence in order so you have a single reference to come back to: You can also follow the Bseah grow light instructions for additional scheduling tips if you use a different controller or setup.
- Unbox and verify all parts (4 fixtures, hub with timer, power cord organizer).
- Assemble fixtures: connect wire terminals, insert base, snap housing together.
- Remove shower cap lid, insert full unit into shower cap opening all the way until seated.
- Route power cord between grow pots and attach cord organizer below the exit point.
- Orient all four fixtures inward toward the tower and space them evenly around the circumference.
- Bend fixture arms to position bulbs approximately 6 inches from the top of your plant canopy.
- Set the timer: rotate dial clockwise to current time, push ON segments outward (each = 15 min), target 16 hours on / 8 hours off to start.
- Plug in and run a quick visual check: do all four fixtures light up? Are they all pointing inward? Any dark zones visible?
- After 3 to 5 days, observe plants for stress signs (burn, bleaching, stretch) and adjust fixture distance or timer duration as needed.
- Revisit every 1 to 2 weeks as plants grow taller and the canopy moves closer to the fixtures.
That is genuinely everything you need to get the GT100 working correctly from day one. The setup is not complicated once you understand why each step matters. The most time-consuming part is the first timer configuration, and the most common ongoing task is just re-bending fixture arms as plant height changes. Do those two things consistently and the rest takes care of itself.
FAQ
Can I use the Tower Garden LED grow lights kit GT100 on other Tower Garden models or outside?
The GT100 is designed for Tower Garden Flex and Home indoor setups only. Do not use it outdoors or in wet or damp areas, and do not install it in a way that exposes the wiring to moisture, because the manual explicitly limits use to indoor environments.
What should I do if I smell a burning odor or see sparks when turning the GT100 on?
Unplug the unit immediately and do not troubleshoot while it is powered. Then inspect the four fixture connections and the power cord for damage or looseness, and contact Tower Garden support if anything looks cracked, bent, or otherwise abnormal.
How do I set the timer correctly if my outlet has a different position or if the light turns on briefly and then off?
Make sure the mechanical dial is set to the correct current time before pushing ON segments, because an incorrect starting time causes the schedule to land at the wrong moments. If the unit turns on briefly then off, verify the dial has fully engaged the segments and try a different outlet to rule out power instability.
Is there a safe way to clean the Tower Garden LED fixtures without risking electrical issues?
Unplug the kit first and let it cool. Wipe fixtures with a dry or lightly damp cloth only, avoid getting any water into the wiring or terminals, and do not use sprays that could run into joints or housings.
How do I adjust lighting when plants outgrow the 6 inch target distance?
As plants grow taller, re-bend the adjustable arms so the bulb ends stay around the recommended spacing. Re-check after major growth changes, and look for heat stress signs near the fixtures, such as tip browning or washed out leaves.
What if only one side of my tower stays darker even after I re-orient the fixtures?
Confirm each fixture arm is facing inward and the four fixtures are spaced evenly around the tower (roughly 90 degrees apart). Also check that each lamp housing base is fully snapped into place, because a fixture that will not hold position usually creates persistent shadowing.
Can I run the GT100 24 hours a day or leave it on longer than the typical schedule?
It is not recommended. The kit is intended for a photoperiod, typical guidance is 14 to 16 hours on with 8 to 10 hours off, and staying too long can lead to stress or poor growth patterns. If you need more intensity, adjust distance and photoperiod gradually rather than going to continuous light.
What are the clearest signs that I need to move the fixtures closer versus farther?
If leaves nearest the bulbs bleach or yellow, move the fixtures farther away by about an inch or two. If stems are thin and plants look stretched (etiolation) or growth is slow, move closer toward the recommended range and consider increasing hours within the target window.
How should I tune the schedule differently for seedlings versus established plants?
Seedlings usually do better with the higher end of the on-time range (often 16 to 18 hours) and a starting distance around 5 to 6 inches. Established leafy plants often do well around 14 to 16 hours, and if mature plants look pale or slow, increase by about one hour before changing hardware.
What if my plants are flowering or fruiting, do I need to change anything?
The GT100 is optimized for herbs and leafy greens, not fruiting or flowering crops that need higher intensity. If you grow tomatoes, peppers, or strawberries, expect slower results and consider supplemental lighting, since fixture positioning and timer changes alone may not provide the intensity those plants require.
Can I use the GT100 with other grow light brands or controllers?
Avoid mixing control systems unless you are replacing the entire controller setup in a way your hardware can safely support. The GT100 relies on its built-in timer, and using an external controller incorrectly can cause schedule errors, so stick to the kit’s intended operation unless you have a documented, compatible method.
Next Article
Bionic Grow Light Instructions: Setup, Mounting, and Dial-In
Step-by-step bionic grow light instructions for setup, mounting, wiring, height tuning, schedules, and quick troubleshoo