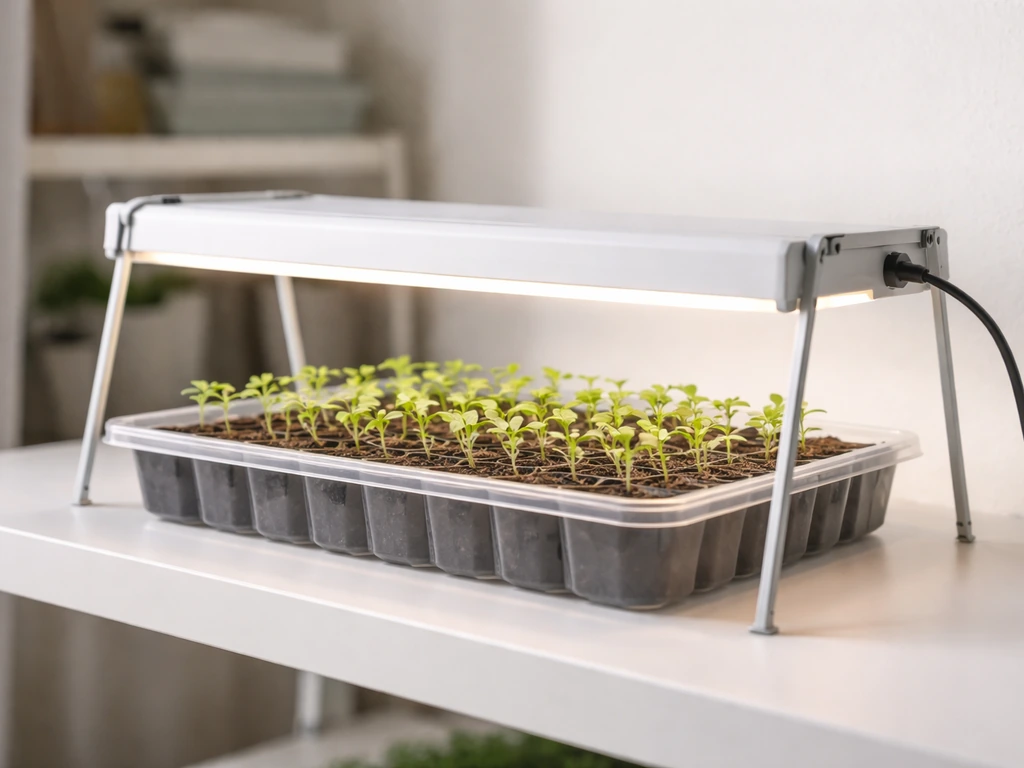
Set up your Sunblaster grow light by assembling the frame (support bars into the base tray, height adjuster clamps onto the bars, canopy slid over the top), snapping your LED or T5HO strip light into the canopy clips, then plugging the power cord into the fixture socket first and into the wall second. If you are using a Vivosun 600W LED grow light, follow the vivosun 600w led grow light manual for the correct setup steps and operating settings. Start the canopy 6 to 8 inches above your seedlings or 12 to 18 inches above larger plants, run the light 16 hours on and 8 hours off for most vegetative growth, and use the included analog timer to automate the schedule. That gets you going today. Everything below tells you exactly how to dial it in for your specific plants and fix problems as they come up. If you are looking for fast, step-by-step likesuns LED grow light instructions, follow the same setup flow and adjust distance and timing to your plants.
Sunblaster Grow Light Garden Instructions: Setup to Troubleshooting

Unbox and identify your Sunblaster light parts
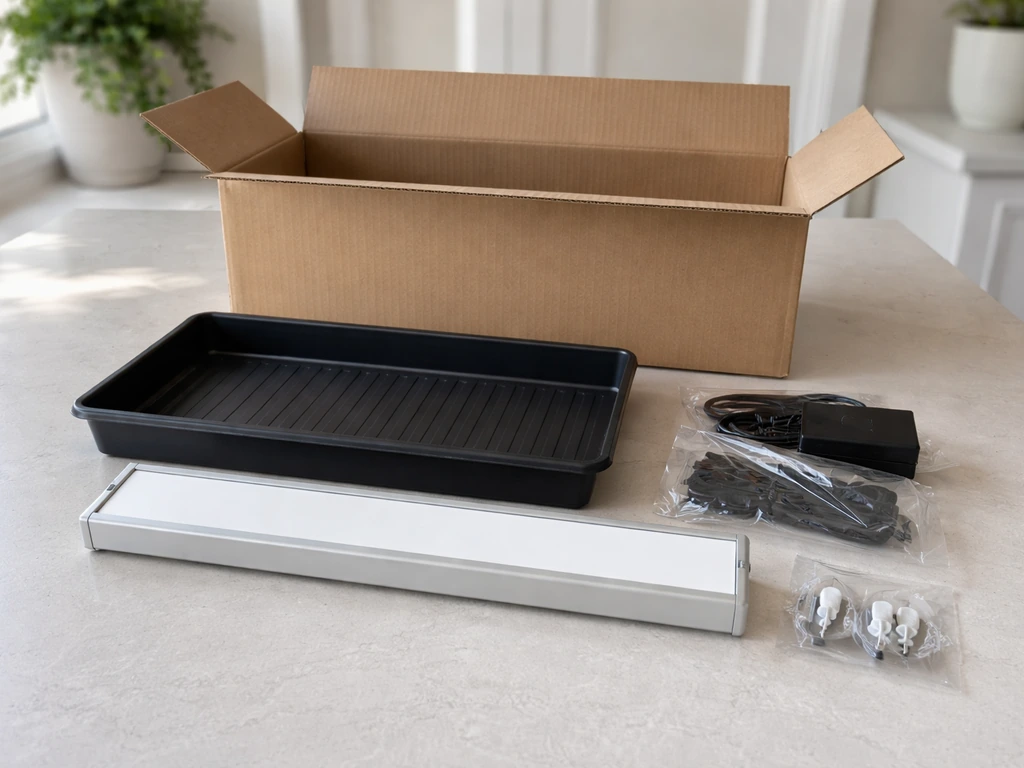
Before you touch anything electrical, open the box completely and lay every piece out on a flat surface. Sunblaster ships different configurations depending on which product you bought, so it helps to know what you have before you start assembling.
If you have a Growlight Garden (the self-contained tray-and-light combo), your box should contain: a base growing tray, two aluminum support bars, height adjuster clamps with thumb screws, a canopy frame, plastic caps for the top of the support bars, and either one LED strip light (Micro Growlight Garden) or two LED strip lights (standard Growlight Garden). The Micro has a single strip; the regular model has two. Check the box label if you are not sure which one you bought.
If you have a T5HO Combo (the standalone strip light without a tray), your kit includes: the T5HO strip light fixture, an electronic ballast, a 6400K lamp, a power cord with an on/off switch, and a jumper plug with both hanging hardware and flat surface mounting clips. Some kits also include NanoTech reflector clips if the reflector is not pre-attached.
- Base tray (Growlight Garden models only)
- Aluminum support bars (usually two, Growlight Garden models only)
- Height adjuster clamps with thumb screws (Growlight Garden models only)
- Canopy frame or light housing
- LED strip light(s) or T5HO lamp and ballast
- Power cord with on/off switch
- Mounting hardware: hanging clips and flat surface clips (T5HO Combo) or plastic bar caps (Growlight Garden)
- Jumper plug (T5HO Combo)
- Any included timer (sold separately or bundled)
If anything is missing, contact Sunblaster before powering on. Running the fixture without the ballast connected properly (on T5HO models) will not work and can damage the lamp. For the LED Growlight Garden, the strip lights snap directly into ballast clips on the canopy, so verify all clips are present and intact before assembly.
Set up safely and mount for best coverage
Assembling the Growlight Garden
- Insert the aluminum support bars into the designated holes in the base tray. They should seat firmly with no wobble.
- Slide the height adjuster clamps onto each support bar. Do not tighten the thumb screws yet, you will set the final height later.
- Slide the canopy over both support bars from the top. It should rest on the adjuster clamps.
- Press the plastic caps onto the tops of the support bars to lock everything in place.
- Snap the LED strip light(s) into the ballast clips on the underside of the canopy. Press firmly until each strip clicks.
- Connect the power cord to the socket at the end of the light fixture. Do not plug the other end into the wall yet.
Mounting the T5HO Combo
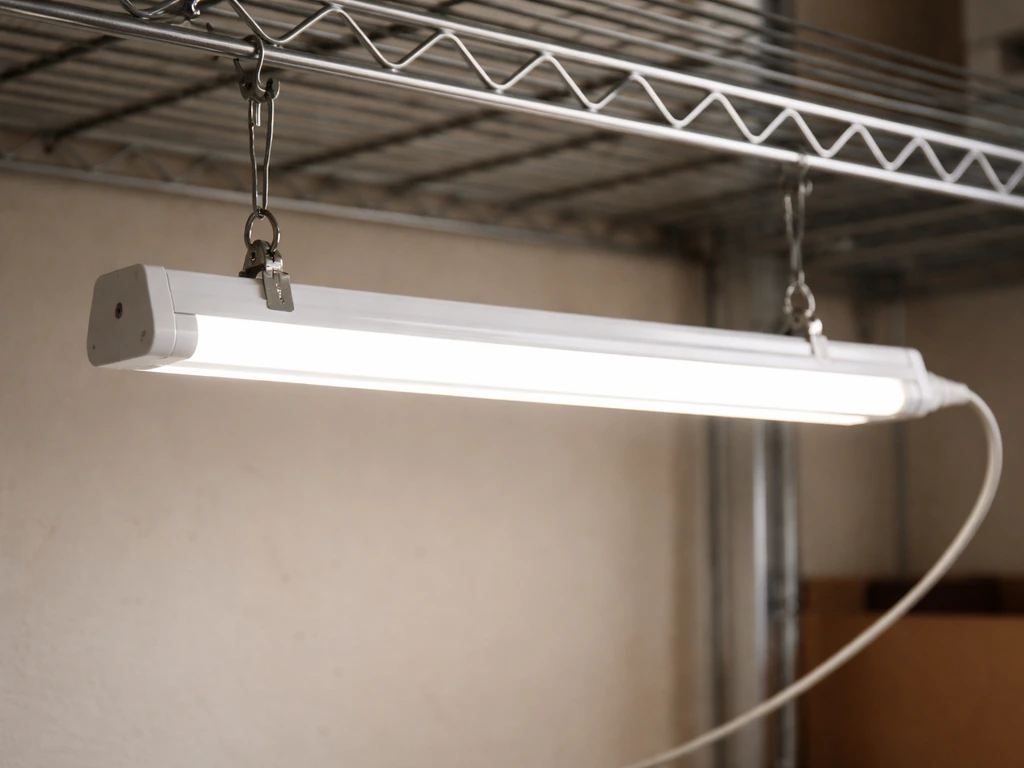
For the T5HO strip light, decide whether you are hanging it or mounting it flat. Use the included hanging clips to suspend it from a shelf, wire rack, or overhead support, or use the flat surface clips to mount it directly under a cabinet shelf. Either way, make sure the fixture is level. An uneven fixture creates uneven light distribution and some plants will get significantly more light than others. Once it is mounted, install the 6400K lamp by inserting it into the lamp holders at both ends until it clicks.
Safety basics before you plug in
- Keep all water and moisture away from the power cord, outlet, and fixture connections. Use a drip loop on the cord if it runs near a water source.
- Do not look directly at the T5HO lamp when it is running. The UV output is low but prolonged direct exposure is not good for your eyes.
- Make sure the power cord is not pinched, kinked, or running under anything heavy.
- Plug into a grounded outlet. Do not use ungrounded adapters.
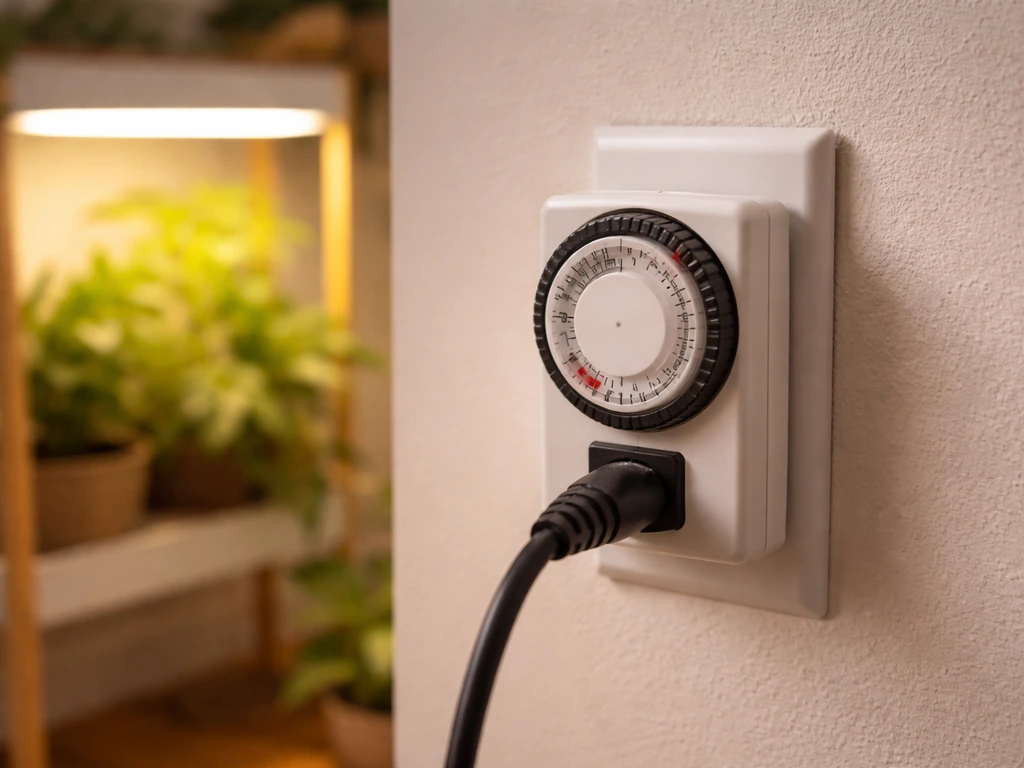
- If you are using a timer, plug the timer into the wall first, then the light into the timer. This keeps the switching load off your hands.
- Check that the canopy or fixture is secured and will not fall onto plants or a water tray.
Sunblaster's T5HO Combos are designed for minimal heat output, which is one of the reasons they recommend placing the fixture as close as 6 inches above the canopy. That said, keep flammable materials (paper, fabric, dry plant debris) away from the fixture and do not cover the ballast area.
Coverage and reflective surfaces
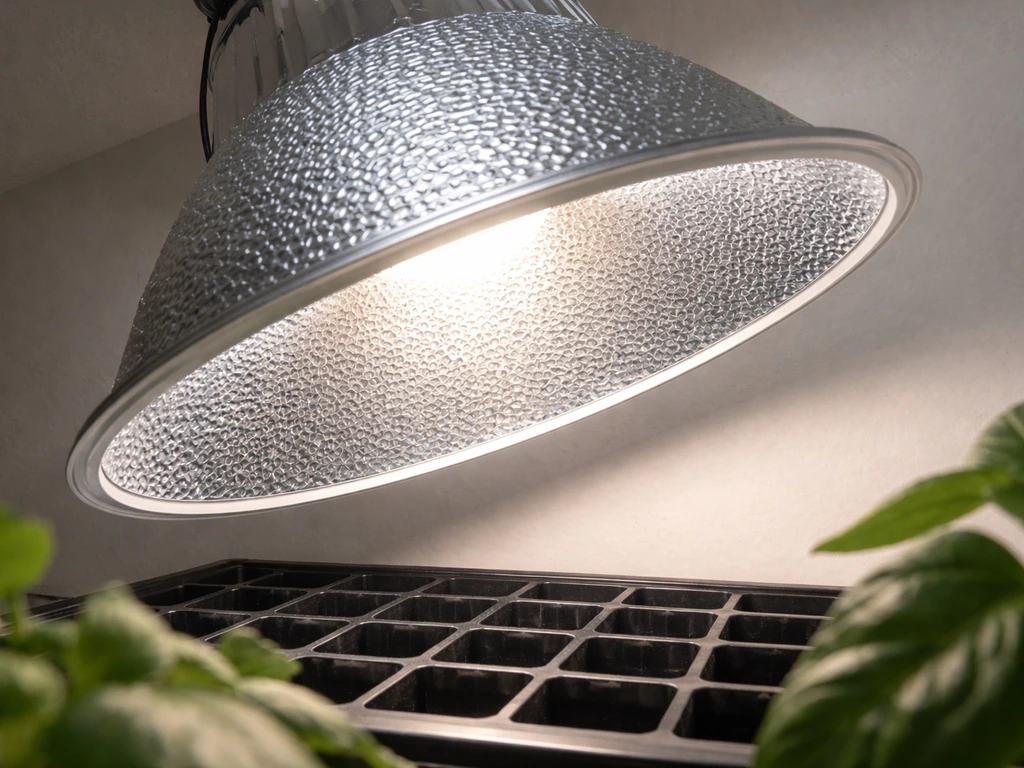
One of the practical advantages of Sunblaster T5HO Combos with the NanoTech reflector is that plants do not need to be rotated to the center of the lamp. The reflector spreads and diffuses light enough that coverage is reasonably even across the fixture's length. Still, try to keep your plant containers centered under the fixture rather than bunched to one side. If you are growing in a closet or small tent, lining the walls with white poly or mylar sheeting bounces stray light back onto plants and measurably improves coverage without buying extra lights.
Distance, intensity, and coverage by plant type and growth stage
This is where most people make their biggest mistakes. Too far away and plants stretch toward the light and get weak. Too close and you can bleach or burn leaves, especially with T5HO lamps running at full power. The good news is Sunblaster gives you a usable starting point: 6 to 8 inches above the plant canopy for their T5HO fixtures, and the Growlight Garden canopy adjusts up to 18 inches if you need more distance.
| Plant type / stage | Recommended distance from canopy | Notes |
|---|---|---|
| Seedlings (first 2 weeks) | 6 inches | Start close to prevent stretching; raise gradually as plants develop |
| Vegetative growth (established) | 8–12 inches | Move up as plants grow taller |
| Houseplants (low to medium light) | 12–18 inches | More forgiving; watch for leggy growth as a sign to lower the light |
| Herbs and greens (active growth) | 6–10 inches | Keep consistent; these benefit from intensity |
| Flowering / fruiting plants | 8–12 inches | Maintain intensity; these need more light energy than vegetative stages |
The Sunblaster approach for the Growlight Garden is to start the canopy close to your plants and move it up gradually as they grow. This is exactly right. A seedling tray on day one can have the canopy nearly touching the tops of the cells. After a week, raise it an inch or two. By the time you are transplanting, you might be at 10 to 12 inches. The adjustable clamps make this easy, and you do not need to re-level anything, just loosen the thumb screws, slide the canopy up, and retighten.
For T5HO wattage context: the 12-inch lamp draws 11W, the 24-inch draws 24W, the 36-inch draws 39W, and the 48-inch draws 54W. More wattage means more light intensity at the same distance, so if you have a longer, higher-wattage fixture over a small tray of seedlings, err toward the higher end of the distance range (8 inches rather than 6) to avoid overwhelming young plants.
Light schedule: hours per day and how to use a timer
Plants need consistent light cycles, and getting this wrong is probably the most common reason for poor indoor growing results. The good news is a simple analog timer handles everything automatically once you set it.
Recommended daily photoperiods
| Plant type / goal | Hours of light per day | Light cycle |
|---|---|---|
| Seedlings and propagation | 16–18 hours | 16 on / 8 off or 18 on / 6 off |
| Vegetative herbs, greens, houseplants | 14–16 hours | 16 on / 8 off is the standard starting point |
| Flowering plants (day-neutral) | 12–16 hours | 12 on / 12 off triggers flowering for some species |
| Long-day plants (lettuce, spinach) | 16–18 hours | More light keeps them in vegetative/harvest mode |
| Short-day plants (chrysanthemums, some cannabis) | 12 hours | 12 on / 12 off required to trigger and maintain flowering |
The Sunblaster 24-hour analog timer controls lights in 15-minute increments and is designed to set cycle times of 12, 16, or 18 hours. That maps perfectly to the most common indoor growing schedules. To set it: plug the timer into the wall, rotate the dial to the current time, then press down the tabs for the hours you want the light ON and leave the tabs up for the OFF period. Plug the light into the timer outlet and you are done.
A few timing mistakes to avoid: do not run your lights during the hottest part of the day if heat is a concern in your space. Running lights at night when ambient temps drop keeps the grow area cooler. Also, do not let the ON period wander by manually overriding the timer frequently. Plants adapt to consistent cycles, and inconsistent photoperiods stress them, especially if you are trying to trigger or maintain flowering.
Wiring and controls checklist before going live
Run through this before you plug into the wall for the first time. It takes two minutes and prevents most common first-day problems.
- Verify the lamp (T5HO) or LED strip is fully seated in its clips or holders. Partially inserted lamps will flicker or not light at all.
- On T5HO Combos: confirm the ballast is connected to the fixture. The ballast should not be dangling loose.
- Check that the jumper plug (T5HO models) is inserted if you are running a single-lamp setup. Missing the jumper is a common reason T5HO fixtures appear dead.
- Connect the power cord to the socket at the end of the fixture first, then route it to your timer or wall outlet.
- If using the on/off switch on the power cord, make sure it is in the OFF position before plugging into the wall.
- Plug the timer into the wall outlet, then plug the light power cord into the timer.
- Set the timer to your desired schedule.
- Turn the on/off switch on the power cord to ON.
- Observe the light for 30 seconds: it should come on fully without flickering. T5HO lamps may take a few seconds to reach full brightness, which is normal.
If the light does not come on: check that the timer tabs are set to the current time being an ON period, confirm the outlet has power (plug in a phone charger to test), and re-seat the lamp or LED strip. If a T5HO lamp flickers continuously, the lamp may be faulty or the ballast connection is loose. Sunblaster T5HO lamps are rated for 10,000 hours, so a new lamp that flickers right out of the box is a warranty issue, not a setup issue.
Troubleshooting plant problems under your Sunblaster
Once the light is running, your plants will tell you pretty quickly if something is off. Here is what to look for and what to do about it.
Leggy, stretched-out growth
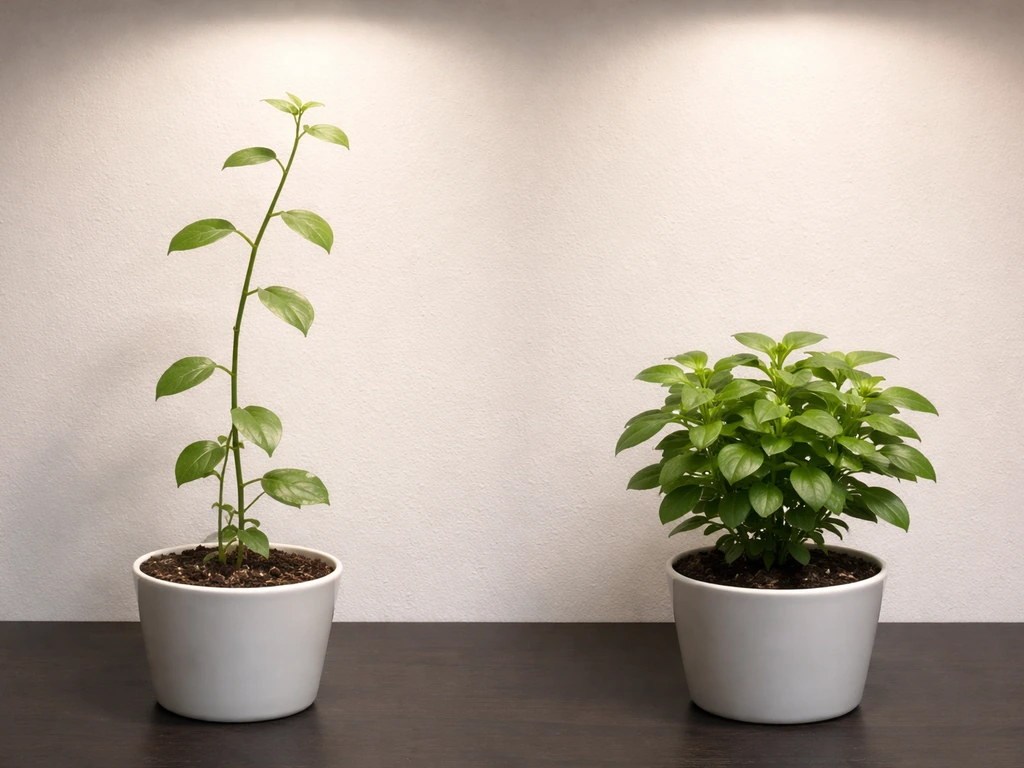
Long, weak stems reaching upward with wide gaps between leaves is the clearest sign your light is too far away or running too few hours. For Sunblaster setups, lower the canopy or fixture by 2 to 4 inches and check that you are running at least 16 hours per day for seedlings. If you are using a VIVOSUN 4000 grow light, the same idea applies: start with the manufacturer’s recommended height and photoperiod, then adjust based on how your leaves respond VIVOSUN 4000 grow light instructions. The Growlight Garden is designed to start close and move up, so if you started too high (more than 10 to 12 inches on young seedlings), just lower it. Growth should tighten up within a week.
Leaf bleaching or scorching
White or pale patches on the tops of leaves, or crispy brown edges directly under the fixture, mean the light is too close or the plant has been under it too long without acclimation. Raise the fixture by 2 to 3 inches and check for heat buildup. Sunblaster T5HO Combos are low-heat, but if the ballast area is enclosed with no airflow, ambient heat can accumulate. Move the bleached leaves will not recover, but new growth should come in healthy once you adjust the distance.
Yellowing leaves
Overall yellowing (especially in lower or older leaves) is usually a nutrient issue, not a light issue. But if the yellowing is happening in newer growth at the top of the plant, or if it is accompanied by general paleness across all leaves, your light may be too weak or too far. First rule out watering and fertilizer problems, then check light distance and hours. Also check that your T5HO lamp is not old: at 10,000 rated hours, a lamp that has been running 16 hours a day has been used for roughly 625 days before hitting its rated lifespan. If you inherited a used setup, the lamp may need replacing.
Uneven growth across the tray
Plants on the edges of the tray growing slower or leggier than those in the center is a coverage problem. Make sure your fixture is centered over the tray, not offset to one side. On the T5HO Combo, the NanoTech reflector does a good job of spreading light, but edge plants will always get slightly less. Rotate your containers end-to-end (not side-to-side) every few days, or line the sides of your grow area with a reflective white surface to bounce light inward.
No growth or very slow growth despite correct setup
If everything looks physically correct but growth is frustratingly slow, check these in order: Are you actually hitting 16 hours of light per day (verify the timer is working)? Is the light spectrum intact (a failing T5HO lamp often dims before it dies, check the lamp age)? Is the temperature in your grow space appropriate (below 60 F or above 85 F slows most plants regardless of light)? Are you watering and feeding at the right intervals? Light is one part of the system, and slow growth is often a combination of factors.
Spotty discoloration or mottled leaves
Random spots or a mottled pattern across leaves is rarely a light issue. This is more likely a pest problem (spider mites, fungus gnats) or a fungal/bacterial issue often worsened by overwatering. Check under the leaves and at the soil surface. That said, if the canopy or fixture is too close and creating uneven hotspots, you might see irregular patterning. Raise the light a few inches and see if new growth comes in clean.
Quick-start workflow for seedlings, houseplants, and flowering plants
Starting seedlings
- Fill your Growlight Garden tray or seed cells with a quality seed-starting mix.
- Sow seeds at the depth the packet recommends.
- Set the Sunblaster canopy 6 inches above the tops of the seed cells.
- Set your timer to 16 hours on, 8 hours off. Run lights during your waking hours if possible so you can observe plants daily.
- Keep the growing medium consistently moist but not saturated.
- As seedlings emerge and reach 2 to 3 inches tall, raise the canopy by 1 to 2 inches.
- Continue raising gradually until you reach 10 to 12 inches as plants approach transplant size.
- Transplant when plants have 2 to 4 true leaves and roots are visible at the bottom of the cell.
Maintaining houseplants
- Position the T5HO Combo or Growlight Garden 12 to 18 inches above the tops of your plants.
- Set the timer to 14 to 16 hours on, 8 to 10 hours off.
- Check plants weekly: if they are reaching toward the light or becoming leggy, lower the fixture by 2 inches.
- Water on your normal schedule. Grow lights can increase evaporation slightly, so check soil moisture more often in the first two weeks.
- Most houseplants do not need supplemental nutrients from grow lights alone, but if you see slow growth after a month, consider a light liquid fertilizer.
Pushing plants into flowering
- Confirm your plant species is short-day (needs 12 hours darkness) or day-neutral before adjusting the schedule.
- Switch the timer to 12 hours on, 12 hours off for short-day species.
- Keep the light at 8 to 12 inches above the canopy to maintain intensity during the shorter photoperiod.
- Make sure the dark period is truly dark. Even small light leaks from other sources can interrupt the flowering signal for sensitive species.
- Once flowering begins, maintain the 12/12 schedule consistently until harvest or bloom completion.
- For day-neutral flowering plants (like many herbs and vegetables), stay at 14 to 16 hours and let the plant flower on its own schedule.
The Sunblaster 6400K spectrum (with intensity peaks at 435 nm and 680 nm) is designed to support both propagation and longer-term growth, so you do not need to swap lamps between stages for most applications. It is not a dedicated flowering spectrum, but it will carry plants through vegetative growth and support flowering in day-neutral species without swapping hardware. If you are growing dedicated short-day flowering plants long-term, a warmer spectrum lamp (3000K range) can help, but that is an upgrade, not a day-one requirement.
If you have been researching other grow light brands like Vivosun or Juhefa for comparison, the core setup principles (distance, photoperiod, acclimation) are similar across all brands. If you need the exact controls and setup steps, follow the vivosun vs1000 grow light instructions for your specific model and adjust distance and timing to match your plants. What makes Sunblaster distinct is the self-contained Growlight Garden format and the NanoTech reflector on the T5HO Combo, both of which are designed to simplify setup for beginners without sacrificing effective coverage. If you are using a sunraise grow light manual, follow its guidance for your exact model before dialing in distance and timing.
FAQ
Can I run the Sunblaster grow light longer than 16 hours per day for seedlings to speed up growth?
You usually should not. If you consistently exceed the recommended photoperiod, you can increase stress and heat load, and plants may show legginess followed by uneven growth. If you want to experiment, adjust in small steps (for example, 15 to 16 hours), then change only one variable at a time (distance first, then hours).
How do I confirm my timer is actually switching on and off correctly?
After setting the current time and ON tabs, do a quick test: watch the light turn on within the next scheduled interval and verify it turns off at the next off window. If your plants later show inconsistent growth, re-check that the dial is set to the correct time and that the timer is firmly plugged in at both ends.
What should I do if my T5HO light starts but the lamp flickers or cycles oddly?
Unplug the unit and re-seat the lamp ends fully so they click into place, then check that the ballast connections are secure (only after confirming power is off). If it continues to flicker immediately, treat it as a likely faulty lamp and request warranty support, since a new lamp should not exhibit flicker right away.
Is it safe to cover the ballast area or enclose the fixture in a sealed box for a closet setup?
No. The ballast section needs airflow, and enclosing it can trap heat even if the lamp itself is low-heat. Keep flammable materials away from the fixture, and leave the ballast zone unobstructed so ambient heat does not build up.
Can I mount the T5HO fixture slightly tilted to spread light better?
Avoid tilting unless you have a way to keep it level consistently. The fixture is designed for uniform distribution when it is horizontal, and tilting tends to create hotspots, uneven leaf bleaching, and faster growth only on the brighter side.
My plants are only growing fast on the center of the tray, the edges are slow. Do I need a bigger light immediately?
Try coverage fixes first. Center the fixture over the tray, then rotate containers end-to-end every few days. On NanoTech reflector models, you still may see some edge reduction, but reflective side walls (white poly or mylar) often improves it without upgrading the fixture.
Do I need to acclimate seedlings when I lower or raise the canopy?
Yes. When you change distance, plants adjust over several days. If you lower the fixture, do it gradually (for example, 1 to 2 inches and then reassess) to prevent top-leaf bleaching and crispy margins that typically show up under intense light.
If the leaves bleach, will the damaged tissue recover after I raise the light?
Usually no. Bleached or crispy tissue is damaged and will not return to normal, but new growth should emerge healthier once you correct distance and heat buildup. The goal is to stop the problem, not to expect reversal of existing spots.
How do I handle temperature swings from running lights at night versus daytime?
If heat is a concern, running at night can keep the room cooler because ambient temperatures often drop. However, verify your grow space stays within a reasonable range, since many plants slow when temperatures fall too low or rise too high regardless of light intensity.
Does the Sunblaster 6400K lamp work for flowering, or do I need to swap to a different spectrum?
For many day-neutral or general vegetative-to-flowering workflows, 6400K can carry plants through flowering without a lamp swap. If you are committed to dedicated short-day flowering species, consider a warmer spectrum upgrade (such as 3000K range), but treat it as an enhancement rather than a requirement on day one.
What is the best order to troubleshoot if my growth is slow but the light seems to be working?
Use a checklist approach. First verify the photoperiod (timer tabs and dial time). Then confirm light delivery (lamp age, lamp fully seated, no failing/dimming). Next check room temperature, then move to watering and feeding intervals. Many “light problems” are actually nutrient, water, or temperature mismatches.
How can I estimate lamp age or remaining life for a used setup?
If you know how long it has run, use the operating rhythm in hours per day. For example, at 16 hours per day, a 10,000-hour rated lamp is roughly 625 days to rated lifespan. If the fixture was used before you owned it, plan for possible replacement if brightness has noticeably dropped or symptoms persist.
Should I rotate the plants side-to-side or end-to-end for even growth?
Rotate end-to-end, not side-to-side, when you are addressing coverage that varies along the fixture length. This helps plants experience more uniform intensity across the entire tray area without concentrating uneven exposure in one orientation.
When should I start raising the canopy as plants grow?
Start with a close position for early growth, then raise gradually on a schedule tied to plant height. A practical rule is to increase distance after the first week or whenever you see the canopy getting too close to the plant tops, since later stages typically benefit from more spacing to reduce stress and allow even light distribution.
Juhefa Grow Lights Manual: Setup, Controls, Placement and Fixes
Step-by-step Juhefa grow lights manual help: setup, mounting, controls, placement, scheduling, and troubleshooting fixes
