To get your VIVOSUN 600W-class LED grow light running today: hang it 18–24 inches above seedlings or 12–18 inches above established plants, plug it in, start at 50–75% intensity if it has a dimmer, and run it 18 hours on / 6 hours off for seedlings or 12/12 for flowering. That gets you growing. The rest of this guide walks you through every step of assembly, mounting, scheduling, and what to do when something goes wrong.
Vivosun 600W LED Grow Light Manual: Setup, Use, Troubleshoot

Marcus Tillman
30 Apr 2026
What comes in the box and what this light is designed for
A quick note before we dive in: VIVOSUN's current VS LED lineup (VS1000, VS2000, VS3000, VS4000, and similar models) doesn't include a model officially called the 'VS600W' in their series documentation. If your box says 600W, it's most likely a blurple or older-style LED marketed at an equivalent HPS wattage, not a Samsung-diode VS-series fixture. That matters because the controls, spectrum, and setup instructions differ slightly. This guide covers both cases so you can apply it to whatever unit you have.
Regardless of the exact model, a VIVOSUN 600W-class LED grow light is built for small to mid-size grow tents, typically 2x4 ft or 4x4 ft coverage areas. It's used for seedlings, vegetative growth, and flowering, and it's a solid beginner light for home growers who want a step up from weak household LEDs without spending professional-level money. The VS-series units use Samsung LM301D diodes running full spectrum from 380 to 780 nm, which covers everything from UV to near-infrared. Plants see it as a full natural light source rather than the patchy blue-red coverage of older grow lights.
Standard box contents typically include:
- The LED grow light fixture (board and driver housing)
- Hanging ratchet straps or rope hangers (usually one pair)
- A hanging bracket or hooks
- A power cord (usually already attached)
- A dimmer knob or controller unit (model-dependent)
- A user manual and warranty card
Before you do anything, lay everything out and confirm all pieces are present and undamaged. Check the driver (the rectangular box connected to or separate from the light board) for any cracks or bent connectors. If the light arrived with a separate controller cable, make sure it's not pinched or frayed. Shipping damage on the driver is the number one reason a brand-new light won't power on.
Assembly, hanging, and power connections
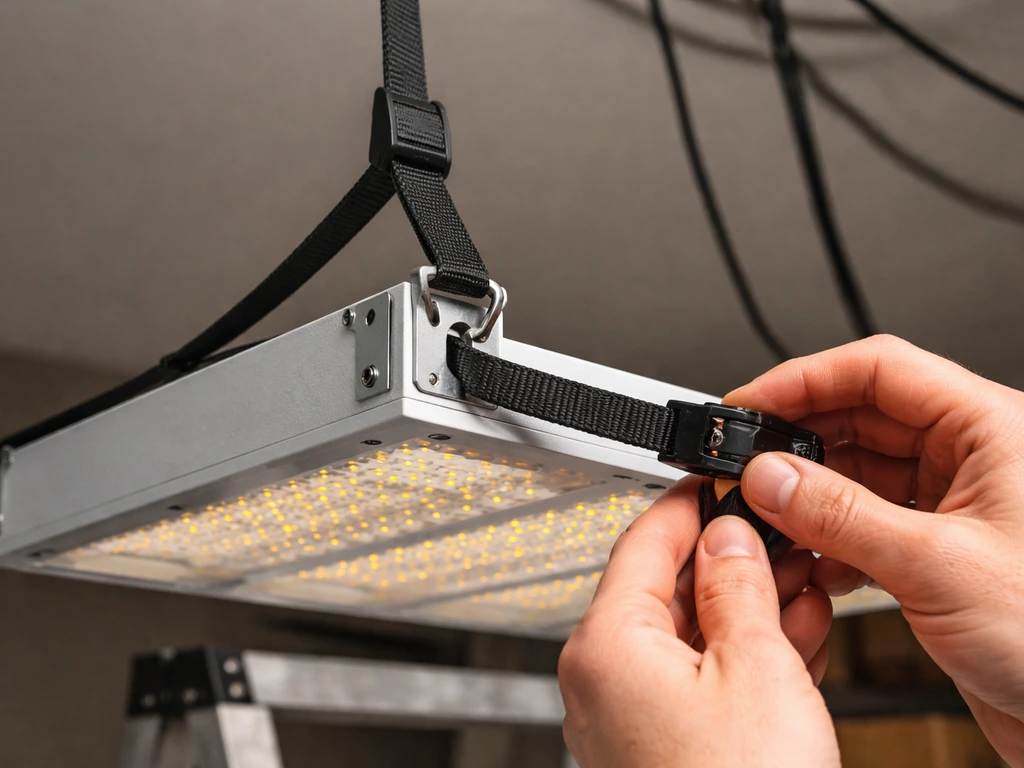
Attaching the hangers
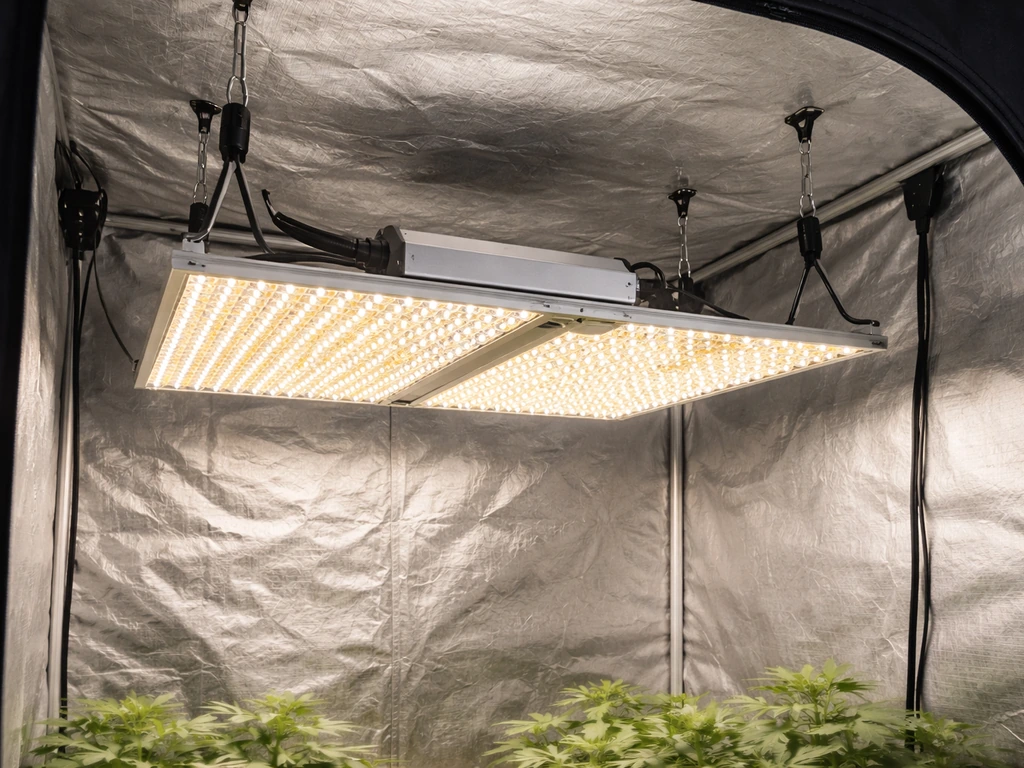
Thread the ratchet straps through the hanging brackets on each corner (or end) of the fixture. Most VIVOSUN lights have two hanging points. Pull the free end of each strap through the ratchet mechanism until you have a comfortable length of slack, then attach the hooks to your grow tent's top bar or ceiling anchor. Do not attach hooks to drywall or hollow ceiling material. You need a solid anchor point, like a tent's cross bar or a mounted wall stud hook, because even a compact LED can weigh 5–10 lbs and vibration from fans can work hooks loose over time.
Setting the initial height
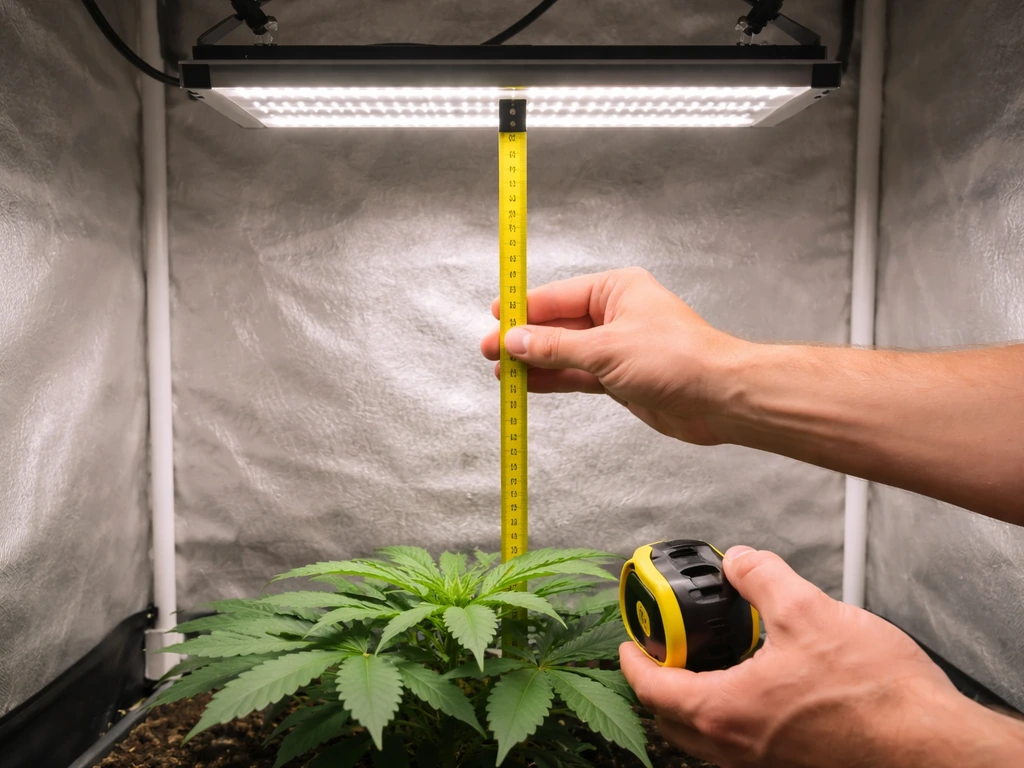
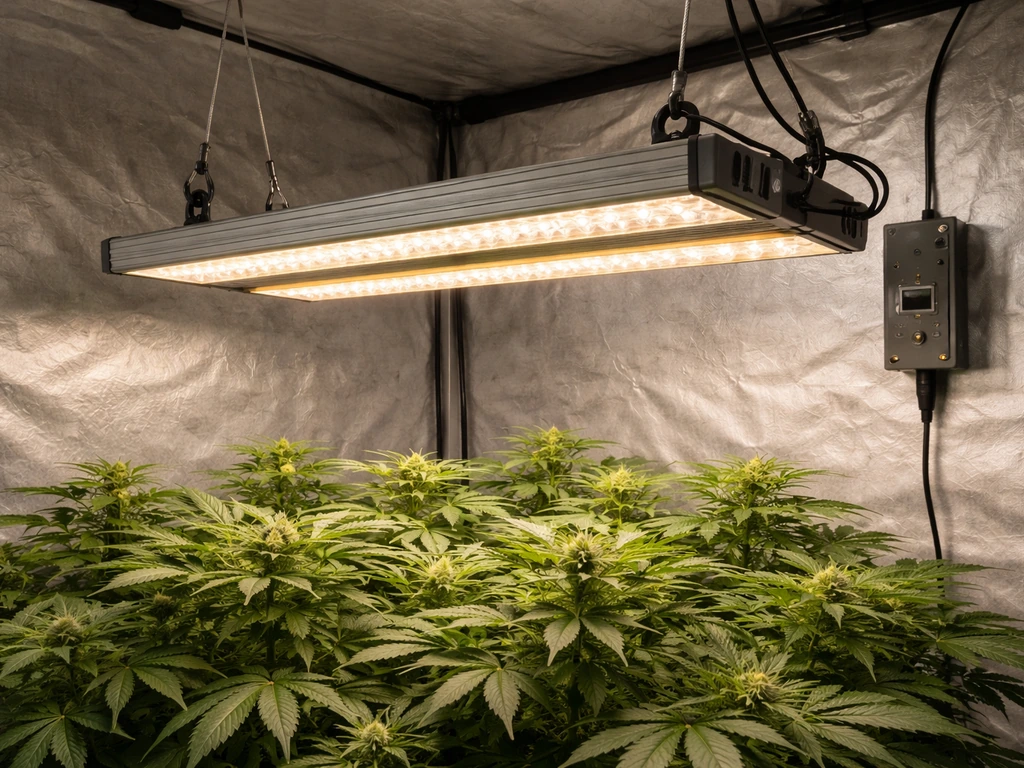
Start with the light higher than you think you need it and work your way down. For a 600W-class LED, start at 24 inches above the plant canopy for seedlings. You'll dial this in over the first week based on how the plants respond. Use the ratchet straps to raise or lower the fixture without unplugging anything. Once you lock the ratchets, give the fixture a gentle tug to confirm it's seated and won't drop.
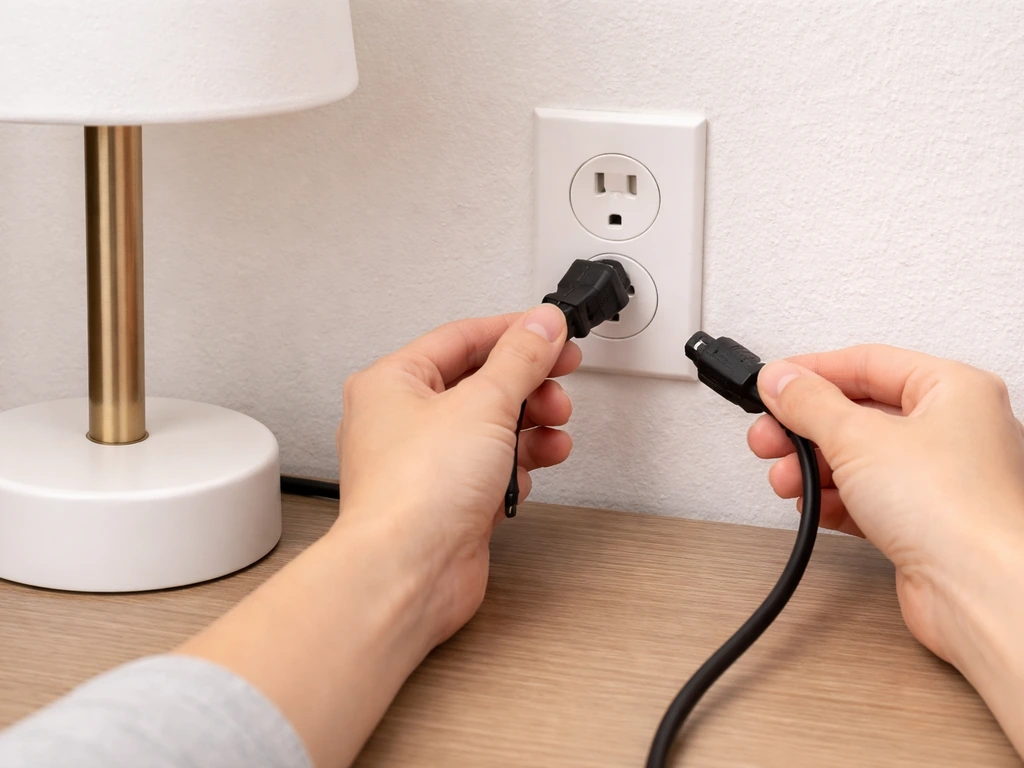
Plugging in and connecting the driver
If your fixture has an external driver (a separate box connected by a wire), connect the driver cable to the light board before plugging the driver into the wall. Always connect the fixture end first, then the power end. Plug into a grounded 3-prong outlet. Do not use an ungrounded adapter or an overloaded power strip. A 600W LED at full power draws roughly 4–6 amps depending on the actual wattage, so make sure the circuit can handle it alongside any fans, timers, or other equipment. A 15-amp household circuit can run a grow tent comfortably, but don't stack too many devices on one outlet strip.
How to operate the controls, dimmer, and timer
Turning it on and using the dimmer
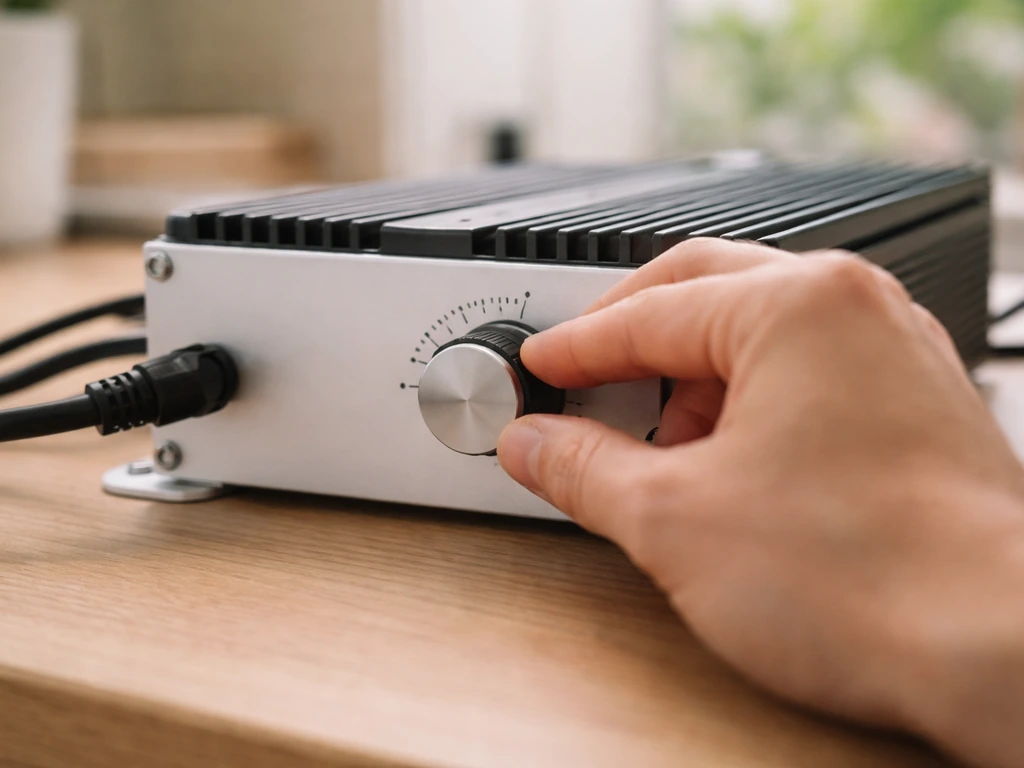
Most VS-series and 600W-class VIVOSUN lights have a dimmer knob on the driver or a controller module. Turn the dimmer to zero before plugging in, then slowly increase to your target intensity after the light is powered up. This prevents an abrupt power surge and is gentler on the diodes over time.
The VS-series supports 0–100% dimming (the VS1000E is an exception and has more limited dimming behavior, so check your specific model). For most plants, you won't run this thing at 100% unless you're deep into flowering with a full canopy. Starting at 50–75% is almost always the right call. For VIVOSUN 4000 grow light instructions, follow the same setup principles, then match the height and schedule to the model’s controller and dimmer behavior.
Setting a light schedule with a timer
VIVOSUN's 600W-class lights don't have a built-in timer, so you'll need an external outlet timer. These are cheap (under $15) and essential. Plug the timer into the wall, then plug the light's power cord into the timer. Set the timer for the schedule that matches your growth stage. Consistency matters more than perfection here: plants respond to a steady rhythm, so a light that comes on at 7 AM every day is better than one that varies by an hour.
| Growth Stage | Light Schedule | Darkness Period | Notes |
|---|---|---|---|
| Seedlings | 18 hours on | 6 hours off | Start at 50% intensity, 24" height |
| Vegetative | 18 hours on | 6 hours off | Can push to 75–100% intensity |
| Flowering | 12 hours on | 12 hours off | Strict dark period triggers blooming |
| Clones/cuttings | 18–20 hours on | 4–6 hours off | Low intensity, 24–30" height |
Placement and distance rules by plant type and growth stage
Height above the canopy is probably the most important variable you control with a grow light, and it's also where most beginners make their biggest mistakes. Too close and you bleach or stress the plants. Too far and they stretch, get leggy, and waste energy trying to reach the light. Here's a practical starting framework for a 600W-class LED: VIVOSUN’s grow-light buying guide includes a distance chart that lists nearest and furthest mounting distances by light model and growth stage blank" rel="noopener noreferrer">distance chart giving nearest and furthest mounting distances.
| Plant Type / Stage | Starting Height | Intensity | Adjustment Signal |
|---|---|---|---|
| Seedlings (all types) | 24 inches | 50% | Stretch = lower light or raise intensity; pale/brown tips = raise light |
| Vegetative herbs/greens | 16–20 inches | 75% | Slow growth = lower height; leaf curl = raise height |
| Vegetative cannabis/tomatoes | 18–24 inches | 75–100% | Watch for internode spacing; tight nodes = light is correct |
| Flowering cannabis/peppers | 12–18 inches | 100% | Bleached top leaves = raise 2–3 inches |
| Houseplants/low-light species | 24–36 inches | 30–50% | Yellowing = lower intensity; drooping = raise light or reduce hours |
The hand test is a quick sanity check: hold your hand palm-down at canopy level for 30 seconds. If it feels uncomfortably warm, the light is too close. If you barely feel any warmth, it's probably too far. Comfortable warmth, like sitting near a sunny window, is the target.
Coverage area is another thing to get right. A 600W-class LED typically covers about 3x3 ft during flowering (when plants need concentrated intensity) and up to 4x4 ft during vegetative growth. If you're growing in a 4x4 tent and wondering why your corner plants look weaker, that's why. Either add a second light or move plants toward the center.
Troubleshooting: what to check when something goes wrong
Light won't turn on
Start with the obvious: is the outlet live? Plug something else in to test it. If the outlet is fine, check whether the driver cable is fully seated at both ends (if it's a two-piece design). A loose connector here is very common and looks fine at a glance but cuts power. Also check for a blown fuse on the driver itself, some units have a small inline fuse near the power cord. If none of that works, try a different outlet on a different circuit. If the light still won't power on, the driver is likely failed and you'll need a warranty replacement.
Flickering or intermittent light
Flickering usually points to a loose connection or an overloaded circuit. Check the driver cable connection first. Then check if the flickering happens when other devices (fans, pumps) kick on, which would indicate the circuit is at or near capacity. Move the light to its own dedicated outlet if possible. If the flickering is constant and not related to power load, the driver is failing and should be replaced, running a failing driver stresses the diodes and shortens the whole fixture's life.
Overheating concerns
Quality LED grow lights get warm but shouldn't get hot enough to worry you. The driver housing will be the warmest part, often 95–115°F (35–46°C) under normal operation. That's fine. What's not fine is if your grow space has no ventilation and ambient temps climb above 85°F (29°C), because heat stress hurts plants more than it hurts the light. Make sure your tent or grow room has an exhaust fan pulling warm air out and passive intake vents at the bottom. If the fixture itself is extremely hot to the touch (can't hold your hand on it for 3 seconds), that suggests a driver problem or inadequate airspace above the fixture.
Uneven coverage or weak spots
Uneven growth is almost always a height or positioning issue, not a defect. Raise the light: the higher it hangs, the wider and more even the spread, at the cost of intensity. A light at 12 inches creates a hot center and dim edges; the same light at 24 inches spreads more evenly. If you're seeing strong center plants and weak edges, raise the light 4–6 inches. If all plants look weak, lower it or increase intensity. Also double-check that the light is centered over your grow area, off-center hanging is surprisingly common.
Plants look stressed after setup
If you moved plants under a new light and they suddenly look droopy, curled, or bleached, you probably skipped acclimation. Never put young or previously low-light plants directly under a full-intensity grow light. Start at 50% intensity and 24+ inches, then spend 5–7 days gradually increasing intensity and lowering height. This matches what you'd do moving plants from shade to full sun outdoors.
Safety, maintenance, and making this light last
Electrical safety basics
Never handle the light with wet hands or in a wet environment. Grow spaces get humid, so check that power cords are routed up and away from water sources, not lying on the floor of a tent where nutrient spills happen. Use a grounded outlet and, ideally, a GFCI outlet or a GFCI power strip in any space where water is present. Don't daisy-chain power strips.
Keeping the fixture clean
Dust on the LED board reduces light output over time. Every 4–6 weeks, power down the light, let it cool completely, and wipe the diode surface with a dry or very lightly damp microfiber cloth. Don't use cleaners or alcohol directly on the diodes. The driver's vents can be cleared with a can of compressed air. A clean fixture runs cooler and outputs more light, it's one of those maintenance steps that actually makes a noticeable difference.
Long-term performance habits
- Check the ratchet straps monthly, they can slip or wear over time
- Log your settings (height, intensity, schedule) for each grow so you can repeat what works
- Replace the driver if you notice sustained flickering, the diode board often outlasts the driver
- Keep ambient grow space temps between 65–80°F (18–27°C) for optimal fixture and plant performance
- Run an oscillating fan in the tent so heat doesn't pool under the fixture
Day 1–7 quick start checklist
Use this to get up and running on day one and make smart adjustments through your first week.
- Day 1: Unbox and inspect everything. Confirm outlet is grounded. Attach hangers to fixture before lifting.
- Day 1: Hang the light at 24 inches above the canopy (or pot rim if plants aren't in yet).
- Day 1: Set dimmer to 50%. Plug into timer. Set timer to 18/6 for seedlings or veg, 12/12 for flowering.
- Day 1: Power on. Confirm all diodes are lit (a few dead diodes in a small cluster may indicate a defect, contact support).
- Day 2–3: Observe plants. Look for stretching (light too far or too dim) or curling/bleaching (light too close or too bright).
- Day 3–4: If plants look healthy and compact, raise intensity to 60–70%. If signs of stress, hold at 50% and raise the fixture 2–3 inches.
- Day 5–7: Continue incrementally lowering height or raising intensity based on plant response. Target 75% intensity and 18–20 inches by end of week 1 for most plants.
- Week 1 end: Check all connections, wipe dust from the board, confirm timer is running correctly, and note your settings for future grows.
If you find yourself wanting more control over scheduling or intensity, it's worth looking at how other lights in this category handle those features. VIVOSUN's own VS4000 and VS1000 have slightly different dimming and controller setups that suit different tent sizes, and other brands like Juhefa and Sunraise take their own approaches to spectrum and timing controls. If you're also using a Sunraise model, follow the Sunraise grow light manual for its specific dimmer and timer setup.
If you are using a Juhefa grow lights manual, double-check how their timer and dimmer controls should be set for your specific model. But for the 600W-class unit you have right now, the settings above give you a reliable, proven starting point for healthy growth. Follow the Sunblaster grow light garden instructions to dial in the right height and schedule for your plants.
FAQ
Can I plug a vivosun 600w led grow light manual into an outlet timer on the same circuit as other equipment?
Yes, but only if the power draw stays within what the timer and outlet circuit can handle. Check the timer’s rated amps and watts, then verify the fixture’s label wattage (not the marketing “600W” figure). If the timer is rated for lower amperage than your fixture draws at full power, the contacts can overheat and fail.
How should I use the dimmer on my vivosun 600W LED grow light, and what’s the safe order of operations?
If the dimmer is built into the driver, set it with the light powered on, but start from zero, then raise gradually. If you cannot set it to zero before plugging in, do not rapidly twist it to high immediately, and re-check the fixture height because intensity changes suddenly can stress seedlings.
What should I do if my tent gets hot, can I still run the light at the same height?
Target a temperature and airflow, not just a height. If you cannot maintain intake and exhaust, keep the light slightly higher and run at the lower end of the intensity range (about 50 to 75% at the start). Stacking the same heat sources (oscillating fans, heaters, humidifiers) without venting often causes the driver to run hotter and plants to show stress.
My plants are taller in the center and weaker at the edges, is it the fixture or the coverage setup?
Don’t rely on the “wattage” number to choose coverage. Use plant response and spread: if you see a bright center with weak corners, raise the fixture by 4 to 6 inches or move plants toward the middle. For a 4x4 area, many growers either reduce canopy density near the edges or add a second light to avoid corner dimness.
What’s the correct way to acclimate seedlings when switching to a vivosun 600w LED grow light?
Start acclimation before you change both height and intensity. If you move plants under a stronger light, begin at roughly 50% intensity and 24+ inches, then adjust over 5 to 7 days. Also keep the schedule steady during acclimation, changing light timing and intensity at the same time can cause droop that looks like overwatering or nutrient issues.
Do I need special care to keep 12/12 dark periods correct for flowering?
For flowering, many setups use 12 hours on and 12 hours off, but the key is uninterrupted darkness. If your timer, plug, or controller causes brief on-off flickers during the off period, plants may treat it as light exposure. Use a timer that has stable switching and keep the dark period completely dark.
What are the most common causes of a vivosun 600w LED grow light not turning on, besides the outlet?
If the light won’t power on, test the simplest parts first: confirm the wall outlet works, then check that the driver connector is seated at both ends. If there’s an inline fuse on the driver’s cord, inspect it and replace only with the same rating. If the driver still fails on a known-good outlet, treat it as a warranty issue rather than repeatedly powering it on.
My light flickers intermittently, how do I decide whether it’s a wiring issue or a failing driver?
Flickering often tracks with power stability. First check whether the flicker starts when other devices turn on, that suggests a near-capacity circuit. If flicker is constant even on a dedicated outlet, avoid extended use and plan for driver replacement because power instability can shorten diode life.
Is a GFCI required for using a vivosun 600w LED grow light in a humid tent?
Yes, use a GFCI if you have humidity and water exposure, but do not use non-GFCI power strips that you then daisy-chain. Also keep all cords routed above splash lines and away from runoff paths, and if you ever see condensation around the driver, pause operation until the driver area is dry and ventilated.
How often should I clean the vivosun 600w LED grow light, and what’s the safest way to do it?
Follow the cleaning guidance, but also check mounting hardware. If dust buildup is heavy around vents, airflow drops and the driver can run hotter. Wipe the LED surface gently with a cloth that is barely damp (if needed) and let it dry completely before powering, never spray cleaners or water into the driver.
Next Article
VIVOSUN 4000 Grow Light Instructions: Setup and Daily Use Guide
Step-by-step VIVOSUN 4000 grow light setup, hanging height, dimming schedules, and troubleshooting for safe daily use