Plug the VS4000 in, hang it at 24 inches above your canopy, set the dimmer to about 50–60% for your first week, run it 18 hours on for seedlings or veg (12 hours on for flower), and you're growing. That's the core of it. The rest of this guide fills in everything between unboxing and a fully dialed-in setup so you don't fry your plants or scratch your head over a blinking light.
VIVOSUN 4000 Grow Light Instructions: Setup and Daily Use Guide

Marcus Tillman
29 Apr 2026
First: Make Sure You Have the Right Model
The VIVOSUN 4000 grow light is officially called the VS4000, part of VIVOSUN's Classic Series. The full model label you'll see on the unit itself and in the manual is VS4000 LED-400J (sometimes listed as WEB-LED-400J in kit packaging). It's a 400W-class LED panel built with Samsung LM301H diodes and a Sosen driver. If your label says VS4000 or VS4000 LED-400J, you're in the right place. If it says VS1000, VS2000, or VS3000, the general steps here still apply but the wattage, footprint, and height recommendations will differ.
What Should Be in the Box
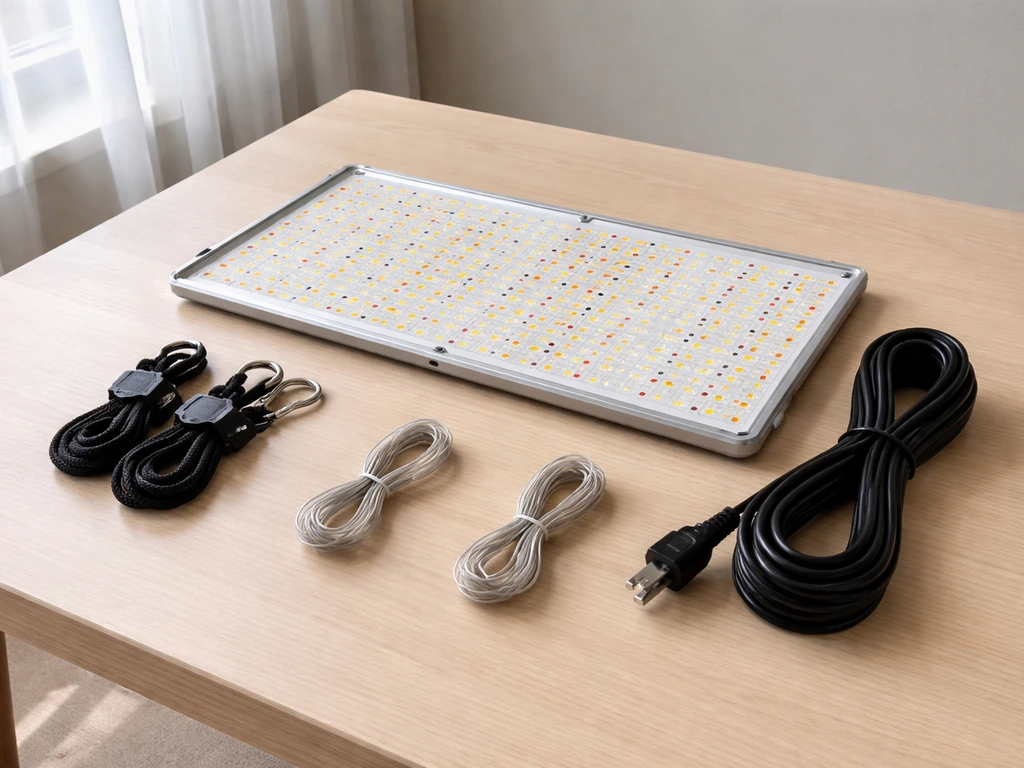
Before you do anything, lay everything out and check it against this list. Missing parts are much easier to deal with before you've started mounting hardware.
- VS4000 LED grow light panel
- Rope hangers (usually a pair)
- Power cord
- RJ11 network cable (looks like a phone cable)
- RJ11 3-way cable splitter
- Additional cable(s) for multi-light daisy-chaining
- Grow room glasses (eye protection for working under the light)
If anything is missing, contact VIVOSUN support before powering up. Running the light without the correct cables can make multi-light configurations behave unpredictably, and starting a support claim before you've used the equipment is always easier than after.
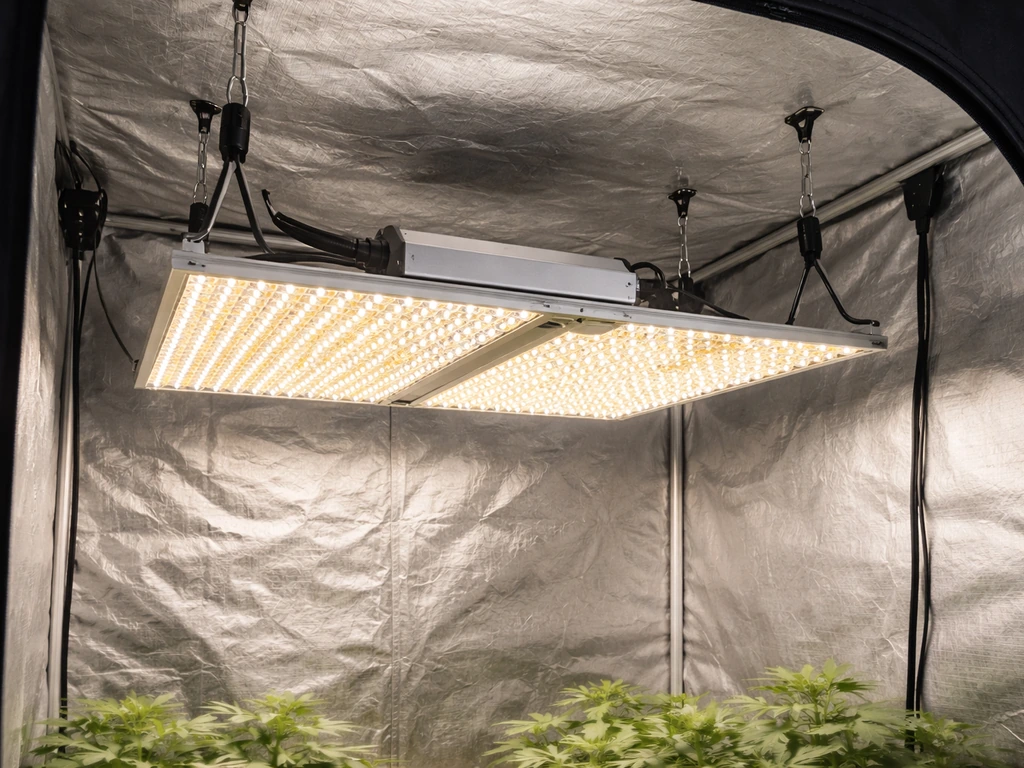
Assembly, Wiring, and Safe Power-On
The VS4000 arrives mostly assembled. You're not building anything from scratch. Assembly really just means blank" rel="noopener noreferrer">attaching the rope hangers, routing the power cord safely, and connecting any control cables before you flip the switch.
Step-by-Step: First-Time Setup
- Thread the rope hangers through the mounting hooks on the light's frame. Most rope hanger designs use a ratchet mechanism: pull the loose end to shorten, press the button to extend. Test both before you hang anything.
- Attach the other end of the rope hangers to your tent's crossbars or ceiling anchor points. Make sure both sides are evenly tensioned so the panel hangs level.
- Route the power cord down and out of the tent to your outlet or power strip. Do not run the cord under a rug, mat, or any material that can trap heat. Keep the cord visible and uncovered.
- If you're running only one light, plug the power cord in and leave the RJ11 cables aside for now. You don't need them for a single-light setup.
- If you're running multiple VS4000 units, connect them before powering on (more on that in the multi-light section below).
- Turn the dimming knob to your starting intensity (50% is a safe first setting for most plants).
- Plug in and power on. The light should come on immediately with no flicker.
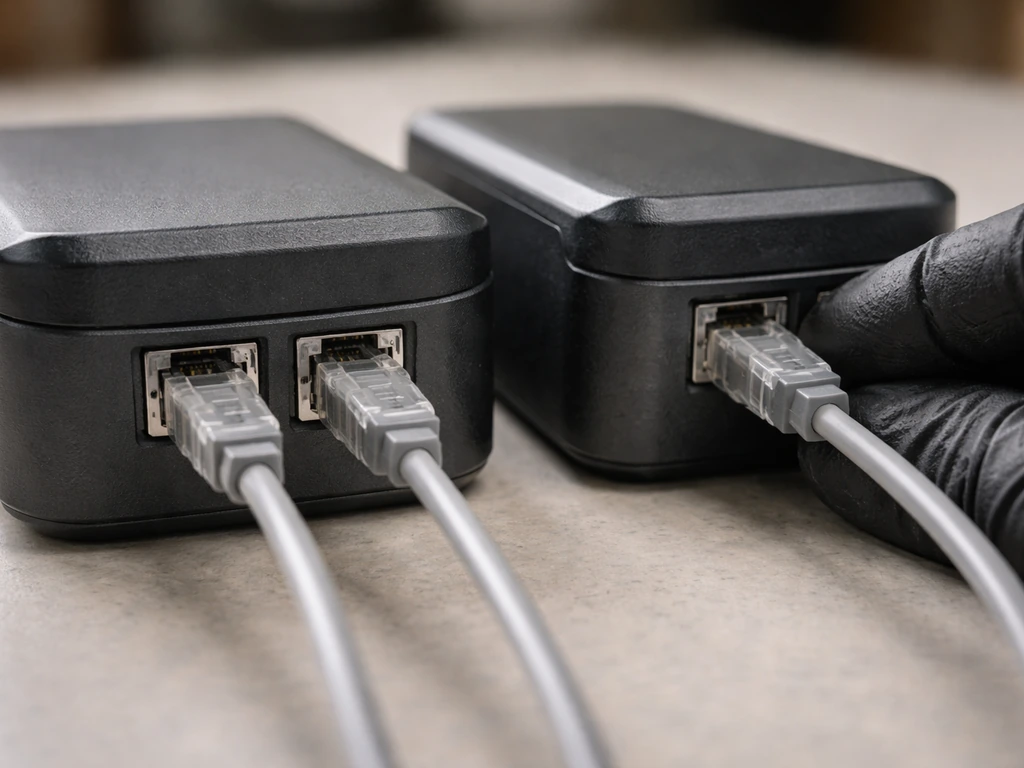
Multi-Light Wiring with RJ11 Cables
If you're running two or more VS4000 units together, the RJ11 cable system lets you control all of them from one dimmer knob on the master light. Here's how it works: plug the RJ11 network cable from the master light's output port into the 3-way splitter, then run RJ11 cables from the splitter to the controlled (secondary) lights. On each controlled light, turn that light's dimming knob to the EXT position. This tells those units to ignore their own knob and take instructions from the master. If you forget to set controlled lights to EXT, they'll run at whatever their local knob is set to, not what you intend.
One thing to double-check: the RJ11 connectors need to click firmly into place. A partially seated cable is one of the most common reasons a secondary light doesn't respond to the master dimmer. Push each connector until you hear or feel a click.
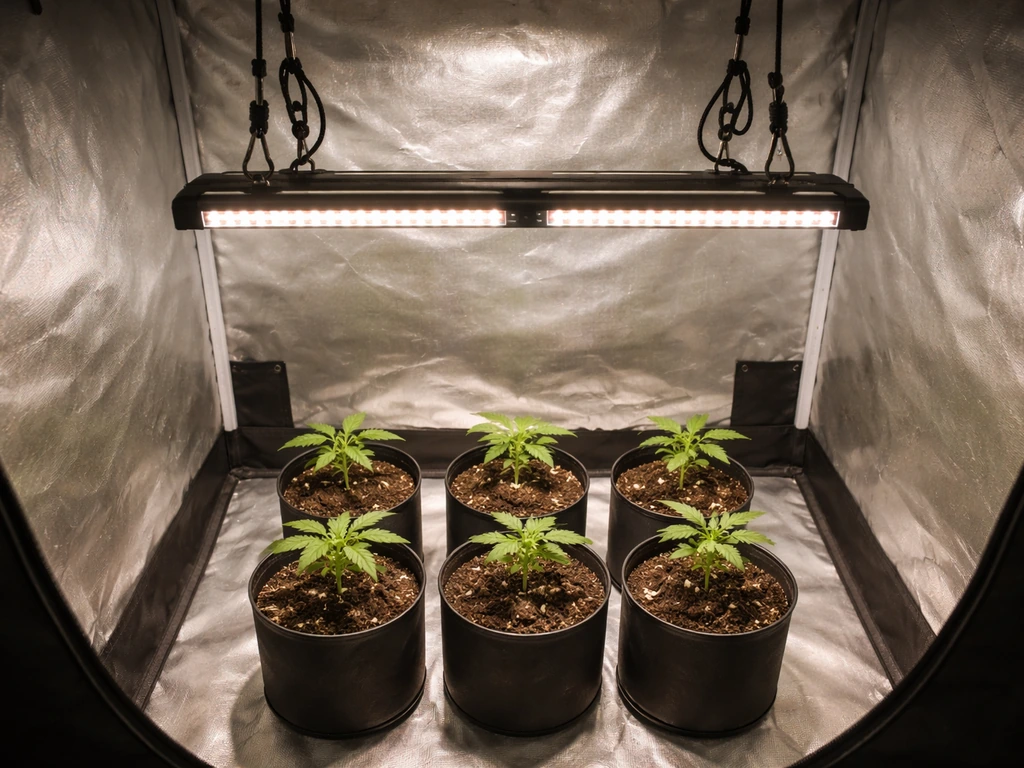
Hanging Height and Coverage: Getting the Position Right
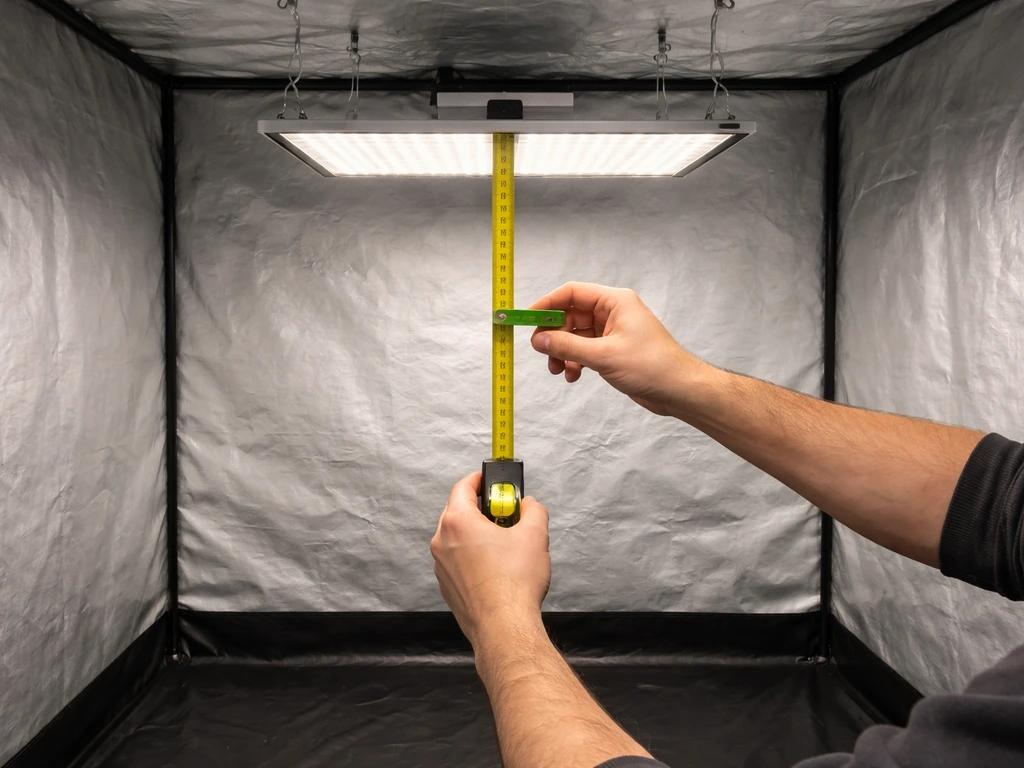
The VS4000 is designed to cover a 4x4 foot footprint, which lines up perfectly with a standard 4x4 grow tent. Mounting height directly controls how intense the light is at canopy level, so getting this right matters more than almost any other setting.
VIVOSUN publishes specific height recommendations for the VS4000 by intensity setting. Here are the key numbers to work from:
| Dimmer Setting | Recommended Height Above Canopy | Best For |
|---|---|---|
| 25–40% | 24 inches | Seedlings and clones |
| 50–70% | 20 inches | Vegetative growth |
| 75–100% | 14 inches | Flowering / fruiting |
These numbers assume you're working in a standard 4x4 space. If your tent is smaller, you'll want to dial the intensity down and raise the light slightly to avoid concentrating too much energy in the center. If your space is larger, the VS4000 won't cover the corners well at full spread, so plan for supplemental lighting or accept reduced intensity at the edges.
How to Check Your Coverage
The easiest way to check coverage without a PAR meter is the hand test: hold your hand at canopy height for 30 seconds. If it gets warm but not hot, you're in a reasonable range. If it's uncomfortably warm within 10–15 seconds, raise the light. A more accurate method is using a PAR/PPFD meter or a smartphone app with a light sensor. VIVOSUN's own guidance targets roughly 100–300 PPFD for seedlings, 400–600 PPFD for vegetative growth, and 800–1000 PPFD for flowering without CO2 supplementation. If you can get even a basic reading at center canopy and at the corners of your space, you'll know immediately whether your coverage is even.
Setting Brightness and Using Timers
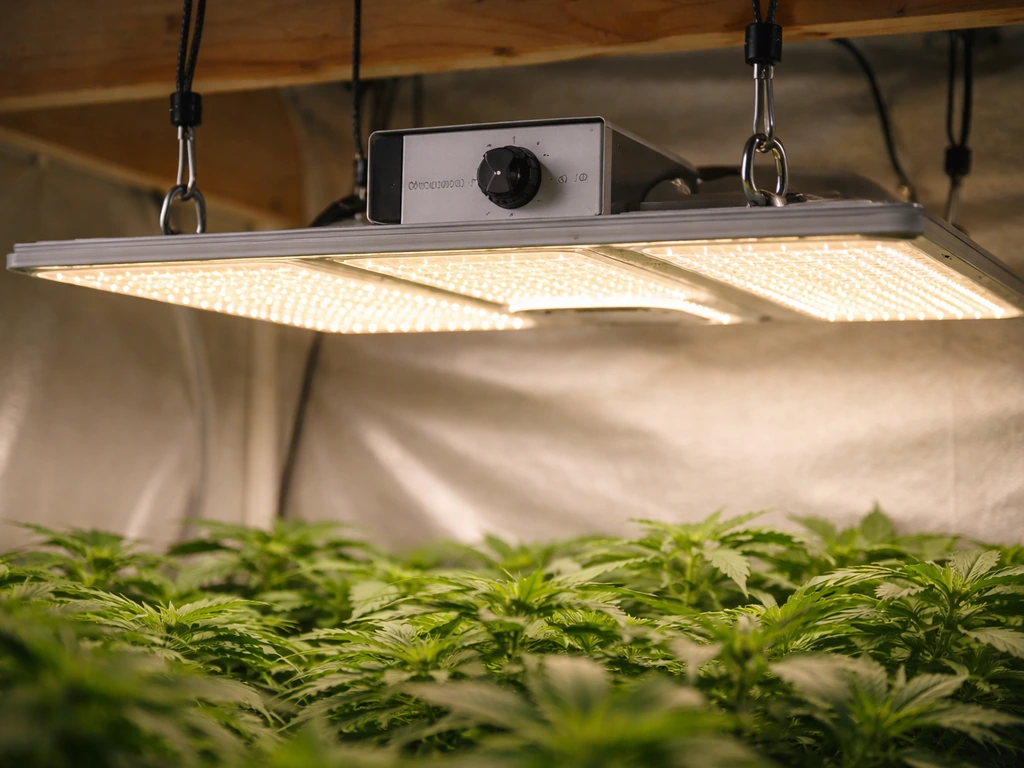
The Dimming Knob
The VS4000 has a 0–100% dimming range controlled by a knob on the driver box. There's no separate "veg" or "bloom" mode switch on this model. You control intensity purely with that knob. This is actually simpler than it sounds: more intensity for mature plants, less for seedlings, and you ramp up gradually as plants grow. Start conservatively. You can always give plants more light; you can't undo bleaching or light stress after the fact.
Timers and Controllers
The VS4000 does not include a built-in timer. You'll need a separate outlet timer, either a basic mechanical plug-in timer or a smart outlet you can schedule from your phone. Both work fine. Set your on/off schedule on the timer before plugging the light into it, then plug the timer into the wall.
This way the light runs on schedule from day one without you having to remember to switch it manually. VIVOSUN's smart controllers (like the VS Controller series) are also compatible with the VS4000 and can manage dimming and scheduling through the RJ11 port if you want to upgrade later. If you prefer the basics, the vivosun 600w led grow light manual will walk you through starting, wiring, and safe operation for this style of VIVOSUN light VS Controller series.
For detailed likesuns led grow light instructions, follow the same safe setup and timer/dimming principles before powering it on.
Light Schedule by Plant Type and Growth Stage
Your light schedule is one of the biggest levers you have over plant growth. These are the baselines that work for the vast majority of home growers using the VS4000.
| Plant Stage | Hours On Per Day | Hours Off Per Day | Dimmer Setting | Height Above Canopy |
|---|---|---|---|---|
| Seedlings / Clones | 18 | 6 | 25–40% | 24 inches |
| Vegetative growth | 18 | 6 | 50–70% | 20 inches |
| Flowering / Fruiting | 12 | 12 | 75–100% | 14 inches |
| Houseplants (general) | 14–16 | 8–10 | 30–50% | 20–24 inches |
Keep the light schedule consistent. Plants respond poorly to irregular light cycles, especially photoperiod-sensitive flowering plants like cannabis or certain herbs. Pick your on-time and off-time, set the timer, and don't change it unless you're deliberately shifting stages. A lot of new growers accidentally interrupt the dark period by popping into the tent at night with the room lights on, which can confuse photoperiod plants. Get into the habit of using your grow room glasses when you do need to check in during light-on hours.
For houseplants like pothos, ferns, or tropical foliage plants, the VS4000 is a lot of light and you'll likely run it at 30–50% with a relaxed 14–16 hour schedule. These plants aren't being pushed to flower, so they don't need peak intensity.
Dialing In Safely: Avoiding Bleaching, Hotspots, and Heat Stress
The VS4000 is a serious 400W-class light. It can absolutely bleach or stress plants if you hang it too low or run it at full intensity too soon. Here's how to stay ahead of problems.
Ramp Up Intensity Gradually
Don't start seedlings at 100% intensity, even if they're going to need full power later. A common approach is to start at 30–40%, raise height to 24 inches, and increase intensity by about 10% every few days as the plants show healthy response. Pale yellowing, upward leaf curl, or leaves that look washed out near the center of the canopy are all early signs that intensity is too high for where the plants are in their development.
Spotting and Fixing Hotspots
Hotspots happen when one section of your canopy gets significantly more light than the rest. With the VS4000 in a 4x4, this usually shows up as plants in the center of the tent growing faster and more compactly while corner plants stretch toward the light. The fix is almost always height: raise the light a few inches so the beam spreads more evenly before it hits the canopy. If you have a PAR meter, take readings at the center and at each corner. A healthy spread has the center PPFD within about 20–30% of the corner readings.
Heat Management
The VS4000's Samsung diodes and Sosen driver are efficient, but 400W still produces real heat. The manual specifically calls for adequate air circulation around the light. In a grow tent, this means running an inline fan that pulls air through the tent continuously, not just an oscillating fan moving air around the canopy. If your tent temperature climbs above 85°F (30°C) at canopy level, that's your trigger to improve airflow before raising intensity further. Keep the driver area clear of obstructions so heat can dissipate from the unit itself.
Troubleshooting: Quick Fixes for Common Problems

Light Won't Turn On
Check the obvious first: is the outlet live? Test it with another device. Is the power cord fully seated into the driver box? These connectors can look plugged in but not be fully engaged. If you're running through a timer, bypass it temporarily and plug the light directly into the wall to rule out a faulty timer. If the light still won't come on with a direct wall connection, contact VIVOSUN support. Don't try to open the driver unit.
Light is Flickering
Flickering is almost always a loose connection or a power supply issue. Check the power cord connection at both ends. If you're using an extension cord, swap it for a direct outlet connection: extension cords can cause voltage drop that creates flicker with sensitive LED drivers. If the flicker happens right when the dimmer is at a very low setting (below 10%), try bumping it up slightly. Some drivers have a minimum threshold below which they don't run cleanly.
Secondary Lights Not Responding to Master Dimmer
This is almost always the EXT setting. Go to each controlled (non-master) light and make sure its dimming knob is physically rotated to the EXT position. Then check that every RJ11 cable connector is clicked fully into place. If one cable is even slightly loose, that light will drop out of the controlled group. Swap cables if you have spares to rule out a defective RJ11 connector.
Uneven Coverage Across the Canopy
First, make sure the light is hanging level. An off-angle panel throws light unevenly across the footprint. Use a level app on your phone against the panel's frame. If it's level and you still have bright spots in the center, raise the light 2–4 inches and reassess. Reflective tent walls help a lot here: white or Mylar-lined tents bounce edge light back toward the canopy, which evens out coverage noticeably.
Overheating or Warm Driver Housing
The driver box will be warm to the touch during normal operation. That's fine. If it's hot enough that you can't hold your hand on it, or if you smell anything burning, power down immediately. Make sure nothing is resting against or draped over the driver. Ensure the tent has active exhaust running. If overheating persists with good airflow and nothing obstructing the driver, contact VIVOSUN support.
Dimmer Not Responding or Stuck
If the dimming knob turns but intensity doesn't change, check whether the light is set to EXT mode when it should be in local control mode. If EXT is selected, the local knob does nothing. Rotate back to local control and test. If the knob feels physically loose or broken, that's a hardware issue and warrants a warranty claim.
Your Next Steps After Setup
Once you've got the VS4000 hanging, wired, and running on a timer, give your plants two to three days to respond before making any adjustments. Look for healthy upright growth, normal leaf color, and no signs of stress. If everything looks good, you can start dialing intensity up gradually as plants develop. Log your settings (height, dimmer %, hours on) in a simple notebook or phone note so you know exactly what changed if something goes wrong later.
If you're comparing this model to other VIVOSUN lights, the VS4000 sits above the smaller VS1000 and VS2000 in the Classic Series lineup, making it the right choice for a full 4x4 grow space where you want serious intensity without stepping up to a more complex multi-bar fixture. If you want a quick comparison, see the vivosun vs1000 grow light instructions so you can pick the right wattage and height for your tent VS4000 and VS1000. Other grow light brands and models follow similar setup logic, though the specific height tables, dimmer configurations, and multi-light cabling will vary by manufacturer.
The most important thing you can do right now is get the light on, get it at a safe starting height, and start watching your plants. Use these sunblaster grow light garden instructions to dial in height, brightness, and schedules for strong early growth get the light on. The VS4000 is a well-documented, beginner-friendly light, and almost every problem that comes up in the first week is fixable with a height adjustment, a cable reseat, or a dimmer correction. Follow the steps above and you'll be past the learning curve in no time.
FAQ
Can I run the VIVOSUN 4000 at 100% right away for faster growth?
You can, but it increases the risk of bleaching and light stress, especially for seedlings and newly transplanted plants. A safer approach is to start lower (around 30 to 40% or whatever your first-week height/dimmer combo indicates), then increase gradually every few days while watching for pale center foliage and leaf curl.
What dimmer setting should I use for seedlings versus veg versus flowering?
The light has a single intensity knob (no separate veg or bloom switch), so you choose based on your plant stage and canopy distance. Many growers start seedlings in the 30 to 40% range, veg often lands around mid-range once plants are established, and flowering is typically higher, but your best target depends on canopy temperature, spread (center versus corners), and whether you use CO2.
How high should I hang it if my tent is not a full 4x4?
If your grow space is smaller than 4x4, you generally want to dial intensity down or raise the light slightly to avoid over-concentrating energy in the middle. If your space is larger, the fixture may not cover corners well at full spread, so plan supplemental edge lighting or accept lower intensity at the perimeter.
Do I need a PAR meter, or can I rely on the hand test?
You can rely on the hand test to quickly spot major issues, but it is not a true PPFD measurement. For more reliable dialing, take readings at the center and corners with a PAR or PPFD meter, or use a phone sensor only as a rough guide. Aim for relatively even center versus corner readings, not just a comfortable temperature.
Why are my plants growing faster in the center than the corners?
That pattern usually indicates uneven intensity, most often a beam spread or height issue. Raise the light a few inches to reduce hotspots, then re-check center versus corner growth. If you see large gaps, adjust intensity down slightly or add supplemental corner lighting.
What’s the correct way to use the timer with the VS4000?
Use the timer to control power to the fixture, then set the on and off times before plugging in. If you ever suspect the timer is misbehaving, bypass it temporarily by plugging the driver directly into the wall to confirm the light itself is working.
How do I confirm two (or more) VS4000 units are truly being controlled together?
Make sure the secondary units are rotated to the EXT position on their dimmer knob. Then check that every RJ11 connector visibly and physically clicks into place. If one controlled light ignores the master, the first thing to troubleshoot is a partially seated RJ11 or a bad cable.
My secondary light is not responding to the master dimmer, what should I check first?
Check the EXT setting on the controlled unit and reseat every RJ11 connector until you feel the click. If reseating does not fix it, try swapping RJ11 cables to rule out a defective connector or cable.
What should I do if the light flickers?
Start by checking the power cord is fully seated at both ends and test with no extension cord (plug directly into the wall). If flicker happens only at extremely low dimmer levels, raise the dimmer slightly because some drivers have a minimum operating threshold.
The light won’t turn on, how do I troubleshoot safely?
First verify the wall outlet works with another device. Then confirm the power cord is fully inserted into the driver box. If the light still won’t start, bypass the timer by plugging into the wall directly. Do not open the driver unit, if it still fails after those checks, contact support.
Is it normal for the driver box to get hot?
Yes, the driver box will warm up during normal use. If it becomes too hot to hold comfortably, or if you smell burning, power down immediately. Also make sure air is moving through the tent with continuous inline exhaust and that nothing is touching or blocking the driver.
What temperatures should make me change my setup?
If canopy-level temperatures rise above about 85°F (30°C), improve airflow before increasing intensity further. Height adjustments and better circulation usually help, but persistent overheating even with good airflow warrants contacting VIVOSUN support.
How quickly should I adjust settings after first turning the light on?
Give plants two to three days to respond to any change in height or dimmer intensity before making another adjustment. During that window, look for leaf color shifts, upward leaf curl, or washed-out center foliage as early signals that intensity is too high.
Do I need to level the fixture, and how important is it?
Yes. If the panel is tilted, your canopy receives uneven illumination. Use a level app against the panel frame (not just the hanging points), then fine-tune height if you still see bright center areas after leveling.
Can I use reflective tent material to improve evenness?
Reflective walls like white or Mylar can reduce harsh unevenness by bouncing edge light back toward the canopy. If you are fighting center hotspots, improving reflectivity can help, but height adjustment is usually still the primary fix.
Next Article
Likesuns LED Grow Light Instructions: Setup, Controls & Troubleshooting
Step-by-step Likesuns LED grow light setup, controls, placement, schedules, and troubleshooting for seedlings to floweri