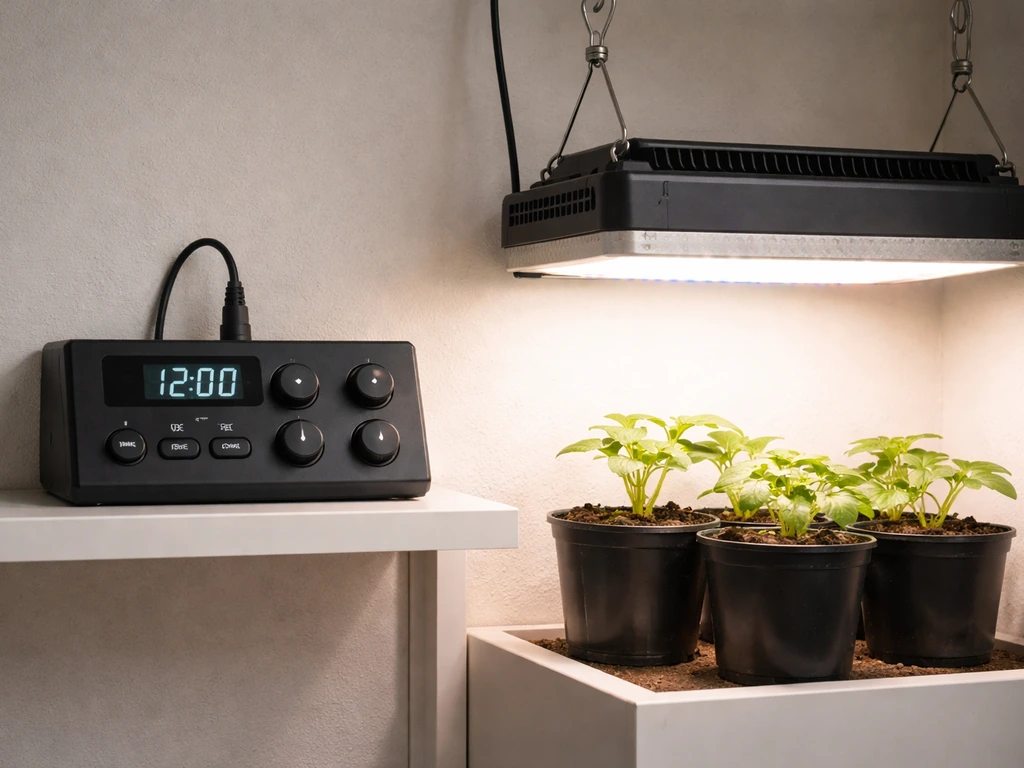
Most SANSI grow lights use a built-in auto-cycle timer with three fixed ON/OFF options: 4 hours on (20 off), 8 hours on (16 off), or 12 hours on (12 off). You set it by pressing the timer button until the indicator light matches the duration you want, then confirm the power is actually on. That's the whole process. The confusion for most people comes from two things: not knowing which SANSI timer model they have, and expecting clock-time scheduling (like 7am to 9pm) when SANSI timers actually run cycles that reset from whenever you first plugged in.
Sansi Grow Light Timer Instructions: Setup and Scheduling Guide

Marcus Tillman
21 May 2026
Identify your SANSI timer type and controls
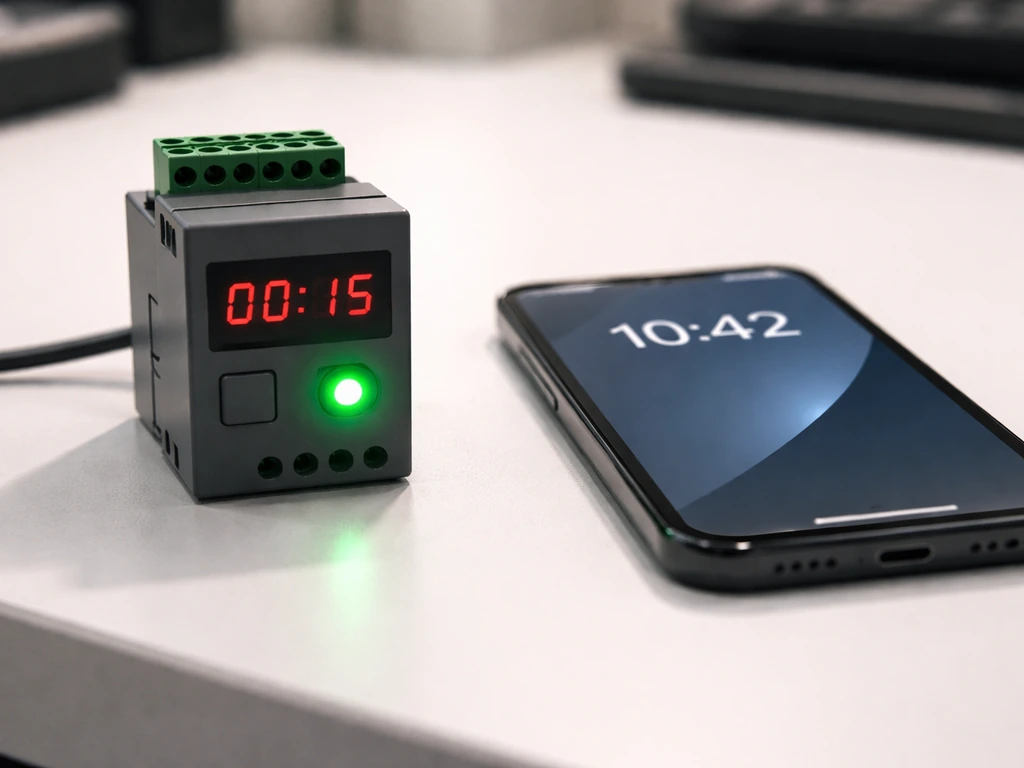
Before you press anything, figure out which SANSI model you have. The two most common timer variants you'll encounter are the 10W LED Puck Grow Light (model C21GL-GE26-10W) and the C23ZW024 grow light. They look similar but have slightly different control layouts and timer options. Flip your light over or check the label on the cord controller for the model number. You can also visit SANSI's Product Manuals page and match your model to the correct manual there.
| Model | Timer Options | Controls | Indicator Behavior |
|---|---|---|---|
| C21GL-GE26-10W (10W Puck) | 4 / 8 / 12 hours ON | Timer button (clock icon) | Indicator color shows selected duration |
| C23ZW024 | 3 / 6 / 12 hours ON | Separate Power button + Timer button | Color-coded LED: e.g., Green = 6H |
The key difference: the C23ZW024 has two separate buttons, one for Power ON/OFF and one for the timer. The Puck model (C21GL-GE26-10W) uses a single timer button with a clock icon. Knowing this upfront saves a lot of frustration because they are programmed slightly differently. If your timer options are 3/6/12 hours, you have the C23ZW024 family. If your options are 4/8/12 hours, you have the Puck or a similar variant.
Set up the timer safely before you program anything
Don't just plug it in and start pressing buttons. Run through this quick safety and baseline check first.
- Confirm the light is rated for indoor use only. SANSI explicitly states this in the C21GL-GE26-10W manual, and it applies across the line. Do not use these in garages or greenhouses with moisture.
- Do not cover or drape anything over the light. No paper, no cloth, nothing that blocks heat dissipation. SANSI's own safety warning calls this out directly.
- Position the light at the correct height before plugging in (more on exact distances below). Repositioning after the fact wastes time.
- Plug the light into a standard wall outlet. Do not use extension cords if you can avoid it, and never daisy-chain outlet adapters.
- Once plugged in, confirm the light turns on at all. Press the Power button (on C23ZW024) or the timer button (on the Puck model) and verify the grow light actually illuminates. If it doesn't, you have a power issue to resolve before timing matters.
That baseline test matters. A lot of people skip it, then spend 20 minutes thinking their timer is broken when the light just wasn't receiving power in the first place.
Program a daily repeating ON/OFF schedule step by step
SANSI timers do not let you set a specific start time like 7:00am. For Elaine Grow Light models, the basic programming steps still follow the same cycle-based logic, so reviewing the exact Elaine Grow Light timer instructions will help you avoid timing offsets SANSI timer instructions. Instead, the cycle begins from the moment you first set it, and then repeats every 24 hours from that point. So if you plug in and set an 8-hour ON cycle at 8:00am, the light will run until 4:00pm, stay off until 8:00am the next day, and repeat. Time your setup accordingly.
For the C21GL-GE26-10W (Puck model)
- Plug the light into the wall outlet at the time you want the ON cycle to begin each day.
- Press the timer button (look for the clock icon on the controller) once to enter timer mode.
- Press again to cycle through the three duration options: 4 hours, 8 hours, or 12 hours ON.
- Stop pressing when the indicator light matches your desired duration. The indicator color or state changes with each press to confirm selection.
- Leave it. The light will now turn on for your chosen duration, turn off for the matching remainder of 24 hours, and repeat daily.
For the C23ZW024
- Plug the light in at the time you want the daily ON cycle to start.
- Press the Power button to turn the light on. You should see the light illuminate immediately.
- Press the Timer button to activate the auto-cycle. The first press typically selects 3 hours; press again for 6 hours, press again for 12 hours.
- Watch the indicator LED. Each option has a corresponding indicator state: for example, the green indicator lights up to confirm 6 hours is selected.
- Once your desired duration is shown on the indicator, stop pressing. The timer is now active.
- The light will run for your selected ON duration, switch off automatically, then turn back on after the remaining hours complete the 24-hour cycle.
One thing worth repeating: on the C23ZW024, if you press only the Timer button without first pressing Power, the schedule may not activate correctly. Power must be ON before the timer takes effect. This is the single most common mistake with this model.
Common problems and quick fixes
Light won't turn on at all
- Check that the Power button is actually pressed (C23ZW024 only). The timer will not run if power is off.
- Verify the outlet is live by plugging in another device.
- Confirm the timer button was pressed and an indicator is showing a selected mode. No indicator lit usually means no timer mode is active.
- Try unplugging completely, waiting 10 seconds, and starting the setup process from scratch.
Light won't turn off on schedule
- You may be in manual/constant-on mode rather than timer mode. Check whether a timer indicator LED is lit. If no indicator is active, you're not in a timed cycle.
- Press the timer button to enter a cycle mode and confirm the indicator shows your chosen duration.
Timer seems off by a few hours
This is the most common complaint, and it's almost always a setup timing issue rather than a malfunction. Because SANSI timers start the cycle from the moment you set them (not from a fixed clock time), if you plugged in and programmed at 10am but want the light on from 8am, your cycle will always be offset by two hours. The fix is simple: unplug, wait until your desired start time, then plug in and set the timer immediately. The cycle will now align correctly.
Stuck in one mode or can't change timer setting
- Unplug the unit from the wall completely.
- Wait 15 to 30 seconds for the controller to fully reset.
- Plug back in and go through the programming steps again from the beginning.
- If the button feels physically stuck, check for debris around the button. Do not force it.
How many hours to actually run your grow light
Choosing the right ON duration from SANSI's timer options matters as much as the programming itself. Here's what the research actually says for common indoor growing situations.
| Plant Type / Stage | Recommended Daily Light Hours | Best SANSI Timer Setting |
|---|---|---|
| Seedlings (starting indoors) | 14 to 16 hours per day | 12-hour setting (closest available option) |
| Vegetative growth (herbs, greens) | 12 to 16 hours per day | 12-hour setting |
| Houseplants (low to medium light) | 8 to 12 hours per day | 8 or 12-hour setting |
| Low-light tolerant houseplants | 6 to 8 hours per day | 6 or 8-hour setting (model dependent) |
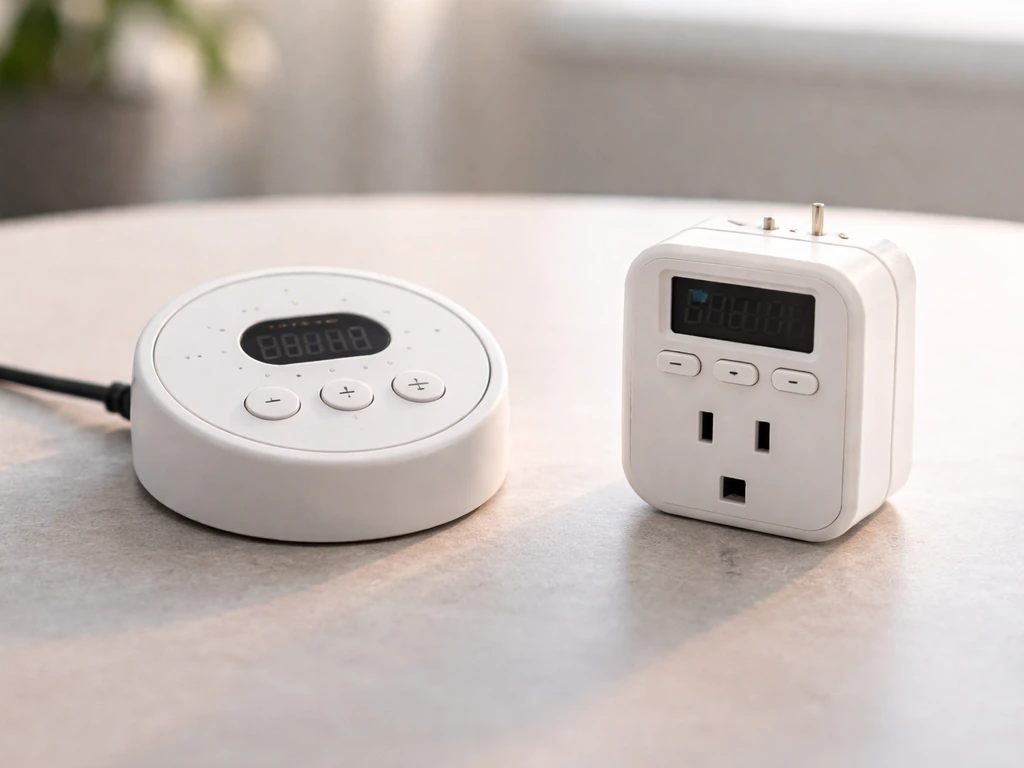
University extension programs consistently recommend 14 to 18 hours of light per day for seedlings, with University of Minnesota Extension landing at 16 to 18 hours and University of Maryland Extension citing 14 to 16 hours. UMass Amherst puts the practical range at 12 to 16 hours. Since SANSI's built-in timer tops out at 12 hours for many models, the 12-hour setting is the practical maximum and is adequate for most seedling setups. For plants that need closer to 16 hours, you may want to supplement with a separate plug-in outlet timer that gives you more precise clock-based control.
General houseplants rarely need more than 12 hours, and many do fine on 8. Over-lighting is a real problem that stresses plants, so don't assume more is always better.
Verify the timer is working with a quick test run
Don't just assume it's working. After programming, run a fast verification check.
- After setting the timer, note the exact time on your phone or a clock.
- Watch the indicator LED. It should be lit and showing your selected duration (e.g., green = 6H on the C23ZW024).
- If you set a short test duration (the minimum option on your model: 3 or 4 hours), check back at the scheduled off time to confirm the light goes dark automatically.
- After the OFF period completes, confirm the light turns back on automatically for the next ON cycle.
- If both transitions happen correctly, your timer is working. If only one works, or neither does, start with the troubleshooting steps above.
Using the shortest timer option for an initial test run is a practical shortcut. You'll know within a few hours whether everything is working rather than waiting a full day to find out your schedule was off.
Placement, spacing, and timing mistakes to avoid
Timer settings only work as intended if the light is actually positioned correctly. University of Minnesota Extension recommends keeping grow lights no more than 4 inches above seedling tops, and as close as 2 inches is often ideal. UMN Extension also recommends aiming as close as 2 inches above seedling tops and giving seedlings 12 to 16 hours of light each day keeping grow lights no more than 4 inches above seedling tops. University of Maryland Extension puts light-to-seedling distance at 1 to 2 inches for best results. Too far away and you're wasting the timer's entire purpose: the light intensity drops dramatically with distance, and your plants won't get the photosynthesis benefit regardless of how perfectly you programmed the schedule.
- Start with your light 2 to 4 inches above seedlings. Raise it as plants grow rather than setting it high from the beginning.
- Plug in at the time you actually want the daily ON cycle to start. The SANSI timer resets from that moment, so timing your setup correctly saves you from constant recalibration.
- Don't cover the light with anything, even loosely. Blocked ventilation builds heat and shortens bulb life.
- Keep the light on a stable surface or mount point so it doesn't shift over days and inadvertently move closer to leaves.
- If you're using the 12-hour timer setting for seedlings but want a 14 to 16 hour photoperiod, consider pairing the SANSI light with a separate mechanical outlet timer for more precise clock-based scheduling.
- Establish a consistent daily routine. Plants respond better to a predictable light cycle than to irregular changes. Set it, confirm it works, and leave it alone.
One thing that trips people up: they set the timer correctly but then unplug the light for a day (to move furniture, do maintenance, whatever) and plug it back in at a different time. Now the cycle is offset again. When you replug, just treat it as a fresh setup and run through the programming steps one more time. It takes less than a minute and gets your schedule back on track.
If you're working with other grow light brands or using a universal plug-in timer module rather than a built-in timer, the logic is similar but the specific buttons differ. The general concepts here around photoperiod hours and cycle-based timing apply across most grow light setups, whether you're working with SANSI or any other brand.
FAQ
My Sansi timer light shows a timer setting, but it never turns on. What should I check first?
First confirm the light is receiving power, then look for a timer indicator that is actually illuminated after you press the timer setting. If the indicator changes but the LEDs stay off, try turning Power OFF then ON, then reselect the timer duration. On the C23ZW024 family, pressing only the Timer button without Power ON can leave you with an “armed” look but no effective schedule.
How can I tell which Sansi grow light timer model I have, and why does it matter?
If your timer has 3/6/12 hour options, that points to the C23ZW024 family, which uses separate Power and Timer buttons. If your options are 4/8/12 hours, that matches the puck-style timer (like C21GL-GE26-10W) that uses a single timer button with a clock icon. The exact button behavior is tied to the model, so using the wrong press sequence is the main cause of confusion.
What happens if I unplug my grow light for maintenance, then plug it back in later?
Because the timer runs a repeating cycle from the moment you set it, every time you unplug and plug back in, you potentially reset the “start” anchor. Treat each replug as a fresh setup, then program again immediately. If you want to avoid offsets, plug the light into a smart outlet but do not power-cycle it during the day you want consistent photoperiods.
How do I verify the timer is actually following my intended schedule?
Do a short verification run, then mark the real on and off times on a wall calendar. If you expected 8am to 4pm but you set the timer at 10am, the cycle will shift by the difference, so you will see it turn off around 6pm and repeat from there. This “expected offset” is normal for cycle-based timers, not a malfunction.
Can I make a Sansi timer turn on at an exact clock time like 7am every day?
Use the timer as your daily photoperiod control, then keep the start anchor consistent. If you need a very specific fixed schedule (for example, always on at exactly 7:00am), prefer a separate clock-time outlet timer, then set the Sansi to the longest practical ON duration. This avoids the cycle reset behavior of Sansi’s built-in timer.
What’s the best way to choose between the timer’s ON options without over-lighting?
When the timer is set to a cycle that exceeds your plants’ needs, you might not notice immediately, stress can build over several days. Start with the shortest practical ON duration for your setup, then adjust upward gradually if plants are pale or growth is slow. Avoid moving directly from an 8-hour test to a 12-hour max without a few observation days.
How can I tell whether the issue is the timer schedule or light distance/position?
Light placement can make it feel like the timer is wrong. If the fixture is too high, plants may not respond even though timing is correct. As a quick diagnostic, keep the light distance within recommended seedling ranges, then compare growth response over a couple of days rather than judging based on a single night.
I keep getting inconsistent behavior. What is the most reliable button sequence to use?
If your model has separate Power ON/OFF and Timer controls, confirm Power is ON before setting duration. If your model uses a single timer button, watch for the correct indicator mode to confirm the timer cycle is selected, then leave it plugged in. If you still get no activation, replug and repeat the sequence once, because most failures are due to control order or an unanchored reset after plugging.
What’s the correct way to change the timer schedule later without ending up with an offset?
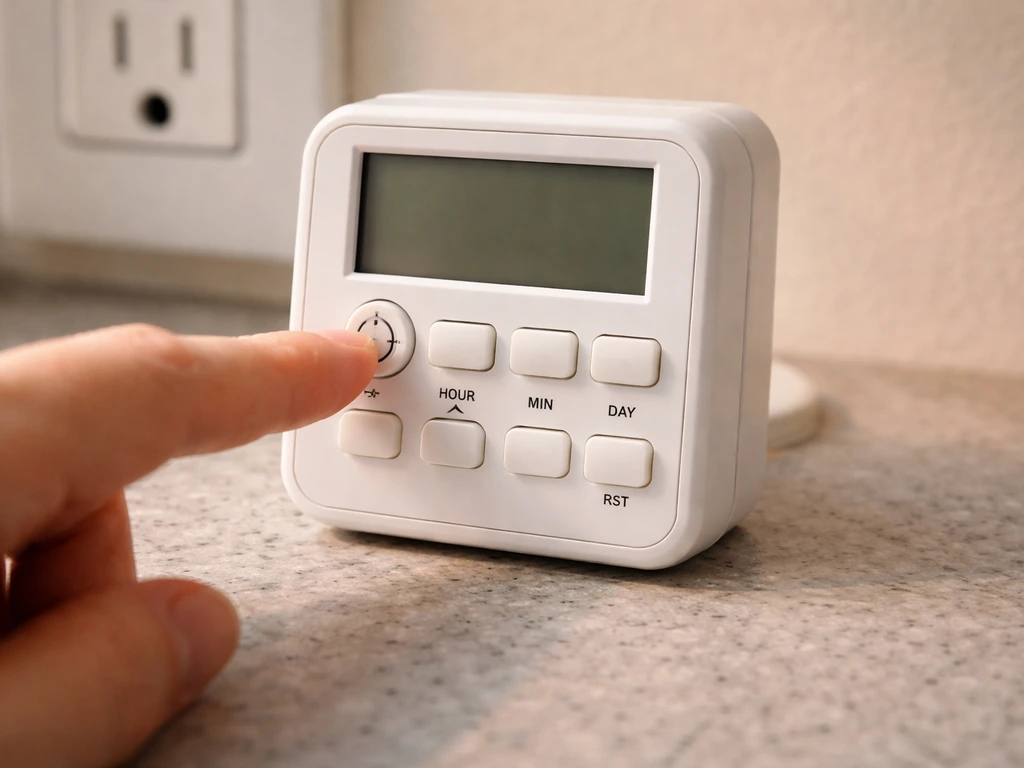
If you want to change the schedule, don’t rely on “editing” mid-cycle. Unplug, wait briefly, then plug in at the time you want the next cycle to start, and set the timer immediately. This keeps the cycle anchor aligned and prevents lingering offsets from the old start moment.
Next Article
Lordem Grow Light How to Set Timer: Step by Step Guide
Set a Lordem grow light timer step by step, avoid wrong times, fix schedule issues, and verify it runs.