Setting the timer on a Lordem grow light is simpler than it looks. Unlike plug-in outlet timers where you set an exact clock time, most Lordem models use a built-in duration timer: you press the Timer button (the one with the clock icon) and choose 4 hours, 8 hours, or 12 hours. For many LORDEM desk-style grow lights with an inline/power-controller pod, the timer uses a 24-hour cycle with three duration choices: 4 hours, 8 hours, and 12 hours, with no clock or time-of-day entry blank" rel="noopener noreferrer">built-in duration timer: you press the Timer button and choose 4 hours, 8 hours, or 12 hours. That's it. The light blank" rel="noopener noreferrer">automatically repeats that on/off cycle every single day from that moment forward. No AM/PM entry, no app pairing, no remote needed on most units. Once you know that, the whole thing clicks into place.
Lordem Grow Light How to Set Timer: Step by Step Guide

Identify your Lordem timer type first
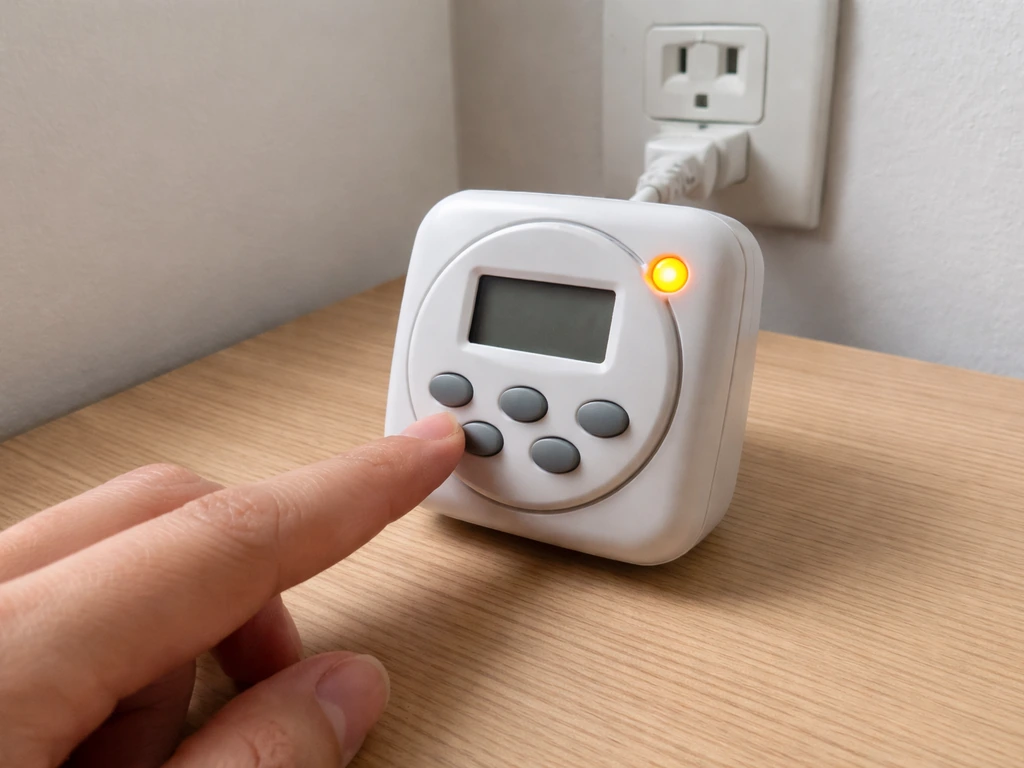
Before touching any buttons, figure out which control style your Lordem uses. For a quick refresher, follow the grow light timer instructions for your specific Lordem model and timer style. The most common setup across models like the HL-116, HL-0083, and HL-003 is a physical controller built into the power cable. It's a small pod or panel that sits inline between the plug and the light head. There's no separate remote and no smartphone app required for scheduling on these units.
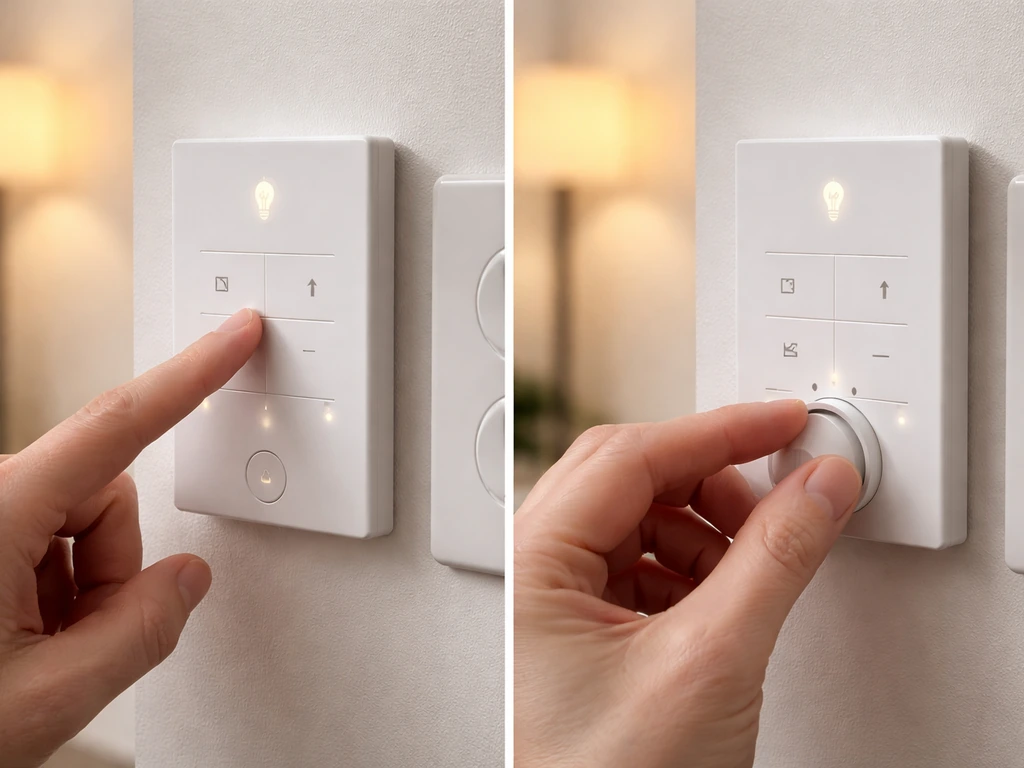
On the controller, you'll see a cluster of buttons identified by icons rather than text labels. Here's what each icon does:
- Power button (⏻): turns the light on or off in manual mode
- Timer button (◷, clock icon): cycles through 4H, 8H, and 12H timer durations
- Spectrum button (↻): cycles through light spectrum presets (full spectrum, warm/cool white, red/blue)
- Brightness +/- buttons: adjusts light intensity across 10 dimming levels (10% to 100%)
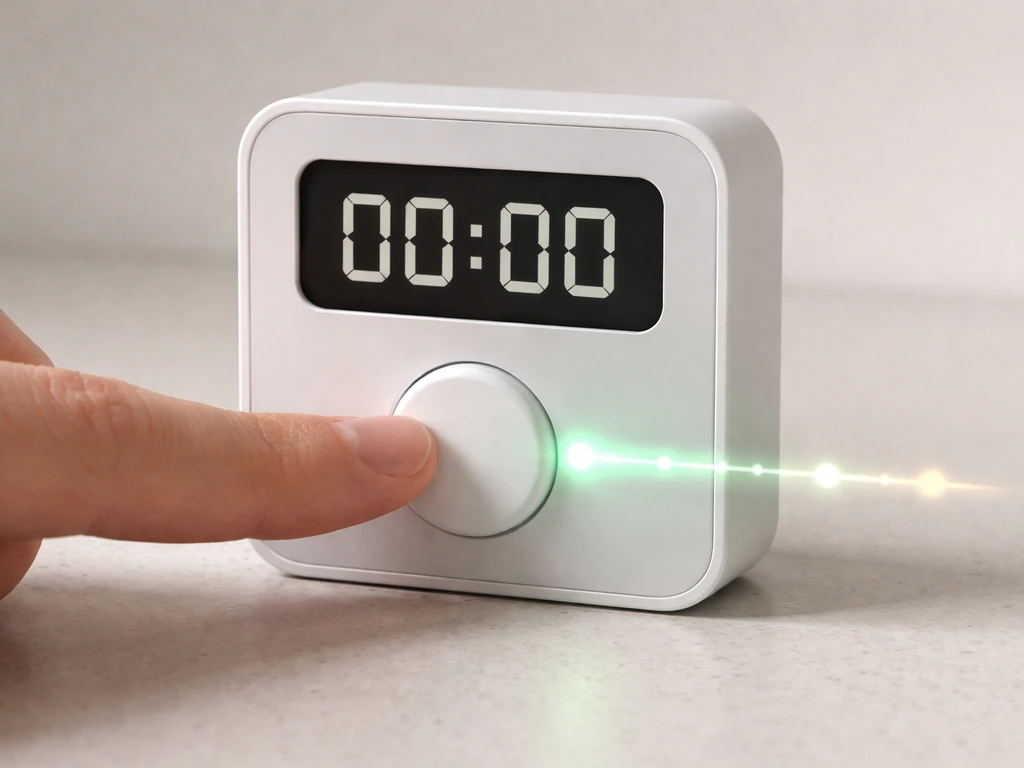
If you have the desk-style Lordem grow lamp, the timer indicator works slightly differently: a green indicator light means 4 hours is selected, blue means 8 hours, and red means 12 hours. You're still pressing the same Timer button, but you confirm the selection by the color rather than a display readout. Either way, the core timer method is identical across these models.
If your unit came with a remote or app pairing, check the included manual for your specific model, since that would be a newer or different variant. But for the vast majority of Lordem lights sold today, you're working with the physical inline controller described above.
Before you set the timer: placement, power, and light settings
Don't set the timer until you've got everything else dialed in. The reason is that the timer locks in the current moment as the reference point for your daily on/off cycle. If you plug in, immediately set the timer, and then spend 20 minutes repositioning the light, your schedule will be offset from when you actually want it to start.
Position the light over your plants first. For most Lordem LED grow lights, 6 to 18 inches above the canopy works for seedlings and smaller houseplants, with closer placement for seedlings needing more intensity and farther away for light-sensitive plants. Make sure the power cable reaches your outlet without being stretched, and that the controller pod is accessible so you can press buttons without disturbing the light's position.
Next, plug in the light and use the Power button to turn it on manually. This is a good moment to check two other settings before enabling the timer:
- Set your spectrum mode using the spectrum button. For seedlings and leafy growth, the full spectrum (5500K, all LEDs on) is a solid default. The red/blue mode (2500K) is better for flowering or fruiting plants.
- Set your brightness using the +/- buttons. Start at 70-80% for most plants. You can fine-tune later, but having the intensity set before you lock in the timer means every scheduled ON period runs at the right level.
- Decide what time of day you want the light to turn on. You won't enter that time into the controller, but you should set the timer at the exact moment you want the daily ON cycle to begin. If you want the light on at 7am every morning, be at the controller at 7am when you press the Timer button.
Step-by-step: set the start time and on-duration
Here's the exact process. Follow these steps in order and you'll have a working daily schedule running in under two minutes.
- Plug your Lordem light into the wall outlet.
- Press the Power button (⏻) to turn the light on manually. Confirm it lights up.
- Set your spectrum and brightness now if you haven't already (see above).
- Wait until the time of day you want the daily ON cycle to start. This is important. Whatever moment you press the Timer button is when the light will turn on every day.
- Press the Timer button (◷, clock icon) once. The light will indicate 4H mode is selected. On the desk-style unit, you'll see the green indicator light.
- Press the Timer button a second time if you want 8H. The indicator shifts to blue on the desk version.
- Press the Timer button a third time for 12H. The indicator shifts to red on the desk version.
- Stop pressing once you've landed on your desired duration. The light is now in timer mode and will complete the current ON period, then turn off, then repeat the cycle daily at the same time.
To be clear about what happens next: if you select 8H, the light stays on for 8 hours from that moment, then turns off for 16 hours, then turns back on again at the same time the following day. If you select 12H, it's on 12 hours, off 12 hours, repeating daily. The math is simple: each cycle is always 24 hours total. You're just choosing how much of that 24 hours is ON time.
There is no AM/PM entry screen and no clock-setting menu. The light doesn't know what time it is in the traditional sense. It knows: 'I was set at this moment, and I repeat every 24 hours from here.' That's why the moment you press the Timer button matters.
Common timer schedules: seedlings, houseplants, and cuttings
Choosing between 4H, 8H, and 12H isn't just a random preference. Different plants have genuinely different light needs, and getting this wrong is one of the most common reasons indoor plants stall or look stressed. Here's a practical breakdown:
| Plant Type | Recommended Daily Light | Best Lordem Timer Setting | Notes |
|---|---|---|---|
| Seedlings (vegetable, flower) | 14-16 hours | 12H + supplemental natural light, or use an outlet timer for longer durations | Built-in max is 12H; supplement with a window or set the light where it also gets ambient daylight |
| Leafy houseplants (pothos, ferns, herbs) | 10-12 hours | 12H | Most foliage plants do well at 12 hours; avoid constant 24H light |
| Succulents and cacti | 8-10 hours | 8H or 12H | These tolerate lower light; 8H is often plenty |
| Rooting cuttings | 8-10 hours | 8H | Strong light isn't needed during rooting; lower duration reduces stress |
| Flowering or fruiting plants | 10-12 hours | 12H with red/blue spectrum | Switch to red/blue spectrum mode to support flowering |
A practical note on seedlings: extension-based guidance commonly recommends 14 to 18 hours of light per day for starting seeds indoors. Since the Lordem's built-in timer maxes out at 12 hours, you have two options. Either position the light near a window so natural light adds a few more hours on top of the 12H timer cycle, or use an external plug-in outlet timer set to 16 hours alongside the light's manual ON mode. Since the Lordem built-in timer maxes out at 12 hours, some people add an external outlet timer to extend the schedule and better match their plants' needs how to set timer on grow light. Most people find 12H plus ambient window light works fine for the majority of common seedlings.
One thing worth flagging: more hours is not always better. Long photoperiods with low intensity can produce leggy, stretched growth rather than compact healthy plants. If your seedlings are stretching toward the light even on 12H, the issue is usually intensity (light too far away) rather than duration. Raise the brightness to 100% or move the light closer before extending the schedule.
Troubleshooting: timer not working, wrong times, schedule not saving
Most Lordem timer problems fall into a small handful of categories. Here's how to diagnose and fix each one.
The light isn't turning on or off at the expected time
The most common cause is that the timer was set at the wrong moment. Remember: the light uses the exact moment you pressed the Timer button as its daily reference. If you pressed it at 3pm but wanted it to start at 7am, it will turn on at 3pm every day. The fix is to cancel the current timer, wait until the correct start time arrives, and re-set it. To cancel, press the Timer button repeatedly until no timer indicator light is active. Then at your desired start time, press it again to select your duration.
The schedule stopped working after a power outage
Power interruptions reset the timer reference on most Lordem models. After any blackout or unplugging, the light doesn't remember when its daily cycle was supposed to start. You'll need to re-set the timer from scratch. Lordem's own documentation on the HL-0026 specifically recommends testing the timer after power outages and checking settings regularly, because this is a known point where schedules get disrupted. Make it a habit: after any power interruption, re-set the timer at your desired start time.
The light turns off unexpectedly mid-session
This usually means the timer ended its ON cycle and the light went into its scheduled OFF period. Double-check which timer setting is active by looking at the indicator light (green=4H, blue=8H, red=12H on desk models; or count how many times you pressed the Timer button on the inline controller). If you need longer ON periods and the light is shutting off after 4 hours when you expected 8, you probably only pressed the Timer button once instead of twice. Cancel and re-set, pressing Timer twice for 8H or three times for 12H.
The timer seems to run but the light doesn't turn back on the next day
If the light completes its first ON period but then never comes back on, check that it's actually in timer mode rather than manual mode. In manual mode, pressing Power turns it on and off as a simple toggle with no daily repeat. In timer mode, the Timer button controls the cycle. Press the Timer button once to enter a duration and confirm the indicator light is active. If the light was somehow switched to manual (or if the controller got bumped), that's enough to break the daily repeat. Also check the outlet itself, especially if you're using a power strip with an individual switch.
The schedule isn't saving
On these Lordem controllers, there's no 'save' step. The moment you press Timer and select a duration, that is the schedule. If it feels like the schedule isn't holding, the most likely culprits are: power interruptions resetting the cycle, the Timer button being accidentally pressed again (cycling to a different duration or canceling timer mode), or the outlet losing power. Try plugging directly into a wall outlet rather than a power strip to rule out intermittent power. Then re-set the timer at your desired start time and confirm the indicator light stays active.
How to confirm the timer is actually running
It's worth taking 60 seconds to verify your setup before walking away and assuming everything is working. Here's a quick confirmation checklist:
- After pressing the Timer button, check that the timer indicator light is on and showing the correct color (or that the controller registered the correct number of button presses for your model).
- Note the exact time you set the timer. Write it on a sticky note near the light if that helps. That time is when the light will turn on every day.
- If it's practical, wait near the light for the first full ON-to-OFF transition. For a 4H setting, that's the shortest wait. You should see the light turn off after 4 hours and the timer indicator extinguish during the OFF period.
- Check the next morning that the light turned on at the expected time without you touching anything.
- After any power outage or accidental unplugging, repeat the timer setup from scratch.
On the desk-style Lordem, the colored indicator is the simplest confirmation: if you see green, blue, or red lit up on the controller, the timer is active. If no indicator light is showing, the unit is either in manual mode or timer mode is off. That's a fast visual check you can do without even bending down.
Fine-tuning: avoiding the most common mistakes with duration and intensity
Once the timer is running, the temptation is to crank everything up, longer hours, higher brightness, thinking more is always better. It usually isn't. Here are the practical mistakes to avoid:
- Don't run 12H schedules for plants that need a night period. Some flowering plants (like short-day plants) will refuse to bloom if they never get enough consecutive darkness. If you're growing anything that should flower, research its specific photoperiod needs before committing to 12H.
- Don't confuse brightness with duration. If a plant looks pale or stretched, the instinct is often to add more hours. But leggy seedlings usually need the light closer or brighter, not on longer. Try increasing brightness to 80-100% or moving the light 2-3 inches closer before extending the ON period.
- Don't leave the light on 24 hours. Even if plants survive it short-term, most plants need a dark period for proper cellular processes. Running a grow light around the clock stresses most common houseplants and seedlings over time.
- Do adjust the timer seasonally. In winter, your plants get less ambient light even near a window, so bumping from 8H to 12H can compensate. In summer, the reverse may apply.
- Do set spectrum and brightness before enabling the timer. Since brightness and spectrum are independent of the timer cycle on Lordem controllers, you can change them any time without resetting the schedule. But it's cleaner to have everything configured before the daily cycle starts.
- Do re-set the timer after any power disruption, not just when something looks wrong. Making this a reflex prevents schedule drift that you might not notice for days.
The Lordem's built-in timer is deliberately simple, and that's actually a feature. You're not configuring clock times, syncing to a Wi-Fi network, or navigating an app. You press one button a few times, and the light runs on a consistent daily cycle from that point forward. The main thing that trips people up is not realizing the start time is determined by when you press the button, not by any clock you enter. Get that part right, confirm the indicator light is active, and you're done. If something goes wrong later, a reset and re-set at the correct time solves the majority of issues.
If you're working with a different brand or a more complex timer setup, the core principles here still apply, but the specific button sequences will differ. Grow light timer instructions vary by brand, so it's worth checking brand-specific guides for units like the Elaine or Sansi grow lights if you're managing multiple setups at once. For more hands-on details, follow the grow light timer instructions for your specific Lordem model and controller style. Grow light timer instructions vary by brand, so it's worth checking brand-specific guides for units like the Elaine or Sansi grow lights if you're managing multiple setups at once sansi grow light timer instructions. Grow light timer instructions vary by brand, so it is worth checking brand-specific guides if you are using an Elaine grow light.
FAQ
Can I change the timer start time without waiting until the next day?
Yes. The timer cycles are based on when you press the Timer button, not on a real clock, so if you need a different start time, you must cancel the current timer (until no indicator is active), then press Timer again at the new desired start moment. You cannot “advance” or “delay” the schedule by minutes.
How do I know the timer is actually active after I set it?
On the desk-style models, the color indicator is your confirmation, green=4H, blue=8H, red=12H. On inline controllers that use button-press cycles, count the number of presses needed for your duration, and verify the indicator lights up or the unit reports the expected state visually. If you do not see a clear timer indicator, it is not running.
What happens if I turn the light off or on manually while the timer is running?
If the light is in timer mode, it will turn on and off according to the programmed daily cycle. Using Power to toggle may interrupt what you intended, especially if you turn it off during an ON period. If you want the schedule to resume exactly, wait until the next scheduled ON time, or re-set the timer at the correct start moment.
Can I set a custom timer duration like 6 or 10 hours?
Most Lordem built-in timers only allow fixed ON durations (commonly 4H, 8H, 12H), so you cannot set 10 hours or 6 hours directly. If you need an unusual duration, use the light’s manual ON mode with an external plug-in outlet timer, or choose the closest built-in option and supplement with natural light.
Will the schedule stay correct if the power goes out or the outlet loses power?
After any blackout, unplugging, or power strip outage, the reference moment can reset. The safe approach is to re-set the timer at the correct start time after power returns, especially if your plants rely on a consistent photoperiod.
Is it okay to run the grow light timer through a power strip?
Avoid using a switched power strip (one with an individual on/off toggle) unless you leave it on continuously, because repeated switching can cause the timer reference to reset or the light to miss its cycle. If you need to test, plug directly into a wall outlet during troubleshooting.
My seedlings look leggy even at 12H, should I extend the hours further?
If the light is stretching even on the longest built-in timer setting, duration is not the only factor. First check intensity by moving the light closer (within the safe distance for the specific plant), and set brightness higher. Long photoperiods with low intensity can still cause leggy growth.
I set the timer in the afternoon, but I wanted it to start in the morning, what should I do?
If your goal is a later start time than when you set the timer, do not assume it will “wait” for the time you want. It will start at the moment you pressed Timer. Cancel and re-set at the exact time you want the first ON period to begin.
The light turns on for the first cycle but then never returns, how can I troubleshoot quickly?
If it never turns back on after the first ON period, confirm it is still in timer mode (Timer indicator active) and that the unit actually completed the ON period and moved into its scheduled OFF time. Also check for controller displacement (it gets bumped easily) and verify the outlet is powered.
Can I combine the Lordem timer with an external outlet timer to get longer than 12 hours?
Yes, you can combine methods. A common approach is using the Lordem built-in 12H plus additional natural light from a window, or using an external outlet timer to extend beyond the built-in maximum while keeping the Lordem on in manual mode. The key is to avoid overlapping conflicting timers, so decide which device controls the ON window.
Elaine Grow Light Timer Instructions: Setup and Troubleshooting
Step-by-step Elaine grow light timer setup, daily schedules, tests, and troubleshooting for reliable plant light cycles.