LED grow lights work, and they work well, but only if you understand a handful of key concepts and avoid a few common setup mistakes. Whether you just unboxed your first light or you're troubleshooting a setup that isn't performing the way you expected, this guide answers the questions that come up most often, in plain language, with real numbers you can actually use. If you want the led grow light basics for choosing spectrum, intensity, and timing, keep the rest of this guide handy as your step-by-step reference.
LED Grow Lights FAQ: Setup, Spectrum, Schedules, Troubleshooting
Marcus Tillman
22 Apr 2026
What LED grow lights actually do
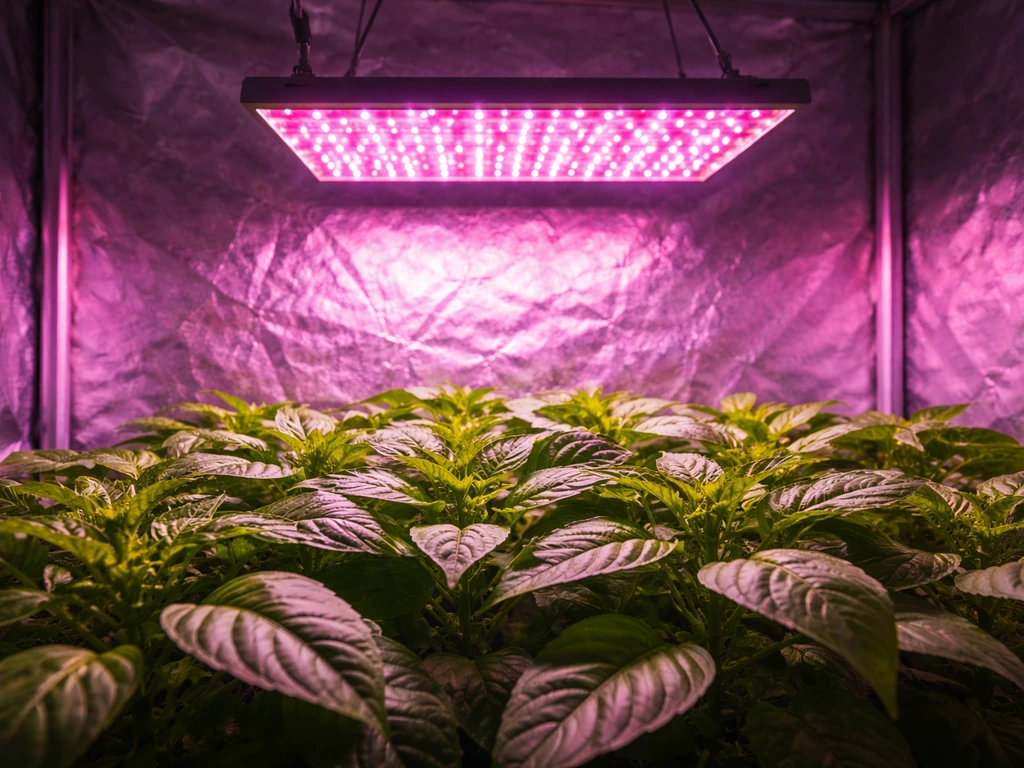
An LED grow light replaces sunlight for your plants by emitting specific wavelengths of light that drive photosynthesis. The relevant range is 400–700 nanometers, which is called PAR (Photosynthetically Active Radiation). Everything your plants need for growth happens inside that window, though some fixtures also include wavelengths just outside it, like far-red (700–800 nm), which affects plant shape and flowering timing through a different signaling pathway.
The three numbers you'll see most often are PPF, PPFD, and DLI. PPF (measured in µmol/s) is the total photon output of the fixture. PPFD (µmol/m²/s) is what actually reaches a specific point at canopy level, which is the number that matters for your plants. DLI (mol/m²/day) is the total light your plant receives over a full day, calculated by multiplying PPFD by your photoperiod in seconds and dividing by one million. A fixture might have impressive PPF on the box, but if your PPFD at canopy level is too low because you've hung the light too high, your plants won't respond well.
Spectrum matters beyond just brightness. A light rich in far-red can trigger shade-avoidance responses in plants, causing longer stems, bigger leaf gaps, and earlier flowering even when the PPFD reading looks fine. This is why a "full spectrum" label alone doesn't tell the whole story. The ratio of red to far-red (R:FR) actually shapes how your plant grows, not just how fast it photosynthesize. Most quality broad-spectrum LEDs are tuned to avoid extreme imbalances, but it's worth understanding that spectrum mix and intensity are two separate levers.
Choosing the right LED grow light for your plants and space
The single most useful question to ask before buying is: what am I growing, and in how much space? The answers determine what PPFD range you need and what fixture size makes sense. Here's a practical breakdown by plant type:
| Plant Type | Target PPFD (µmol/m²/s) | Daily Light Integral (DLI) | Notes |
|---|---|---|---|
| Seedlings / clones | 100–300 | 6–12 mol/m²/day | Low intensity to avoid stress on young tissue |
| Houseplants / low-light tropicals | 50–150 | 4–8 mol/m²/day | Many do fine at the low end |
| Herbs (basil, parsley, mint) | 200–400 | 12–20 mol/m²/day | Benefit from longer photoperiods |
| Leafy greens / lettuce | 150–300 | 10–17 mol/m²/day | Very well-studied under LED; respond predictably |
| Fruiting / flowering plants | 400–700+ | 20–40 mol/m²/day | Higher intensity needed for yield and bud development |
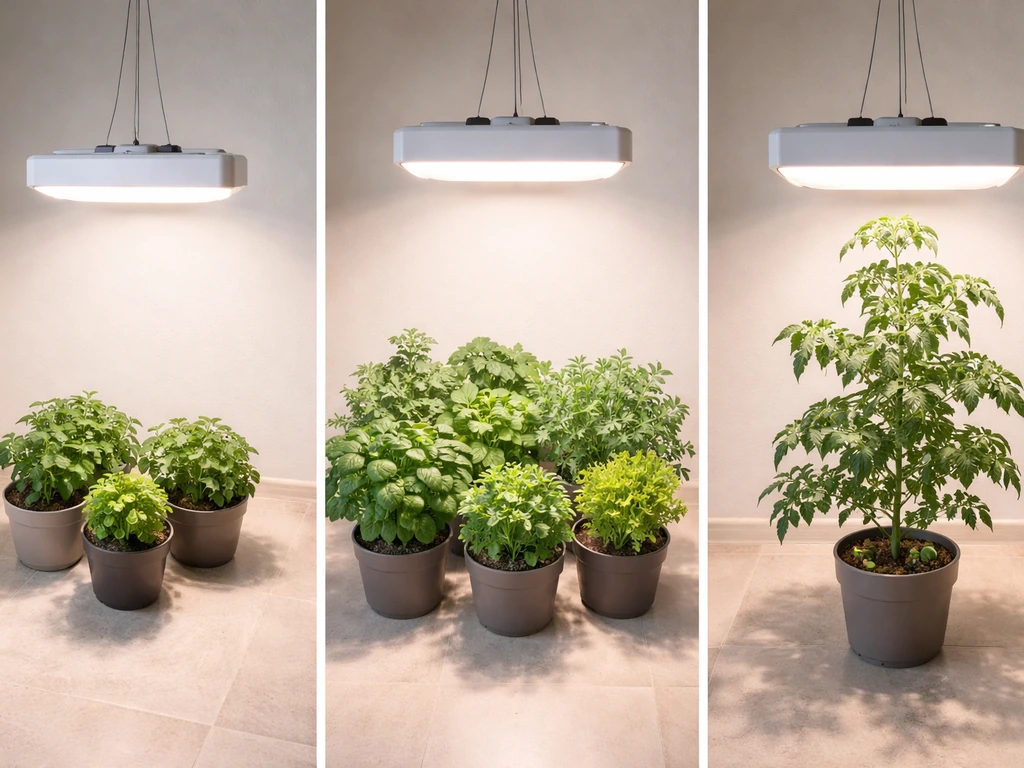
For space sizing, match the fixture's stated coverage to your actual canopy area, not the room size. A light marketed as covering a 4x4 ft tent at flowering intensity may only cover 3x3 ft for high-demand crops. Always check whether the manufacturer's coverage claim is based on vegetative or flowering PPFD targets, since those are very different thresholds.
For windowless rooms or grow tents, you need to supply all the light yourself, which means running lights long enough to hit your DLI target. A small shelf garden with herbs can often get by with a 30–40 watt LED panel. A 2x4 ft tent for flowering tomatoes or peppers needs something in the 200–300 watt range from a quality fixture. Budget boards from less established brands often underdeliver on actual PPFD at canopy, so check for published third-party testing or user measurements if you can.
Placement rules: hang height, distance, and even coverage
Most manufacturer hang-height charts are a starting point, not a final answer. Distance affects PPFD dramatically because light intensity drops off as you move the fixture farther away. The general principle (roughly following the inverse-square law for point-source-style fixtures) is that doubling the distance cuts intensity to about one quarter. Large LED panels with spread optics don't follow this perfectly, but the trend holds: lower means more intense, higher means softer and wider.
Here are practical starting heights for different plant stages as a baseline:
- Seedlings and clones: 24–36 inches above canopy (soft intensity, wide spread)
- Vegetative herbs and houseplants: 18–24 inches
- Vegetative flowering plants: 18–24 inches
- Flowering / fruiting stage: 12–18 inches (if your fixture supports it without heat stress)
Coverage uniformity matters as much as peak PPFD. The commercial benchmark for acceptable uniformity is at least 75–80% (meaning the minimum PPFD reading across your canopy is at least 75–80% of the average). If you have hot spots in the center and dim edges, you'll see uneven growth, with plants near the edges lagging. You can improve uniformity by raising the light slightly, repositioning it to center over the canopy, or rotating plants regularly. Some growers add a second, lower-power fixture to supplement edge coverage.
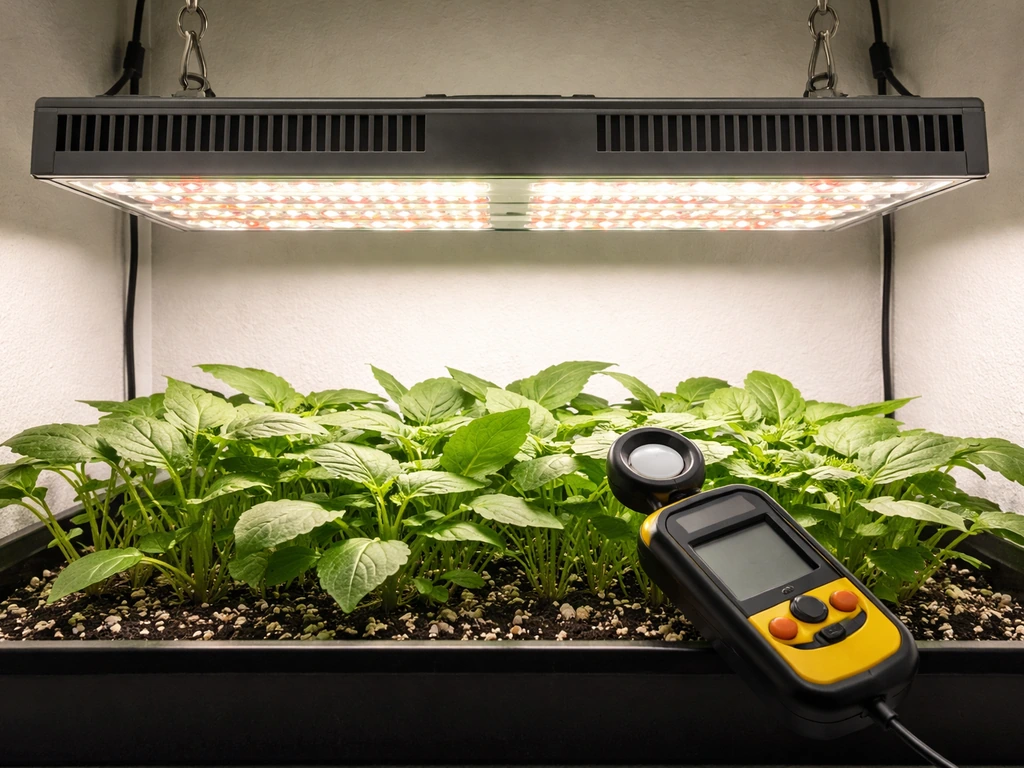
The only reliable way to verify your actual PPFD at canopy is to measure it. A quantum PAR sensor like the LI-COR LI-190R gives accurate results in µmol/m²/s. If that's out of budget, the Photone app (available for smartphones) measures PAR/PPFD in µmol/m²/s and DLI in mol/m²/day. It's not as accurate as a dedicated sensor, but it gives you a directionally useful reading. Just be aware that phone-app readings and real quantum sensor readings can differ, so treat app measurements as estimates rather than absolutes.
How many hours per day: schedules, timers, and photoperiod
The relationship between intensity (PPFD) and duration (hours of light) combines into DLI, and that's the number you're really trying to hit. If your PPFD is lower than ideal, you can partly compensate by running the lights longer. If your PPFD is high, shorter photoperiods protect against over-lighting.
For most non-photoperiod-sensitive plants, a simple 16-hours-on / 8-hours-off schedule works well during vegetative growth. Seedlings do fine on 14–16 hours. Herbs generally thrive at 14–16 hours. For flowering plants that require short days (like certain cannabis strains or chrysanthemums), you switch to a 12/12 schedule to trigger and maintain flowering. Long-day plants need 14–18 hours or a night-interruption technique, where you briefly turn the light on in the middle of the night (even a few µmol/m²/s for a few hours around midnight is enough to prevent them from flowering prematurely).
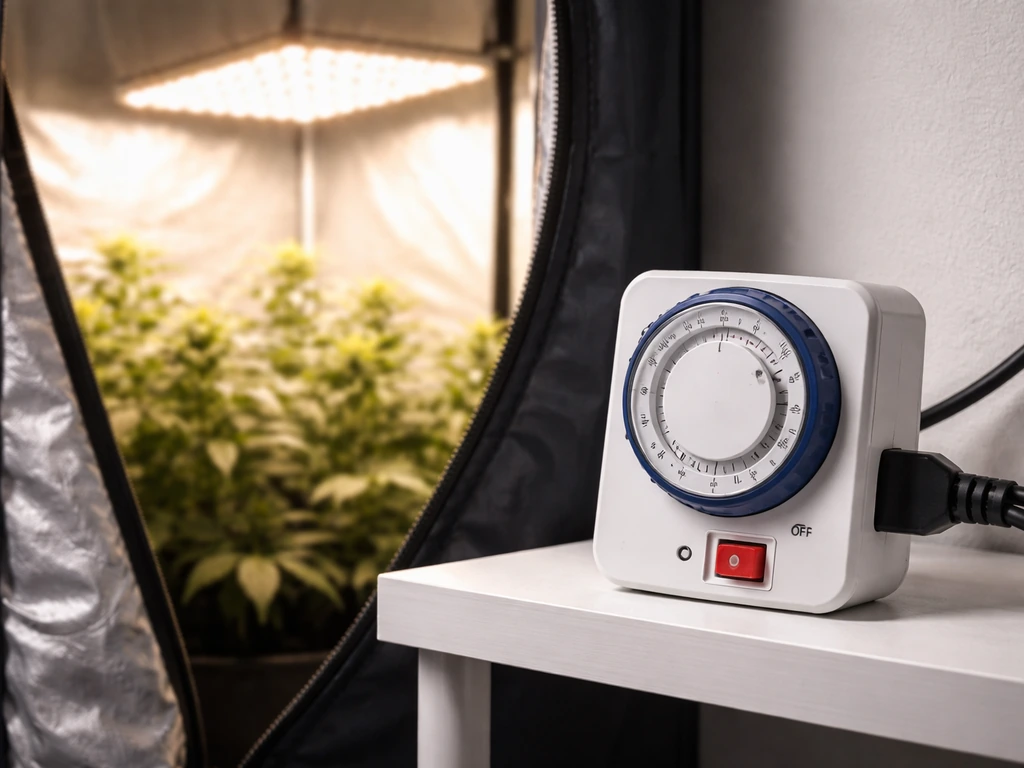
Use a timer. Every time. Manual switching introduces inconsistency that stresses plants, and photoperiod-sensitive plants in particular will react badly to even occasional missed light cycles. A basic mechanical outlet timer costs a few dollars and eliminates this entire category of problem. Digital timers let you set multiple on/off periods, which is useful if you want to mimic natural sunrise/sunset ramps or run night-interruption cycles.
Troubleshooting: leggy growth, slow growth, bleaching, and heat stress
Most problems with LED-grown plants fall into a few categories, and the fix usually involves adjusting one variable at a time. Here's how to diagnose the most common ones.
Leggy, stretched growth
Long internodes (big gaps between leaves on the stem) almost always mean insufficient light. Your PPFD is too low at canopy level. Lower the light, increase intensity on dimmable fixtures, or extend the photoperiod slightly. One exception: if you're using a fixture with heavy far-red output, the R:FR imbalance can cause shade-avoidance stretching even at seemingly adequate PPFD. Check your fixture's spectrum specs.
Slow overall growth
Slow growth is trickier because it can also be nutrients, root problems, or temperature, not just light. Rule those out first. If watering, nutrients, and temperature (ideally 65–80°F / 18–27°C for most plants) are fine, then check your DLI. Calculate it: PPFD × hours per day × 3600 ÷ 1,000,000. If you're targeting herbs and getting a DLI of 6 when you need 15, that's your answer.
Bleaching, yellowing, or leaf curl near the light

These are classic signs of too much light (photoinhibition) or heat stress. If the top leaves closest to the fixture are yellowing or bleaching while lower leaves look fine, raise the light. If leaves are curling upward and the tissue feels dry or crispy rather than soft and yellowed, heat stress from the fixture is likely. Measure the air temperature directly under the light with a thermometer. LED fixtures run cooler than HPS, but they still generate heat, especially in enclosed spaces. Raise the fixture, improve airflow, or reduce intensity.
Uneven growth across the canopy
Plants on the edges grow slower or stretch while center plants look great. This is a uniformity problem. Raise the light slightly to widen the spread, rotate plant positions weekly, or add a secondary fixture. You can also check PPFD at multiple canopy points using the Photone app or a PAR sensor to confirm where the drop-off happens.
Setting intensity and avoiding over/under-lighting
If your fixture has a dimmer, use it. Don't run a new light at 100% right away. Start at 50–70% for the first week while plants acclimate, then increase gradually. This is especially important when transitioning seedlings from a low-intensity environment to a higher-intensity flowering setup.
The right intensity is defined by PPFD at the canopy, not by wattage or the fixture's listed output. Two lights with the same wattage can have very different PPFD at canopy depending on their efficiency (measured in µmol/J, where higher is better), their optics, and how high they're hung. A quality modern LED fixture runs around 2.5–3.0 µmol/J or better. Budget panels may be closer to 1.5–2.0 µmol/J, meaning you need more wattage to hit the same canopy PPFD.
Over-lighting is a real problem that's easy to create with powerful modern LEDs in small spaces. At PPFD levels above roughly 800–1000 µmol/m²/s without CO2 enrichment, most plants can't use the extra light efficiently, and you risk photoinhibition, bleaching, and wasted electricity. Under most home-growing conditions without supplemental CO2, there's rarely a reason to push PPFD above 600–800 µmol/m²/s for flowering plants and 300–400 for greens and herbs.
Here's a simple process to dial in intensity without a PAR sensor:
- Set your light at the manufacturer's recommended height for your plant stage
- Start at 60% intensity (or use the manufacturer's vegetative distance if no dimmer)
- Run for 7 days and observe: are plants compact and healthy, or stretching?
- If stretching, lower the light 2 inches or increase intensity 10%
- If bleaching or curling, raise the light 2 inches or reduce intensity 10%
- Repeat weekly adjustments in small increments until growth looks compact and healthy
Checking your specific fixture: settings, specs, and performance
Every LED fixture is a little different, but there are a few things worth checking on any light you own or are considering. First, look up the driver. The driver is the component that regulates power to the LEDs, and it's a major factor in both reliability and dimming performance. Fixtures using quality drivers (brands like Meanwell are widely referenced in the hobby community) tend to run more consistently and have better dimming response. Cheap integrated drivers in budget lights are usually the first thing to fail.
Check the IP rating if you're using the fixture in a grow tent or humid environment. IP65 means the fixture is dust-tight and protected against water jets, which is more than adequate for most tents. A fixture with no IP rating or IP20 is not designed for humid conditions and could be a safety risk over time.
Look at the warranty and L70 lifespan claims. L70 is the point at which LED output drops to 70% of its initial brightness. Some manufacturers publish L70 claims of 50,000 hours or more, which sounds impressive, but real-world longevity depends heavily on how well the fixture manages heat. A light running hot because of poor thermal design will degrade faster than its L70 claim suggests. If a manufacturer offers a genuine 3–5 year warranty (some premium brands like Optic LED advertise 5–10 year support programs), that's a meaningful signal of confidence in their build quality.
If your fixture has a dimmer knob or app control, test it across its range to confirm it actually reduces output smoothly and doesn't flicker at low settings. Some cheaper dimmers pulse the light at low frequencies, which can stress plants and cause headaches for the grower. If you notice flickering, avoid using the low end of the dial.
Safety, maintenance, and keeping your light running well
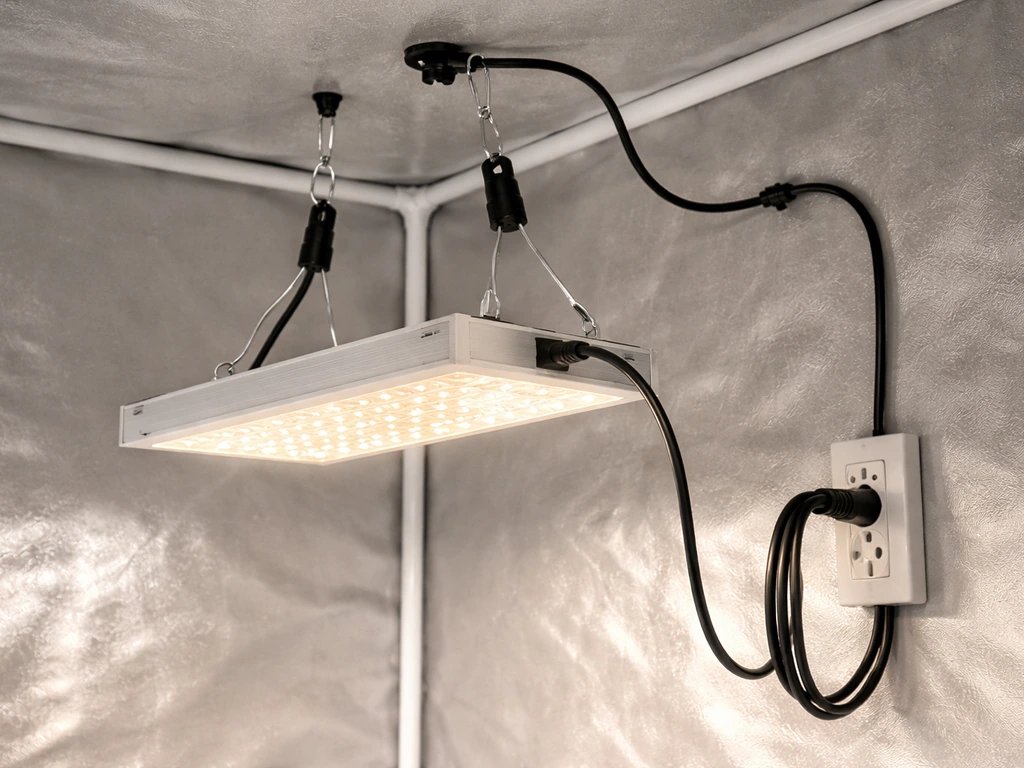
LED grow lights are electrically safe when installed correctly, but a few basics are worth stating plainly. Always plug directly into a properly grounded outlet or a quality surge-protected power strip. Avoid daisy-chaining multiple extension cords. Don't hang a light using its power cord as a support point. In grow tents, keep power strips and outlets elevated off the floor where condensation or spilled water could reach them.
Never look directly at a running LED grow light, especially high-intensity ones. The blue and white LED clusters in modern grow lights are bright enough to cause eye damage with prolonged direct viewing. Use UV-blocking safety glasses if you need to work in the tent with the light on. Your phone camera can also be damaged by direct pointing at high-power LEDs.
For maintenance, the main task is keeping the fixture clean. Dust accumulates on LED arrays and heatsinks and reduces both light output and cooling efficiency. Every 4–6 weeks, power down and wipe the light surface with a dry or lightly damp microfiber cloth. Don't spray anything directly onto the fixture. Check mounting hardware (ratchet hangers, hooks, carabiners) for wear, especially if the fixture is heavy. A dropped light can damage plants, crack pots, and create a water-near-electricity hazard.
Check the fixture's heat output periodically by placing your hand a few inches from the heatsink fins after a full run cycle. It should be warm, not hot enough to be uncomfortable. If it's burning hot, check that the fins are clear of dust and that the tent or room has adequate airflow. An inline fan exhausting air from the grow space is almost always worth adding if you're running any fixture above 100 watts in an enclosed space.
Your practical next steps from here
If you're starting fresh, follow this sequence and you'll avoid most of the common mistakes:
- Identify your plant type and look up its PPFD and DLI targets using the table above
- Match a fixture to your canopy area, checking for published PPFD data at your target height, not just wattage
- Hang the light at the manufacturer's starting height for your plant stage
- Set intensity at 60–70% if you have a dimmer, or use the vegetative distance recommendation
- Set a timer for an appropriate photoperiod (14–16 hours for most vegetative growth, 12/12 for short-day flowering)
- After 7–10 days, observe plant response: adjust height or intensity in small steps based on what you see
- Optionally measure PPFD at canopy using the Photone app or a PAR sensor to confirm you're in the right range
If you already have a setup and something isn't working, start by ruling out non-light causes (watering, nutrients, temperature) before adjusting the light. Then use the troubleshooting section above to match your symptom to a fix. Most problems come down to one of three things: light is too far away, light is too close, or photoperiod is wrong. The plant will tell you which one if you know what to look for.
This guide covers the core questions, but there's a lot more to dig into depending on your setup. If you want the practical LED grow light guide basics for choosing spectrum, intensity, and timing, this article is the right place to start. Use our indoor grow light guide for a complete walkthrough of choosing the right spectrum, intensity, and photoperiod for your space LED grow light guide. If you are using CFL bulbs instead of LEDs, our CFL grow lights guide walks through the key setup rules for spectrum, intensity, and timing. If you want to go deeper on how different light types compare, or how to build a complete grow light schedule for a specific plant type, the related guides on this site cover those topics in detail, including a full breakdown of LED grow light basics, setup specifics for indoor growing environments, and tips for getting the most out of whatever fixture you're already running. If you need the quick foundations, our grow light explained overview walks through how LEDs deliver usable light for plant growth. If you want to fine-tune your setup, the Grow Lights Guide covers the key concepts behind choosing spectrum, intensity, and timing.
FAQ
What does “coverage” really mean on the box, and how should I verify it for my plants?
Coverage claims usually assume a specific target PPFD and sometimes a particular plant height or stage. Verify by mapping your canopy area (not your tent size) to a usable PPFD range at that height. If you do not have a PAR meter, use the fixture’s published photometric or any third-party PPFD testing to estimate whether the edges will land near your required minimum, then expect to adjust hang height or use a second fixture for uniformity.
If my light has dimming, should I dim by watts or by PPFD?
Dimming should be treated as a path to a target PPFD at canopy level, not as a guarantee that “half power means half PPFD.” Different drivers and optics behave differently across the dimming range. After you set a dimmer, measure with an app (directional) or ideally a PAR sensor, then lock in the setting so your DLI stays consistent.
Is it better to run a higher PPFD for fewer hours, or a lower PPFD for more hours?
Your plants respond to DLI, but intensity can still matter for stress and daily rhythm. If you are hitting the same DLI, a lower PPFD spread over more hours often reduces peak stress risk, while higher PPFD can increase chances of bleaching or heat stress near the top leaves. Practical choice: adjust based on temperature, uniformity, and how far you are from the heat or photoinhibition threshold, then confirm with symptoms.
How do I tell the difference between too much light and too much heat from the fixture?
Too much light often shows bleaching, yellowing, or “crispy” look in the upper canopy even when lower leaves seem less affected. Heat stress usually comes with wilting or upward leaf curl plus dry, tissue-like dryness, and it tracks with air temperature near the lamp. The quick check is to measure temperature directly under the light during the brightest part of the photoperiod, then adjust hang height or airflow before changing PPFD again.
What if my plants are stretching even though my PPFD reading seems okay?
Stretching can be caused by spectrum imbalance (high far-red), but it can also come from general environmental conditions that reduce effective growth, like low root-zone temps, inconsistent watering, or nitrogen limitation. Since PPFD alone does not capture spectral signaling, check the R:FR ratio in the fixture specs if stretching persists after you confirm adequate PPFD and reasonable DLI, then look at your nutrient and temperature ranges.
Can I rely on phone apps like Photone to make final adjustments?
Use phone apps for direction and relative changes, not for fine compliance with target PPFD. Differences in sensors, calibration, and mounting can shift absolute values. A good approach is: use the app to bring your canopy into a rough range, then validate with a quantum PAR sensor if you need accuracy for dosing strategies or tight uniformity requirements.
How close can I hang the light without risking damage?
The safe “closest” point depends on fixture thermal design, your canopy heat removal, and air movement. Instead of guessing from watts, start with a conservative hang height, then watch leaf temperature symptoms and measure air temperature under the light. If you see heat signs (curling, dry tissue) or the heatsink runs unusually hot to the touch near the fins, raise the fixture and improve airflow before going closer.
What PPFD should I aim for if I do not have a target DLI?
If you do not know your DLI target, start with stage-based DLI logic: seedlings often do well with moderate DLI and longer photoperiods, while flowering typically needs higher DLI but can hit stress limits sooner at high intensity. A practical method is to choose a reasonable photoperiod first (based on your plant type), then set PPFD so your calculated DLI falls within a typical working window for that stage, and refine using growth rate and leaf response.
How do I avoid photoperiod mistakes with timers?
Use a timer that you trust and test, then avoid any “manual override” habits. Photoperiod-sensitive plants can react to even short interruptions, so confirm the timer’s actual switch behavior (especially digital timers) and keep the plug in a stable outlet. If your setup has power-loss risk, consider a backup plan like an uninterrupted power supply or a timer with memory and safe restart behavior.
Do LED grow lights need an acclimation period when I increase intensity?
Yes. Even if your final PPFD is within your target range, jumping from low light to high light can cause temporary stress. A common approach is to start around 50 to 70 percent output for a week, then increase gradually while observing new growth, especially in seedlings and plants moved from a window or a lower-intensity shelf.
Why do the center plants look better than the edges, even if I think I placed the light correctly?
Uneven growth is usually a spread optics and uniformity issue, not just placement error. Even with correct height, edge drop-off happens if the fixture’s coverage assumes a different canopy size or if your plants are not centered. Fixes that work in combination are rotating plants weekly, raising slightly to widen spread, checking multiple PPFD points across the canopy, and adding a secondary lower-power light for the outer zones.
What maintenance steps actually improve both light output and plant health?
Dust on heatsinks can reduce cooling, which can shorten LED lifespan and indirectly reduce output. Clean the fixture on a set interval (about every 4 to 6 weeks), keep mounting hardware secure, and watch for unusual heat output. If you are running enclosed tents, ensure airflow so the fixture can maintain normal operating temperature.
Is there a safety issue with running LEDs near water or in humid tents?
Yes, but it is manageable with the right hardware. Confirm the fixture’s IP rating before using it in a humid tent, and keep power strips and any outlets elevated away from splashes and condensation. Also avoid extension cords that are not rated for the environment, and never support the fixture by its power cord.
Next Article
LED Grow Light Guide: Buy, Set Up, and DIY Successfully
Step-by-step led grow light guide to buy or DIY, size PPFD coverage, set placement, schedules, and fix common issues.