You can make a fully adjustable grow light setup today using common hardware store parts: a length of jack chain or ratchet hangers, a few eye hooks or a ceiling-mounted rail, and your existing LED bar or panel. The core idea is simple: attach your light to something that lets you raise or lower it (or tilt it) in minutes, so you can move it closer as seedlings establish, pull it back as plants stretch, and fine-tune intensity by changing distance rather than buying new equipment. This guide walks you through every step, from choosing your adjustment method to wiring it safely and dialing in the right height for each growth stage.
How to Make Adjustable Grow Lights: Build and Set Height

Marcus Tillman
18 May 2026
Choose your adjustable setup type first
There are three main ways to make a grow light adjustable, and picking the right one depends on your space and what you actually need to control. Height adjustment is the most useful for most home growers. Tilt adjustment is handy for side lighting or angled coverage over a bench. Beam control (reflectors and diffusers) is more of a refinement for advanced setups. Here is how each one works in practice.
Adjustable height (the one most growers actually need)
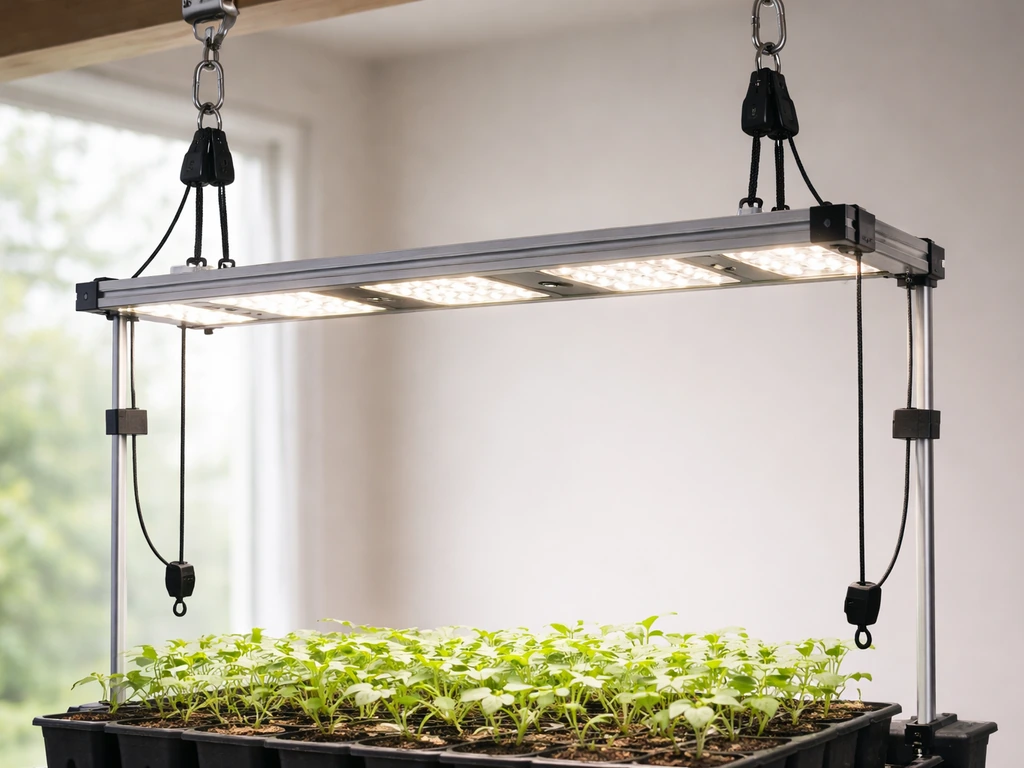
Height adjustment is how you control light intensity without touching a dimmer. Moving the light closer to the canopy raises the PPFD (the amount of photosynthetically active light hitting your plants); moving it farther away drops it. This is your main dial for seedlings vs. vegetative vs. flowering stages. The two most practical height mechanisms are ratchet hangers (the kind sold for grow tents, usually rated around 8 lbs per pair) and steel jack chain with S-hooks or adjustable cargo strap ratchets. Ratchet hangers are the easiest and cheapest option for lights under 10 lbs. For heavier fixtures (many full-spectrum LED bars run 15 to 25 lbs), use a steel rail system with adjustable hangers or chain rated for the actual load.
Tilt and pivot mounts
A tilting mount lets you angle the light off vertical, which matters if you have plants on a shelf, along a wall, or need to cover an irregular canopy shape. The simplest DIY version uses a pivot bolt through a slotted bracket (available at any hardware store in the electrical conduit section). You set the angle, tighten the bolt, and it holds. More precise options include articulating monitor arms rated for 15 to 25 lbs, which are especially good for small tents or closet setups where you need to swing the light aside for plant access.
Beam and coverage control (reflectors and diffusers)

Some growers add removable reflectors or diffusers to widen or concentrate the beam. This matters because the beam angle baked into your LED optics determines how light spreads at a given height. A fixture with a 120-degree beam angle throws a wide, relatively even footprint; a tight 60-degree beam concentrates intensity in a narrow column. You can clip a white reflective mylar sheet into a hood shape around a bare bar light to redirect spill light back toward the canopy, which effectively increases intensity without raising power. Diffusion film (available online for around $10 per roll) can smooth out hot spots if you have multiple LEDs causing uneven coverage. That said, if your light already has a quality lens, adding a reflector may not help much. Focus on height adjustment first and treat beam control as a bonus tweak.
Parts list and safety checks before you build
Getting the right parts before you start saves a frustrating trip back to the hardware store mid-build. Here is everything you need for a basic ratchet-hanger or chain-based adjustable setup, plus the safety items you should not skip.
Basic parts list
- Ratchet rope hangers (look for ones rated at least 8 lbs each; use two or four depending on fixture weight) OR steel jack chain in 1/0 or 2/0 size with S-hooks rated to at least double your fixture's weight
- Ceiling anchor points: heavy-duty screw-in eye hooks (rated 50+ lbs) into a stud or joist, or a 1-inch steel pipe or Unistrut rail bolted across two joists for multi-light runs
- Power strip or outlet with a grounded (3-prong) connection near the hanging point
- Strain relief gland or cable clamp (usually plastic, costs under $2) to keep the power cord from pulling on internal connections
- UL-listed wire connectors if you are splicing any wiring
- Hook-and-loop cable ties or clip-on cable guides to route cords cleanly
- A measuring tape, pencil, and a stud finder
- Optional: a simple lux meter or PPFD meter app (phone-based apps are not super accurate but useful for relative comparisons)
Safety checks you must do before hanging anything
- Verify your ceiling anchor point hits a joist or stud, not just drywall. Drywall alone will not hold a grow light under load.
- Check that your LED fixture's power draw matches what your outlet circuit can handle. Most home circuits are 15A at 120V (1,800W max); most LED grow lights draw 100 to 600W, which is fine, but do not daisy-chain multiple high-draw fixtures on one outlet.
- Confirm the fixture is listed for damp locations if you are growing in a humid tent or greenhouse space. The manual or label will say 'damp location rated' or 'UL damp.'
- Inspect the power cord for any nicks, fraying, or exposed conductor before installing.
- Make sure the fixture case is grounded: the grounding pin on the plug must connect through to the fixture chassis. If you are hard-wiring, run a dedicated ground wire and confirm continuity with a multimeter.
- Keep wiring away from standing water, wet soil splashes, and any surface that gets regularly condensed on.
Measure and plan before you drill a single hole
Skipping the measurement step is how people end up with a grow light that only adjusts two inches before it bottoms out on the canopy, or one so high it barely moves. Take 10 minutes to measure first.
What to measure
- Ceiling (or rail) height to the floor or grow bench surface. Write this number down.
- Height of your tallest expected plant at maturity. Add 12 inches of buffer above that for the light fixture itself.
- Minimum distance you will ever need the light to the canopy. For most LED bars this is around 18 inches during flowering; seedlings need 28 to 40 inches. The total travel range you need is the difference between those two numbers.
- Cord or cable length from the outlet to the fixture at its highest point. Add 18 inches of slack so you can lower the light without unplugging it.
Calculate your chain or hanger length
Here is the formula: (ceiling height) minus (minimum canopy distance) equals the total hanger length you need at maximum extension. For example, if your ceiling is 8 feet (96 inches) and your minimum light-to-canopy distance is 18 inches, you need hangers or chain that extend to at least 78 inches from the ceiling anchor. Most ratchet hangers extend 24 to 60 inches; if your ceiling is higher than 7 feet, buy the longer 60-inch version or use chain and cut to length. For chain, add 10 percent extra and use S-hooks to take up any surplus at the ceiling end.
Spacing for multiple lights

If you are covering a larger canopy with multiple bar lights, the rule of thumb is to space them so the edge of one light's footprint overlaps slightly with the next. For lights with a 120-degree beam angle hung at 24 inches, each light covers roughly a 3-by-3 foot area. Space the mounting points about 24 to 30 inches apart and stagger the heights slightly if you want more even overlap. Running a single long Unistrut rail across the ceiling and hanging each light from it with individual chains lets you slide the spacing without re-drilling.
Step-by-step build: hanging and adjusting your grow light
These steps cover the most common setup: a single LED bar or panel hung from a ceiling or tent crossbar using ratchet hangers or jack chain. Adjust as needed for rails or pivot mounts.
- Locate and mark your anchor points on the ceiling using a stud finder. Mark two points at the same distance as your light's hanging bracket width. If there is no joist where you need it, install a 1-inch steel pipe or a length of Unistrut spanning two joists, and hang from that.
- Install screw-in eye hooks rated for at least double the fixture weight. A 10-lb LED should have hooks rated 25 lbs minimum. Thread them fully into the joist until only the eye is exposed.
- Attach the top end of your ratchet hangers or chain to the ceiling eye hooks. For chain, use an S-hook and pinch the top of the S closed with pliers so it cannot slip.
- Attach the bottom end of the hangers or chain to the mounting hooks or holes on the fixture. Most LED bars have pre-drilled hanging holes or supplied hanging brackets. Use the supplied hardware if available.
- Before plugging in, install a strain relief gland on the power cord entry point at the fixture. Thread the cord through the gland, then tighten it so the cord cannot be pulled out by its own weight when the light is raised or lowered. This prevents the cord from yanking on internal wire connections.
- Route the power cord up along the chain or hanger using hook-and-loop ties every 12 inches. This keeps it from dangling freely and reduces strain on the cord at the plug end.
- Set the initial height: for most LED setups, start at about 30 to 36 inches above where your seedlings will sit. You will fine-tune this in the next section.
- Plug in, confirm the light turns on, and then tug gently on the fixture to verify the hangers or chain feel solid. There should be zero wobble at the ceiling anchor point.
If you are adding a tilt or pivot mount
For a tilt mount, bolt a slotted steel bracket to the fixture's mounting rail and attach the bracket to your ceiling mount with a single bolt and locknut. Loosen the locknut, rotate to the angle you want, then re-tighten. Mark your preferred angles with a paint pen so you can return to them quickly. For an articulating arm mount, follow the arm's weight rating closely: most consumer articulating arms are rated for monitors under 20 lbs, so check the spec before loading a heavy fixture on one.
Using drawer slides for a sliding vertical-adjust rail
If you want a smooth, tool-free vertical adjustment on a wall-mounted grow setup, heavy-duty drawer slides work surprisingly well. Products like the Salice 208R slides are rated for 100 lbs static and 75 lbs dynamic, which is more than enough for even large LED bars. Mount the fixed rail to your wall or grow rack uprights with lag bolts into studs, then attach the moving rail to the fixture's mounting plate. The light slides up and down smoothly and locks in place with a friction cam or locking lever depending on the slide model. Always follow the manufacturer's load rating and use the full set of recommended mounting holes, not just two corner bolts.
Dialing in placement and intensity
Once the light is hung, the distance between the fixture and the plant canopy is your main intensity control. Grow Shop Italia notes that the distance between the lamp and the canopy directly affects PPFD, photosynthesis rate, and plant health blank" rel="noopener noreferrer">the distance between the fixture and the plant canopy is your main intensity control. If you find the plants are reacting slowly, revisit your current setup and adjust the grow light height in small steps, then re-check placement and intensity adjust grow light height. Getting this right matters more than almost anything else in your setup.
Starting distances by growth stage
These are practical starting points for typical LED grow lights (quantum board or bar-style LEDs in the 200 to 600W range). Always verify with your specific fixture's manual if one is available, then adjust based on plant response.
| Growth Stage | Starting Distance (LED) | Target PPFD Range | Signs you need to adjust |
|---|---|---|---|
| Seedlings / Clones | 28 to 40 inches (70 to 100 cm) | 100 to 300 µmol/m²/s | Pale or leggy stems = too far; bleached tips = too close |
| Vegetative | 20 to 30 inches (50 to 75 cm) | 400 to 600 µmol/m²/s | Slow growth or stretching = raise or lower accordingly |
| Flowering | 18 to 26 inches (45 to 65 cm) | 600 to 1,000+ µmol/m²/s | Bleached or burned tops = raise light 2 to 4 inches |
You do not need a lab-grade PPFD meter to verify intensity. A $15 to $30 basic lux meter from Amazon gives you a relative reading you can use to compare spots across the canopy. Take readings at canopy level in five spots (four corners and center) and check that the center reading is not more than 30 to 40 percent higher than the corners. If the center is dramatically brighter, raise the light slightly or spread your fixtures wider. Phone-based lux apps work for rough comparisons but are not reliable for absolute PPFD numbers.
Beam angle and coverage math
Your fixture's beam angle determines how wide the light spreads at a given height. A 120-degree beam at 24 inches above the canopy covers roughly a 3-foot circle; the same fixture at 36 inches covers closer to 4.5 feet but at lower intensity. Raising the light increases coverage area but decreases PPFD. This tradeoff is why height adjustment is so powerful: you are trading intensity for coverage, or vice versa, with every inch of movement. For most home growers with one or two plants, keeping the light at the lower end of the recommended range (closer to the plant) gives better results than trying to cover a huge area with less intensity.
Heat and airflow at the canopy
Modern LED grow lights produce far less radiant heat than HPS or fluorescent setups, but the driver (the black box that powers the LEDs) gets warm and needs airflow. Mount the driver at the fixture end or, if it is an external driver, on the wall or outside the tent where ambient temps are lower. Do not wrap the driver in insulation or press it against a surface with no clearance; LED driver manuals specify a maximum case temperature (often 75 to 85 degrees C) and exceeding it shortens driver life significantly. Keep at least 2 to 3 inches of clearance around the driver body and check that it is not hot to the touch after 30 minutes of operation. If it is uncomfortably hot, improve airflow or relocate it.
Scheduling and adjusting through the growth cycle
A physically adjustable setup is only as good as your light schedule. Getting the timing right for each stage is just as important as the height you set.
Seedling and clone stage (weeks 1 to 2)
Start with 18 hours on and 6 hours off for most plants. Keep the light at the upper end of the recommended range (30 to 40 inches) and target a low PPFD around 100 to 300. Seedlings are sensitive to both too much and too little light: too much causes bleaching and heat stress at the tender stem; too little causes etiolation (long, weak stretching toward the light). Check plants daily in the first week and look at stem thickness and node spacing as your main feedback signals.
Vegetative stage (weeks 2 to 6 or beyond)
Keep the 18/6 schedule or move to 20/4 if you want slightly faster vegetative growth. Lower the light gradually every few days as plants establish, targeting 20 to 30 inches above the canopy. As a rule of thumb, raise the light gradually as plants move from seedlings into vegetative growth, and then lower it again for flowering so you can fine-tune intensity click and grow when to raise light. You are aiming for compact, evenly spaced nodes. If internodes are stretching far apart, the light is too far away or the PPFD is too low. If leaf tips are curling up or showing bleaching, the light is too close. Small adjustments of 2 to 3 inches at a time give you the feedback loop you need without shocking the plant.
Flowering / fruiting stage
For photoperiod-sensitive plants, switch to a 12-hour on and 12-hour off schedule to trigger flowering, and make sure the dark period is completely uninterrupted. Even a brief light leak during the dark period can disrupt flowering in sensitive species. Lower the light to 18 to 26 inches above the canopy and push PPFD up toward 600 to 1,000 µmol/m²/s if your fixture allows. If your LED has a built-in dimmer, you can also increase intensity by turning it up rather than lowering the fixture, giving you a second lever to work with. The combination of distance and dimmer gives you very fine control.
Daily light integral (DLI) and why it matters
DLI is the total amount of light your plants receive in a day, combining both intensity (PPFD) and duration (hours). Die Kombination aus Lichtdauer und LED-Intensität beeinflusst den Daily Light Integral (DLI), und wenn am Pflanzenbestand (Canopy) die PPFD zu niedrig ist, können sich Wachstum und Streckung entsprechend verändern. If your PPFD at the canopy is on the lower end, running the light for more hours compensates. If PPFD is high, fewer hours may be sufficient and may reduce electricity costs. A simple way to think about it: if plants look healthy but growth is slow, try adding 2 hours to the photoperiod before you change the height. If they look stressed despite being at the right distance, check whether temperature at the canopy is too high from ambient heat, not just the light.
Troubleshooting common problems
Most problems with adjustable grow light setups fall into a handful of categories: mechanical issues (slipping, wobbling, sagging), electrical or heat issues, and coverage or growth problems. Here is how to diagnose and fix the most common ones.
The adjustment mechanism keeps slipping
Ratchet hangers are the most common culprit. If the ratchet is not clicking positively between positions, the cord inside may be fraying or the plastic pawl is worn. Replace the hanger rather than fighting it. For chain setups, slippage usually means an S-hook that was not fully pinched closed with pliers. Take 30 seconds to pinch every S-hook and the problem disappears. For drawer slide vertical adjusters, check that all mounting screws are tight and that the slide rails are parallel; a slightly out-of-parallel installation creates bind-and-slip behavior.
Light is flickering or flashing
Flicker almost always points to one of three things: a loose connection somewhere in the wiring run, a mismatch between your dimmer type and the driver's dimming protocol, or incorrect input voltage to the driver. Start by inspecting every wire connection between the outlet, any timer or controller, and the fixture. If you are also figuring out the electrical side, follow a dedicated how to wire grow lights checklist to keep every connection safe and code-compliant. Wiggle connections while the light is on and watch for flicker. If you find the culprit, replace the connector using a UL-listed wire connector. If connections are fine, check whether your dimmer is compatible with the driver: 0-10V dimmers require a 0-10V driver; trailing-edge dimmers and leading-edge (TRIAC) dimmers are not interchangeable. Using the wrong type causes persistent flicker, especially at low dim levels. Also confirm the driver's input voltage matches your outlet supply.
Light seems dim even at close range
First, check the dimmer or control knob position. It sounds obvious but dimmers often get bumped. Second, check whether the driver is overheating: a driver that is too hot will throttle output to protect itself. Improve airflow around the driver and see if brightness recovers after a cool-down period. Third, electrolytic capacitors inside aging drivers gradually lose capacitance, which reduces output over time. If your fixture is more than 3 to 4 years old and showing reduced output, the driver may need replacement.
Uneven growth across the canopy
Plants on one side growing faster or taller than the other side almost always means uneven light distribution. Take lux readings across the canopy at plant height. If one side is reading 30 percent lower, try sliding the fixture toward the dim side, raising the light slightly to broaden coverage, or adding a reflective surface (white wall, mylar sheet) on the dim side to bounce light back. Rotating plants a quarter turn every few days is also a simple fix that works well in small setups.
Fixture wobbling or pulling away from ceiling
Any movement at the ceiling anchor means the anchor point is failing. Do not ignore this. Take the fixture down immediately and re-anchor into a stud or joist with the correct hardware. If there is no joist where you need it, install a cross-brace (a piece of 2x4 screwed between two joists) and hang from that. A falling grow light is a real electrical hazard, especially in a humid growing environment.
Power cord pulling tight when light is lowered
This means you either cut the cord route too short or forgot to add enough slack. The fix is to re-route the cord so it loops up to the ceiling anchor before dropping down to the outlet, giving you enough slack for the full range of motion. Use hook-and-loop ties to gather the extra cord at the ceiling point when the light is in the raised position, and release the ties when you lower it.
FAQ
How can I make adjustable grow lights safe if I’m using chain, S-hooks, or ratchet hangers?
Confirm every suspension component is rated for the fixture weight plus a margin, use locking pins or properly pinched S-hooks, and keep the driver secured so it cannot swing or rub against wiring. Also leave strain relief at the driver leads so the weight adjustment only moves the light, not the wire connections.
What’s the simplest way to adjust height without measuring every time I change plant stage?
Pick 2 or 3 repeatable settings and mark them. For ratchet hangers, tie a small tag string or add a paint mark at the webbing position, for chain use a zip tie as a height stop, then move only the light, recheck canopy clearance, and adjust in 2 to 3 inch steps.
How do I calculate the right chain length if my fixture mounts to a crossbar instead of the ceiling?
Use the same math, but substitute the mounting point height for the ceiling height. Measure from the crossbar to the canopy at your minimum target distance, then add enough chain to reach that minimum plus extra for slack and for the highest position you want.
Can I make my grow light adjustable for tilt and height at the same time?
Yes, but keep the tilt pivot separate from the vertical suspension. A common approach is to hang the entire pivot assembly on ratchet hangers or chain for vertical movement, then use a slotted bracket or articulating hardware only for angle. This prevents torsion from loading the ceiling anchor and wiring.
Why does my adjustable light keep slipping down even when the ratchet clicks?
If it clicks but slowly drops, the issue is usually load shock or worn internals. Replace the hanger if the pawl does not engage cleanly, and ensure the hanger is aligned so the pull force stays in line. Also avoid hanging from accessories that can twist, like loose eye hooks without washers.
Is a drawer slide a good idea for adjustable grow lights in a tent or closet?
It can be, especially on a wall rack, but make sure the slide is protected from high humidity condensation and that you still use lag bolts into studs or the correct load-rated anchors. In tents, plan airflow so the driver and slide area stay dry, and periodically check that screws have not loosened from vibration.
How do I prevent light spread problems when I adjust height up and down?
Use your fixture beam angle as a guide and verify uniformity at canopy level. After any height change, repeat the quick corner-and-center check (or at least corners) and adjust spacing or add reflective surfaces on the dim side before making large changes, since height mainly trades intensity for footprint.
What lux meter readings count as “good enough” for dialing in adjustable lights?
Use relative comparison rather than chasing absolute lux. Take readings at equal distance from the canopy across multiple points, then aim for similar values where plants are placed. If the center is much higher than corners, raise slightly, reposition, or spread the fixtures so coverage improves.
My plants stretched even though the light height seemed correct. What’s the next thing to check?
First confirm the fixture is at the expected distance throughout the whole day. Then verify your photoperiod schedule matches the stage, because stretching often comes from insufficient total daily light, not just PPFD. Finally, check that the driver is not throttling from overheating, which can silently reduce output.
How can I fine-tune intensity if my adjustable setup has no dimmer?
Treat height as your intensity knob and make small moves. Shift 2 to 3 inches at a time, wait a few days to judge response (node spacing and leaf posture), then repeat. If you need better control without moving constantly, add beam-shaping like a diffuser only if it improves hotspot uniformity, not just brightness.
What should I do if I get flicker after changing height or using a timer?
Inspect all connection points, especially between the outlet, timer/controller, driver, and any dimmer. Confirm your dimmer type matches the driver protocol, 0-10V dimmers require a 0-10V driver, and trailing-edge or leading-edge dimmers are not interchangeable. Also check driver temperature, if it is overheating it may throttle and appear unstable.
How do I keep adjustable grow lights from becoming an electrical hazard when plants are humid?
Route power so the cord has slack for the full travel range, keep connections above potential splash zones, and secure the driver so it has clear airflow and cannot contact leaves. Avoid wrapping the driver or covering vents, leave the recommended clearance, and stop using the setup if any connector feels loose or warm.
Next Article
Click and Grow When to Raise Light: Height Guide
Rule-based guide for raising Click and Grow lights by growth stage, height, and stress signs to prevent leggy or burned
