For the MostHink FG4 2024 model, plug all four light bars into the single power adapter with the integrated controller, mount the bars using double-sided tape, screws, or zip ties, then press the power button and start at 20% brightness for seedlings or 60% for established plants. The MostHink FG4 2024 instruction manual states the kit is dimmable with 6 brightness levels: 5%, 20%, 40%, 60%, 80%, and 100%. Set the built-in timer to 12 hours for most plants.
MostHink LED Grow Light Instructions: Setup, Wiring, and Tuning

Marcus Tillman
15 May 2026
That covers the core setup in one pass. But the details below will save you from the most common mistakes: loose bar connections that cause flicker, wrong timer behavior, and placing the lights too close or too far for your specific plant stage.
Before you start: identify your MostHink model and what's in the box
MostHink sells a few different grow light configurations, so before you do anything else, check the model number printed on the power adapter or light bar end cap. This guide covers the FG4 2024 in detail because that's the model with the documented instruction manual. If your unit looks different (different number of bars, a different-style controller, or RJ-style plug ports for daisy-chaining multiple fixtures), some of the button labels and connection steps may not match exactly. The FG4 2024 uses an inline controller built directly into the power adapter cord, not a separate remote or an app.
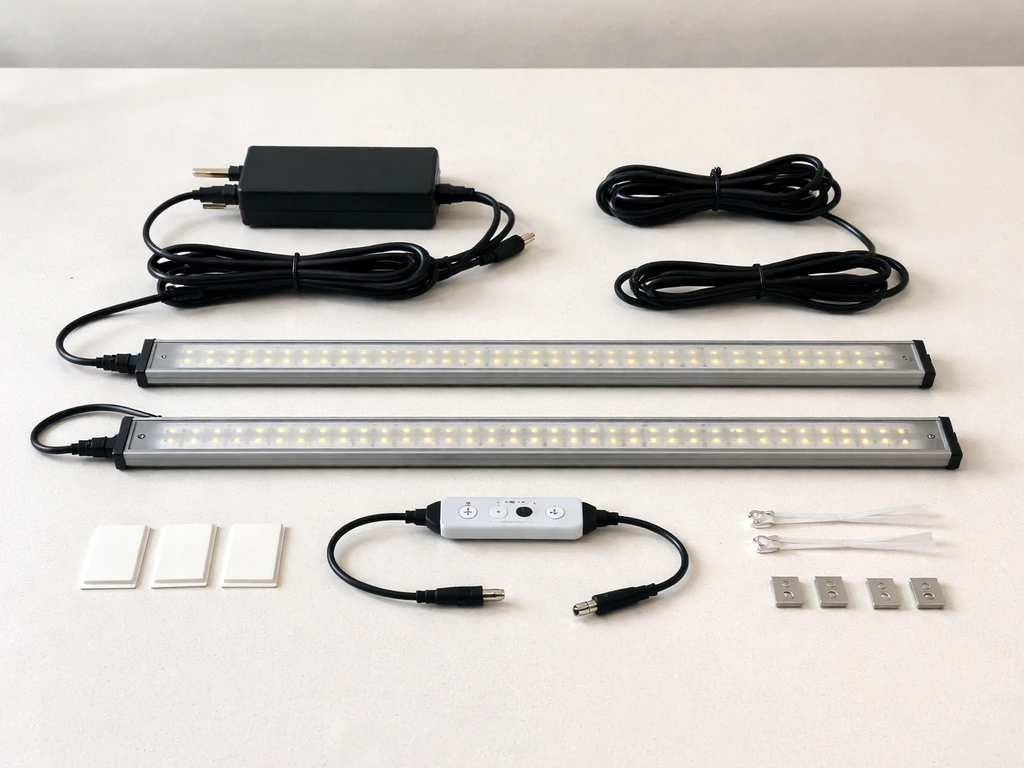
Once you've confirmed the model, lay everything out on a flat surface and cross-check it against the box contents. The FG4 2024 should include:
- 4 LED grow light bars, each 13 inches long
- 1 power adapter with integrated controller and a 76-inch (about 6.3-foot) cord
- 16 screws
- 8 zip ties
- 4 double-sided adhesive tape strips
- 1 user manual
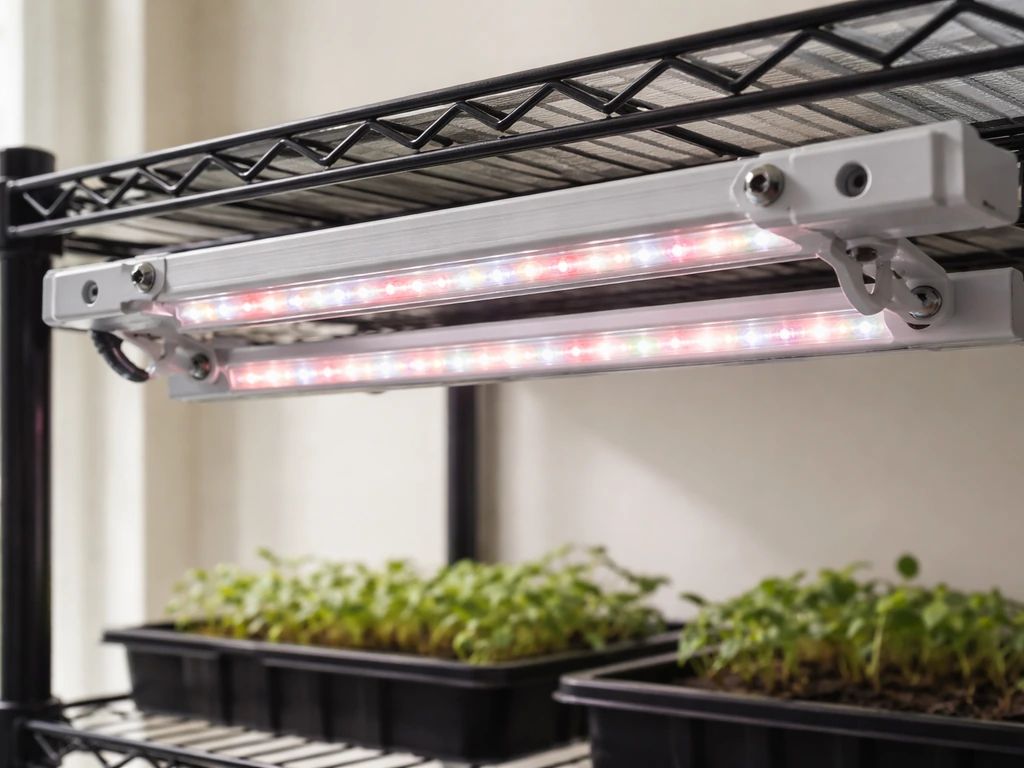
If any of the four light bars are missing or if the controller is separate from the power adapter cord, you likely have a different MostHink model. The manual may not apply perfectly in that case. The FG4 2024 is a 40W total system running 204 LEDs across all four bars, with a full-spectrum output from 380 to 800nm (blue 410–520nm, red 610–720nm) and a color temperature of 5500K. That's a daylight-leaning white light that works well for most herbs, leafy greens, and flowering plants.
If your manual is missing or unclear, the information in this guide covers everything the official FG4 2024 manual contains. You don't need to hunt down a PDF to get going. For jump start grow light system instructions, use the button and timer guidance in the sections on controls, timing, and first-run checks.
Safety and power: setup checklist and common wiring mistakes
The FG4 2024 uses a low-voltage DC system where the power adapter does all the electrical conversion. That makes it much safer than wiring a traditional fixture. Still, there are a few things worth checking before you plug anything into the wall.
- Connect all four light bars to the main cable before plugging the adapter into the outlet. The manual is explicit about this: confirm every connection is secure first.
- Keep the unit away from water and high-moisture areas. The FG4 2024 is not waterproof. If you're growing in a tent with frequent misting or a humidifier running close by, position the light and controller where direct splash or condensation can't reach them.
- Use a dedicated outlet or surge protector, not a crowded power strip running multiple high-draw appliances. An overloaded circuit is one of the main causes of flickering with this model.
- Don't run the cord under rugs or pinch it behind furniture. The 76-inch cord gives you plenty of reach without forcing a tight bend.
- Once the timer is set, do not manually turn off the light or unplug the adapter. Cutting power resets the timer. If you need to move the unit, accept the reset and re-set the timer afterward.
The most common wiring mistake with this model is plugging in the adapter before all four bars are connected. If one bar isn't fully clicked or screwed into its connector, you'll get uneven lighting, and if you then move things around trying to fix it with the power on, you risk damaging the connector. Always connect bars first, power second.
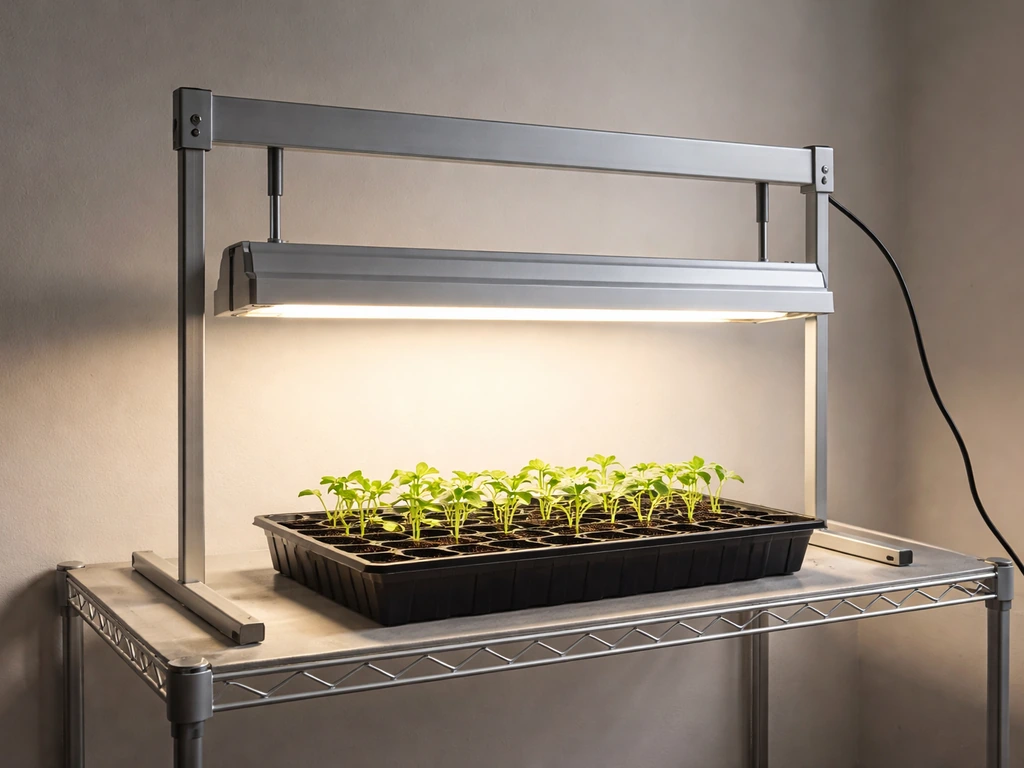
Mounting and positioning: three ways to hang it, and how far above your plants
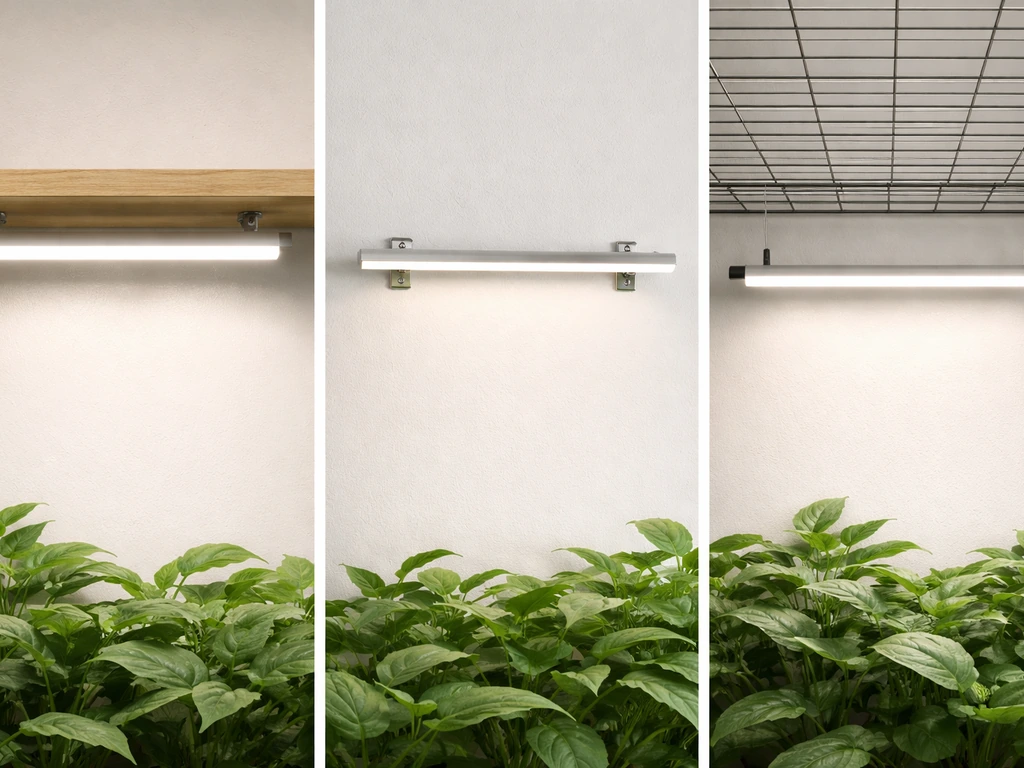
Your three mounting options
The FG4 2024 doesn't use an adjustable hanging kit the way a single overhead panel might. Instead, each bar mounts directly to a surface (shelf, frame, or wire rack) using one of three methods. Choose based on your setup:
- Double-sided adhesive tape: Peel and stick to the back of each bar, then press firmly onto a clean, dry surface. Best for lightweight shelf setups where you won't be repositioning often. The surface has to be genuinely clean and dry or the tape won't hold.
- Screws through the end-cap mounting holes: Drill or screw directly into wood or a frame. This is the most secure option and best if the setup is semi-permanent.
- Zip ties through the end-cap mounting holes: Loop zip ties around wire shelving. Fast, easy to reposition, and totally reversible. This is the method most growers with wire racks end up using.
Distance from the plant canopy
Because each bar is only 13 inches long, the FG4 2024 is designed for close-proximity, shelf-mounted use rather than lighting a large open grow area from above. For seedlings and young plants, mount the bars 8 to 12 inches above the canopy. For mature herbs, leafy greens, or flowering plants, 6 to 10 inches works well at higher brightness settings. If you're seeing pale, washed-out leaves or bleached tips, raise the bars 2 to 3 inches. If plants are stretching toward the light and stems are thin and leggy, lower the bars or increase brightness.
Coverage mapping is straightforward with a bar-style fixture: each 13-inch bar covers roughly the width of a standard 12-inch shelf or a small tray. With all four bars active, you're covering an area of about one to two square feet effectively. Space the bars evenly across your grow area so there are no dark gaps between them. If you have a corner spot that seems dimmer, that's almost always a gap issue, not a power issue.
Controls and modes: how to actually use the buttons
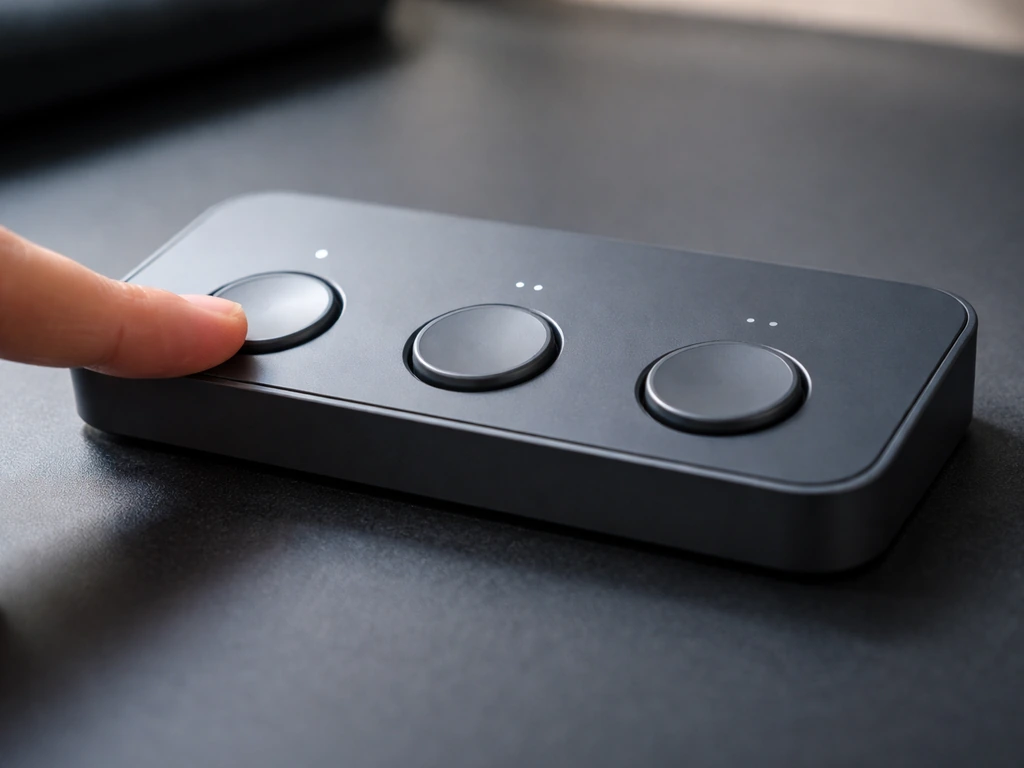
The FG4 2024 controller has three main functions: power, brightness, and bar selection. Here's what each button does and how to use them together.
| Button | What it does | Practical use |
|---|---|---|
| Power | Turns the entire system on or off | Press once to turn on, press again to turn off. Avoid using this after setting the timer. |
| Brightness | Cycles through 6 dimming levels: 5%, 20%, 40%, 60%, 80%, 100% | Press repeatedly to step up or down through brightness. Start low for new plants. |
| Bulb Switch | Selects how many bars are active: 1, 2, 3, or 4 | Use fewer bars if you're only covering a small area or want less total light output. |
| Timer | Sets auto on/off cycle to 3, 6, or 12 hours | Press to cycle through timer options. Once set, the light repeats the same on/off schedule daily. |
The timer is the function that trips people up most often. Once you set it (say, 12 hours), the light turns on and off automatically at the same times every day. The key rule: do not manually press the power button or unplug the adapter after setting the timer. If you do, the timer resets and you'll need to set it again. Think of it like a programmable thermostat where cutting the power loses the program.
There is no daisy-chain port on the FG4 2024. This model is self-contained: one adapter controls all four bars. If you need to run multiple FG4 units in the same space, each one operates independently on its own adapter and controller. You can't link them together the way you can with some other grow light brands.
First run verification: checking output, heat, and flicker
After mounting and powering on for the first time, spend five minutes checking these things before walking away.
- Confirm all four bars are lit. If one bar is dark or noticeably dimmer, that bar's connection to the main cable is loose. Unplug the adapter, reseat the connector firmly, and plug back in.
- Check for flicker by holding your hand under each bar. Occasional flicker during the first seconds after power-on is normal. Persistent flicker (more than 30 seconds in) usually means a loose connection or an overloaded power circuit.
- Feel the bars after 15 to 20 minutes of operation. They should be warm to the touch, not hot. The aluminum housing is designed to dissipate heat. If a bar feels uncomfortably hot or you smell anything burning, unplug immediately and check for blocked airflow around the fixture.
- Check for adequate airflow. The manual specifically calls this out. Don't mount the bars in a totally enclosed space with no air circulation. Even a small gap for air movement around the bars is enough.
- Verify the color output looks right. The FG4 2024 should emit a white light with a slight warm tint from the red LEDs. If it looks purely purple/pink, you may have a different MostHink model with a different LED mix.
The FG4 2024 is rated for approximately 50,000 hours of life. You shouldn't need to do anything special during the first run beyond these checks. If everything looks good after 20 minutes, you're ready to configure for your specific plants.
Plant-specific setup: timing and intensity for each growth stage
How long you run the light and how bright you set it depends almost entirely on what you're growing and what stage it's at. Here's a practical starting framework.
| Plant Stage / Type | Brightness Setting | Daily Duration | Distance from Canopy |
|---|---|---|---|
| Seedlings / germination | 20% | 16 hours on / 8 hours off | 10–12 inches |
| Young vegetative plants (herbs, greens) | 40–60% | 14–16 hours on / 8–10 hours off | 8–10 inches |
| Mature herbs and leafy greens | 60–80% | 14 hours on / 10 hours off | 6–8 inches |
| Flowering plants (fruiting stage) | 80–100% | 12 hours on / 12 hours off | 6–8 inches |
| Succulents and cacti | 40–60% | 12–14 hours on / 10–12 hours off | 8–12 inches |
The built-in timer only offers 3, 6, or 12-hour settings, which creates a limitation. You can't set a 14 or 16-hour cycle using the built-in timer alone. To work around this, use a separate outlet timer (a basic plug-in mechanical timer costs a few dollars) and plug the MostHink adapter into that instead. Use these great value grow light instructions to dial in timing and intensity without overcomplicating the setup.
If you want different grow light instructions than the built-in 3, 6, or 12-hour options, an outlet timer is an easy way to extend your schedule use a separate outlet timer. Set the MostHink timer to 12 hours as a backup safety, and let the outlet timer control the actual on/off schedule. That gives you precise 14-hour or 16-hour cycles without modifying the unit.
For the most common indoor use case (herbs and leafy greens on a kitchen shelf), run at 60% brightness, all four bars active, 14 hours on and 10 hours off, with the bars 8 inches above the canopy. Use these FG4 2024 starting points as your bestva grow light instructions baseline, then adjust height, brightness, and on-time based on what you see. That's a solid baseline that you can adjust based on what you see over the first two weeks.
Troubleshooting when plants look wrong
Plants are stretching and getting leggy
Stretching toward the light (called etiolation) means your plants aren't getting enough of it. Either the bars are too far away, the brightness is too low, or the daily duration is too short. Fix: lower the bars by 2 inches, increase brightness by one step, or add 2 hours to the daily on-time. Don't change all three at once or you won't know what worked.
Leaves are bleaching or showing white/yellow patches near the top
This is light stress from too much intensity too close. Raise the bars by 2 to 3 inches and drop brightness by one step. If bleaching stops progressing within 3 to 4 days of adjusting, you've solved it. New growth coming in after the adjustment should look healthy and green.
Growth is generally slow or weak across all plants
If plants aren't stretching (so it's not a distance issue) but growth is just sluggish, the most likely culprit is total daily light hours. Increase the on-time by 2 hours first. If that doesn't show improvement within a week, try increasing brightness by one step. Also check that all four bars are actually active using the Bulb Switch button: if someone cycled through and left it on 2 bars instead of 4, you're running at half output.
Uneven results across the grow area
If plants on one end of the shelf look great and plants on the other end are struggling, the bars aren't evenly spaced, or one bar is running dimmer than the others. Check the spacing first. Then check connections on any dim bar. [Loose wire terminations and increased resistance at connection points](https://electricrepairauthority.
com/flickering-lights-electrical-repair) can cause intermittent current flow and flicker in LED lighting. Loose or poor electrical connections can cause intermittent LED flicker, so it is worth checking the bar connectors for a secure fit. Also, plants closest to the center of the four bars will always get slightly more overlap from adjacent bars than plants at the edges.
Rotate your pots or trays by 180 degrees every 5 to 7 days to even out exposure.
Timer not working or light not following the schedule
Almost always this is caused by accidentally pressing the power button or unplugging the adapter after setting the timer. Re-set the timer: with the light on, press the timer button until the desired interval (3H, 6H, or 12H) appears, then leave it alone. Do not touch the power button again. Do not unplug. If the timer still won't hold a schedule, consider the outlet timer workaround described in the plant setup section above.
Fine-tuning over the first 2 to 4 weeks
The first run settings are always a starting point. Here's a simple adjustment schedule for the first month that keeps things from going sideways.
- Days 1 to 3: Run at conservative settings. For seedlings, that's 20% brightness and 16 hours. For established plants, 60% and 14 hours. Don't adjust anything during this period. Just observe.
- Days 4 to 7: Look at stem thickness, leaf color, and how fast new growth is emerging. If stems are thin and pale, lower the bars or increase brightness. If tips are yellowing or bleaching, raise the bars.
- Week 2: If plants look healthy, bump brightness up by one step (for example from 40% to 60%) to push growth. Lower the bars by 1 inch if they're responding well and you have room.
- Weeks 3 to 4: Most plants will have settled into a rhythm. For plants moving toward flowering, shift to a 12-hour on / 12-hour off schedule and increase brightness to 80–100%. For herbs and greens that you're harvesting, maintain 14 hours and 60–80% and harvest the outer leaves regularly to keep the plant producing.
One rule worth memorizing: only change one variable at a time. Height, brightness, or duration. If you adjust two things simultaneously and the plant reacts badly, you have no idea which change caused it. Growers who make methodical one-variable adjustments figure out their ideal setup in two weeks. Growers who change everything at once often spend two months chasing problems.
If you later expand to a larger grow setup and find the FG4 2024 doesn't cover enough area, it may be worth looking at how other brands handle multi-fixture setups. Some competitors include daisy-chain ports that let you link multiple units to a single controller. The MostHink FG4 2024 doesn't offer that, so scaling up means buying additional independent units. That's worth factoring into your setup plans if you're thinking about growing beyond a single shelf.
FAQ
Can I use the FG4 2024 with a different power adapter or extension cord?
Use only the FG4 2024’s included power adapter, because the unit is designed around its low-voltage DC controller wiring. If you need distance, choose a heavy-duty, outdoor-rated extension cord for the wall-to-adapter run, keep the cord away from water, and avoid plugging power into power strips or stacked adapters.
What do I do if the timer won’t “stick” even after I set 12 hours?
First confirm you are not pressing the power button after the timer setting, and that the adapter stays plugged in continuously. If it still resets, try a full power loss cycle (unplug from the wall, wait 30 seconds, plug back in) and then set the timer again while the light is on. If it continues, the outlet itself may be switching power, consider an outlet timer workaround.
How do I verify all four bars are actually on (not just partially lit)?
Cycle the bar selection (Bulb Switch) slowly and confirm you can see each bar glowing at full brightness when selected. If one bar stays dim, inspect that connector for a fully seated click or screw-tight connection, then retest. Don’t leave the system running with a loose bar connection, it can cause flicker and uneven growth.
Is it okay to run the lights at 60% brightness continuously?
It can work for a first baseline, but most growers avoid “all day” continuous schedules with the FG4 2024 because the built-in timer is limited to 3, 6, or 12 hours and the unit is intended for staged light cycles. If you want long days, use a separate outlet timer and keep brightness within your adjusted step plan rather than leaving it unchanged after you change duration.
Can I daisy-chain multiple MostHink FG4 2024 kits together to one adapter?
No. The FG4 2024 is self-contained, one adapter controls its own four bars. For more coverage, you must run separate FG4 units on separate adapters and controllers, then spread them evenly and rotate trays to balance overlap.
Do I need to change the light height after I increase brightness or hours?
Yes, at least partially. Height and intensity interact, so if you raise brightness or extend on-time, re-check plant response after 3 to 7 days and adjust height by about 2 inches if you see signs of stress, then keep duration adjustments separate so you know what caused the change.
What spacing should I use between the bars on a shelf to avoid dark gaps?
Place the bars so their positions cover the width of each standard 12-inch shelf or tray, then keep equal gaps between bar mounts. If one end is consistently weaker, it is often uneven spacing or a tray not rotated; rotate the pots every 5 to 7 days before moving the bars again.
How can I tell if pale leaves are from too little light versus too much light?
Pale, washed-out growth usually points to insufficient intensity or duration, try lowering the distance slightly or increasing brightness by one step and adding 2 hours on-time. Bleached or crispy pale tips plus stress-like symptoms suggest too much intensity too close, raise the bars by 2 to 3 inches and reduce brightness by one step, then wait several days to confirm the change.
What’s the safest way to mount the bars if the shelf gets wiped or watered?
Mount bars with secure mechanical attachment when possible (screws or zip ties on a frame or rack), and keep the taped areas away from direct splashes. Route the cord so it won’t be pulled during cleaning, and keep the adapter and connections elevated above any water-prone zones.
The manual is missing, can I still start safely without guessing button behavior?
Yes. Start with the conservative baseline: connect all four bars first, then power on, use the brightness setting step-by-step, and set the timer once without touching the power button again. For stage changes, adjust only one variable at a time (height, brightness, or duration) during the first two weeks.
If I switch plants between shelves, how do I avoid overcorrecting with a new height and brightness?
Reuse your baseline for the plant stage (seedlings versus established), then make a single adjustment after observing for 3 to 7 days. If the new plants are much taller or older, begin by setting height first, because distance changes can quickly reduce etiolation or stress.
Next Article
Jump Start Grow Light System Instructions: Setup and First Test
Step-by-step Jump Start grow light setup: mounting, wiring, first test, placement, timer settings, and quick troubleshoo