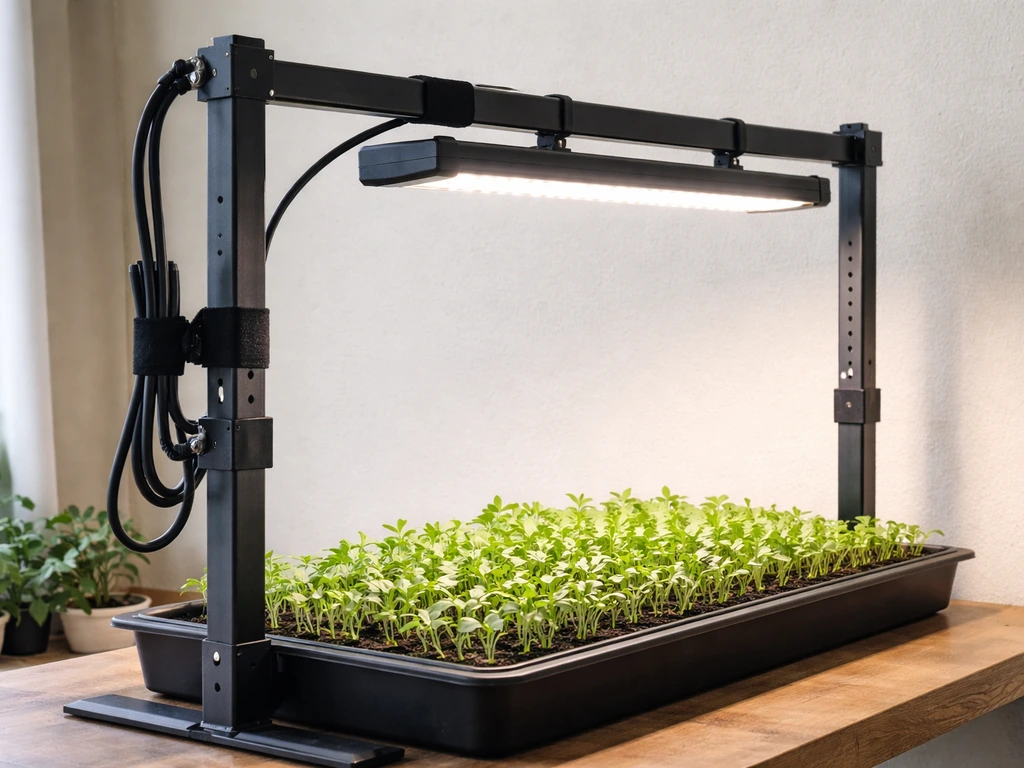
A quantum board grow light is one of the most efficient ways to grow plants indoors, and you can absolutely build one yourself for a fraction of the cost of a commercial unit. Whether you want to DIY the whole thing from scratch or just want to know what separates a great quantum board from a mediocre one before you buy, this guide covers both paths in full detail.
How to Build a Quantum Board Grow Light Step by Step

Marcus Tillman
14 Apr 2026

What a quantum board grow light actually is
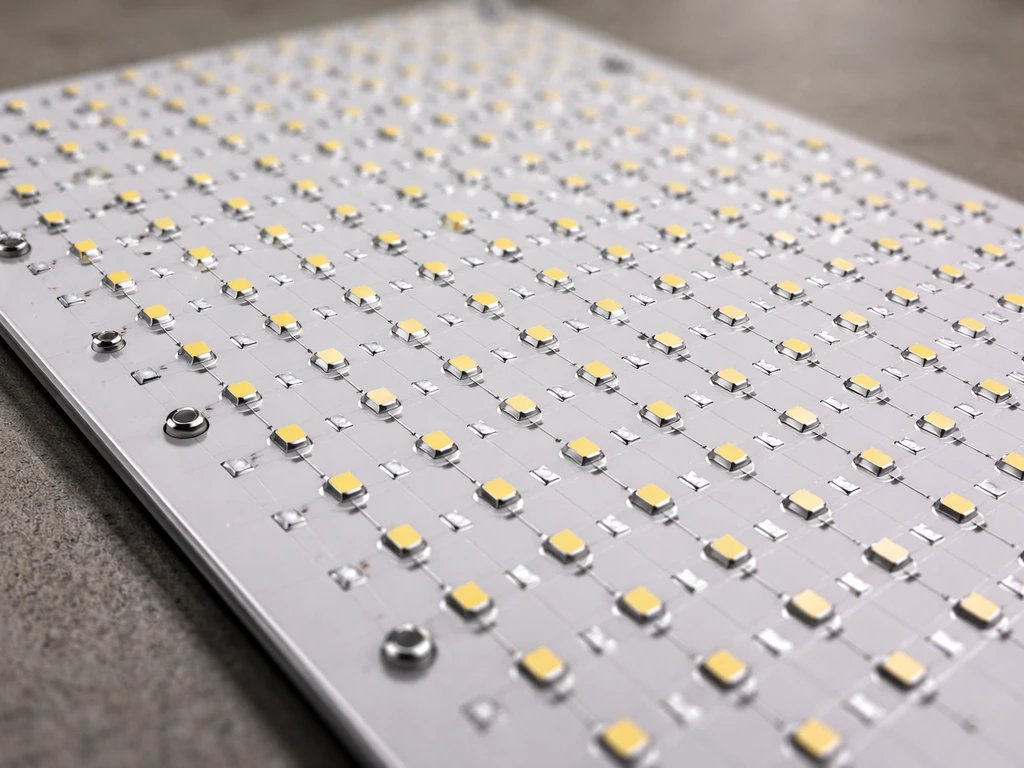
A quantum board is a flat PCB (printed circuit board) covered in a large number of small, spread-out LED diodes, typically Samsung LM301B or LM301H chips. Instead of clustering lots of bright LEDs into a small area like older blurple bar-style lights, a quantum board distributes the light source across a wide, thin panel. The result is a fixture with a much larger emitting surface, which means less heat per square inch, more even canopy coverage, and dramatically better photon efficacy.
The term "quantum" in this context refers to photons, the packets of light energy that drive photosynthesis, not anything exotic. It connects directly to how these lights are measured: in PPFD (photosynthetic photon flux density), expressed as µmol·m⁻²·s⁻¹. That unit counts the photons hitting a surface per second, which is what actually matters to plants. A lux meter measures light the way human eyes see it, which is why lux readings are nearly useless for plant growing. PPFD is the number you want.
People choose quantum boards because they hit a sweet spot: high efficiency (often 2.5 to 3.0 µmol/J or better), full-spectrum white light that supports every growth stage, a slim low-profile form factor that's easy to hang and adjust, and relatively simple thermal management since the heat is spread across a large surface rather than concentrated. They're also the go-to platform for DIY builds because the boards are sold separately from drivers, letting you match components to your exact space and budget.
How quantum board grow lights work
Understanding the basics here will help you make smarter decisions when you're picking parts or troubleshooting later.
Diodes and spectrum
The LEDs on a quantum board are almost always binned to deliver a "full spectrum" output centered around 3000K, 3500K, or 4000K color temperatures, often combined with a smaller number of deep red (660 nm) or far-red (730 nm) diodes to optimize flowering response. Plants use photons from roughly 400 to 700 nm for photosynthesis, which is the PAR (photosynthetically active radiation) range. Some manufacturers also include UV (around 385 nm) and far-red diodes outside that window for supplemental effects. For most home growers, a 3000K or 3500K board with some red diodes handles everything from seedling to harvest without switching lights.
Drivers and dimming
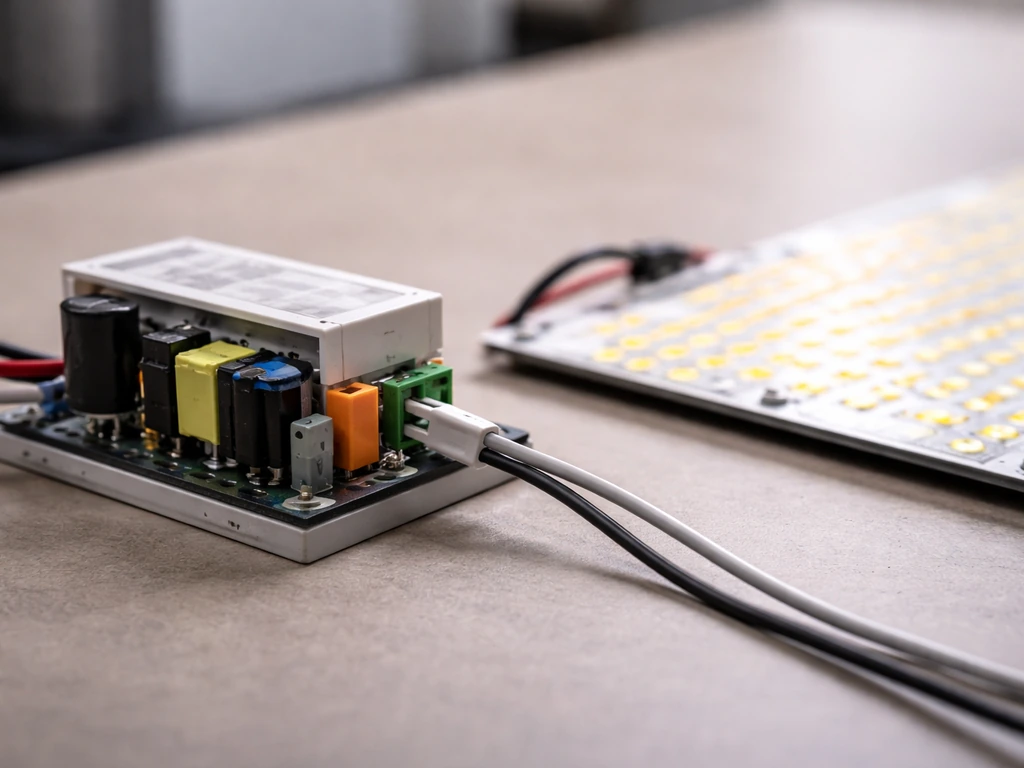
The driver is the power supply that converts your wall voltage into the constant current the LEDs need. Quantum boards use constant-current (CC) drivers, not constant-voltage ones. The most widely used drivers in DIY builds are from MEAN WELL: the HLG series for higher-wattage boards and the ELG series for mid-range builds. The MEAN WELL HLG-240H, for example, is a constant-current driver family that supports 1-10 Vdc, 10 V PWM, or resistance dimming depending on the variant you choose. For a 150W build, the MEAN WELL ELG-150-C series is a popular option, offering 0-10V dimmable control that lets you dial output from nearly zero to full power. Dimming capability isn't just a convenience; it lets you reduce intensity for seedlings, save energy during vegetative growth, and push to full power only when plants are ready for it.
Efficacy: why µmol/J matters more than watts
Photon efficacy (PPE) is measured in µmol/J, meaning how many photons you get per joule of electricity consumed. Horticultural fixture comparisons use this metric precisely because lumens-per-watt is based on human vision, not plant response. A good DIY quantum board build targeting Samsung LM301H chips with a quality MEAN WELL driver will typically achieve 2.7 to 3.0 µmol/J. Budget boards with inferior chips or mismatched drivers often land at 2.0 µmol/J or less. The DLI (daily light integral) your plants receive is the total photon dose over 24 hours, calculated by multiplying your average PPFD by your photoperiod in seconds and dividing by 1,000,000. Tracking DLI rather than just hours-on gives you a more accurate picture of whether your plants are getting enough light.
Heat management fundamentals
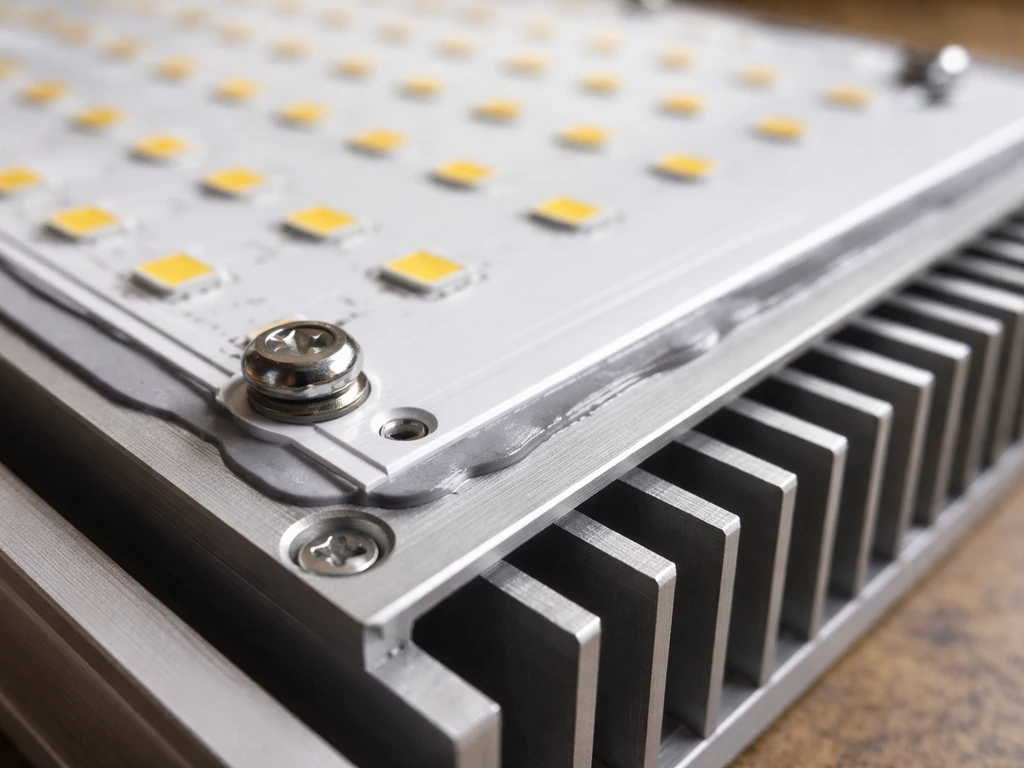
Every watt that doesn't become light becomes heat at the LED junction. Nichia's thermal documentation for their LED components emphasizes that junction temperature directly affects LED reliability and lifespan. The relationship is expressed through thermal resistance (RθJC), which connects the case temperature you can measure to the actual junction temperature inside the diode. Nichia’s application note defines RθJC as the thermal resistance from junction to the TC measurement point, and also notes that specifications can vary by individual devices blank" rel="noopener noreferrer">RθJC connects the case temperature you can measure to the actual junction temperature. In practical terms: if you under-size your heatsink or run a board at 100% power without adequate aluminum backing, junction temperatures climb, efficiency drops, and the LEDs degrade years faster than spec. Digi-Key explains that elevated LED junction temperature can reduce light output and significantly decrease life expectancy, which is why you should keep junction temperature within the manufacturer’s specifications junction temperatures climb, efficiency drops, and the LEDs degrade years faster than spec.. For DIY builds, a correctly sized aluminum heatsink (or just the aluminum board substrate itself on larger boards) keeps junction temps in the safe range without active cooling in most setups.
How to build your own quantum board grow light
This is absolutely doable as a beginner project if you take it methodically. If you're new to do it yourself grow lights in general, the good news is that quantum board builds are actually one of the more forgiving DIY lighting projects because the components are designed to work together with minimal custom fabrication.
Parts list for a 200W DIY quantum board build
| Component | What to Look For | Approximate Cost |
|---|---|---|
| Quantum board(s) | Samsung LM301B or LM301H chips, 3500K + 660nm mix, aluminum substrate | $30–$80 per board |
| LED driver | MEAN WELL HLG or ELG series, constant-current, dimmable (0–10V or potentiometer) | $40–$90 |
| Heatsink / frame | Extruded aluminum, sized to board; many boards include substrate | $10–$40 if needed separately |
| Hanging hardware | Adjustable ratchet hangers, rated for at least 2x fixture weight | $8–$15 |
| Wiring and connectors | 18–22 AWG stranded silicone wire, lever-wire connectors (Wago 221 style) | $10–$20 |
| Power cord / plug | Grounded (3-prong) IEC or NEMA cord, rated for driver input | $5–$15 |
| Strain relief fittings | Cord grip strain reliefs sized to your wire gauge | $3–$8 |
| Thermal paste | Arctic Silver or similar compound for board-to-heatsink interface | $5–$10 |
| Hardware | M3/M4 screws, standoffs for mounting board to heatsink | $3–$8 |
Total cost for a solid 200W build typically lands between $120 and $220 depending on whether you source boards domestically or from overseas suppliers. Commercial equivalents cost $350 to $600, so the math on DIY holds up well.
Step-by-step assembly
- Plan your build first: Decide your target wattage, grow space size, and whether you want dimming control. A 200W board covers roughly a 2x4 ft footprint at full power. Sketch your layout before buying anything.
- Mount the board to the heatsink: Apply a thin, even layer of thermal paste to the back of the board substrate, then secure it with M3 or M4 screws evenly around the perimeter. Don't overtighten; just snug. Even contact is what matters for heat transfer.
- Install strain relief fittings: Before running any wires into the driver housing, thread the cord grip / strain relief fittings into the driver's knock-out holes. UL 8750 explicitly requires a strain relief to prevent cord pullback from stressing internal connections. This step is easy to skip and genuinely dangerous to skip.
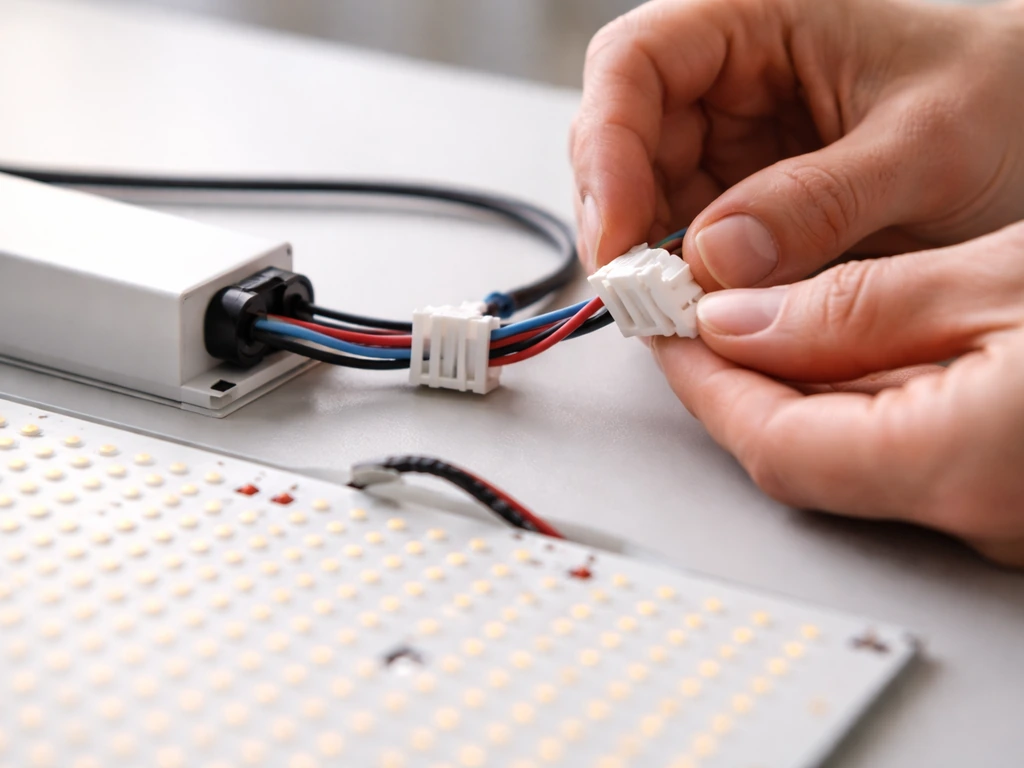
- Wire the driver output to the board: Connect the driver's V+ and V- output terminals to the LED board's positive and negative pads using 18–20 AWG stranded wire. Use lever-wire (Wago-style) connectors where possible for cleaner, more reliable connections. Double-check polarity before powering on.
- Wire the AC input: Connect your grounded power cord's Line (brown/black), Neutral (blue/white), and Ground (green/yellow) wires to the corresponding driver input terminals. Ground is not optional.
- Set up dimming (if applicable): For a MEAN WELL HLG or ELG driver with potentiometer dimming, wire the pot between the driver's DIM+ and DIM- terminals per the datasheet. For 0–10V control, connect your controller to those terminals. Resistance dimming is simplest for a standalone build.
- Test before enclosing: With everything connected but before mounting in your tent, power on briefly in a safe location. The board should light up evenly across all diodes. Check for any diodes that are out, which could indicate a wiring issue or a DOA board.
- Mount and hang: Use ratchet hangers rated well above the fixture weight. A 200W quantum board build typically weighs 1.5–3 kg depending on heatsink size. More details on mounting are in the installation section below.
If you want to go deeper on wiring methods and enclosure options for a more polished finished product, the broader guide on how to build grow lights covers enclosure choices and cable management approaches that apply here too.
Choosing the best quantum board grow light: what actually matters
If you're buying rather than building, or comparing commercial options to your DIY cost, here's how to cut through the marketing noise. The specs that matter most are photon efficacy (µmol/J), actual PPFD at your target hanging distance, coverage area at usable PPFD levels, and driver quality.
Specs comparison: what to look for
| Spec | Budget Tier | Mid-Range Tier | Premium Tier |
|---|---|---|---|
| Photon efficacy (PPE) | 1.8–2.2 µmol/J | 2.3–2.6 µmol/J | 2.7–3.0+ µmol/J |
| LED chips | Generic / unlisted | Samsung LM301B | Samsung LM301H or equivalent |
| Driver brand | Unknown OEM | MEAN WELL ELG | MEAN WELL HLG or equivalent |
| Dimming control | None or on/off switch | Onboard potentiometer | 0–10V / PWM + external controller |
| Spectrum | Single color temp only | 3000K or 3500K full spectrum | Multi-channel spectrum with R/FR tuning |
| Warranty | 1 year or less | 2–3 years | 3–5 years |
| Typical price (200–240W) | $80–$130 | $150–$250 | $300–$600 |
The single biggest differentiator between a board that delivers and one that underperforms is efficacy, which is mostly a function of the LED chip quality and how well the driver is matched to the board's forward voltage. A unit claiming "300W" but using generic chips and a non-MEAN WELL driver is almost certainly running at a lower actual wattage and worse efficacy than advertised. Always look for third-party PPFD maps or verified watt measurements if you can find them.
Color temperature is worth thinking about too. A 3500K board is a good all-rounder. If you grow mostly leafy greens and vegetables through vegetative stages, leaning toward 4000K adds slightly more blue for compact growth. If flowering is your priority, 3000K with added 660 nm red diodes pushes more energy into the red range plants use during bloom.
Installation and setup: mounting, distance, and coverage
Getting the mounting height right is where a lot of growers make their first significant mistake, either burning plant tops with too-close placement or starving plants of light by hanging too high. A complete DIY grow light setup involves more than just flipping a switch, so let's walk through the key variables.
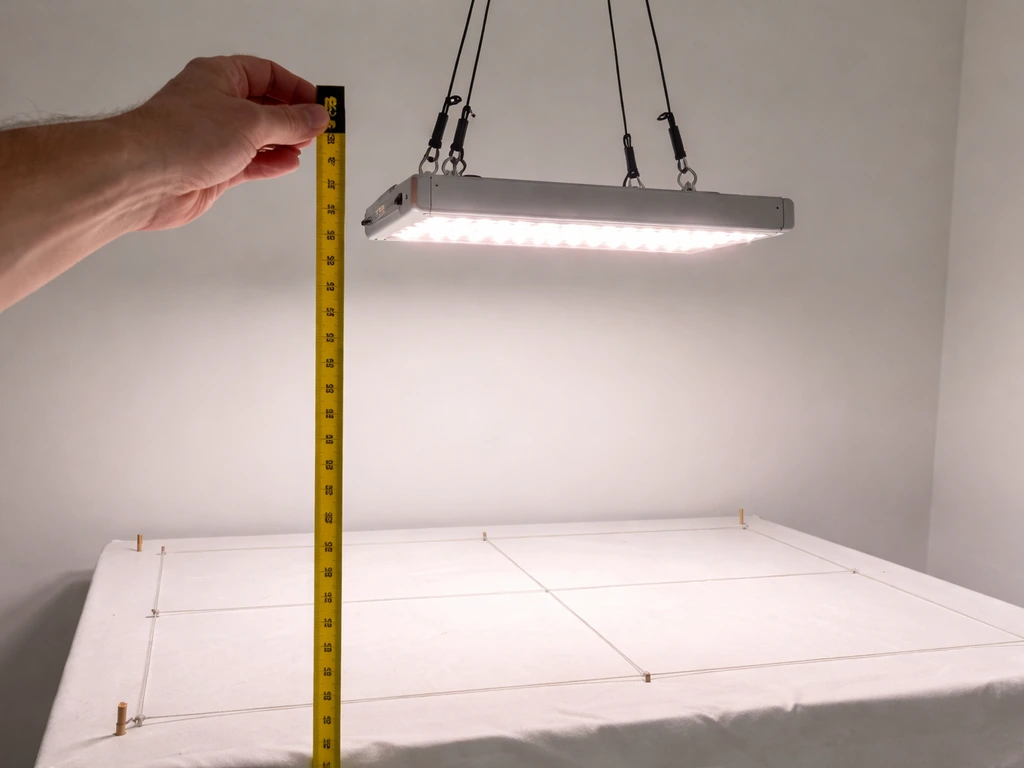
Hanging height and PPFD targets
| Growth Stage | Target PPFD (µmol·m⁻²·s⁻¹) | Typical Hanging Height (200W board) | Photoperiod |
|---|---|---|---|
| Seedlings / clones | 100–250 | 24–36 inches above canopy | 18–20 hours |
| Early vegetative | 250–400 | 18–24 inches above canopy | 18 hours |
| Late vegetative | 400–600 | 14–20 inches above canopy | 18 hours |
| Early flowering | 600–800 | 12–18 inches above canopy | 12 hours |
| Peak flowering | 800–1000 | 10–16 inches above canopy | 12 hours |
These heights are starting points for a 200W board. Dial in your actual PPFD with a quantum meter if you can, rather than relying purely on height estimates. The Apogee MQ-500 is the standard reference tool for this: it measures PPFD in µmol·m⁻²·s⁻¹ using a photon-based detector rather than lux, so you're measuring exactly what your plants experience. You can use it to create a PPFD map across your entire canopy, identifying hot spots and low spots and adjusting board position accordingly.
Coverage area
A single 200–240W quantum board delivers usable flowering PPFD (600+ µmol·m⁻²·s⁻¹) over roughly a 2x2 to 2x3 ft footprint. For vegetative growth, where target PPFD is lower, the same board can cover a 3x3 ft area adequately. A 4x4 ft tent at flowering intensity typically needs 400–600W of quantum board coverage, so either one large board or two mid-size boards. Tiling multiple boards is actually a good approach because it gives you more even coverage than a single large central fixture.
Heat management in practice
In a well-ventilated tent with an inline fan exhausting warm air, a quantum board running at or below its rated wattage usually stays within safe temperature limits passively. The board substrate (aluminum) handles most of the heat spreading. Where heat becomes an issue is if you're running the driver inside a sealed or poorly ventilated space, or if you've mounted the board in a way that restricts airflow across the heatsink. Always position your driver outside the tent if your tent gets warm, since driver operating temperature directly affects longevity. MEAN WELL HLG and ELG drivers are rated to operate in ambient temperatures up to 40°C to 50°C depending on the model, so tent heat can push you toward the edge of that range.
Building a dedicated grow light stand rather than hanging directly from tent poles gives you more flexibility to adjust board height and angle, which helps with coverage evenness.
Wiring, safety, and troubleshooting
This is the part most DIY guides rush through, and it's the part that matters most for safety. Take it seriously.
Wiring safety basics
All AC wiring should follow NEC Article 300 requirements for conductor installation, which includes proper wire gauge for the load, correct insulation type for the environment, and physical protection of conductors where they're subject to damage. For a 200W build on 120V, your AC input draw is under 2 amps, well within the capacity of standard 18 AWG cord, but use a properly rated grounded power cord regardless. Never use ungrounded two-prong connections on a metal-chassis LED driver. The ground connection protects you if the driver casing ever becomes energized through a fault.
UL 8750 is the safety standard that covers LED lighting equipment, addressing electrical insulation, grounding, overcurrent protection, temperature management, fire resistance, and mechanical integrity. While your DIY build won't be UL-certified, building to those principles (proper strain relief, grounded chassis, thermally derated wiring) is what separates a safe build from a liability. In particular, UL 8750 requires that accessible openings in enclosures don't expose live parts to accidental contact, and that all cords entering driver housings have proper strain relief installed so a tug on the cord doesn't stress internal connections.
Dimming and driver troubleshooting
The most common driver-related issue in DIY builds is incorrect dimming wiring. If your MEAN WELL driver supports 0–10V dimming but you've connected it incorrectly, the driver may default to minimum output (very dim) or maximum output (no dimming control). Check the datasheet for your specific driver variant: the HLG-240H-B version uses a different dimming wiring approach than the HLG-240H-AB version. When in doubt, start with a simple potentiometer wired to the DIM terminals for the most foolproof dimming setup.
Flicker and other common issues
- Flicker at low dim settings: Most constant-current drivers have a minimum dimming threshold (often 10–20% of rated output). Dimming below that threshold causes flicker or instability. Don't run your driver at its absolute minimum; stay above 20% for stable output.
- Partial board failure (section of diodes out): This usually indicates a solder joint failure or a damaged LED string. Check with a multimeter for continuity across the string. On well-designed boards, a single failed diode in a parallel string won't kill the whole board.
- Driver getting very hot: Check ambient temperature and verify the driver isn't undersized for the board. A 200W board needs at least a 200W rated driver, and running at 90–100% of rated capacity continuously reduces driver lifespan significantly. Size up by 20% if possible.
- Board not lighting at all: Check polarity first, then verify the driver output voltage with a multimeter before assuming the board is faulty. Also verify your dimming control isn't set to zero.
- Uneven PPFD across canopy: Usually a height issue, not a board defect. Raising the board trades peak intensity for more even distribution. A quantum board at 24 inches covers more area more evenly than the same board at 12 inches, even though peak PPFD is lower.
Light scheduling by plant stage
How you schedule your light is as important as how much light you deliver. Getting the DLI right for each growth stage is what separates growers who wonder why their plants are struggling from growers who consistently get good results.
Seedlings and clones
New seedlings and freshly rooted clones are easily stressed by intense light. Target 100 to 250 µmol·m⁻²·s⁻¹ at the canopy, hang the board 24 to 36 inches above, and run an 18 to 20-hour photoperiod. That gives a daily DLI of roughly 7 to 18 mol·m⁻²·day⁻¹, which is plenty for early development. If you see seedlings stretching toward the light even at 18 hours, raise the intensity slightly rather than extending the photoperiod further.
Vegetative growth
Most plants in active vegetative growth benefit from 400 to 600 µmol·m⁻²·s⁻¹ and an 18-hour photoperiod. At 500 µmol·m⁻²·s⁻¹ for 18 hours, your DLI is about 32 mol·m⁻²·day⁻¹, which is in the right zone for vigorous growth in most fruiting and flowering plants. This is also where dimming control pays off: you can run your board at 60 to 70% during veg, saving energy and extending LED lifespan, then ramp to full power when flowering starts.
Flowering
For photoperiod-sensitive plants like cannabis, switching to a 12/12 schedule (12 hours on, 12 hours off) triggers flowering. At that point, raise your PPFD to 700 to 1000 µmol·m⁻²·s⁻¹ if your plant and system can support it, targeting a DLI of 30 to 40 mol·m⁻²·day⁻¹. For plants like tomatoes and peppers that aren't photoperiod sensitive, you can maintain an 16 to 18-hour schedule at higher intensity throughout fruiting. Always increase intensity gradually, about 20% per week, rather than jumping straight to maximum.
Non-fruiting plants and herbs
Herbs, leafy greens, and most houseplants are happy at much lower PPFD levels: 150 to 350 µmol·m⁻²·s⁻¹ for 12 to 16 hours covers their needs without wasting energy. This is actually a great use case for a dimmable quantum board, since you can run at 20 to 40% power and cover a 3x3 ft herb garden efficiently.
Making your build look good and work better
If you're setting up the light in a visible space, like a living room grow shelf or a display setup, aesthetics matter too. Quantum boards have a naturally clean, flat profile that works well in open-frame builds. Cable management, a tidy driver mount, and consistent hanging hardware all make a difference. There's solid guidance on how to make grow lights look nice without sacrificing function, which is worth reading before you finalize your mounting approach.
For growers who want to expand beyond a single board, tiling two or three boards across a wider frame is both more efficient and more visually consistent than mixing fixture types. A well-built multi-board frame on a solid stand is also much easier to adjust and maintain than a collection of individual lights hung at different heights. If you're planning a larger setup, thinking through your overall DIY grow light setup holistically before you start buying boards will save you money and frustration.
The short version: what to do next
If you're building: pick a Samsung LM301B or LM301H board sized to your tent footprint, pair it with a MEAN WELL HLG or ELG constant-current driver with dimming, mount it properly with strain relief on all cord entries, and use ratchet hangers so you can adjust height easily as plants grow. Start with the board higher than you think you need, measure PPFD if you can, and lower gradually.
If you're buying: ignore watt claims and look for verified photon efficacy in µmol/J, a named MEAN WELL driver, and a third-party PPFD map for your target hanging distance. Anything above 2.5 µmol/J from a reputable supplier is competitive. Anything below 2.0 µmol/J is a compromise you'll eventually want to replace.
Either way, a quantum board is genuinely one of the best tools available for indoor growing right now, and the DIY route puts a premium-level light within reach for most growers at a price that's hard to argue with. Take your time with the wiring, get the hanging height right for your growth stage, and you'll be well ahead of where most beginners start.
FAQ
Can I dim a quantum board, or do I need to change LEDs to reduce light?
In most DIY quantum board builds, you can run the board at a lower output using a dimmable constant-current driver (for example, 0-10V control) while keeping the LED wiring the same. What you should not do is try to dim a constant-current driver by adding a random resistor or using a dimmer meant for AC mains, because you can end up with unstable current, flicker, or reduced LED reliability.
How do I calculate what wattage or number of boards I need for my exact tent size?
A practical way to choose the right board is to start with your target PPFD at canopy and your tent footprint, then back-calculate wattage using verified PPFD maps if possible. If you do not have maps, use the coverage ranges in the guide as a starting point, but confirm with a PPFD meter at your real hanging distance because reflector angles, board spacing, and canopy height can shift results.
Where should I mount the driver, and does it matter if it stays inside the tent?
For safety and longevity, treat the driver like a component that needs airflow, not like an accessory. If the enclosure is warm, mount the driver outside the grow space when you can, or at least ensure clear ventilation paths and avoid burying it in foam or sealed cabinets. Even if the LEDs are fine, a hot driver can shorten its lifespan.
What should I do if my driver dimming behaves backward (minimum becomes maximum or vice versa)?
Yes, but only if your specific driver supports that mode and you wire it correctly to the DIM terminals. Drivers with different dimming variants may behave differently, so do not assume that one common wiring diagram works for all HLG or ELG models. If you see it defaulting to very dim or full power when connected, stop and verify the driver variant and dimming method before continuing.
Can I set my light using a phone lux meter instead of a PPFD meter?
Do not rely on lux readings to set your light. Lux can mislead you because it weights light by human vision, which does not track photon delivery for plants. If you cannot measure PPFD directly, use the guide’s DLI and PPFD targets with conservative starting heights, then fine-tune based on plant response (stretching, leaf color, and clawing) while avoiding sudden jumps in intensity.
My plants look stressed, how can I tell if the quantum board is too far, too close, or just too intense?
When plants are light-stressed, the symptoms can overlap, so use a quick decision checklist. If seedlings stretch or internodes lengthen, increase PPFD or reduce distance slightly within safe limits. If leaves bleach, curl, or show persistent pale spots, reduce PPFD or raise the light and let them recover before making another adjustment.
Can I pair any quantum board with any constant-current driver as long as the wattage is similar?
Boards are designed to operate within their specified forward voltage range, but the actual system relies on correct driver matching. If you mix an incompatible board and driver, you might get underdriving (lower light output) or overdriving (higher current than intended), which can hurt both performance and lifespan. Stick to the board size and driver family guidance given in your chosen components, and confirm the driver’s rated LED string voltage/current range before powering.
Does tiling multiple quantum boards require different height targets than a single board?
Yes, tiling can improve canopy uniformity, but it changes how you should set height and dimming because overlap patterns matter. After tiling, measure or at least observe the canopy at the ends and center, then adjust either the hanging height or dimming levels so the entire footprint stays within target PPFD rather than tuning only the middle.
What’s the safest way to ramp up intensity during the first week after installing the board?
Typically, best practice is to avoid running at full output until you confirm heat management and stability, then ramp intensity gradually. A common workflow is start at a conservative PPFD for a week, then increase about 20% per week as noted in the guide, while also watching substrate temperature and leaf appearance. This reduces the risk of shocking seedlings or prematurely overheating the system.
For cannabis or other photoperiod-sensitive plants, should I adjust photoperiod or use dimming when I need less light?
If you are using dimming, you can reduce total light dose without changing your photoperiod, which often works better than suddenly extending hours. For photoperiod-sensitive crops, you still need the correct on/off schedule to trigger flowering, so use dimming to fine-tune intensity during those fixed light cycles rather than trying to compensate with hours.
Next Article
How to Build a Grow Light Stand Step by Step
Step-by-step plans to build a sturdy adjustable grow light stand with safe mounting, height setup, and cable management.