Set your Sondiko grow light 10–30 cm above seedlings and 30–70 cm above mature plants, plug it into a 5V USB source (for strip models) or a standard outlet (for the halo model), then use the built-in timer to blank" rel="noopener noreferrer">run it 14–16 hours a day for seedlings or 12–14 hours for established plants. That covers the core of it. The rest of this guide walks you through every step from unboxing to daily scheduling, plus fixes for the most common problems people run into. For step-by-step innova grow light instructions, double-check your fixture type and follow the same placement, timer, and intensity principles covered for Sondiko daily scheduling.
Sondiko Grow Light Instructions: Setup, Positioning, Timing

Marcus Tillman
12 May 2026

First: Figure Out Which Sondiko Model You Have
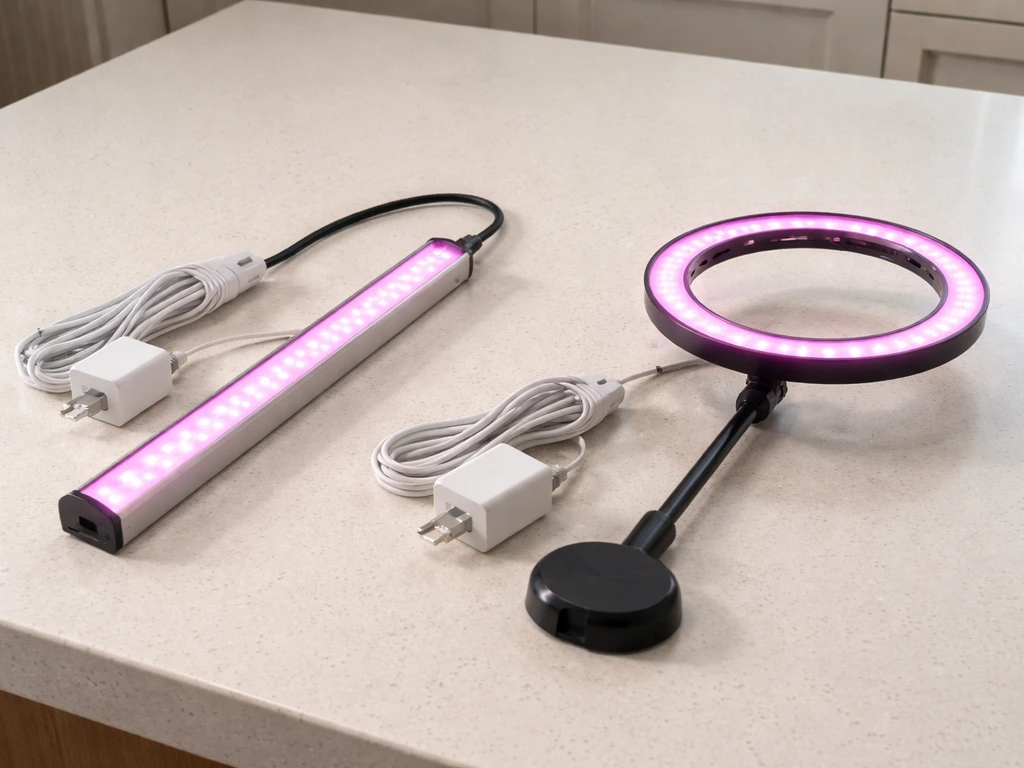
Sondiko makes more than one grow light, and the setup details differ depending on which one landed on your doorstep. Before you do anything else, flip the unit over or check the box for a model number. The two most common ones you'll encounter are the A51542 LED strip light and the 10-inch Halo LED Plant Light. They look very different, connect differently, and have different controls. Getting this wrong wastes time.
| Feature | A51542 LED Strip | 10" Halo LED Plant Light |
|---|---|---|
| Power connection | USB (5V) | Standard plug (outlet) |
| Height/distance range | 10–70 cm from plant | 23–140 cm adjustable stand |
| Timer options | Built-in cycle timer | 3 / 9 / 12 hour auto timer |
| Dimming | Integrated controller | 10 dimmable levels |
| Lighting modes | Full spectrum (420–800 nm) | 3 lighting modes |
| LED count | 48 LEDs | Halo ring array |
| Mounting | Screws, adhesive tape, zip ties | Adjustable-height stand |
If you're not sure which one you have, look at the power connection. If it ends in a USB plug, you have the strip (likely the A51542). If it has a standard two-prong or three-prong plug going into the wall, you have the halo or a similar stand-mounted model. Everything below is split by model where the steps differ.
Confirm What's in the Box
A51542 LED Strip package
- 1x Sondiko LED Grow Light Strip (Model A51542) with 48 LED bulbs
- USB cable with integrated controller (for power, brightness, and timer)
- Instruction manual
- Mounting screws
- Double-sided adhesive tape
- Zip ties
Halo LED Plant Light package
- 10-inch halo LED ring light
- Adjustable-height stand (extends from 23 cm to 140 cm)
- Power cable
- Control button or inline switch for timer and dimming
If anything is missing, stop here and contact Sondiko support before mounting anything. A missing controller cable on the strip model means you can't control the light at all, and improvising with a random USB cable won't give you the dimming or timer functions.
Safety and Power Setup Before You Plug In Anything
For the A51542 strip: the manual is clear that this light runs on 5 volts via USB. That means you should plug it into a USB wall adapter rated at 5V, a powered USB hub, or a computer port. Do not plug it into a fast-charging adapter or a high-wattage phone charger thinking more power is better. Stick to 5V. Using the wrong adapter is one of the most common ways people fry the controller on this unit.
For the halo model: it plugs into a standard wall outlet, so voltage matching isn't something you need to think about unless you're outside the US. Just make sure the outlet isn't shared with a high-draw appliance on the same circuit.
Both models come with a 78-inch (about 2-meter) power cord, which gives you decent flexibility in placement. Still, plan your cord route before you mount the light so you're not stuck with cord draped across your plants or hanging in an unsafe spot.
- Keep the light and all cords away from water and high-humidity zones. The manual for the A51542 specifically calls this out. A misting spray near exposed wiring is a real risk.
- Do not mount the light directly over an open water reservoir without some kind of shield or distance buffer.
- Use the zip ties or cord clips to run cables along a shelf edge, curtain rod, or grow tent pole. Loose cords near grow medium or wet soil are a hazard.
- Unplug the unit if you won't be using it for an extended period. Don't rely on the timer to act as an off switch for safety purposes.
- Never disassemble or modify the light or controller. If something seems broken, replace it.
How to Assemble and Install the Light
Installing the A51542 strip
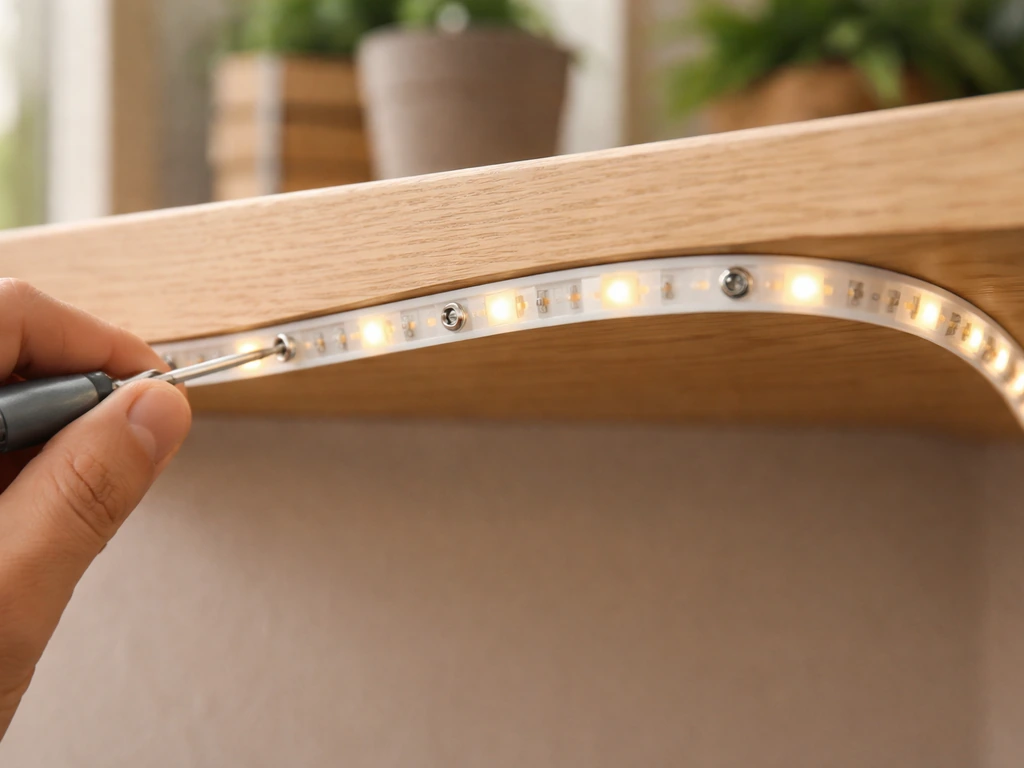
The strip is flexible and designed to wrap around or hang above your plants. You have three mounting options in the box: screws, double-sided adhesive tape, and zip ties. Here's how to decide which to use.
- Screws: best for wood shelves or a permanent setup where you want the strip to stay put. Pre-drill small pilot holes so the wood doesn't split.
- Double-sided adhesive tape: works well for smooth, clean surfaces like the underside of a glass shelf or a plastic grow light rack. Clean and dry the surface first or the tape won't hold after a few days.
- Zip ties: the most practical option for grow tents or wire shelving. Thread them through the mounting points on the strip and cinch tight around the rack bar.
Once mounted, plug the USB cable into the controller and then into your 5V USB source. The controller should light up or respond to a button press. Don't run the light resting on top of your plants or curled up on itself while testing, even briefly. It needs airflow to stay cool.
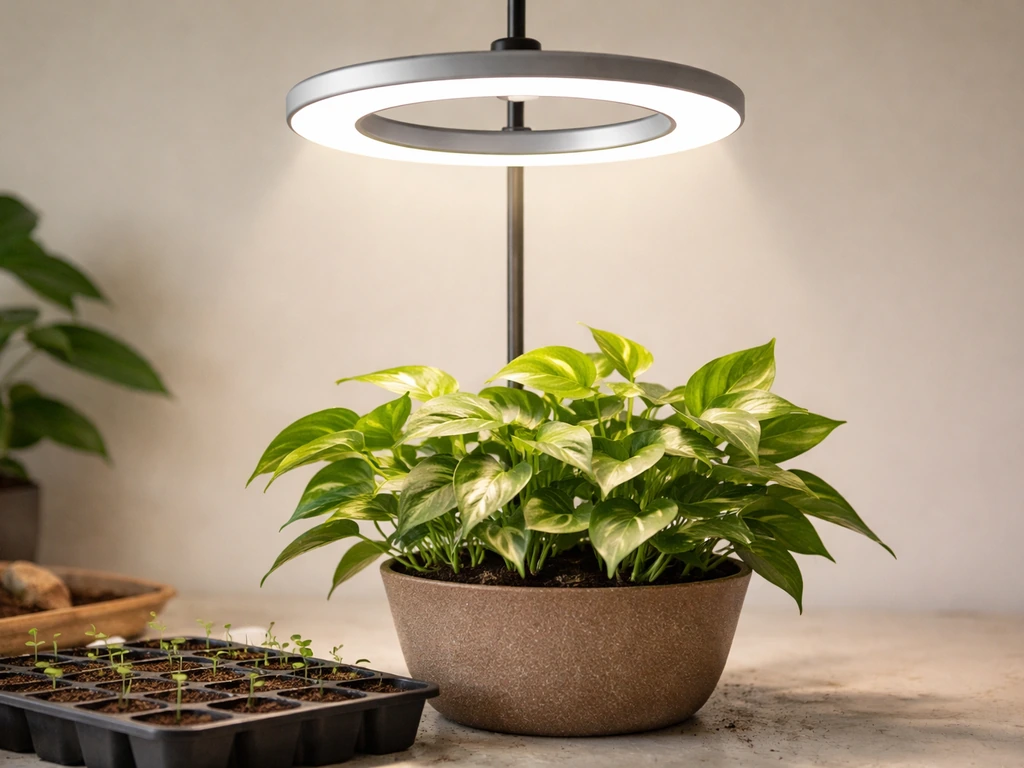
Setting up the Halo light
The halo model is simpler to install because the adjustable stand does most of the work. Extend the stand to your starting height (start around 40–50 cm for most plants until you dial in the right distance), set it next to or over your plant, and plug it in. The stand height adjusts from 23 cm all the way up to 140 cm, which gives you a lot of room to experiment without moving the light fixture itself.
Best Placement Distance: Seedlings vs. Mature Plants
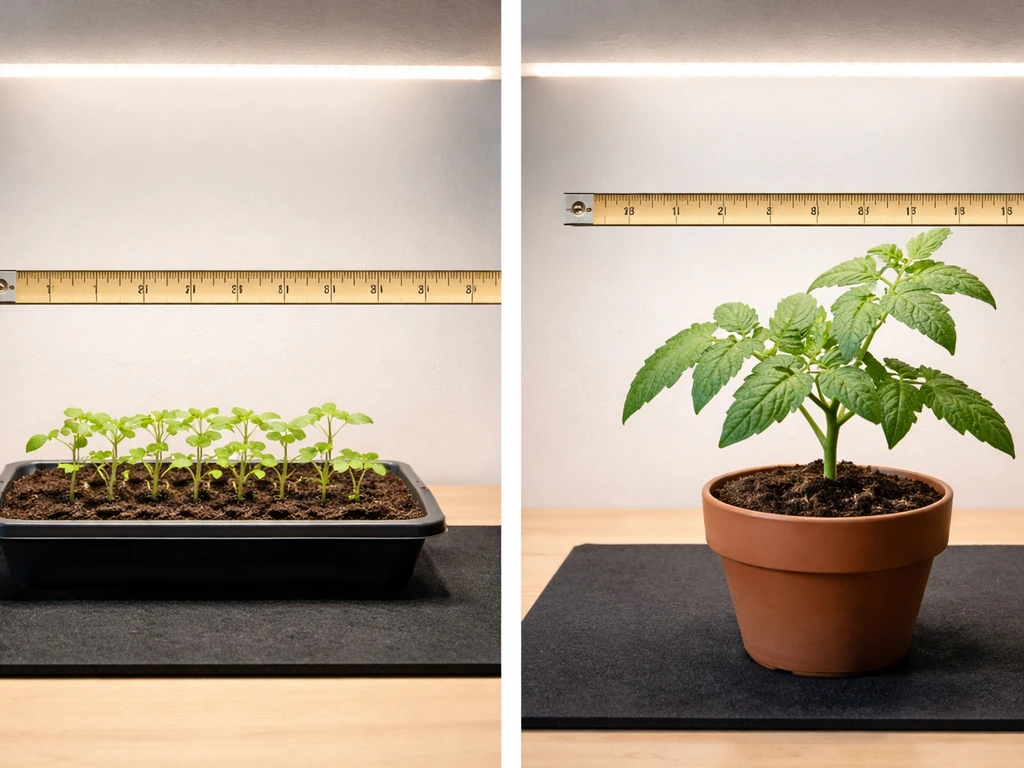
Height above the plant canopy is probably the most important variable you'll adjust. LED grow-light guidance also emphasizes that distance strongly changes PPFD at the canopy, with an inverse-square relationship between distance and intensity. Too close and you burn or bleach leaves. Too far and your plants stretch tall and leggy trying to find the light. Here are the practical starting points based on Sondiko's own guidance and real-world use.
| Growth Stage | Recommended Distance | Hours per Day |
|---|---|---|
| Seedlings / germination | 10–20 cm | 14–16 hours |
| Young plants / vegetative | 20–40 cm | 14–16 hours |
| Mature / flowering plants | 30–70 cm | 12–14 hours |
| Succulents / low-light plants | 40–70 cm | 10–12 hours |
These are starting points, not locked-in rules. The real test is watching your plants over 5–7 days. If tips are going yellow or showing small brown spots, move the light up 5–10 cm. If stems are stretching and plants look pale and floppy, bring the light down 5–10 cm. Your plants will tell you what they need if you know what to look for.
For the halo model with its stand range of 23–140 cm, you have more than enough room to cover every stage. Just don't leave it at 140 cm unless you're dealing with a very large plant or a very light-sensitive variety. Most setups will live somewhere in the 30–80 cm range.
Setting Intensity, Modes, and Your Daily Light Schedule
A51542 strip controls
The A51542 controller handles three things: power on/off, brightness level, and the timer cycle. The brightness adjustment and timer are on the same inline controller attached to the USB cable. Press and hold or cycle through the button options to step through brightness levels. The built-in cycle timer is a two-way timer, meaning you set the on period and it automatically calculates the off period. Refer to your included manual for the exact button sequence since button labeling varies by production batch.
Halo model controls
The halo model gives you more control options. It has 3 lighting modes (which typically correspond to different spectral blends, such as full spectrum, warm/red-heavy, or blue-heavy) and 10 dimmable brightness levels. On Sondiko’s product page for the 10-inch Halo LED Plant Light, the light is described as having 3 lighting modes and 10 dimmable brightness levels the 10-inch Halo LED Plant Light includes 3 lighting modes and 10 dimmable brightness levels. Cycle through modes with one button press and step up or down through brightness levels with another. For most plants, full spectrum mode at 70–100% brightness is the right call. Drop brightness to 40–60% for very young seedlings or shade-tolerant houseplants.
Timer setup (both models)
The halo model's timer gives you three choices: 3 hours on (then 21 off), 9 hours on (then 15 off), or 12 hours on (then 12 off), repeating daily from the moment you set it. For most home grows, 12 hours is the minimum and 16 hours is the practical maximum. If your halo timer only goes to 12 hours, supplement with a simple plug-in mechanical timer set to turn the whole unit off and on at the right wall-outlet times.
For the A51542's built-in cycle timer, set your desired on-period first, then let the timer handle the rest automatically. Always set the timer at the start of your intended light period, not mid-cycle, so the schedule anchors correctly.
- Seedlings: 14–16 hours on, 8–10 hours off
- Vegetative / actively growing plants: 14–16 hours on
- Flowering plants or fruiting herbs: 12–14 hours on
- Succulents and cacti: 10–12 hours on
- Low-light houseplants (pothos, snake plant): 8–10 hours on
One thing that trips people up: plants need a dark period. Running the light 24 hours is not better. Most plants use the dark cycle for important metabolic processes, and skipping it consistently leads to slower growth, not faster.
Troubleshooting: Light Won't Turn On, Flickers, Overheats, or Plants Look Wrong
Light won't turn on
- Check the USB adapter voltage first. The A51542 requires 5V. A mismatched adapter is the most common cause of a dead unit right out of the box.
- Try a different USB port or wall adapter to rule out a power source problem before concluding the light is faulty.
- Make sure the controller is fully seated and clicked into the USB cable connection. A half-seated connector won't power on.
- For the halo model, check that the outlet has power and that the inline switch is in the on position.
Light flickers or pulses
- Flickering almost always points to an unstable power connection. Re-seat the USB plug on both the adapter and controller ends.
- A loose or failing USB adapter will cause flickering. Try a different 5V adapter.
- If flickering happens after the light has been on for a while, it could be a sign of heat buildup. Make sure the strip isn't coiled or covered.
Light feels hot or you're worried about overheating
LED grow lights run warm, but they shouldn't be burning hot to the touch. The A51542 strip dissipates heat through its backing, so it needs airflow around it. Don't tape it flat against an insulating surface like foam or fabric. Leave at least a small gap behind the strip. For the halo model, the stand keeps the fixture in open air, which is good, but don't place it inside an enclosed box without ventilation. If the controller feels unusually hot, unplug it, let it cool for 20 minutes, and check that the adapter is the correct voltage.
Plants look off: stretching, yellowing, or scorched tips
| Symptom | Likely Cause | Fix |
|---|---|---|
| Stems stretching tall and thin | Light too far away or too few hours | Lower light by 10 cm or add 2 hours to daily schedule |
| Leaf tips turning brown or crispy | Light too close or intensity too high | Raise light by 10–15 cm or reduce brightness by 2 levels |
| Leaves turning pale yellow-green | Too much light or wrong spectrum mode | Raise light, reduce brightness, or switch spectrum mode |
| Lower leaves yellowing and dropping | Not enough light reaching lower canopy | Reposition or add a second light strip |
| Slow or stunted growth despite healthy color | Too few daily light hours or low intensity | Increase to 14–16 hours and bump brightness to 80–100% |
Your 7–14 Day Adjustment Checklist
After initial setup, your job for the first two weeks is to observe and fine-tune. Don't make multiple changes at once or you won't know what fixed (or caused) the problem. Change one variable every 5–7 days and watch the plant response.
- Day 1–2: Set light at the recommended starting height for your plant stage (20 cm for seedlings, 40–50 cm for mature plants). Set timer for the appropriate daily duration. Note what the plant looks like today so you have a baseline.
- Day 3–5: Check stem direction. Are new shoots growing straight toward the light or leaning hard to one side? Rotate the pot 90 degrees if needed. Check for any tip browning, which means the light is too close.
- Day 5–7: Assess growth rate vs. your baseline. If a seedling hasn't pushed any new growth, it's likely under-lit. Add 2 hours to the daily schedule or lower the light 5 cm.
- Day 7–10: If you adjusted height, check again for burning or stretching. If the plant looks good, hold the current settings for another 7 days before making any further changes.
- Day 10–14: At this point you should see a clear trend. Healthy plants show compact, green new growth growing steadily toward the light. Lock in your height, brightness level, and timer setting and only revisit if you change growth stage or plant type.
One last thing worth mentioning: if you're comparing the Sondiko setup experience to other budget grow lights like the Yadoker, Wakyme, or Aokrean models, you'll find a lot of the positioning and timing logic transfers directly. These Wakyme grow light instructions follow the same core ideas about positioning, daily timing, and fine-tuning based on what your plants do.
If you want to mirror the same approach for a Yadoker setup, follow the Yadoker grow light instructions for positioning and daily timing. The plant-response cues (stretching, tip burn, yellowing) are universal regardless of brand. The main difference with Sondiko is that the timer and dimmer are built into the controller cable on the strip model, which is more convenient than units that require a separate timer, but it also means the controller is a single point of failure.
Keep the original manual in a drawer so you can reference the button sequence later.
FAQ
Can I power the Sondiko A51542 strip from a USB power bank or a random phone charger?
Yes. For the A51542 strip, the safest move is using a regulated 5V USB adapter (the kind labeled 5V output). If you must use a USB hub, choose one that explicitly supports stable 5V power and avoid hubs connected to low-power laptop ports if the controller flickers or won’t stay on.
What should I do if my strip light is flickering after plugging it in?
Don’t. Fast-charging adapters may negotiate a higher mode than plain 5V even if the label suggests 5V availability. If you want to test, power the light briefly and watch the controller response, if it gets unusually hot or behaves erratically, switch to a true 5V adapter immediately.
How do I adjust height if my plants are in multiple pots with different heights?
If it’s the halo model, set the stand height first, then fine-tune the distance by lowering or raising the fixture, not by moving it day to day in large jumps. If it’s the strip, adjust the mounting position and keep airflow behind the strip, the control cable and any adhesive mounts should not be strained.
My plants look stressed, do I change the timer or the distance first?
If a leaf problem appears, isolate the cause before changing schedule. Yellowing tips or small brown spots usually suggest the light is too close or too intense, start by raising the light 5 to 10 cm and keep the timer the same for 5 to 7 days.
Can I combine the Sondiko built-in timer with an external wall outlet timer?
Use the controller as the source of truth for that model. If you add a separate plug-in timer, make sure it turns power on at your intended start time and then let the built-in cycle (on the strip) or the built-in on choices (on the halo) run their full cycle without interruption.
What’s the best way to change my light schedule without stressing the plants?
For most home grows, keep a consistent dark period. If you have to shift schedules, adjust gradually (for example, move start time by 30 to 60 minutes) over a few days rather than changing from “noon” to “midnight” overnight, so plants don’t get an abrupt rhythm change.
If my halo timer only has a 12-hour option, can I use an external timer to reach 14 to 16 hours?
No, not as a general rule. If your halo timer only offers up to 12 hours, you can run a supplemental external timer, but keep total dark time similar day to day and avoid stacking two timers that create overlapping power pulses.
Can I mount the A51542 strip directly on a shelf with tape or foam underneath?
Use a practical target of a small gap behind the strip for airflow, and keep the strip from touching reflective surfaces that can trap heat. If you’re using adhesive tape, confirm it is clean, dry, and not covering vents or the controller connection strain point.
The controller on my Sondiko strip feels hot, is that normal?
That usually points to airflow, adapter power, or heat buildup at the controller. Unplug, let it cool 20 minutes, then verify you used a correct 5V adapter, ensure the strip has a small air gap, and check that the controller cable is not being pulled tight or pinched.
How can I tell whether I need more hours versus more brightness?
Don’t rely only on the number of hours. Use plant cues plus temperature and leaf condition, if you see stretching, raise time by small steps only after you confirm distance is not too high, and aim for one change every 5 to 7 days.
For the halo model, should I switch lighting modes daily or keep one mode for a while?
Treat mode changes like a new variable. Start with full spectrum if you’re unsure, then if your plant looks pale, try a mode or brightness step and hold it for a week, rather than cycling modes daily, which makes it hard to diagnose what worked.
What’s the best starting brightness for young seedlings with the halo model?
Avoid full intensity at the start. If seedlings are newly transplanted or very young, begin at a lower brightness (often around the 40 to 60% range on the halo) and move up only after new growth stabilizes for several days.
Any extra placement tips for the halo stand at the taller 100 to 140 cm range?
If the stand is extended very high, keep the base stable and avoid placing it where it can be bumped. With taller heights, distance errors become bigger, so re-check the canopy distance after any stand adjustment or after watering when plants may shift slightly.
I reset power after a blackout. How do I restore the exact same settings quickly?
Keep the original manual and also note the exact button sequence that sets your timer and brightness for your specific unit. Button labeling can vary by batch, so a quick note lets you reprogram accurately if the power is disconnected.
Next Article
Aokrean Grow Light Instructions: Setup, Settings, and Fixes
Step-by-step Aokrean grow light setup, placement, settings, timers, and fixes for common issues like flicker and burn.