If your grow light isn't working, the most likely culprit is one of five things: a power or wiring problem, a failed or overheating driver, a misconfigured timer or dimmer, a placement issue that makes the light look weak even when it's fine, or an actual hardware failure. Before you assume it's broken and order a replacement, run through the checks below. Most problems get solved in under 15 minutes.
Grow Light Not Working Troubleshooting Checklist and Fixes

Marcus Tillman
16 Apr 2026
Quick diagnosis: figure out your symptom first
The fastest way to troubleshoot is to match your symptom to a cause. The table below maps what you're seeing to where you should start looking.
| Symptom | Most likely cause | Start here |
|---|---|---|
| Light won't turn on at all | Power, outlet, driver, blown fuse | Power and electrical checks |
| Light flickers or pulses | Loose wiring, incompatible dimmer, failing driver | LED-specific causes + electrical checks |
| Only part of the light works | Damaged LED board, partial driver failure | LED-specific causes |
| Light looks dim or weak | Overheating, wrong height, misconfigured PPFD/dimmer, aging LEDs | Placement fixes + settings |
| Plants aren't growing well but light looks on | Wrong PPFD for stage, bad photoperiod schedule, too far away | Settings + PPFD targets |
If you're not sure whether your light is actually putting out useful light at all, there's a quick way to tell: point your phone camera at the diodes. Most cameras pick up near-infrared and UV that your eyes miss, so even a "dark-looking" light will show a purple or white glow on screen if the LEDs are firing. For a more reliable answer, check out how to know if grow light is working for a proper step-by-step test.
Power and electrical checks
Start here if the light is completely dead or behaves erratically. Work through these in order because each one takes less than two minutes.
Check the outlet and circuit
Plug something else into the same outlet, a phone charger or lamp, and confirm it powers on. If nothing works, check your breaker box. Grow lights, especially larger LED panels running at 200W or more, can trip a breaker if they're sharing a circuit with other high-draw devices. If the outlet is on a GFCI strip, press the reset button on the strip itself.
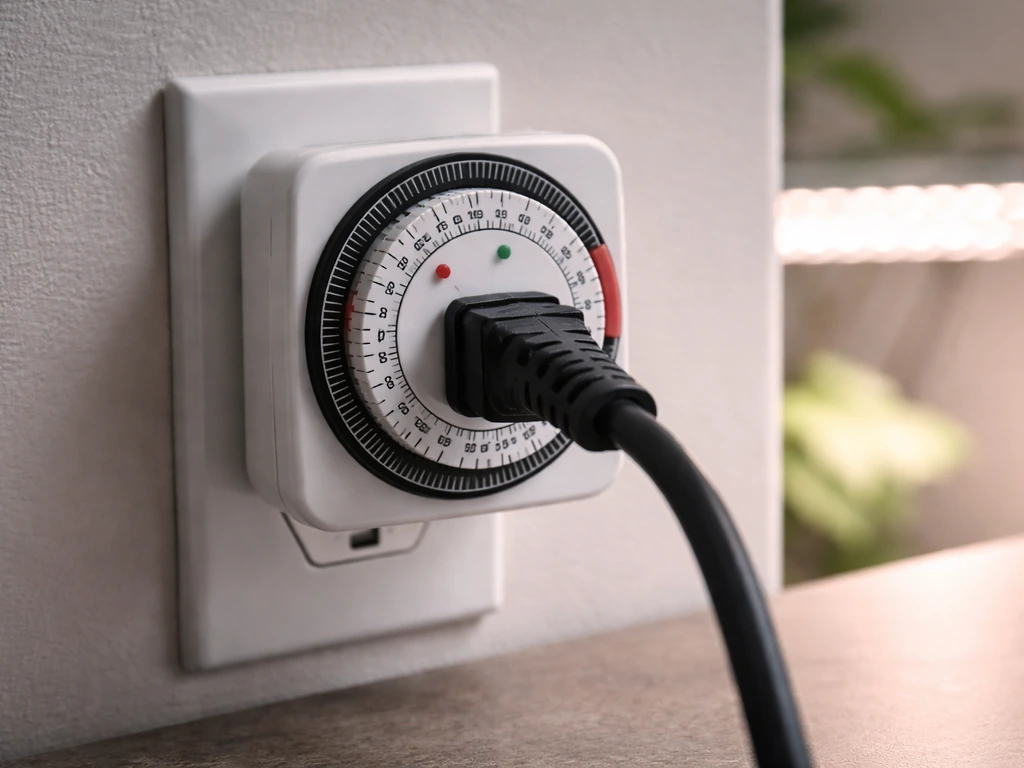
Check your timer and smart plug
This is the number one "my light stopped working" culprit that isn't actually a light problem. Mechanical outlet timers lose their programming after a power outage. Smart plugs sometimes drop off WiFi and stop responding to schedules. Bypass the timer entirely: plug the grow light directly into the wall. If it turns on, your timer is the issue, not the light.
Check the driver and wiring
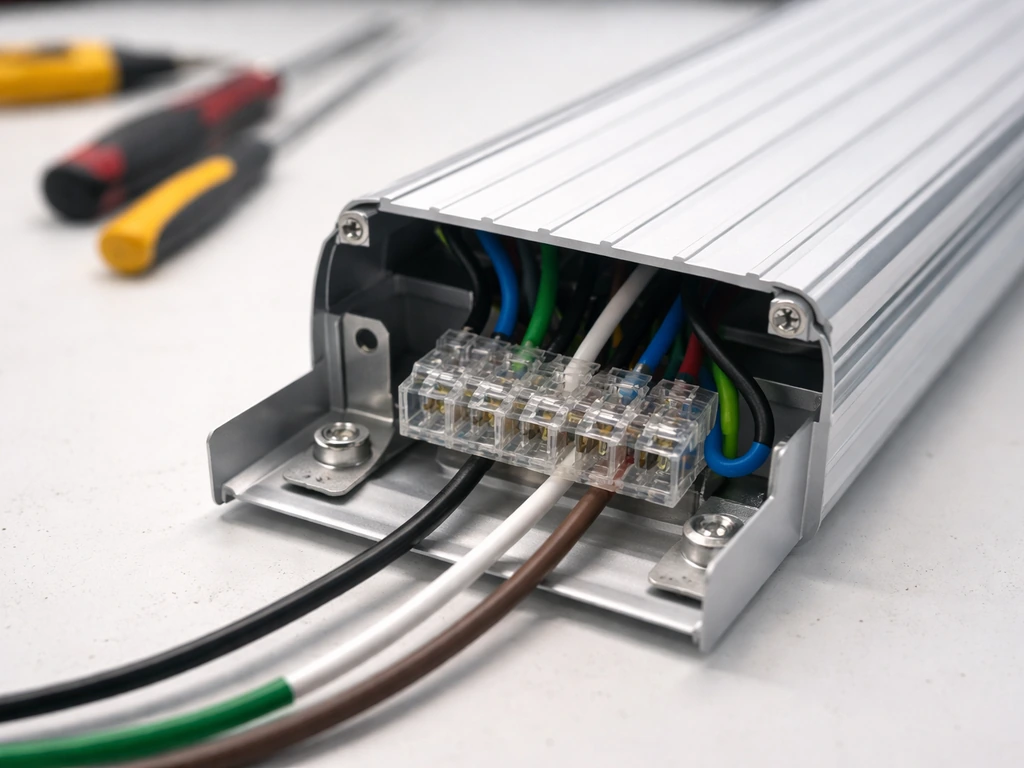
The driver is the box (sometimes built in, sometimes external) that converts AC mains power into the DC current your LEDs need. If the driver has failed, the light simply won't turn on, or it will flicker and die. To test an external driver with a multimeter, set your meter to DC voltage mode and probe the output terminals. A functioning driver should deliver a stable DC voltage within about plus or minus 5% of its rated output. For example, a driver rated at 54VDC should read somewhere between 51.3V and 56.7V. If you're reading zero or a wildly unstable number, replace the driver. Make sure you're in DC mode on your multimeter, not AC, because LED driver outputs are rectified DC and an AC reading will give you garbage data.
While you have the driver accessible, inspect every wire terminal. Loose or improperly seated wires are a very common cause of both flickering and complete failure. A wire that looks connected can be barely making contact. Push each connector firmly and re-seat any that feel loose. If you see any scorching or melted insulation near terminals, stop, disconnect power, and treat it as a hardware failure requiring replacement.
Dimmer compatibility
If you've added an external dimmer to your setup, it may be the problem. Many LED grow lights are designed to work only with their own built-in dimmer knob or a manufacturer-approved controller. Spider Farmer, for example, explicitly instructs users not to connect their lights to third-party dimming devices without confirmation that they're compatible. An incompatible dimmer can prevent the light from starting at all, cause flickering, or reduce output to near-zero. Remove the external dimmer and plug the light directly into the wall to rule this out.
LED-specific failure modes
Driver failure
The driver is almost always the first thing to fail in an LED grow light, not the diodes themselves. Drivers contain electrolytic capacitors that degrade over time, and when those capacitors lose capacitance, you get increased ripple current, which shows up as visible flickering before the driver eventually fails completely. If your light is a few years old and has started flickering before going out, a worn-out driver is the most likely explanation. Replacement drivers are usually available from the manufacturer and are often cheaper than buying a new fixture.
Overheating and thermal shutdown
LED grow lights have thermal protection built in. When the fixture gets too hot, it will either dim down or shut off entirely to protect the diodes. If your light turns on, runs for a while, then dims or cuts out, overheating is the likely cause. This happens when the heatsink is dusty (dust acts as an insulator), when there's no airflow moving hot air away from the fixture, or when the grow space itself is too warm. Spider Farmer's manuals specifically describe a high-temperature protection mode that reduces output when a temperature threshold is hit, so what looks like a failing light is sometimes just a light that's too hot. Check that the heatsink fins are clean and clear, and make sure you have exhaust airflow moving warm air out of your space.
Routine maintenance matters here more than most growers realize. Dust and mineral buildup on the heatsink and LED array reduce thermal performance over time. A quick wipe-down with a dry cloth every month or two is enough to prevent this from becoming a problem.
Damaged LED boards
If part of your light works and part doesn't, you likely have a damaged LED board or a broken connection between boards. LEDs are typically wired in series strings, so when one string fails, the entire row or section goes dark. This can happen from physical impact, water damage, or a one-time power surge. Visually inspect the board for blackened or burned diode spots. If you see a burned diode, that board needs to be replaced.
Lifespan and aging
Quality LED grow lights are rated for 50,000 hours or more, but budget fixtures can start showing significant output degradation after 15,000 to 20,000 hours. If your light is several years old and has been running 16-18 hours a day, do the math. A light running 16 hours daily hits 20,000 hours in about 3.4 years. Gradual dimming over months without any other explanation usually means the LEDs are aging out. At that point, replacement is the right call.
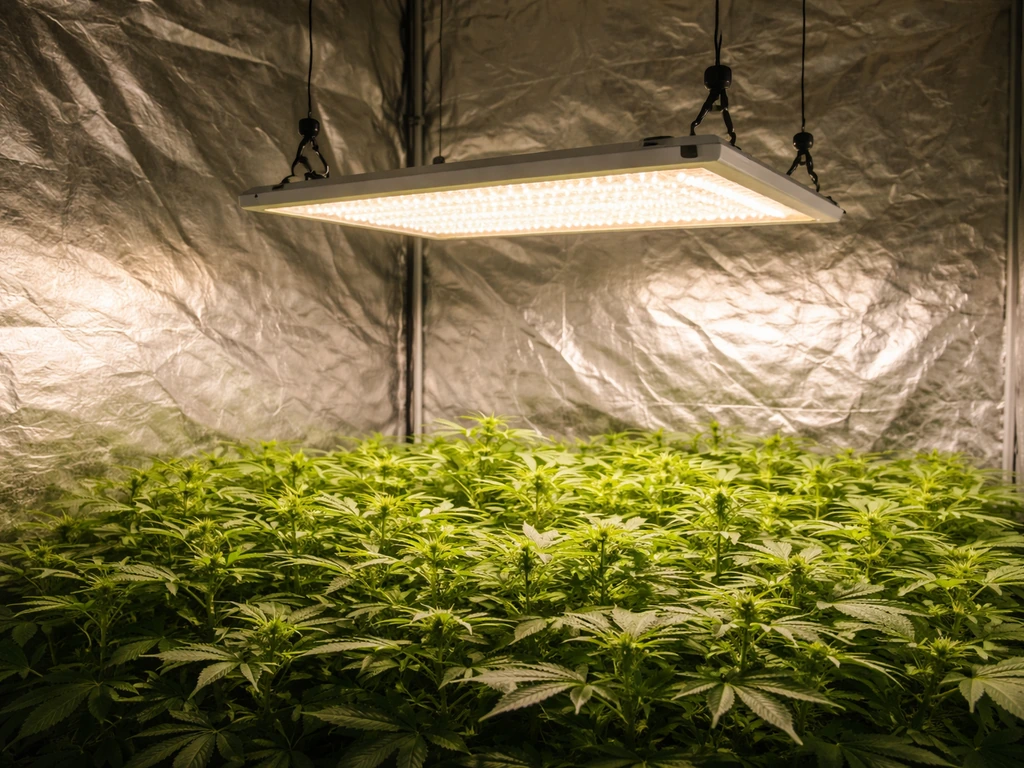
Placement and setup fixes
A lot of "my grow light isn't working" complaints are really "my grow light is placed wrong." The light is functioning fine, but the plants aren't getting what they need because of height, angle, or coverage problems.
Hanging height and distance from plants
Light intensity follows the inverse square law: double the distance, quarter the intensity. A light hanging 24 inches above your canopy delivers roughly one-quarter the PPFD it would at 12 inches. Most LED grow lights for seedlings should be kept somewhere between 18 and 24 inches above the canopy. Check your manufacturer's hanging chart. If you don't have one, start at 24 inches and use a quantum meter to verify you're hitting your target intensity. Getting too close causes bleaching and heat stress at the leaf surface, which can look like a sick plant even though the light is working perfectly.
Coverage area and beam angle
LED grow lights have a defined coverage footprint, and that footprint shrinks dramatically at the edges. If your plants are outside the rated coverage area, they may be receiving a fraction of the light the center plants get. This creates uneven growth that looks like a lighting problem but is really a positioning problem. Overlap coverage from multiple fixtures if you're running a wide canopy, and consider adding a reflective mylar wall to bounce edge-spill back toward the plants.
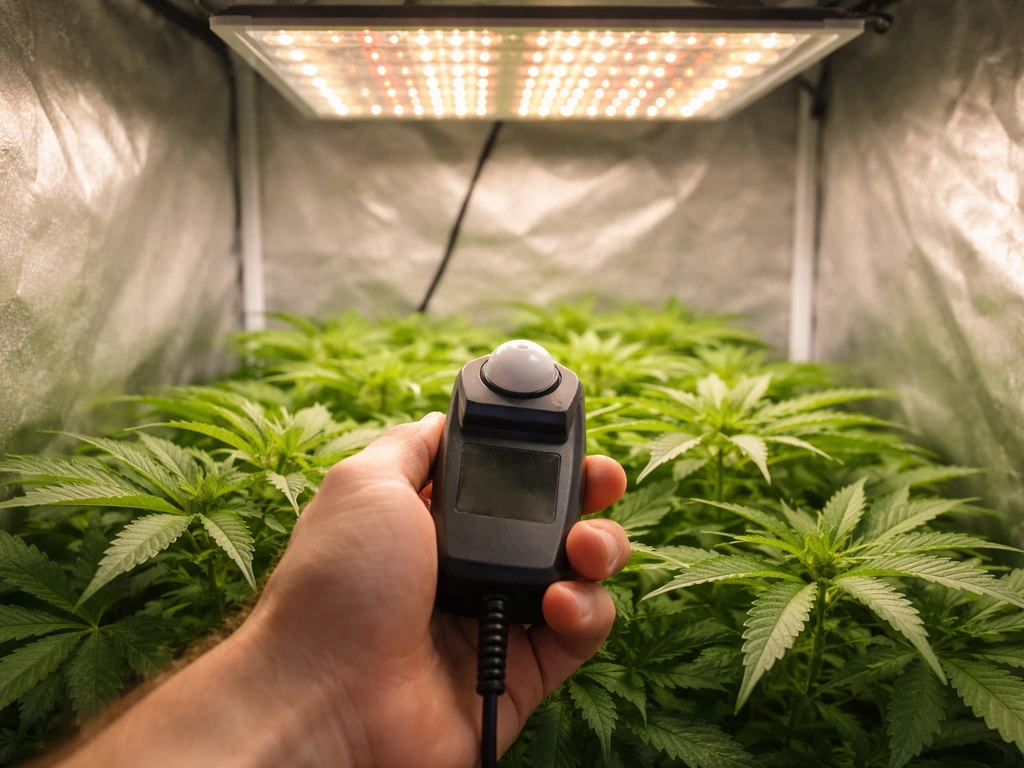
Measuring actual intensity
Don't guess. A regular lux meter isn't accurate for grow lights because it weights light based on human vision, not plant photosynthesis. You need a quantum meter that measures PPFD in µmol m⁻² s⁻¹. Tools like the Apogee MQ-500 are the gold standard for this, using full-spectrum quantum sensing calibrated specifically for photosynthetically active radiation rather than the human-visible lux weighting. If you want to understand how to measure grow light intensity properly, a dedicated quantum meter is the tool to use, not a lux meter app on your phone.
Settings and scheduling
Is the light actually on long enough?
Slow or stunted growth when the light appears to be working is often a photoperiod problem, not a hardware problem. Most plants need 14 to 18 hours of light per day during vegetative growth, and 10 to 12 hours during flowering. Seedlings and clones typically do well at 16 to 18 hours. If your timer is set to 8 or 10 hours because you read a generic recommendation somewhere, that may not be enough for your specific crop or stage. Double-check your timer settings by watching the light turn on and off, and count the actual on-time.
Dimmer and intensity settings
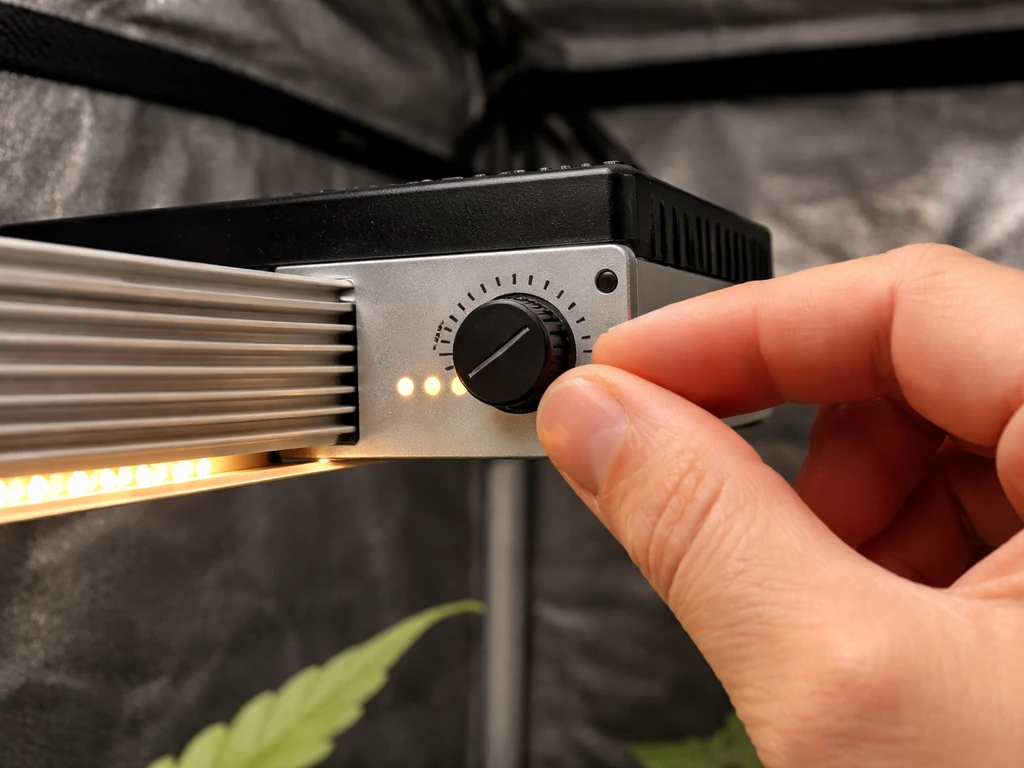
Check the dimmer knob or controller setting on the fixture itself. Many lights arrive set to 50% or 75% intensity from the factory or after a reset. If someone bumped the knob or the controller reset after a power outage, you could be running at half power without realizing it. Turn the dimmer to 100% and see if output visibly improves.
Controller-based PPFD settings
If you're using a smart controller like the Spider Farmer GGS, the system can automatically adjust light output based on a target PPFD value and a connected sensor. If the target PPFD is set too low, or if the sensor is misplaced and reading a higher-than-actual canopy value, the controller will deliberately reduce output. The light looks dim because the controller thinks the plants already have enough light. Check your controller's PPFD target setting and compare it to your crop's actual needs. For seedlings, you're typically targeting 100 to 300 µmol m⁻² s⁻¹. Vegetative growth usually calls for 400 to 600 µmol m⁻² s⁻¹, and flowering stages generally need 700 to 900 µmol m⁻² s⁻¹.
Troubleshooting by symptom
No light at all
- Test the outlet with a different device.
- Bypass any timer or smart plug and plug the light directly into the wall.
- Check and reset the circuit breaker.
- Inspect the driver output voltage with a multimeter (DC mode). Zero output means a failed driver.
- Check all wire connections and terminals for looseness or scorching.
- If the driver is external and replaceable, swap it out.
Flickering
- Remove any external dimmer and plug the light directly into the wall.
- Re-seat all wire connections at the driver terminals.
- Check for overheating: feel the heatsink, check airflow, clean dust from fins.
- If flickering is intermittent and gets worse over time, the driver capacitors are likely failing. Plan for a driver replacement.
- If the outlet voltage in your home is unstable (check with a multimeter: should be 110-120VAC in North America), a power conditioner or UPS can help.
Partial light (only some sections working)
- Inspect the LED board visually for burned or blackened diodes.
- Check connections between boards or between the driver and individual board sections.
- If one board is dead and others work, the issue is board-specific, not a driver failure.
- Contact the manufacturer about board-only replacement, which is often available and less expensive than a full unit.
Weak or dim output
- Turn the dimmer knob or controller to maximum and re-check.
- Check for thermal shutdown: clean the heatsink and improve ventilation, then retest.
- If using a smart controller, verify your PPFD target isn't set lower than your crop needs.
- Measure actual PPFD with a quantum meter at canopy height. Compare to target ranges for your growth stage.
- Reduce hanging height in 2-inch increments and recheck PPFD at each step.
- If measured output is far below spec and the light isn't hot and settings are maxed, the LEDs are aging. Plan for replacement.
Plants not growing but light looks normal
- Measure actual PPFD at canopy level. Don't rely on wattage or visual brightness.
- Verify your daily light integral (DLI): PPFD multiplied by hours of light per day multiplied by 0.0036 gives you mol m⁻² d⁻¹. Most vegetative crops need 12 to 20 mol m⁻² d⁻¹.
- Confirm your photoperiod is set correctly for the growth stage.
- Check that coverage reaches all plants evenly, not just the center of the canopy.
- Rule out other limiting factors: temperature, CO₂, watering, and nutrient issues can all mimic light deficiency.
When to test and replace parts, and when to call support
The driver is almost always the right first replacement to try because it's the component most likely to fail, and standalone drivers are typically inexpensive. Before you buy anything, check whether your light is under warranty. Many quality brands offer two-year coverage on manufacturing defects. Spider Farmer's warranty, for example, covers defects within a two-year window in the supported region, and making a warranty claim is almost always cheaper than buying a replacement driver out of pocket.
Here's how to decide between DIY repair and contacting support:
- Replace the driver yourself if: the light is out of warranty, the driver is external and the replacement part costs less than about 30% of a new fixture, and you're comfortable with basic electrical work.
- Replace the LED board yourself if: you can source the exact board, the rest of the fixture is in good condition, and the light is out of warranty.
- Contact manufacturer support if: the light is under warranty (shipping a defective unit back is free value), you can't identify the failure, or the fixture has both a bad driver and bad boards.
- Buy a new fixture if: the light is more than 3 to 4 years old and running 16+ hours daily, multiple components have failed, or the cost of parts exceeds 50% of a new unit.
If you're working with a Bell and Howell unit specifically and the light has stopped responding, there are some brand-specific quirks worth knowing about. The Bell Howell grow light not working guide covers the most common failure patterns for those models, and if you need help with initial setup or wiring on that brand, the Bell and Howell grow light instructions page walks through the full setup process.
One last thing: if you've run through every check above and you still can't tell whether the light is actually working, the answer is to measure, not guess. A quantum meter reading at canopy height is the definitive test. If your light is producing 200 µmol m⁻² s⁻¹ at seedling canopy height, it's working. If it's producing 40 µmol m⁻² s⁻¹, something is wrong regardless of how bright it looks to your eyes. Light intensity for plants is measured in PPFD, not in visual brightness, and your eyes are genuinely not a reliable tool for this.
FAQ
My grow light turns on, but only for a few seconds then shuts off. What should I check first?
Look for thermal cutoff or a failing driver connection. First, clean the heatsink and confirm there is airflow around the fixture, then reseat the driver output and any terminal blocks. If it still short-cycles, test the driver output for stable DC voltage (not AC) and replace the driver if the voltage collapses or becomes erratic.
Can a loose wire make the light dim instead of fully failing?
Yes. A marginal connection can produce reduced LED current so the light appears weak, and it may flicker when the fixture warms up. Reseat all connectors at the driver and LED terminals, and stop if you find scorching or melted insulation, since that can indicate overheating at the connection.
How do I tell if my dimmer or controller is incompatible when the light doesn’t start?
The quickest rule-out is removing any third-party dimming component and plugging the light directly into the wall. If it starts normally at full output, the issue is the dimming device or settings. Also ensure the fixture is receiving power continuously (some controllers output pulsed or require a specific input type).
My outlet tester shows power, but the grow light is still dead. What’s the next step?
Check for voltage sag under load and confirm you are actually feeding the fixture’s required voltage. If you can, measure the wall outlet voltage while the light is plugged in, then inspect the power cord and strain relief. If the outlet voltage is solid and the light is still dead, the driver is often the next suspect.
Should I test the driver while it’s connected, or disconnect it first?
For safe testing, disconnect power before moving wires. Then test the driver output only after the driver is properly reconnected and you are set to DC voltage mode on your multimeter. If you are not comfortable identifying the correct output terminals, treat it as a warranty or support job rather than forcing measurements.
What PPFD target should I use if I’m using a controller with a sensor?
Use canopy height targets based on plant stage, but calibrate for real placement. If the sensor is mounted too high or in a brighter spot, the controller may reduce output thinking you already reached the target. As a fix, verify actual PPFD at leaf level with a quantum meter, then adjust the controller’s PPFD target and sensor location accordingly.
Do I need a quantum meter if the light has a stated wattage or “covers X square feet”?
Wattage and coverage claims do not guarantee the PPFD at your canopy height, especially if the fixture is high, angled, dirty, or partially outside its rated footprint. A quantum meter at canopy height is the deciding test when plants look underlit, dim, or uneven even though the light appears to be “on.”
How can I tell if the light is aging out versus an environmental or placement problem?
Aging usually shows gradual dimming over months alongside stable operation and unchanged setup. If your fixture was already dim before any placement changes, or it flickers then worsens, suspect the driver first. If everything else is unchanged and plants steadily underperform, measure PPFD at canopy height and compare it to the expected range for your setup.
Is it safe to clean the heatsink if the light has been overheating or shutting off?
Unplug the fixture first and let it cool completely. Use a dry cloth or compressed air gently to remove dust, then avoid touching LED boards with tools. If you see signs of scorching, melted components, or a damaged driver, stop cleaning and plan on a hardware replacement or support request.
My light works but plants show bleaching. Could it be a measurement error?
Bleaching usually indicates excessive intensity or too-close mounting, not a “broken” light. Re-check hanging height using a fixed measurement, then confirm PPFD with a quantum meter. If you relied on lux readings or a phone app, you could be overestimating actual PAR/PPFD.
How do I handle warranty if I suspect the driver, but the issue might be wiring or settings?
Gather evidence before claiming. Take photos of terminal areas, note whether there is flicker, and confirm what you tested (outlet, timer, direct wall power, driver output voltage if you measured). If the light only fails after using a timer or controller, tell support that detail, since it can affect whether they consider it a compatibility or defect claim.
Next Article
How to Measure Grow Light Intensity: PPFD and Lux Guide
Learn how to measure grow light intensity using PPFD or lux, place the sensor right, map coverage, and adjust LEDs for e