The short answer: you probably should not start at 100%. Most plants need you to work up to full intensity gradually, and many common houseplants and seedlings never need 100% at all. Whether full power makes sense depends on your plant's growth stage, how far the fixture is from the canopy, and whether your setup actually delivers the right amount of usable light at that distance. This guide walks you through all of it so you can make a confident call today.
When Should I Turn My Grow Light to 100%? Rules for Timing

Marcus Tillman
24 Mar 2026
How growth stage changes what your plant needs from your light
Plants have very different light appetite depending on where they are in their life cycle. A seedling just poking out of soil is nothing like a flowering tomato plant, and treating them the same way is one of the most common mistakes beginners make.
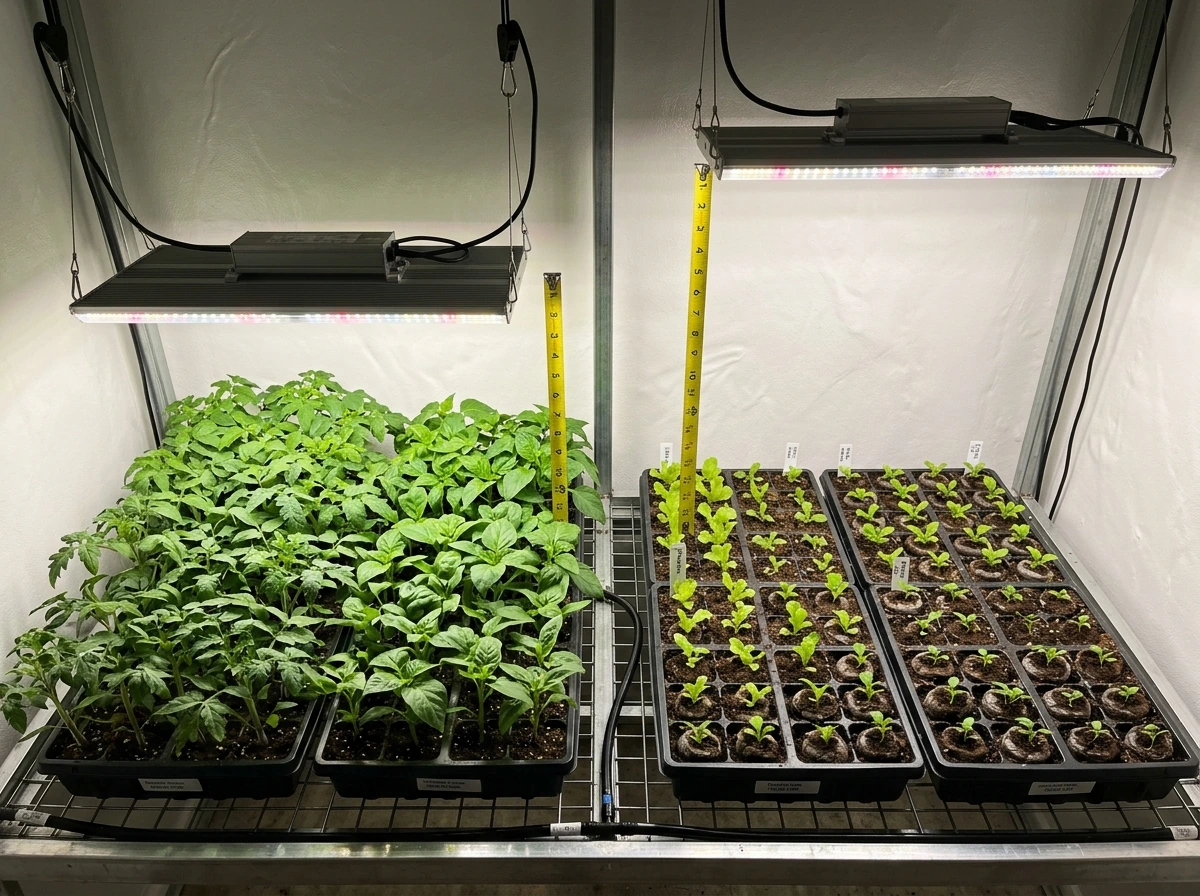
Seedlings and clones are the most sensitive. They have minimal root systems and fragile leaf tissue, so even a modest LED running at 50-60% can cause stress if it's too close, so it's crucial to learn how to use grow light for seedlings safely. If you want the safest starting point, follow a step-by-step approach for how to use grow light correctly, especially for seedlings and houseplants. A safe starting PPFD (photosynthetic photon flux density, which measures the actual usable light hitting your plant) for seedlings is roughly 100-200 µmol·m⁻²·s⁻¹. That's a low number on purpose.
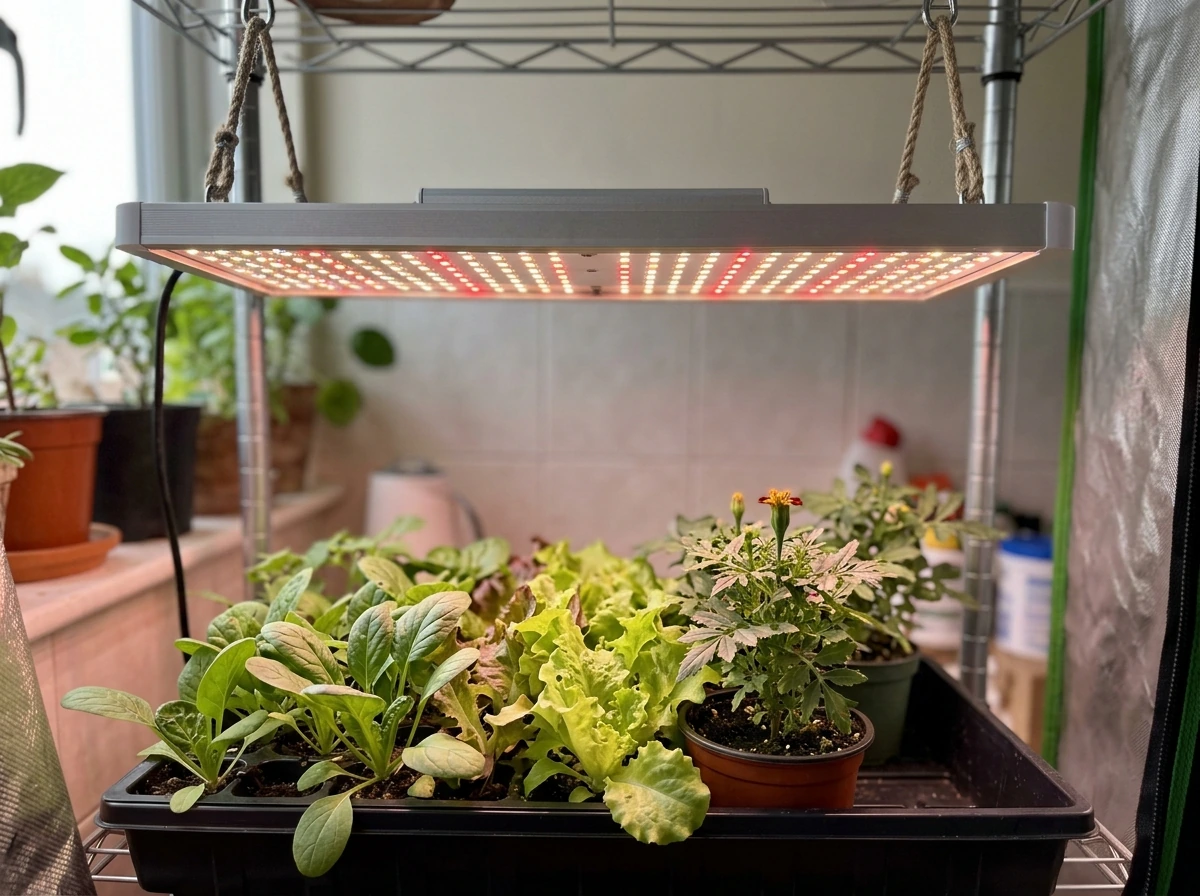
Vegetative plants can handle and benefit from more. Once a plant has established roots and is actively growing leaves and stems, you can push into the 200-600 µmol·m⁻²·s⁻¹ range depending on species. Herbs like basil thrive around 300-500 µmol·m⁻²·s⁻¹. Lettuce does well at 200-300 µmol·m⁻²·s⁻¹ with a 16-hour photoperiod. More light-hungry crops like cannabis in veg typically want 400-600 µmol·m⁻²·s⁻¹.
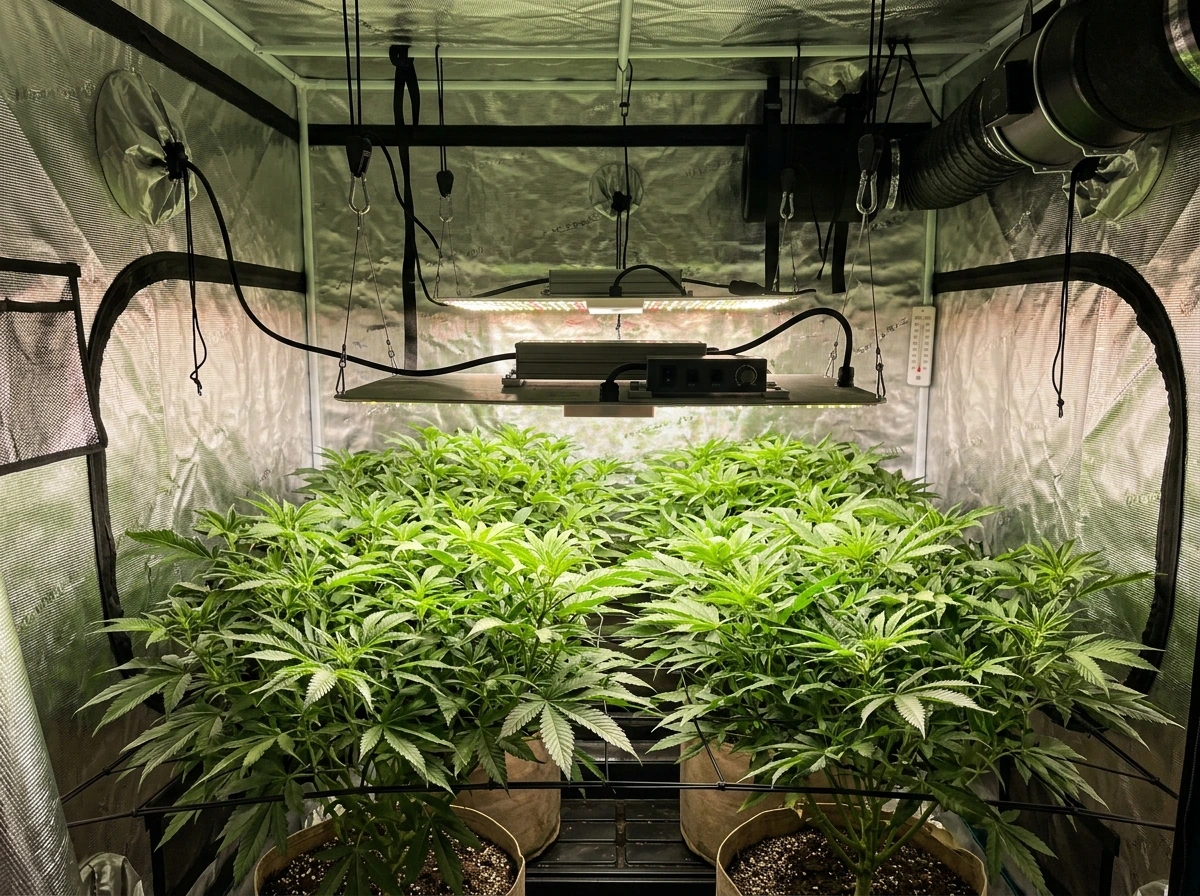
Flowering and fruiting plants generally want the most light. This is when ramping toward or reaching 100% on a well-matched fixture starts to make real sense, especially for high-demand crops. Fruiting vegetables, cannabis in flower, and many blooming plants can use 600-900 µmol·m⁻²·s⁻¹ or higher when conditions support it (good CO2 levels, proper temperature, healthy root zone).
Houseplants are a different category. Most tropical houseplants like pothos, peace lilies, or snake plants are low-to-medium light plants in the wild. They typically want no more than 100-250 µmol·m⁻²·s⁻¹ at the leaf surface. Running a powerful LED at 100% directly over a peace lily is a fast way to bleach it. If you're growing houseplants under supplemental light, check out guidance on using grow lights for houseplants specifically, since those setups are deliberately dialed back from maximum power.
The beginner rule of thumb: when to go to 100% (and when to stay back)
start at 50-60% and only move to 100% once your plant is in an established vegetative or flowering stage AND you've confirmed the light at canopy level is actually within the target PPFD range for that species.
A high-end 600W LED at 100% three inches from seedlings will destroy them. The same light at 100% hanging 36 inches above might deliver a perfectly reasonable 400 µmol·m⁻²·s⁻¹ at canopy level. The percentage setting is just a dial. What matters is the light actually reaching your plants.
When NOT to go to 100%: during germination and early seedling stages (first 1-2 weeks), when your fixture is closer than the manufacturer's minimum recommended hanging height, When NOT to go to 100%: during germination and early seedling stages (first 1-2 weeks), when your fixture is closer than the manufacturer's minimum recommended hanging height, when your plants show any signs of heat or light stress (more on those below), or when you're growing low-light species that simply don't need it. (more on those below), or when you're growing low-light species that simply don't need it.
When it makes sense to go to 100%: you're in mid-to-late veg or flowering with light-hungry plants, the fixture is at the correct hanging height for full power (check your light's manual or manufacturer chart for this), room temperature stays under 85°F, and your plants have been incrementally acclimated to higher intensity over a week or two.
Distance, PPFD, and light spread: the real controls
Intensity control actually has two levers: your dimmer setting and your hanging height. Most growers treat the dimmer as the only control and forget that moving the light up or down is just as powerful. These two work together, and you need to understand both to avoid overdoing it.
Using PPFD as your target number
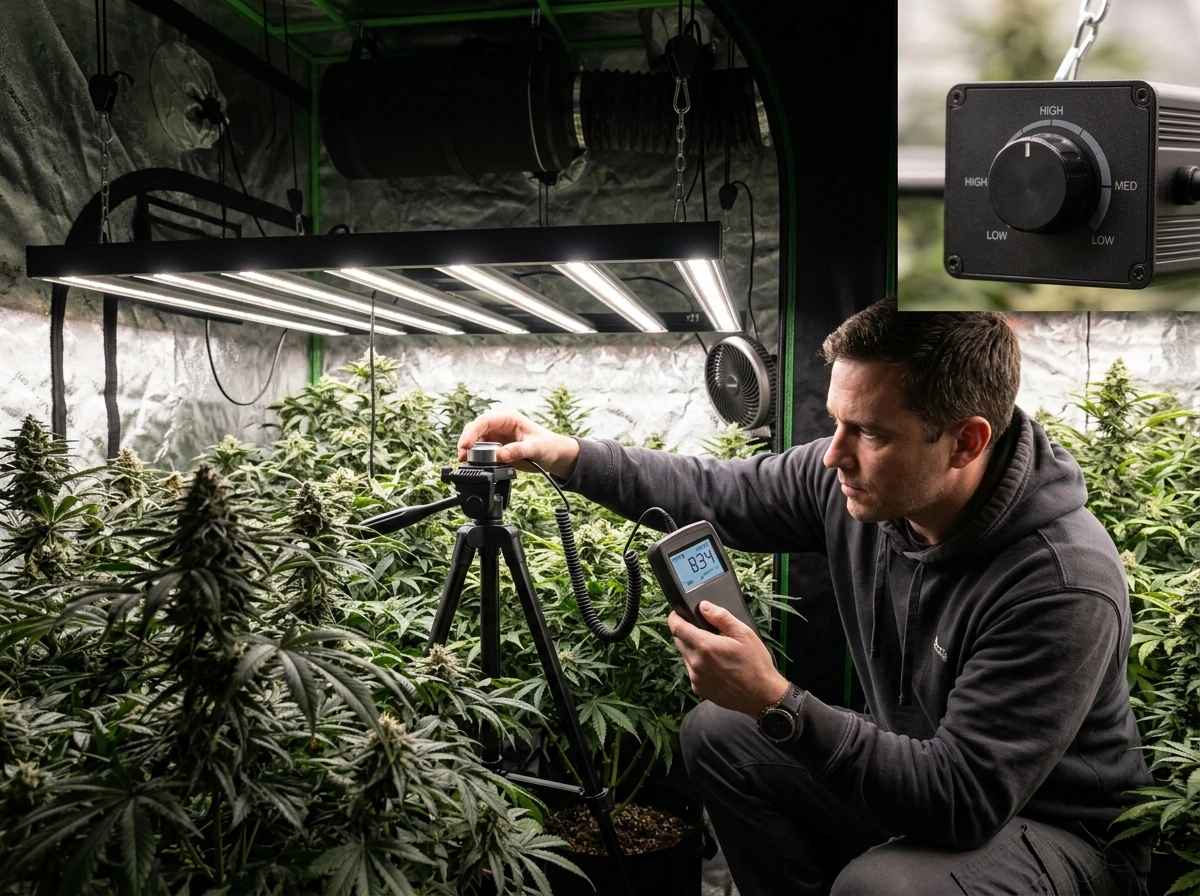
PPFD (µmol·m⁻²·s⁻¹) is the gold-standard measurement for grow light intensity because it measures photons in the wavelength range plants actually use, not just visible brightness to the human eye. If you can get a PAR meter or quantum sensor, taking a reading at canopy level is the most reliable way to know if you're in the right zone. A reading of 200 µmol·m⁻²·s⁻¹ is appropriate for lettuce at 16 hours per day. A reading of 400-500 is solid for herbs and leafy greens in peak veg. Flowering crops typically want 600-900, and some pushed cannabis grows exceed that.
Don't have a PAR meter? You can use foot-candles as a rough proxy. The conversion isn't exact because foot-candles measure light the way human eyes perceive it (photopic weighting) while PPFD counts actual photons plants use. But as a rough guide: 200 µmol·m⁻²·s⁻¹ is approximately 1000-1500 foot-candles, and common light meters or smartphone apps can give you a ballpark. For basil and herb production, you're aiming for roughly 3000-5000 foot-candles at canopy. For lettuce, 1500-2500 foot-candles is a useful target range. These are approximations, not precise conversions, because the actual number depends on your light's spectrum.
Using manufacturer hanging charts when you don't have a meter
Many grow light manufacturers publish PPFD maps or height charts that tell you what intensity you'll get at different distances and power settings. If your light came with one of these, use it. Some charts specifically list the recommended fixture height above the canopy at 100% intensity for different growth stages. This is the most practical no-meter approach: match your growth stage to the chart, hang the light at the listed height, and set power accordingly. If your plant canopy is shorter than expected or you're in an early stage, raise the light or lower the power percentage before anything else.
Light spread and uniformity matter too
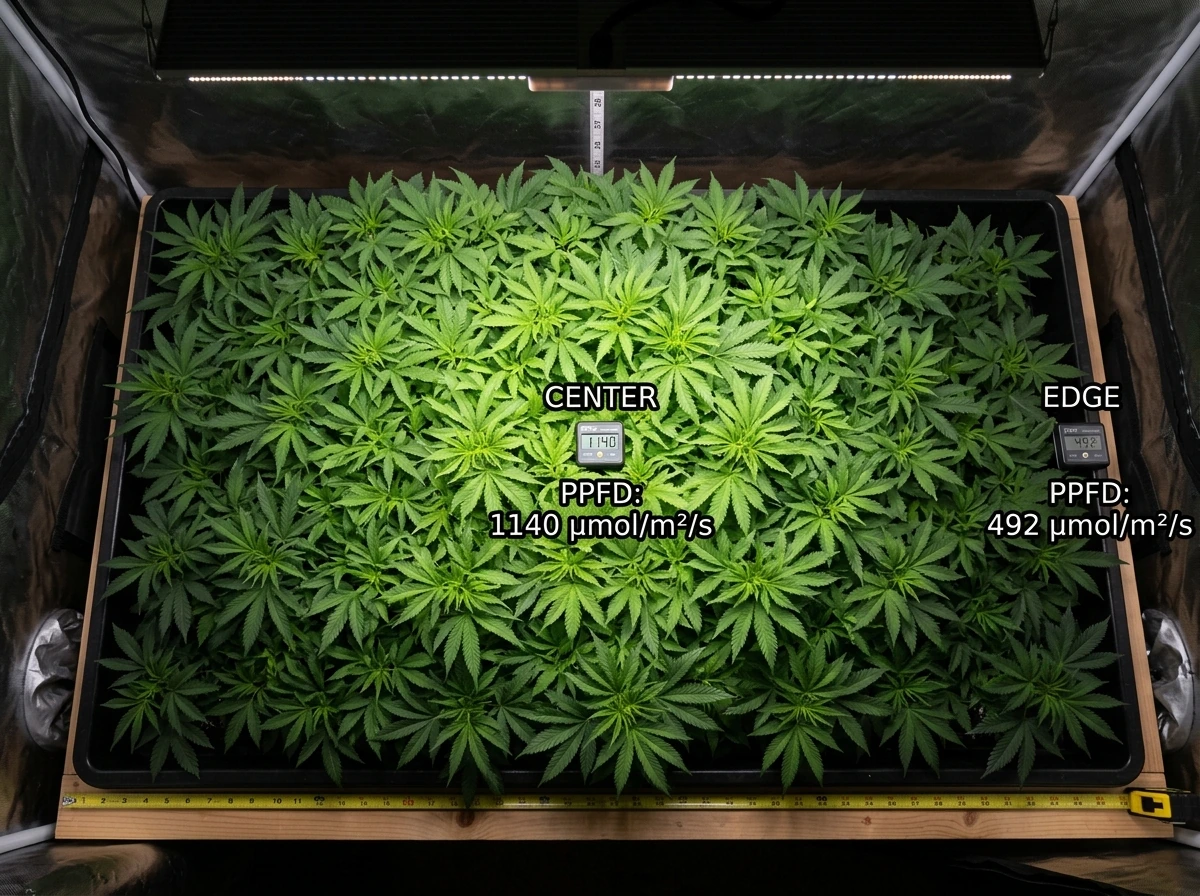
One thing beginners overlook: the center of your canopy gets more light than the edges. If you measure PPFD only in the middle, you might think you're in good shape while the outer plants are struggling. Best practice is to take readings at multiple points (at least the four corners and center of your grow area) to confirm you have reasonably uniform coverage. A single bright hotspot in the middle doesn't mean your whole canopy is well-lit. If uniformity is poor, consider raising the light to widen its footprint, even if that means bumping power up slightly to compensate.
Daily light schedules: how long and how bright
Intensity and duration are connected through a concept called Daily Light Integral (DLI), which represents the total amount of usable light your plant receives in a day. The formula is simple: DLI = 0.0036 × PPFD × hours of light per day. A PAR/PPFD meter measures light intensity in micromoles per second, and the constant 0.0036 converts between PPFD and DLI. This means you can deliver the same DLI with high intensity for fewer hours or lower intensity for more hours. That flexibility is useful.
For lettuce and leafy greens, a minimum DLI of around 12-14 mol·m⁻²·d⁻¹ supports solid production. A PPFD of 250 µmol·m⁻²·s⁻¹ running for 16 hours per day delivers a DLI of about 14.4 mol·m⁻²·d⁻¹, which aligns with what research on lettuce and basil consistently shows as a productive target. You don't need to push intensity to reach that number if you can extend your photoperiod a bit instead.
For vegetative plants, 18-hour photoperiods are common, and DLI targets in the 25-40 range are typical for moderate to high-demand crops. For flowering, most photoperiod plants get switched to 12 hours, which means you need higher PPFD to maintain adequate DLI. That's often the real reason growers push toward 100%: not because the plant needs it in veg, but because the shorter day in flower demands more photons per hour to hit the same daily total.
Should you run 100% all day? Not necessarily. Some growers use a ramped schedule where intensity starts lower at the beginning and end of the photoperiod (mimicking sunrise and sunset) and peaks midday. This can reduce stress, especially in warmer environments where heat accumulates under lights. Even just running at 75% for the first and last hour of your light period makes a difference. That said, timer-based home setups run a flat schedule (same intensity all day), and that works fine as long as your overall PPFD and DLI targets are appropriate.
Dimming and automation for common home setups
Most modern LED grow lights have a built-in dimmer, either a physical knob on the driver or a controller port. Here's how to approach it practically depending on your setup.
Manual dimmer knob (most budget and mid-range LEDs)
- Start your seedlings or new transplants at 50-60% power with the light at the manufacturer's recommended seedling height.
- After 5-7 days with no stress signs, bump to 70-75%.
- After another 5-7 days, move to full vegetative power (which may be 80-100% depending on your hanging height and target PPFD).
- If you're entering a flowering stage with a 12-hour photoperiod, this is typically when 100% makes the most sense for high-demand crops.
- Re-check canopy temperature after any increase. If leaves feel warm to the touch or air temp under the light exceeds 85°F, raise the fixture before cranking power.
App-controlled or smart controller setups (AC Infinity, Mars Hydro, etc.)
Brands like AC Infinity offer controller units that can automate intensity schedules, including timed ramp-up and ramp-down curves. If you have this type of setup, take advantage of it. A schedule that ramps from 40% to 100% over two hours at lights-on, holds 100% for the middle of the day, then drops back down before lights-off is genuinely useful for plant health and power efficiency. One important note: if you're trying to control a third-party light with a smart controller, check compatibility first. Different manufacturers use different dimming protocols, and the wrong adapter will give you no control or erratic behavior.
Basic timer-only setups (no dimmer)
If your light has no dimmer at all, your only tools are hanging height and photoperiod length. Raise the light to reduce intensity and shorten or lengthen your day length to hit your DLI target. This is a workable approach, just less flexible. If you're running seedlings under a non-dimmable fixture, raise it significantly higher than the veg recommendation (often 24-36 inches) and use a 14-16 hour schedule instead of a more intense shorter one.
How to tell if you're overdoing it or underdoing it
Your plants will tell you what's wrong if you know what to look for. Here's a practical breakdown of the most common signs and what to do immediately when you spot them.
Signs of too little light (under-lighting)
- Stretching or etiolation: stems get long and leggy as the plant reaches for more light
- Slow growth: leaves are small, growth rate is noticeably sluggish
- Pale or yellowing lower leaves: plants may drop older leaves when they're not getting enough photosynthetic return
- Seedlings flopping over: weak stems that can't support themselves often signal insufficient light intensity
What to do: lower the fixture by a few inches, increase power by 10-15%, or extend your photoperiod by 1-2 hours. Introduce changes one at a time so you can see what's actually working. Stretching seedlings specifically benefit most from lowering the light rather than extending hours, since long photoperiods can cause their own issues.
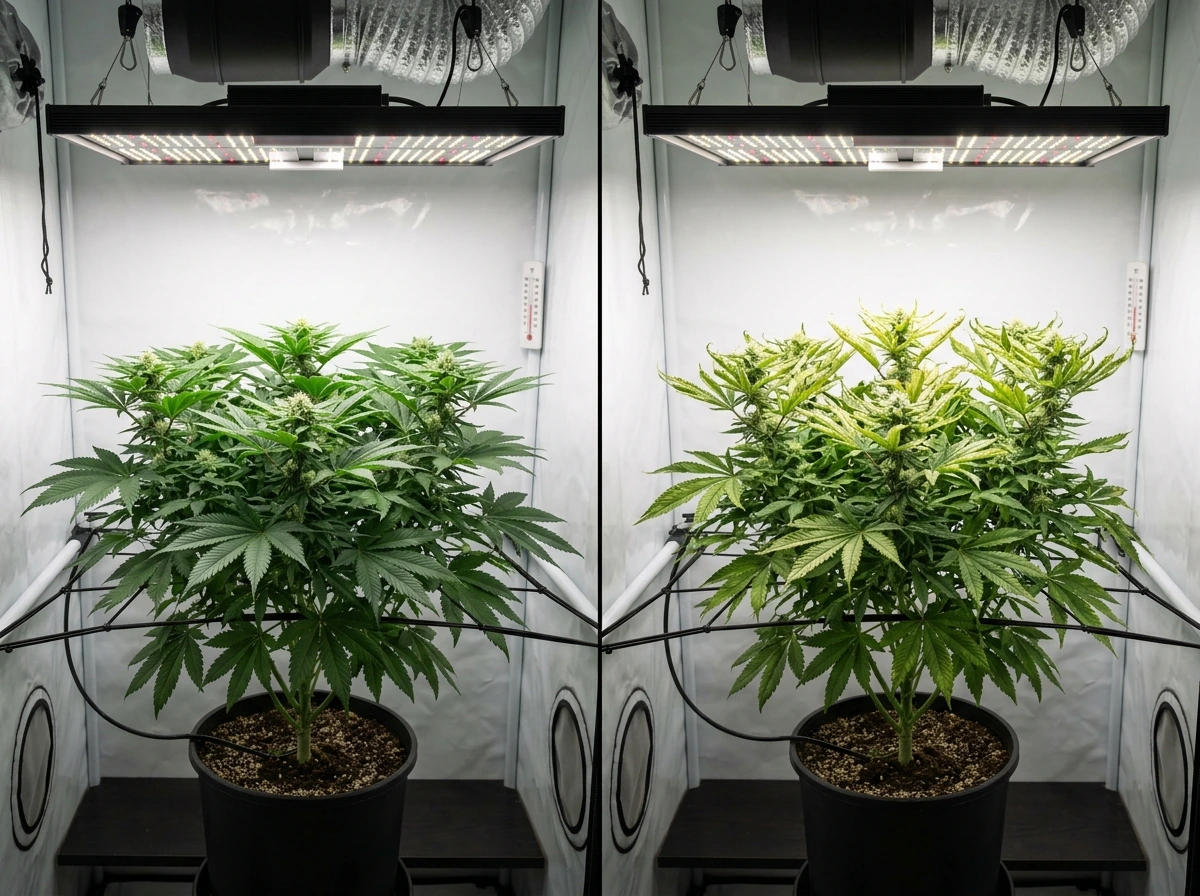
Signs of too much light (over-lighting)
- Leaf bleaching or whitening near the top of the canopy: chlorophyll is being destroyed by excess photons
- Leaf curl or 'taco-ing': leaves curl upward along the edges as a stress response to protect themselves
- Crispy or burned leaf tips: especially on newer growth closest to the light
- Stunted growth despite good nutrition: plants can actually stall when light is too intense because photosynthesis becomes saturated and photorespiration increases
- Leaves pointing or angling away from the light: the plant is physically trying to reduce its exposure
What to do immediately: raise the fixture 3-6 inches, drop power by 15-20%, or both. Do not just shorten the photoperiod as a first response, because you may drop your DLI too low trying to compensate for excessive intensity. Fix the intensity first, then dial in the schedule. Give the plant 3-5 days to show improvement before making another change.
A side-by-side reference
| Symptom | Likely cause | First fix |
|---|---|---|
| Stretching toward the light | Too little intensity or light too far away | Lower fixture 2-4 inches or increase power 10-15% |
| Pale, slow-growing leaves | Under-lighting or short photoperiod | Extend photoperiod 1-2 hours or raise intensity slightly |
| Bleached white patches on top leaves | Too much intensity at canopy | Raise fixture 3-6 inches or reduce to 75-80% |
| Leaf edges curling upward (tacos) | Light stress or heat stress from excess intensity | Raise fixture, check temp under light, reduce power |
| Burned or brown crispy tips | Intense heat or light burn on newest growth | Raise fixture immediately, check for heat buildup |
| Growth stalling despite correct schedule | PPFD too high causing photoinhibition, or heat above 85°F | Raise fixture, reduce power, improve air circulation |
Putting it all together: a practical starting framework
If you take nothing else from this guide, use this process. Check your plant's growth stage. Look up the PPFD range recommended for that stage and species. Check your fixture's manufacturer chart to find the hanging height that delivers that PPFD at your chosen power level. Set that height and start at 50-60% power if you're introducing plants to the light for the first time. Ramp up by 10-15% every 5-7 days while watching your plants. Reach 100% only when your setup confirms you're delivering the right PPFD range for your stage, your plants show no stress, and your canopy temp stays below 85°F.
Full power is not a goal. It's just one point on a dial. Your actual goal is delivering the right DLI for your plant's growth stage, and you can reach that with many combinations of intensity, distance, and photoperiod. The growers who get the best results aren't the ones who push their lights hardest. They're the ones who actually measure what's reaching their canopy and adjust accordingly.
FAQ
If I start at 50 to 60%, how fast should I increase power before trying 100 percent?
Use small steps and give the plant time to respond. A practical approach is raising intensity by about 10 to 15 percent every 5 to 7 days, then re-checking canopy conditions (leaves posture and any bleaching) and, if possible, your PPFD at canopy level. If you see stress, pause the ramp and correct the intensity or height first.
Can I tell when I should stop increasing and avoid going to 100 percent even if the plant is growing well?
Yes. If your new growth is healthy but you notice slow leaf expansion, edge curling, or persistent pale or “washed” leaf color, that can be early light stress even before obvious wilting. In that case, keep the current intensity, improve air movement, and confirm PPFD near the leaf surface rather than assuming “growth means more light is fine.”
What should I do if my fixture chart says 100 percent is safe, but my plants still look stressed?
Assume your real conditions differ from the chart. Most charts are based on specific fixture models, spacing, and room heat. First verify the hanging height matches the chart precisely, then check distance-to-canopy while accounting for plant height changes. Next, reduce power 15 to 20 percent or raise the light 3 to 6 inches, and wait 3 to 5 days to evaluate before making another adjustment.
Is it possible that I’m at 100 percent but my plants are actually under-lit?
Definitely. Hotspots at the center can fool you, and dimmers or older drivers can deliver less output than expected. Without a PPFD or at least multiple foot-candle readings at corners and edges, you can end up with a range where the middle is fine but the outer canopy is under the target. Measure multiple points, or use the manufacturer PPFD map if provided.
Should I run 100 percent for fewer hours in the day instead of running a lower intensity all day?
Often you can, because DLI is what ties intensity to results. If you raise PPFD, keep an eye on heat and leaf stress, and then reduce hours to match your target daily total. The key is to avoid swapping one problem for another, so adjust intensity and duration together and re-check plant response over several days.
Do temperature and heat buildup change when I should use 100 percent power?
Yes. If canopy temperature is close to your upper comfort limit, you may need to stay below 100 percent even when PPFD targets suggest otherwise. Use a reliable thermometer at canopy height, and prioritize keeping canopy temp under 85°F. If your room runs warm, a ramped schedule can help reduce peak stress even if the midday peak reaches 100 percent.
What if I don’t have a PAR meter, can I still confidently choose when to go to 100 percent?
You can make a reasonable decision using foot-candles as a proxy and by matching the manufacturer’s height charts, but treat it as a ballpark. Measure at canopy height in multiple locations (center plus corners). If your readings are uneven or far below typical targets for your crop, do not jump to 100 percent, even if the dimmer is capable.
How do I adjust when my canopy is uneven, some plants are taller than others?
Try to control for the canopy level before adjusting power. If tall plants shade shorter ones, your “average” readings can look fine while the shorter plants underperform. Consider spacing plants, raising or lowering the light to the more sensitive canopy area, or splitting them into separate trays or zones so each gets its intended PPFD.
Is 100 percent ever appropriate for houseplants, or should I always stay below it?
For most low-to-medium light houseplants, staying well below maximum is usually safer, even if they seem tolerant. A better approach is to target the appropriate PPFD range at the leaf surface (commonly around the low-to-mid hundreds for many tropicals) and use height changes rather than repeatedly forcing the dimmer to 100 percent. If you do experiment with higher intensity, acclimate over a couple of weeks and avoid placing the light directly overhead.
My seedlings look stretched, should I immediately go to 100 percent to fix it?
No, stretching is not always a signal that you need maximum intensity. It can be caused by insufficient light, but it can also be caused by photoperiod or general conditions. First raise the light closer within safe limits (or lower intensity only if you also see bleaching), then aim for the low seedling PPFD range and keep the first changes gradual. If you shorten the photoperiod as a first move, you might drop DLI too far and worsen the issue.
Next Article
What Is the Red Light For on a Grow Light?
Learn what the red channel on grow lights does, how to schedule it by plant stage, and fix common misuse issues.