If your houseplants are stretching toward the window, putting out tiny pale leaves, or just sitting there doing nothing for months, the problem is almost always light. The good news is that a grow light can fix it, and setting one up correctly is not complicated once you know the actual numbers and rules. This guide walks you through deciding whether you need one, picking the right type, mounting it at the right distance, setting a schedule, and avoiding the most common mistakes that kill houseplants under grow lights.
How to Use a Grow Light for Houseplants: When and Setup

Marcus Tillman
24 Mar 2026
Does your houseplant actually need a grow light?
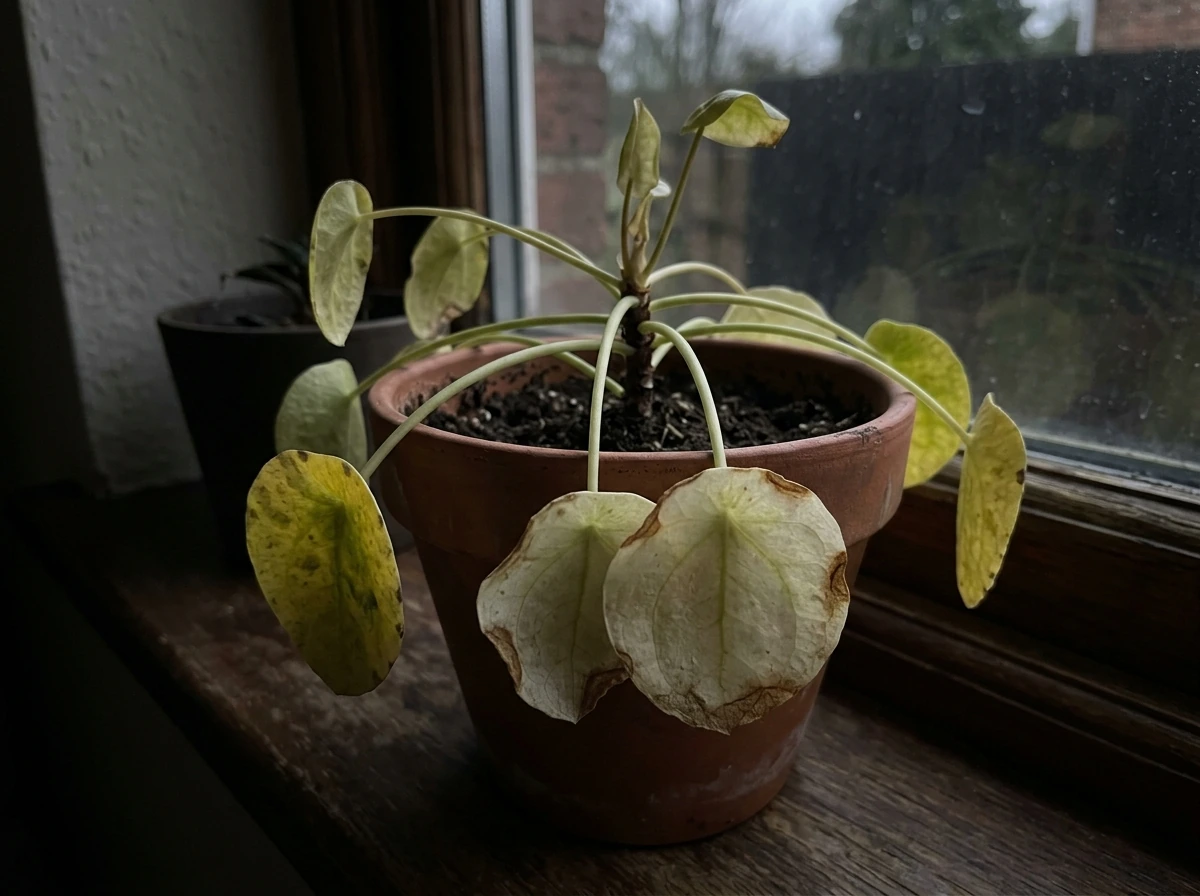
Before spending money on equipment, it helps to know what insufficient light actually looks like. The University of Maine Extension lists the classic symptoms: yellowing leaves (especially older ones), leaf drop, weak and spindly new growth, new leaves that are noticeably smaller than older ones, and, for flowering plants, buds that fail to develop or simply drop off. The most obvious sign is etiolation, which is when stems grow long and stretched with large gaps between leaves. Succulents show this dramatically, leaning and reaching toward any light source they can find.
Other symptoms are subtler. Illinois Extension points out that a lack of light can cause browning leaf tips and loss of the plant's normal color, which people often misread as an overwatering or fertilizer problem. If you have tried adjusting your watering and your plant still looks washed out or stunted, light is worth investigating first.
The practical decision point is simple: if your plant is more than a few feet from a window, in a north-facing room, or you are heading into fall and winter when outdoor light drops significantly, supplemental lighting is likely going to make a real difference. Low light indoors is typically measured at 25 to 100 foot-candles, according to the University of Maryland Extension. Even "low-light" plants like ZZ plants, snake plants, and peace lilies can benefit from supplemental light, and Penn State Extension notes that those same plants often do best with bright indirect light even if they tolerate dim conditions.
Choosing the right grow light type and specs
For houseplants, you do not need a complicated or expensive setup. Most people will do well with one of three options: LED panels, LED strip lights, or compact fluorescent (CFL) bulbs in a standard fixture. Here is how they compare for typical indoor use.
| Light Type | Best For | Energy Use | Heat Output | Typical Cost | Lifespan |
|---|---|---|---|---|---|
| LED Panel | Multiple plants, shelving setups | Low | Very low | $$–$$$ | 50,000+ hours |
| LED Strip Light | Single shelves, under-cabinet use | Very low | Very low | $–$$ | 30,000–50,000 hours |
| Full-Spectrum CFL Bulb | Single plants, small areas | Medium | Moderate | $ | 8,000–15,000 hours |
| T5 Fluorescent Tube | Wide shelf coverage, multiple plants | Medium | Low-moderate | $$ | 20,000–30,000 hours |
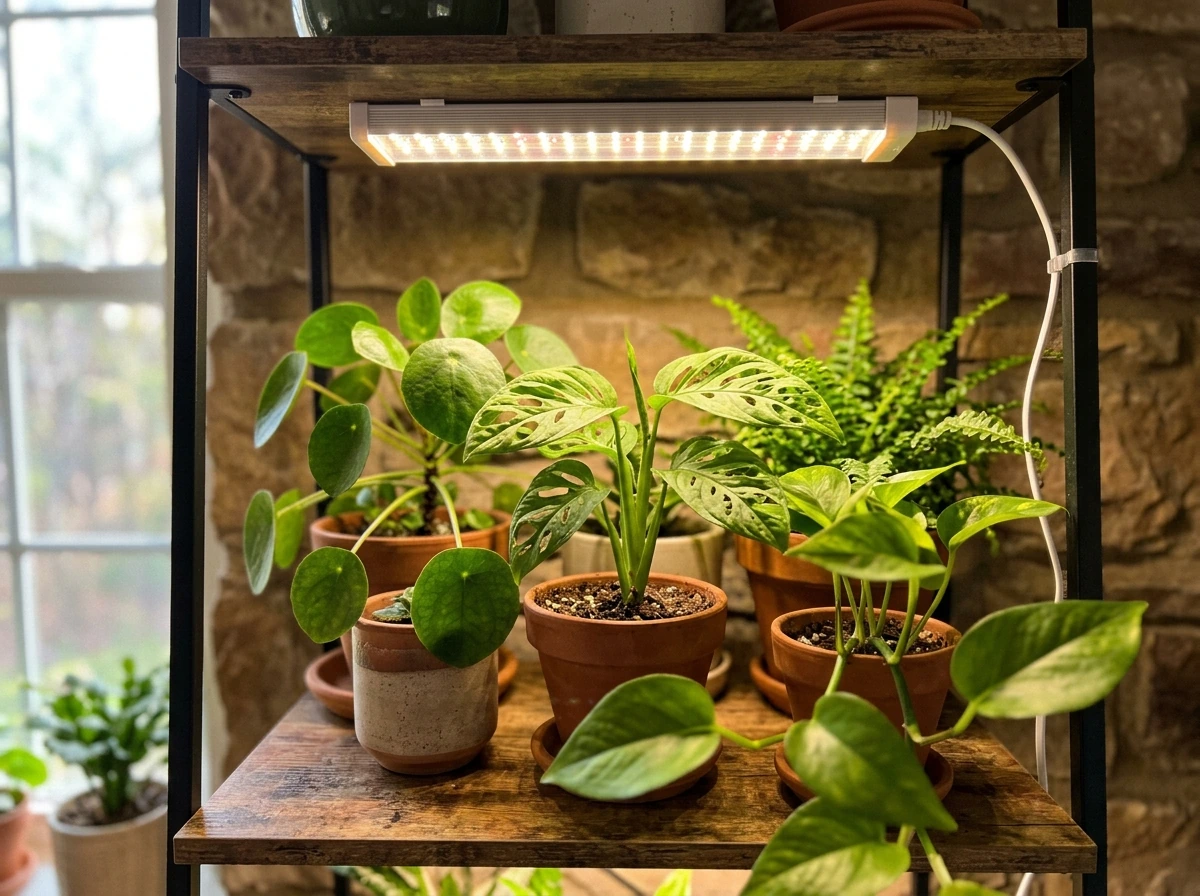
For most people growing houseplants, a full-spectrum LED panel or LED strip is the practical choice. LEDs run cool, use very little electricity, and last for years. Full-spectrum lights cover both the blue wavelengths that support leafy, compact growth and the <span>red wavelengths that matter for flowering</span>. If you want to dig deeper into how specific light spectrums affect your plants, our guide on how to use full-spectrum grow lights covers that in detail.
For specs, look for a light rated in PPFD (micromoles per square meter per second). For typical foliage houseplants, you want to hit somewhere in the range of 100 to 200 PPFD at the canopy level. Succulents and cacti sit at the lower end of that range. Most budget LED panels sold for houseplants will hit those numbers at the distances recommended below, so you do not need to obsess over specs if you are buying from a reputable brand.
The key is matching the fixture size to the area you are trying to cover, so a small clip-on LED works for a single plant on a desk, while a shelf of six to ten plants needs a longer panel or tube fixture.
Where to place grow lights for best coverage
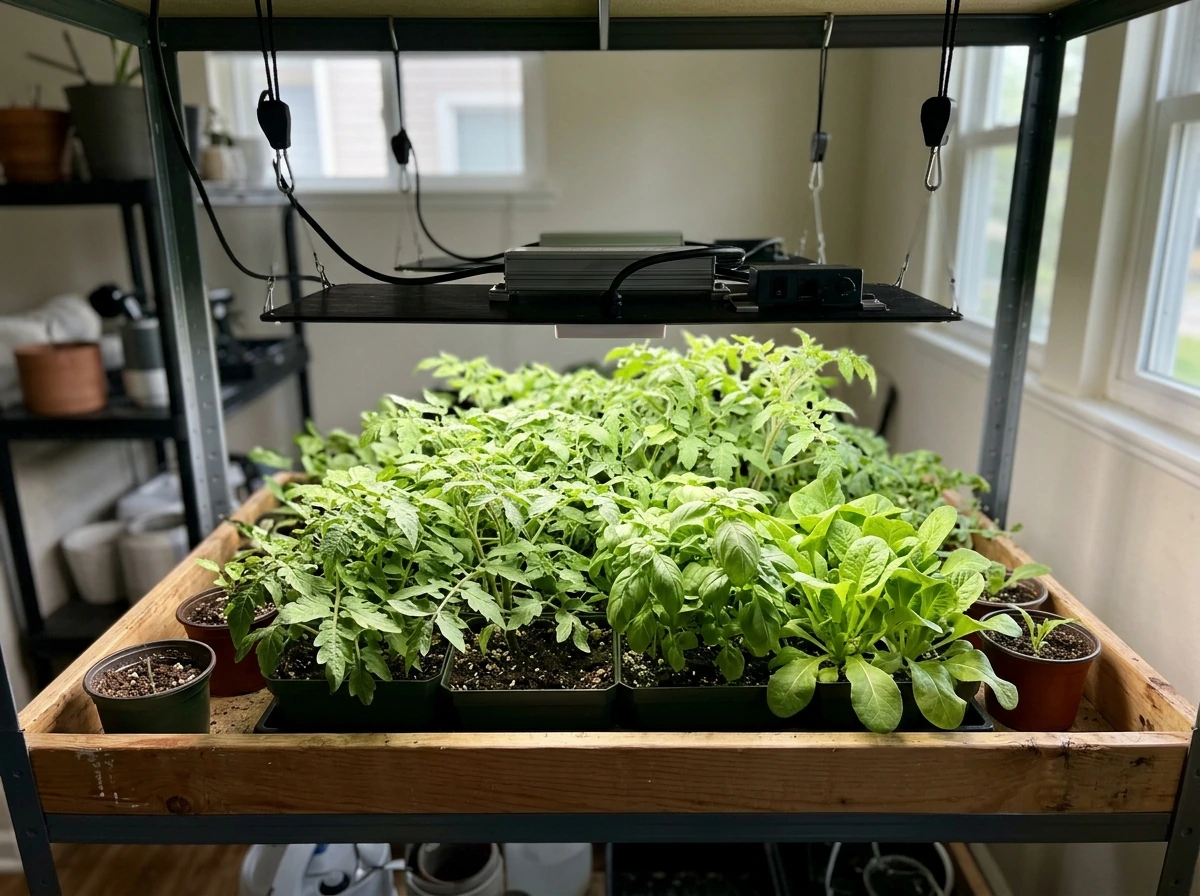
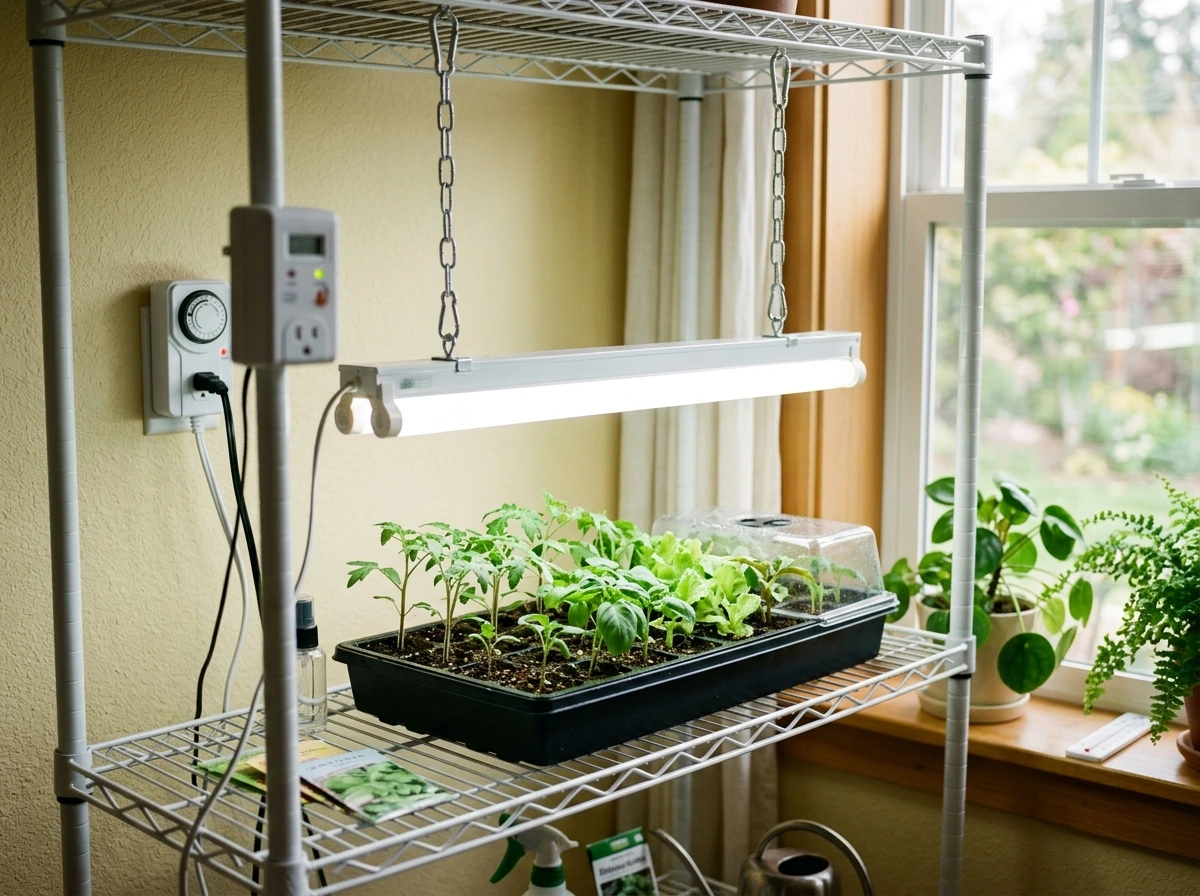
Position your grow light directly above the plant canopy, centered over the area you want to illuminate. Lighting from above mimics the natural direction of sunlight and helps plants grow upright rather than leaning. If you have a single plant on a shelf or desk, a clip-on light centered over it works perfectly. For a group of plants on a shelf, a bar-style fixture or T5 tube running the full length of the shelf gives much more even coverage than a small spotlight.
One thing to watch for is edge coverage. Plants sitting at the far ends of a shelf often get noticeably less light than those directly underneath the fixture. The University of Missouri Extension recommends using supplemental spotlights for taller plants or ones at the periphery of your setup. Rotating your plants every couple of weeks is the low-effort version of this, making sure every side gets equal exposure over time.
Avoid placing lights off to the side of plants. A light that shines at an angle causes uneven growth and can trigger the same leaning behavior you were trying to fix. Overhead and centered is the rule.
How far to mount the light above your plants
Distance is the single biggest variable in getting grow lights right. Light intensity drops off rapidly as you move the fixture farther away, and this applies equally to grow lights as to any other source. Mount it too close and you risk leaf burn; too far and your plants get the same weak light they had before.
The University of Missouri Extension gives a practical starting point: place plants 6 to 12 inches from the light source for typical indoor houseplant setups. That said, the exact distance depends on the power of your specific fixture. A high-output LED panel needs to be kept farther away than a small strip light. Most budget grow lights sold for houseplants include a recommended distance range from the manufacturer, and that is a reasonable starting point. From there, you dial it in by watching your plants.
Here is a quick reference for where to start based on light type and plant sensitivity:
| Plant Type | Light Sensitivity | Starting Distance from Canopy |
|---|---|---|
| Succulents and cacti | Moderate to high light need | 6–10 inches |
| Tropical foliage (pothos, philodendron) | Medium | 10–18 inches |
| Low-light plants (ZZ, snake plant, peace lily) | Low to medium | 12–24 inches |
| Flowering houseplants | Medium to high | 8–14 inches |
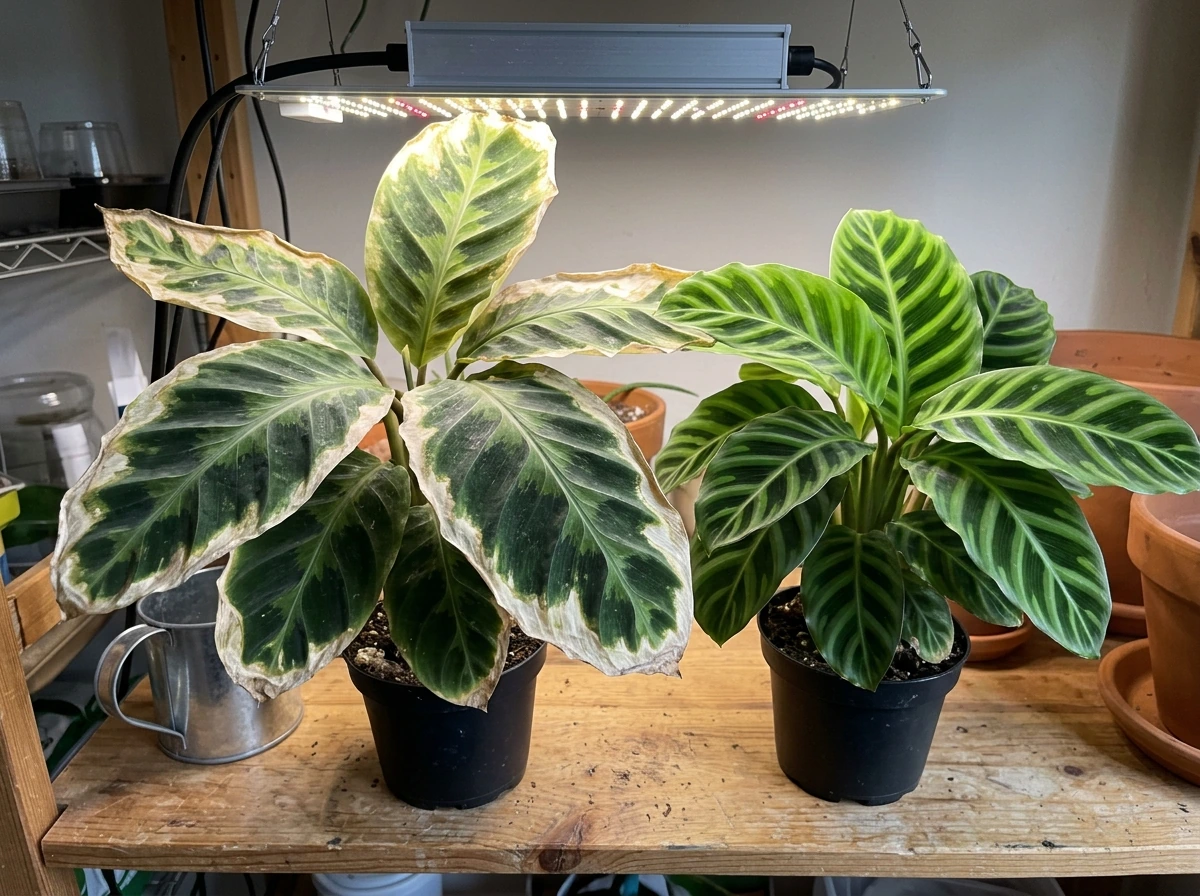
Check new growth after two weeks. If leaves are small and pale or stems are stretching, move the light closer. If leaf edges look bleached, scorched, or papery, move it farther away. The University of Maryland Extension notes that pale or brown leaves are a clear sign of too much light intensity, and distance is the fastest fix.
How long to run your grow light each day
Plants need a dark period just as much as they need light. The University of Maryland Extension is direct about this: illuminate your plants for no more than 16 hours per day in total, counting any natural light they receive. Running lights around the clock is not only wasteful, it actually stresses plants and can disrupt flowering cycles.
Here are the photoperiod targets recommended by the University of Minnesota Extension, which are a reliable baseline for common houseplants:
- Foliage houseplants (pothos, ferns, philodendrons, snake plants): 12 to 14 hours of light per day
- Flowering houseplants (African violets, orchids, anthuriums): 14 to 16 hours of light per day
- Succulents and cacti: 12 to 14 hours per day is usually sufficient
How much of that time the grow light needs to run depends on how much natural light your plants already receive. The University of Missouri Extension breaks it down clearly: if your plants get no outdoor light at all, run the grow light for 16 to 18 hours per day. If they get some natural light from a window, 12 to 14 hours of supplemental light per day is usually enough. Illinois Extension adds a hard ceiling: do not exceed 16 hours of light exposure total.
If you are growing photoperiod-sensitive plants like poinsettias or Christmas cacti, keep in mind that day length controls flowering for these species. Michigan State University Extension notes that poinsettias begin flowering around 12 hours or fewer of light per day. If you accidentally give them too many hours, you will delay or prevent flowering entirely.
Setting up timers, dimmers, and day-to-day safety
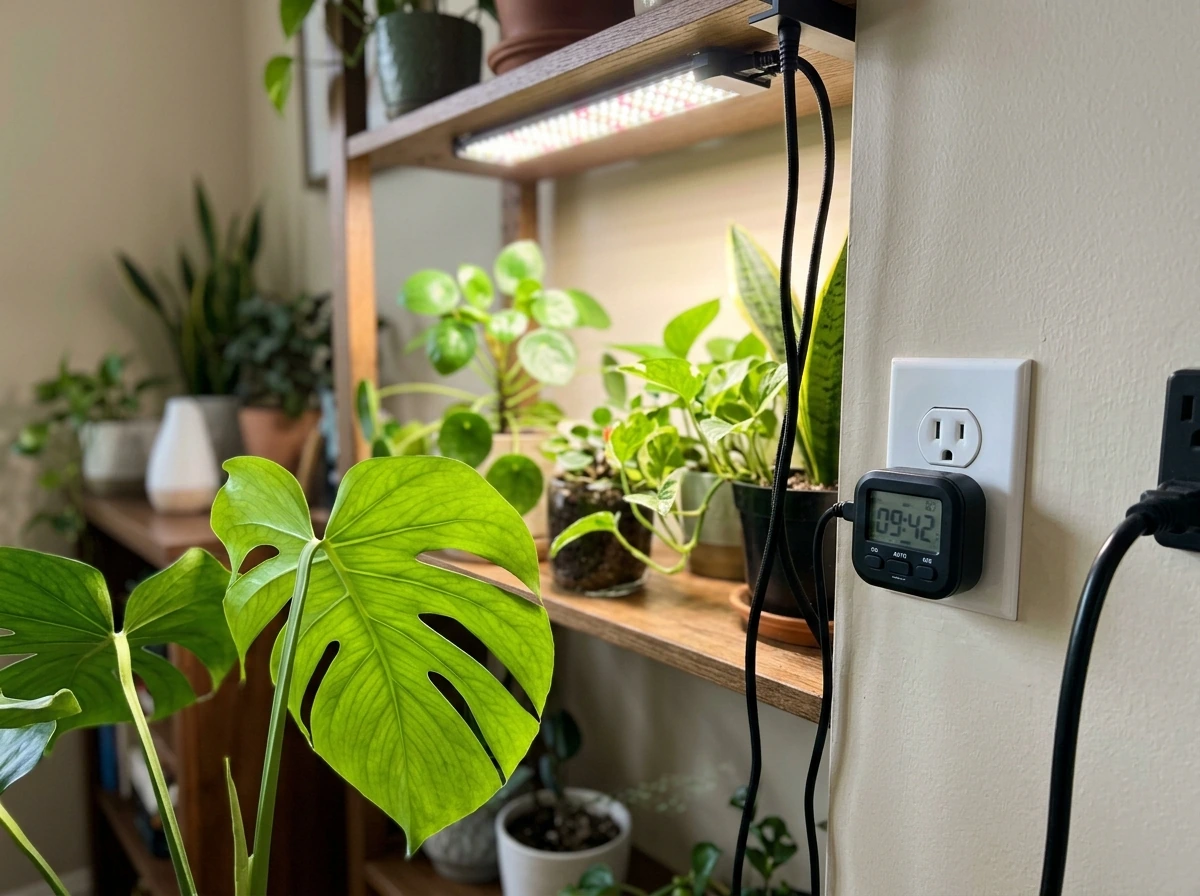
Use a timer, always
A plug-in mechanical or digital outlet timer is the best five-dollar investment you can make for a grow light setup. Without one, it is nearly impossible to run consistent hours, and inconsistent photoperiods confuse plants and slow their growth. Set the timer to turn the light on in the morning and off in the evening, aligning it roughly with your household daytime. If your plants get some window light, time the grow light to run during or just after the natural daylight window to extend their light period smoothly.
Use a dimmer if your light supports it
If you bought a grow light with a built-in dimmer, start at 50 to 75 percent intensity for the first week or two, then gradually increase to your target level. The University of Maryland Extension recommends a gradual approach when increasing light exposure to avoid scorching, and this applies equally when using a new grow light. Jumping a plant from low ambient light to full grow-light intensity overnight is a recipe for bleached or burned leaves.
Watch for heat buildup
Most modern LED grow lights run cool enough that heat is rarely a problem at normal distances. However, CFL and HID fixtures can get warm, and any fixture placed too close to a plant canopy can create localized heat stress even if the light intensity itself is appropriate. UC IPM notes that leaf scorch can result from excess heat as well as excess light, so if you notice curling or browning on leaves closest to the light, check the temperature at canopy level with your hand. If it feels uncomfortably warm after 30 seconds, raise the fixture.
Start slow when introducing a new light
Even if you are confident in your distance and schedule, it is smart to introduce any new grow light gradually. Run it for 8 hours per day for the first week, then increase by 2 hours per week until you hit your target schedule (best grow light schedule 1). If you are wondering where to buy grow lights, start with reputable indoor gardening retailers or trusted online marketplaces where to buy grow lights schedule 1. This mirrors the gradual acclimation approach the University of Maryland Extension recommends for moving plants into more light, and it gives your plants time to adjust their leaf chemistry before you hit them with full intensity.
Troubleshooting common grow-light problems
Even with the right setup, things do not always go perfectly at first. Here is how to read what your plant is telling you and what to change.
| What You See | Likely Cause | Fix |
|---|---|---|
| Leaves bleached, pale, or papery at edges | Too much light intensity | Raise the fixture 4–6 inches; reduce dimmer setting if available |
| Stems stretching long, leaves spaced far apart (etiolation) | Not enough light reaching the plant | Lower the fixture or increase hours; check that the light is centered over the plant |
| New leaves smaller and lighter green than usual | Light too far away or too few hours | Move fixture closer; add 1–2 hours to daily schedule |
| Leaf tips or margins browning | Heat stress or excess intensity | Raise fixture; check canopy temperature; switch to LED if using CFL |
| Flowering plant won't bloom | Insufficient hours or wrong spectrum | Increase to 14–16 hours/day; ensure light has adequate red spectrum |
| Plant looks healthy but grows very slowly | Too few hours or too low intensity | Verify timer is working; try adding 2 hours/day or lower the fixture slightly |
| Leaves yellowing and dropping (especially older leaves) | Not enough light overall | Increase duration and/or reduce distance; reassess window light contribution |
The most important habit to build is checking your plants once a week and looking specifically at new growth. New leaves are your clearest feedback loop. Healthy new growth that matches or exceeds the size of older leaves means the light level is right. Smaller, paler, or deformed new growth means something needs to change, and distance is almost always the first thing to adjust.
One mistake a lot of beginners make is changing too many variables at once. If you adjust distance, schedule, and intensity all in the same week, you have no idea which change helped. Make one adjustment at a time and give the plant 10 to 14 days to respond before changing anything else. It feels slow, but it is the only way to actually learn what your specific plant needs.
If you are also using grow lights for seedlings or starting plants from cuttings, the distance and duration rules are different from mature houseplants, and that setup gets its own treatment. But for established houseplants, the framework above covers the vast majority of what you will ever need to adjust. If you want step-by-step instructions for using grow lights, follow the full article on how to use grow light and then fine-tune the setup based on your plant’s response.
Get the light centered overhead, start at 6 to 12 inches, run it for 12 to 14 hours on a timer, and watch your plants as you learn how to use grow light for seedlings. They will tell you the rest.
FAQ
Do I need to measure PPFD, or can I go by distance and plant response alone?
If you buy a reputable LED panel, you can usually skip PPFD measurement and use the distance targets (often 6 to 12 inches) plus the weekly visual check. Only consider PPFD if you are stacking lights, trying to standardize output for multiple shelves, or using very weak/unknown fixtures where the manufacturer specs may be unreliable.
How do I tell the difference between too much light and too much water when my leaves look stressed?
Look at the pattern and new growth. Light issues usually show pale, bleached, or scorched areas and stunted or deformed new leaves, while overwatering more often causes persistent wilting plus soft, translucent tissue and widespread decline. Also check whether stress is strongest directly under or closest to the lamp, which points to intensity or heat.
Can I leave the grow light on longer than the recommended hours to “speed up” growth?
Usually no. More hours does not automatically equal faster growth, and it can increase stress or disrupt flowering for photoperiod-sensitive plants. A practical ceiling is 16 hours total including natural light, and if you want more growth, adjust distance or intensity first rather than exceeding the photoperiod limits.
What should I do if my plant has been stretching for months, then I add a grow light immediately?
Acclimate gradually. Start with shorter daily runtime or lower intensity (if your light has a dimmer), then increase over 1 to 3 weeks while monitoring new growth. The stretched leaves may never fully recover, but new growth should become shorter and greener once the light is right.
Do I need to rotate plants, or is overhead lighting enough to prevent uneven growth?
Overhead centered lighting greatly improves uniformity, but rotation still helps for shelves, corners, and larger setups where edges receive less intensity. A good routine is rotating the plants every couple of weeks, especially those at the far ends of the illuminated area.
Is it better to use one strong light or two weaker lights spaced out?
Two weaker lights can work better for a larger group because they improve edge coverage and reduce hotspots. If you use multiple lights, avoid overlapping so much that you create intense peaks near the center, and keep the fixture heights consistent so the entire canopy receives similar intensity.
Should the grow light be positioned higher if my leaves are touching it?
Yes, raise it or back it off immediately if leaves are close enough to risk heat or bleaching. Even LEDs run cool compared with many bulbs, leaf tissue can still scorch if intensity is too high at that distance. Use the “papery or bleached edges” sign as your cue to increase distance.
My plant leans away from the light even with the grow light centered. What causes that?
Leaning despite centered overhead usually means uneven intensity, the fixture is too wide compared with the canopy, or the plants are not actually directly under the brightest portion. Check that the canopy sits within the central coverage area, then ensure the light is not mounted at an angle or obstructed by shelves or blinds.
How do I choose a timer schedule if I live somewhere with very cloudy winters?
Treat it like a baseline adjustment process. Start within the recommended range (for many houseplants, 12 to 14 hours supplemental if there is some window light, up to 16 to 18 if there is essentially none), then fine-tune by observing new leaf size and color after 2 weeks. Keep the total photoperiod consistent day to day with the timer.
Will a grow light help plants like ZZ and snake plants if they are already “tolerant of low light”?
Yes, but the effect may be slower and subtle. Even plants that survive dim conditions often look better with brighter supplemental light, especially for producing sturdier, more regular new growth and maintaining color. Expect more noticeable improvement in winter than summer.
Can I use a grow light for variegated plants, or will the extra light reduce their markings?
Variegated plants generally benefit from supplemental light, but they can also scorch more easily if the light is too intense. Start at a slightly greater distance than you would for fully green plants, then move closer only if new growth remains small or pale.
What’s the fastest way to troubleshoot if results are not improving after setup?
First, confirm distance and schedule consistency (use a timer). Then make only one change and wait 10 to 14 days, focusing on distance before intensity. If growth is still pale and stretched, the light is often too far or too short on daily photoperiod, while browned or bleached leaf edges often mean it is too close or too intense.
Next Article
How to Use Grow Light for Seedlings Step by Step
Step-by-step setup for seedling grow lights, schedules, placement, troubleshooting, and DIY safe options for compact gro