If you're holding a Yoyomax grow light and can't find a proper manual, you're not alone. Yoyomax doesn't publish a detailed owner's manual on their website, and what comes in the box is usually a thin sheet of basic instructions that skips over everything you actually need to know. This guide fills that gap. It covers how to identify your specific model, how to install and mount it safely, how to run it day-to-day, and how to troubleshoot the most common problems so your plants actually grow.
Yoyomax Grow Light Manual: Setup, Controls, Timers, Troubleshooting

Marcus Tillman
19 Apr 2026

Identify your Yoyomax model and its controls
The first thing to do is find your model number. Flip the light over or check the side panel for a sticker. The most commonly listed Yoyomax grow light model is PM-WXMO-POZW, sold under the brand YOYOMAX INC. If your sticker shows a different alphanumeric code, note it down and search it on the retailer page where you bought the light (Amazon, Ubuy, etc.) because that listing will have the most detailed spec sheet available.
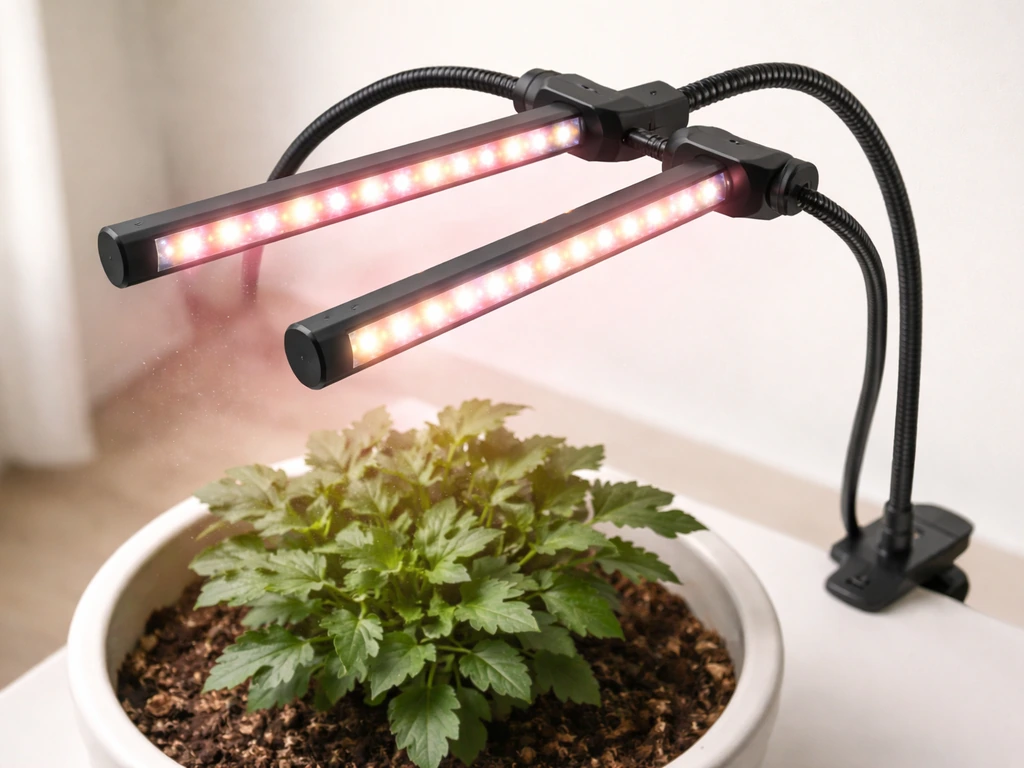
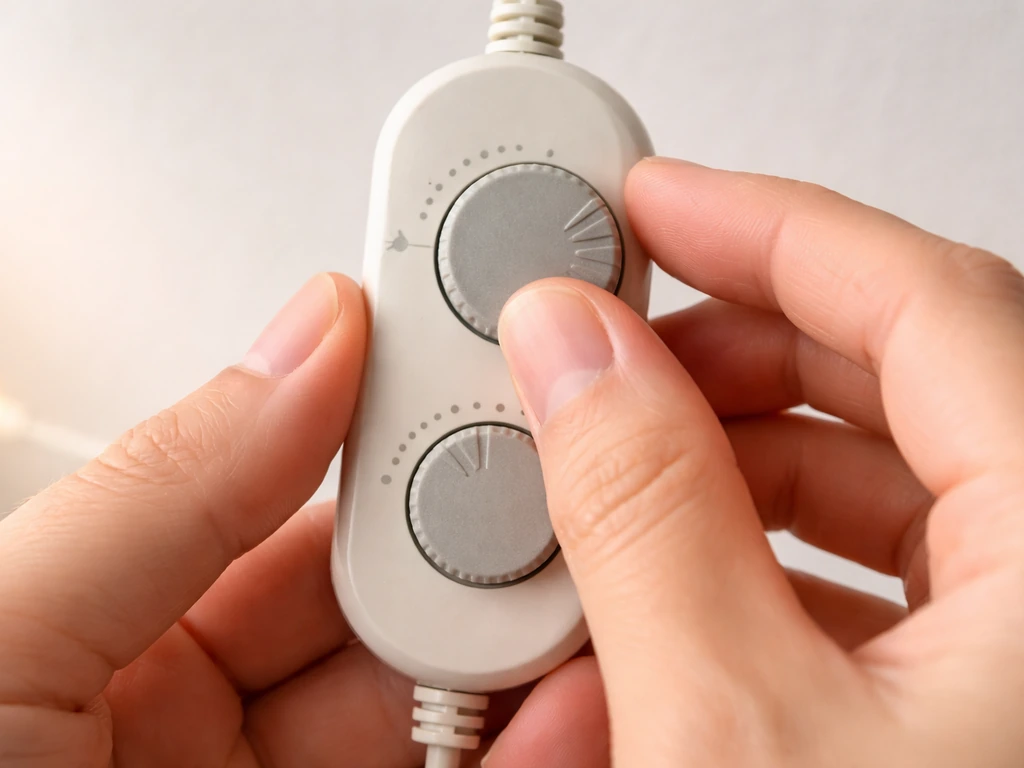
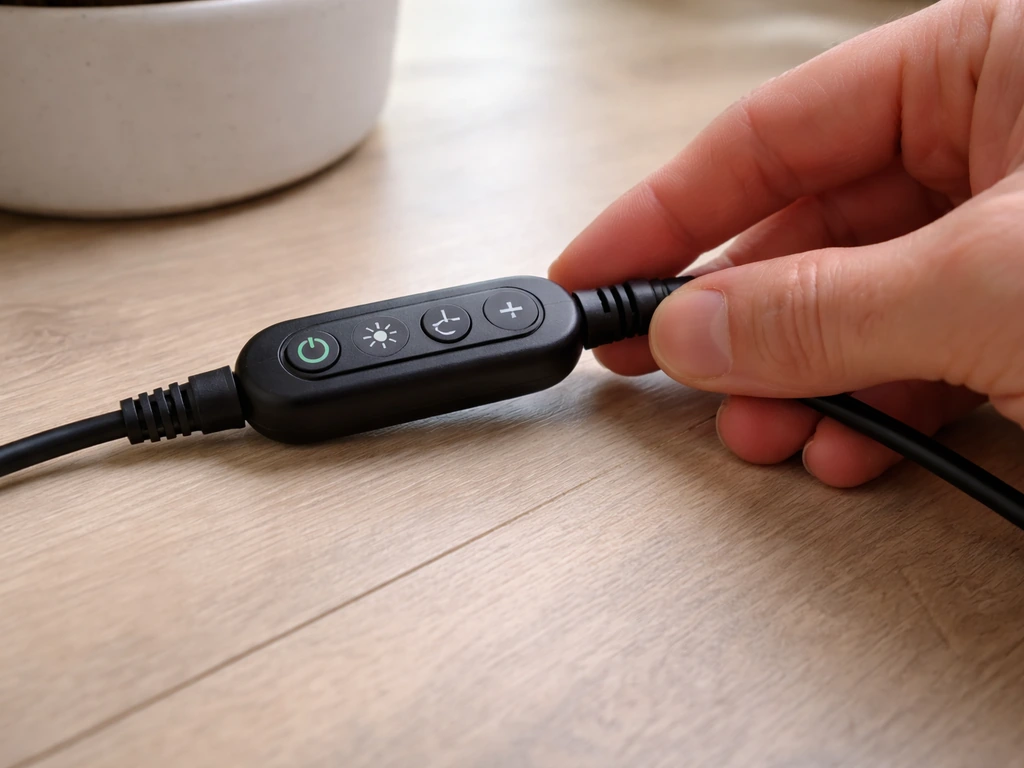
Once you know your model, look at what controls it has. Most current Yoyomax grow lights use one of two control setups: a physical dial or button on the unit itself, or an in-cable remote that sits partway along the power cord. The in-cable remote version is the more common newer design. It typically has a round dial or rotary knob for brightness dimming and one or two buttons for switching timer modes. Knowing which setup you have changes how you operate the light every day.
Here's a quick checklist to identify your controls before you do anything else:
- Look for a dimmer dial on the in-cable remote or on the fixture housing itself
- Check for a timer button labeled with hour increments (commonly 3H, 6H, 12H, or On/Off cycling)
- Check whether the light has a single power cord or supports daisy-chaining multiple units (look for an extra socket port on the housing)
- Note the wattage rating on the sticker — common Yoyomax models range from 45W to 100W actual draw
- Check the light spectrum: full-spectrum white LEDs, a red/blue blurple panel, or a combination
If you have the PM-WXMO-POZW or a similar model with an in-cable remote, the timer modes cycle through Auto On/Off intervals of 3 hours, 6 hours, and 12 hours. This is important to understand before you start because it affects your entire daily schedule. The light remembers the last setting you used even after a power cycle on some units, but not all, so test yours before relying on it.
What's in the box, assembly, and safe mounting
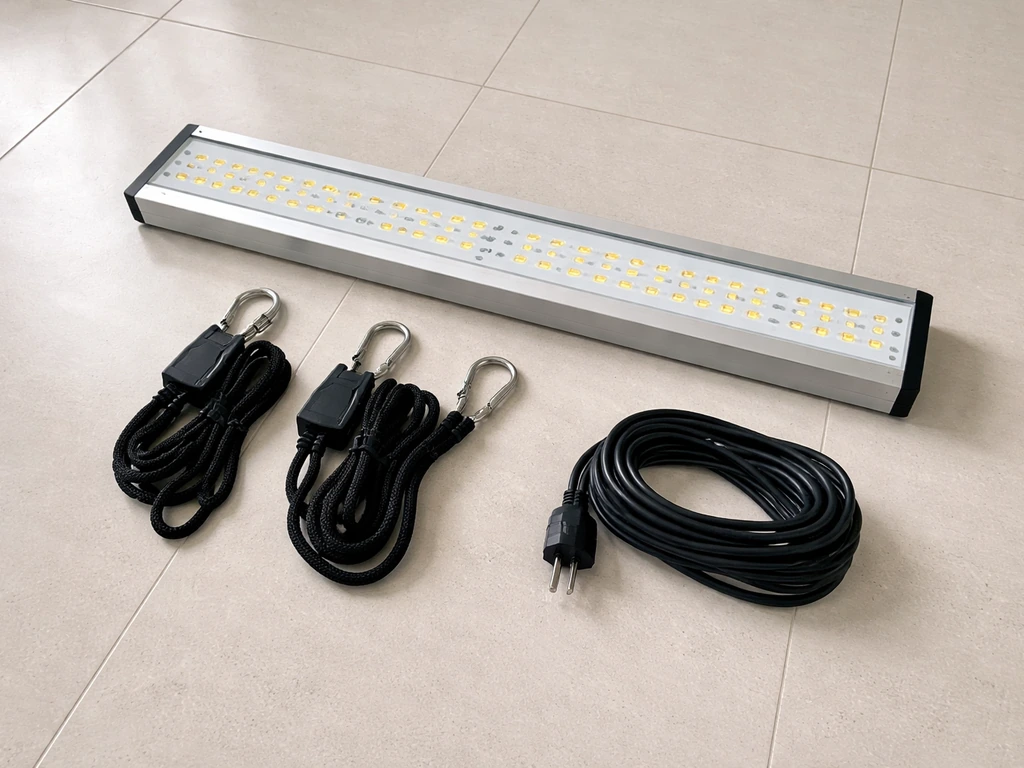
A standard Yoyomax grow light package includes the LED panel or bar fixture, a hanging kit (usually two adjustable ratchet straps or rope hangers), a power cord with the in-cable remote, and a single-page instruction sheet. Some kits include a carabiner clip or steel hook. That's typically it. There's no mounting bracket for wall or desk use, so if you're not hanging it from above, you'll need to buy a separate gooseneck clamp or light stand.
Before you do anything with the light, check the power cord for any damage, pinching, or bare wire. Yoyomax lights are budget-tier products and occasional quality control issues do appear on units shipped from overseas warehouses. A two-minute cord inspection before the first plug-in is worth it.
For safe hanging installation, follow these steps in order:
- Thread the ratchet straps through the hanging slots or hooks on the top of the fixture
- Attach the top of each strap to a sturdy anchor point above your grow space — a tent crossbar, a shelf support, or a ceiling hook rated for at least 10 lbs
- Do NOT hang from flimsy wire shelving or single adhesive hooks; the light plus cord can weigh 2 to 4 lbs and needs a secure anchor
- Leave the power unplugged while you set the initial height
- Once hanging is secure, plug the power cord into a standard 120V wall outlet or a surge-protected power strip — never use an extension cord that runs under rugs or through walls
- Turn the dimmer to its lowest setting before powering on for the first time
If you plan to use the daisy-chain feature (available on some Yoyomax models with a secondary socket on the housing), do not chain more than 2 to 3 units on a single outlet without checking the total wattage draw. Follow general electrical safety guidance when using any daisy-chain or multi-unit setup, including checking total wattage draw and avoiding unsafe overloading daisy-chain feature. A standard 15-amp household circuit can handle about 1,440 watts safely at 80% load. Add up the actual wattages from each unit's label and stay well under that number.
Mounting height, spacing, and aiming at the canopy
Getting the height right is the single most important physical setup decision you'll make. Too close and you burn leaves. Too far and the plants stretch toward the light and get weak. The good news is there's a practical starting range based on wattage, and you fine-tune from there based on how your plants respond.
| Light Wattage (actual draw) | Seedlings / Clones | Vegetative Growth | Flowering / Fruiting |
|---|---|---|---|
| 20–45W | 18–24 inches | 14–18 inches | 10–14 inches |
| 45–75W | 22–28 inches | 16–20 inches | 12–16 inches |
| 75–100W | 24–30 inches | 18–24 inches | 14–18 inches |
These are starting heights, not fixed rules. Once your light is running at full power, hover your hand over the canopy at the intended mounting height for 30 seconds. If your hand gets uncomfortably warm, raise the light by 4 inches and test again. If there's almost no warmth and the light feels very dim visually, lower it by 4 inches.
For spacing across a grow area, one Yoyomax panel or bar light covers roughly a 2x2 foot footprint at good intensity when hung at the correct height. For a 2x4 foot shelf or tent, you'll want two units. For a 4x4 foot space, plan on four units. Running a single budget light over a large area is a very common beginner mistake, and plants on the edges of that footprint simply won't get enough light to perform well.
Aim the light directly downward over the center of the plant canopy. If you're growing a single tall plant versus a wide tray of seedlings, adjust the angle if your fixture allows it. Most Yoyomax bar lights are fixed-angle, so the main adjustment lever you have is height and horizontal position.
How to operate your Yoyomax light every day
Daily operation is straightforward once you understand the two main controls: the dimmer and the timer. Here's how each works in practice.
Using the dimmer
The dimmer dial on the in-cable remote controls brightness from roughly 10% to 100%. Turn it clockwise to increase intensity, counterclockwise to decrease. For most plants, you'll run between 60% and 100% intensity during active growth. The lower settings (10% to 40%) are useful for freshly transplanted seedlings that need a gentle acclimation period, or for plants recovering from stress. Don't run the light at 50% or lower indefinitely just to save electricity, underpowered light is one of the top reasons indoor plants fail to thrive.
Using the built-in timer
If your model has the 3/6/12-hour Auto On/Off timer, here's how it works: press the timer button once to activate the 3-hour cycle (light runs for 3 hours, then shuts off, then repeats). Press again for 6 hours, press again for 12 hours, press again to turn the auto-timer off and run continuously. The cycle resets based on when you first press the button, so if you want your light on from 7am to 7pm, plug in the light at 7am and activate the 12-hour cycle at that moment.
One important limitation: the built-in timer on most Yoyomax models is a countdown-and-repeat timer, not a clock-based scheduler. It doesn't know what time of day it is. If there's a power outage or you unplug it, the cycle resets when power comes back. For more reliable scheduling, use a basic plug-in mechanical outlet timer (available for under $10) and plug your Yoyomax into that. Set the outlet timer to the exact on/off window you want. This is honestly the most reliable method and what I'd recommend regardless of whether your model has a built-in timer.
Light schedules by plant stage
The hours of light your plants need changes significantly depending on where they are in their growth cycle. Using the wrong schedule is one of the most common reasons plants underperform even with a perfectly installed light.
| Plant Stage | Daily Light Hours | Dimmer Setting | Notes |
|---|---|---|---|
| Seed germination | 16–18 hours on | 40–60% | Keep light higher and dimmer; seeds need warmth more than intense light |
| Seedling (first 2 weeks) | 16–18 hours on | 50–70% | Gradual intensity increase; watch for stretching as a sign of insufficient light |
| Vegetative growth | 16–18 hours on | 80–100% | Full intensity, consistent schedule; most houseplants and herbs stay here |
| Flowering / fruiting | 12 hours on / 12 hours off | 90–100% | Strict 12/12 schedule triggers flowering in photoperiod-sensitive plants |
| Succulents / cacti | 12–14 hours on | 70–90% | Less water, less intensity than tropical plants; adjust based on leaf appearance |
For non-flowering houseplants like pothos, ferns, or herbs, the 16/8 schedule at 80% to 100% intensity is your default and you stay there permanently. For vegetables like tomatoes, peppers, or cannabis that need to flower and fruit, the shift to a strict 12/12 schedule is what triggers the reproductive phase, so consistency matters a lot. Even a few minutes of stray light during the dark period can interrupt the cycle.
Troubleshooting common Yoyomax grow light problems
This is the section most people searching for a Yoyomax manual actually need. If you can't find a Yoyomax grow light manual, use the control and schedule steps below to set up your light correctly anyway. If you can't find a Yoyomax grow light manual, use the control and schedule steps below to set up your light correctly anyway, or check an ezorkas grow light user manual for closely related dimmer and timer guidance.
If you can't find a Yoyomax grow light manual, use the control and schedule steps below to set up your light correctly anyway, or check a leoter grow light manual for closely related dimmer and timer guidance. If you’re working from a keelixin grow light manual, compare its timer and dimmer settings to match your Yoyomax model’s control setup.
If you still need the exact settings for your setup, a grow light manual can help you confirm timer and dimmer behavior. Here are the most common failures and exactly what to do about each one.
ROBUS also notes that LED flicker can be caused by an incorrect LED driver type or operating outside its range, and that flicker may disappear when the dimmer is the source an LED driver being the wrong type or being pushed outside its operating range.
Light won't turn on at all
- Check that the power cord is fully seated in the outlet — Yoyomax cords can feel plugged in but not make contact
- Test the outlet with another device to confirm the outlet itself has power
- Check if you're using a power strip with an overload switch that may have tripped — press the reset button on the strip
- On models with an in-cable remote, check that the dimmer isn't turned all the way to zero (minimum) — rotate it clockwise slowly
- If the light still doesn't respond, the unit may be dead on arrival, which does happen with budget lights; contact the retailer for a replacement within the return window
Light flickers or dims unexpectedly
- Check the connection between the in-cable remote and the main cord — wiggle the joint; if flickering stops or worsens with movement, the connection is loose and the remote unit may need to be replaced
- Flickering can also happen when the light is on the same circuit as a high-draw appliance (space heater, air conditioner) — try a different outlet on a different circuit
- If flickering started after weeks of normal use, the LED driver inside may be failing; budget lights have shorter driver lifespans than premium brands and this is a known weak point
Wrong color output or sections of the light not working
- If a section of LEDs is dark while others are lit, individual LED chips or a section of the driver circuit has failed — this typically isn't repairable at home on a budget fixture
- If the light appears only red/blue but you expected full-spectrum white, confirm your model spec — some Yoyomax models are sold in both blurple and full-spectrum versions and you may have received the wrong variant
- A slight color shift (slightly more red or blue than expected) at low dimmer settings is normal for many budget LED drivers and corrects itself at higher power levels
Light feels hot or output seems weaker than expected
- Yoyomax lights have passive heatsinks on most models — ensure there's at least 6 inches of clear airspace above and around the fixture for heat dissipation
- If you're in a tent, make sure you have an exhaust fan running; heat buildup reduces LED efficiency and shortens driver life significantly
- Weak output compared to what you expected is common with budget grow lights; the marketed wattage (often 1000W or 600W equivalent) is a marketing comparison claim, not actual draw — check the real wattage on the spec sticker and compare it to actual par/ppfd charts for that wattage class
Timer not working or cycling incorrectly
- If the built-in timer resets randomly, it's likely due to brief power fluctuations — the solution is to switch to an external plug-in outlet timer as your main scheduler
- If the timer button doesn't respond, hold it for 2 to 3 seconds rather than a quick press — some Yoyomax models require a long press to activate the timer mode
- If none of the buttons on the in-cable remote respond, the remote unit itself may have a failed connection point; try unplugging and replugging, and if the problem persists, the unit needs replacement
Fine-tuning for better results and avoiding common mistakes
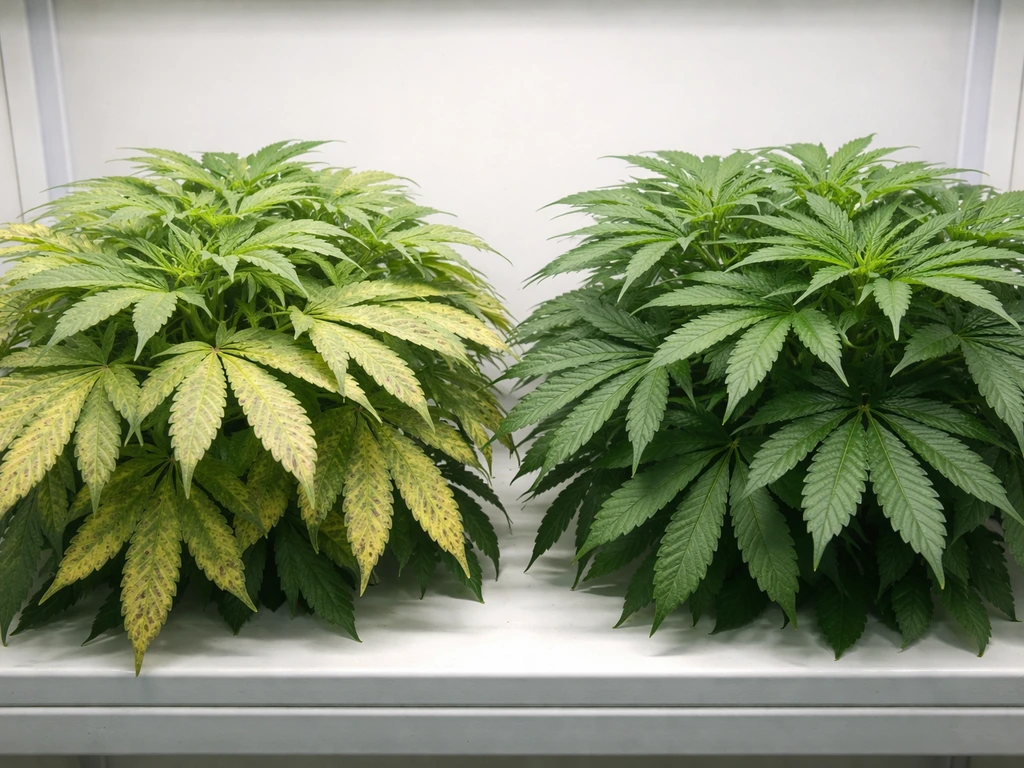
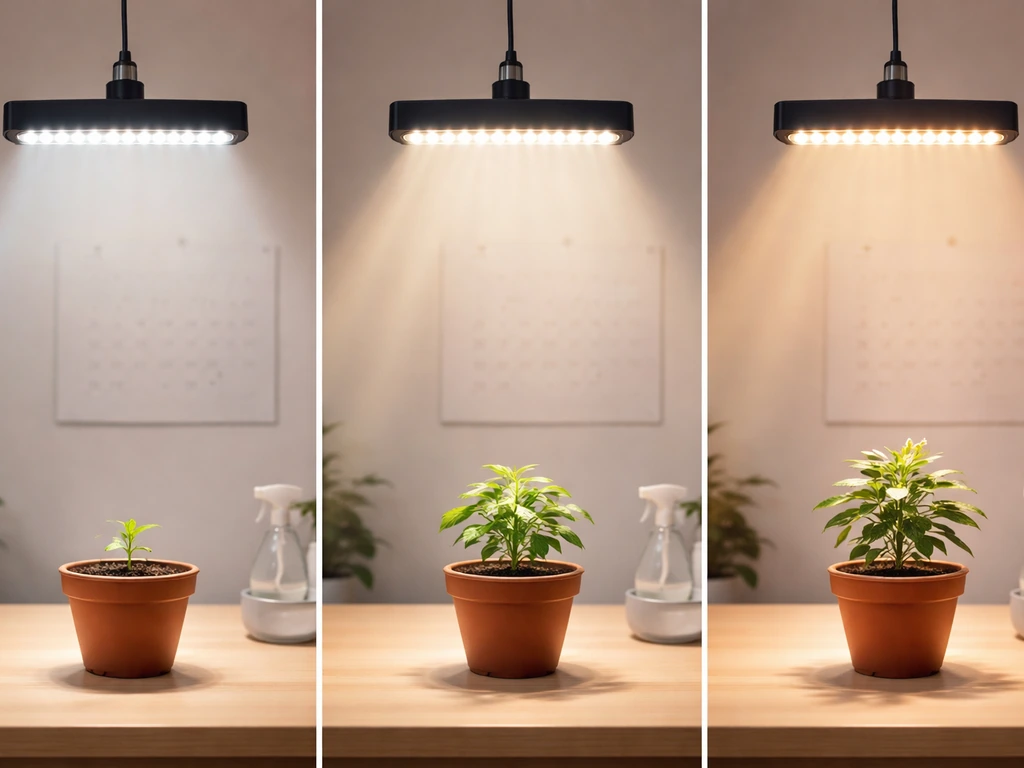
Once your light is installed and running on a schedule, the next job is watching your plants and adjusting based on what they tell you. Plants give clear visual signals when something is off, and most problems trace back to either too much or too little light.
Signs your light is too close or too intense
- Bleached or pale yellow patches on the tops of leaves closest to the light (light burn)
- Curling or cupping leaf edges, especially on newer growth
- Crispy brown leaf tips without any signs of underwatering
- Rapid wilting even when soil moisture is fine
If you see any of these, raise the light by 4 to 6 inches immediately and reduce the dimmer by 10% to 20%. Give the plant 48 to 72 hours to show improvement before adjusting again.
Signs your light is too far away or too dim
- Stems stretching long and thin toward the light (etiolation)
- Wide spacing between leaf nodes — the plant looks leggy rather than compact
- Leaves are very dark green as the plant tries to maximize chlorophyll to capture more light
- Slow or stalled growth despite regular watering and feeding
If you see stretching, lower the light by 3 to 4 inches or increase the dimmer. If you're already at 100% and the light is as low as the safe zone allows, you likely need a second light to cover the space properly.
Estimating intensity at the canopy without a meter
You don't need a PAR meter to get reasonable results. As a practical rule of thumb, a 45W actual-draw LED at 18 inches above the canopy delivers roughly 200 to 300 PPFD (micromoles per square meter per second) at the center of its coverage footprint. Most leafy greens and herbs thrive at 200 to 400 PPFD. Most flowering plants want 400 to 600 PPFD during vegetative growth and 600 to 900 PPFD during flowering. A budget Yoyomax light at the lower wattage ranges will comfortably grow herbs, leafy greens, seedlings, and houseplants but may underperform for fruiting vegetables or high-light flowering plants unless you use two units.
Quick setup checklist before you walk away
- Model number confirmed and controls identified
- Hanging hardware secured to a rated anchor point
- Power cord inspected, plugged into a surge-protected outlet or outlet timer
- Mounting height set to the correct starting range for your plant stage
- Dimmer set to the appropriate intensity level
- Timer programmed for the correct on/off schedule
- Daisy-chain wattage totals checked if applicable
- Airflow around the fixture confirmed for heat dissipation
If your plants still aren't thriving after all this
Light is just one piece of the puzzle. If you've dialed in the setup correctly and plants are still struggling, the next things to check are watering frequency (overwatering kills far more indoor plants than underwatering), soil or growing medium quality, pot drainage, and ambient temperature. Grow lights also work significantly better with some airflow, even just a small fan moving air over the canopy. If you're comparing notes with setups from other budget light brands, the operational logic for Yoyomax is very similar to what you'd find in a general grow light manual or with comparable brands like LBW, Lxyoug, or Ezorkas, all of which use similar LED driver and dimmer configurations at this price point.
The bottom line: Yoyomax grow lights are functional, budget-friendly fixtures that will do the job if you set them up correctly and respect the height and schedule guidelines. If you're mapping components like LED drivers and control boards in Stationeers, knowing the correct grow light IC code helps you match the right settings to your hardware stationeers grow light ic code. The lack of a detailed official manual is frustrating, but between identifying your model, following the stage-based schedules, and watching your plants for feedback, you have everything you need to get good results.
FAQ
Can I set the built-in timer to turn on at a specific time of day (like 7am) and off at 7pm)?
Most Yoyomax remotes use a countdown cycle, so if you want consistent results you should use the mechanical plug-in outlet timer mentioned in the article (set exact on and off times). If you rely on the built-in timer, avoid unplugging or power interruptions because the cycle restarts from zero when power returns.
If I turn the brightness down, will the timer run for less time or still use the same 3/6/12-hour interval?
No. The dimmer changes intensity but it does not change the timer’s on/off duration. If you lower brightness to “save energy,” your plants still receive the same light window length, just at reduced power, which can slow growth.
What’s the safest way to daisy-chain multiple Yoyomax lights without tripping a breaker or overheating the cord?
Check the fixture label wattage and then total the watts when daisy-chaining. Also account for the circuit’s real-world limits: extension cords and worn outlets can overheat at high loads even if the math looks safe. If the light housing is warm to the touch near the daisy-chain socket, stop and reduce the number of units.
After a power outage, will my Yoyomax automatically return to the same brightness and timer mode?
If your “last setting” memory works, it will usually restore brightness and timer mode after a brief power cycle, but it is not consistent across models. Do a quick test: set a distinctive brightness level (for example 70%), cut power for a minute, then confirm what the light returns to before committing to a weekly schedule.
What’s the best way to dial in brightness and height the first week if I’m starting with seedlings?
Don’t start with the “full blast” setting. Use a test ramp: begin around 60% intensity, set the initial height using the hand-warmth method, then adjust after 48 to 72 hours based on leaf response. Sudden jumps in intensity are a common reason seedlings get scorched or stall.
Do I really need a fan, and what airflow should I aim for with a budget Yoyomax setup?
A good airflow check is whether you can feel gentle, consistent airflow across the canopy, not just a fan blowing at one spot. If the canopy stays very humid or the leaves feel cool and clammy at the same time you see weak growth, increase airflow and recheck height (too high can look like a heat problem).
If plants are stretching, how do I tell whether it’s a height issue or a coverage (number of lights) issue?
If you’re seeing stretching, first verify the light coverage area. One light over a wide tray often causes edge plants to stretch even when the center looks okay. Split coverage by adding a second unit rather than only raising the dimmer.
What signs mean my Yoyomax light is too intense versus too dim (beyond general “leaf changes” descriptions)?
Use the hand-warmth test plus observation. If leaves are bleaching or curling upward, raise the light and reduce intensity. If leaves look dark and growth is slow, lower the light or increase intensity, but only within the safe adjustment range and after watching for improvement over 2 to 3 days.
Can I run the lights at a lower dimmer level for flowering plants without harming the 12/12 schedule?
Yes, but only if your goal is to reduce power usage, not to change the plant’s photoperiod. Keep the on/off window consistent for the growth stage (for example 16/8 for non-flowering houseplants, 12/12 for flowering). If you change the schedule, use a full, stage-appropriate window every day.
My Yoyomax remote dial or timer buttons seem unresponsive, what are the quickest checks before I assume the light is broken?
If the remote dial or buttons aren’t responding, first unplug and inspect the remote cable for pinching or damage, then check the plug orientation and the outlet you’re using. Also test with a short power interruption (unplug for 30 seconds, plug back in) to see whether the unit resets stuck timer mode.
How can I tell whether weak plant growth is from the light setup or from watering and soil problems?
Common root causes include overwatering, poor drainage, and nutrient shortage, but you can separate these from light problems by looking at pattern. Light issues often show as uniform stretching or edge fading under the footprint, while watering issues usually create inconsistent wilting across pots regardless of position.
Next Article
Ghodec Grow Light Manual: Setup, Placement, and Fixes
Step-by-step GHODEC grow light manual for setup, placement, schedules, troubleshooting, and maintenance fixes.