You can absolutely run grow lights on solar power, but only if you size the system correctly from the start. The basic chain is: solar panels charge a battery bank through a charge controller, and an inverter converts that stored DC power into the AC your grow light needs. Get the sizing right, and your plants get consistent light on schedule. Get it wrong, and you end up with flickering lights, dead batteries, and sad seedlings. This guide walks you through every decision, in order, so you can build a setup that actually delivers the photoperiod and intensity your plants need.
Solar Panel Grow Light Setup: Step-by-Step Indoor Guide

Marcus Tillman
3 May 2026
Start here: define your goals before buying anything
Before you touch a solar calculator, you need three numbers: how many plants (and what type), what light schedule they need, and how much floor area you're covering. These answers drive every other decision in this guide.
Different plant stages need very different light intensities, measured in PPFD (micromoles of light per square meter per second). Seedlings do fine at 200 to 400 µmol/m²/s. Vegetative growth wants 400 to 600 µmol/m²/s. Flowering plants typically need 600 to 1,000+ µmol/m²/s. Running a light too bright for seedlings wastes power and stresses plants; running too dim for flowering plants means poor yields. Know your stage.
Schedule matters just as much as intensity. Most seedlings and houseplants thrive on 14 to 16 hours of light per day. Flowering plants (especially photoperiod-sensitive ones) often want a strict 12-hour cycle. Write down your target hours per day now, because that number is the foundation of your battery sizing math later.
Coverage area is the third variable. Measure your grow space in square meters or square feet. A 2x2 ft (0.37 m²) propagation tray has very different power needs than a 4x4 ft (1.5 m²) tent. Once you have these three numbers, you're ready to choose a light.
Choose the right grow light for a solar setup
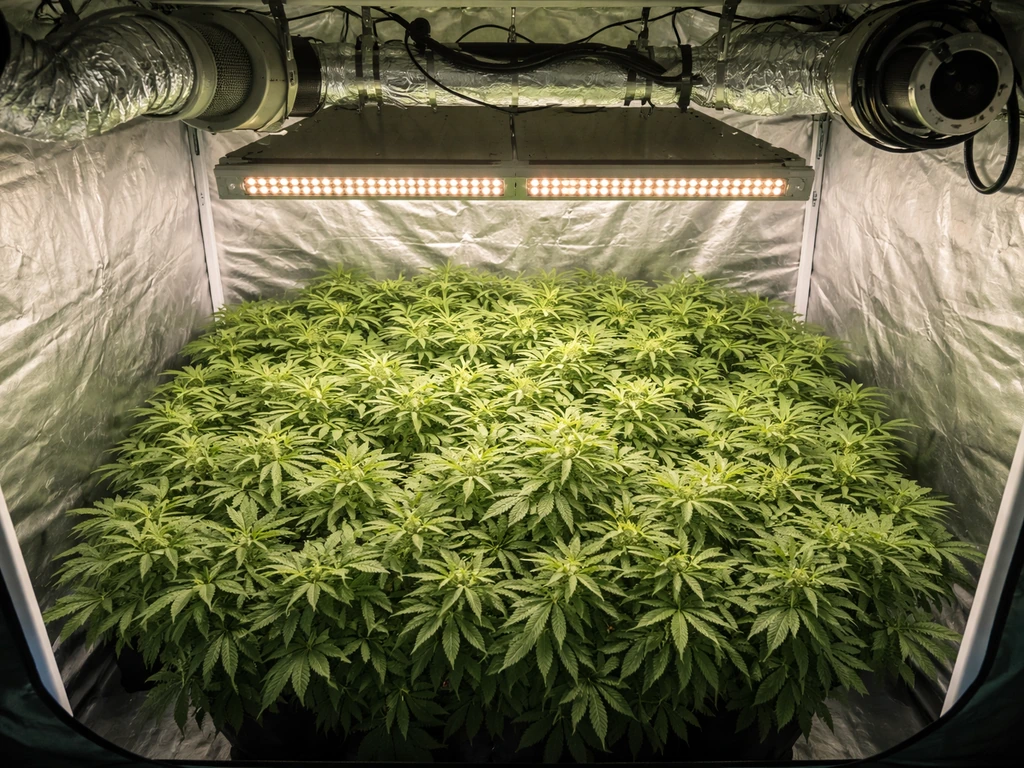
For a solar-powered setup, LED grow lights are the obvious choice. They draw far less power than HPS or CMH alternatives for the same PPFD output, which means smaller (and cheaper) solar and battery systems. For HPS grow light setups, the key is still sizing the solar, battery, and inverter around the much higher watt draw compared to LEDs. A quality full-spectrum LED panel in the 100W to 300W range covers most home-scale indoor grows efficiently. A method like the seven operator HPS plus grow room glasses approach is sometimes used to estimate grow light and space setup trade-offs, but you should verify it against real electrical draw and your plants' target PPFD full-spectrum LED panel. If you're comparing options, HPS setups pull two to three times the wattage for equivalent coverage, which is workable on solar but demands a much larger panel and battery bank. CFL setups are low-wattage but also low-intensity, best limited to seedlings and clones.
When shopping for LEDs, look for actual (draw) watts, not the inflated "equivalent" wattage some brands advertise. A light advertised as "1000W equivalent" might only draw 100W from the wall, which is actually fine for a 2x2 to 2x3 ft space. Focus on actual draw watts and published PPFD maps when available. For a 4x4 ft space targeting vegetative growth, you typically need a light drawing 200 to 300W. For flowering in the same space, budget for 300W or more.
Check for safety certifications before buying. In the US, NEC Article 410.172 (from the 2020 NEC update) blank" rel="noopener noreferrer">requires that horticultural lighting equipment be Listed, and the standard used for that listing is UL 8800, which is specifically written for grow light environments. Look for UL 8800 or ETL Listed markings. When a product is listed or tested under UL 8800, its scope covers lighting equipment intended for use in a horticultural environment and installed in accordance with U.S. requirements blank" rel="noopener noreferrer">UL 8800 or ETL Listed markings. This matters extra in a solar setup where you're building a custom electrical system and want every component to meet a minimum safety bar.
| Light Type | Typical Draw (W) for 4x4 ft | Efficiency | Heat Output | Solar Compatibility |
|---|---|---|---|---|
| LED (full spectrum) | 200–300W | High | Low–Medium | Excellent |
| HPS | 400–600W | Medium | Very High | Workable but expensive |
| CFL | 100–200W | Low | Low | Good for seedlings only |
| T5 Fluorescent | 100–240W | Medium | Low–Medium | Good for seedlings/veg |
Every component you need (the full checklist)
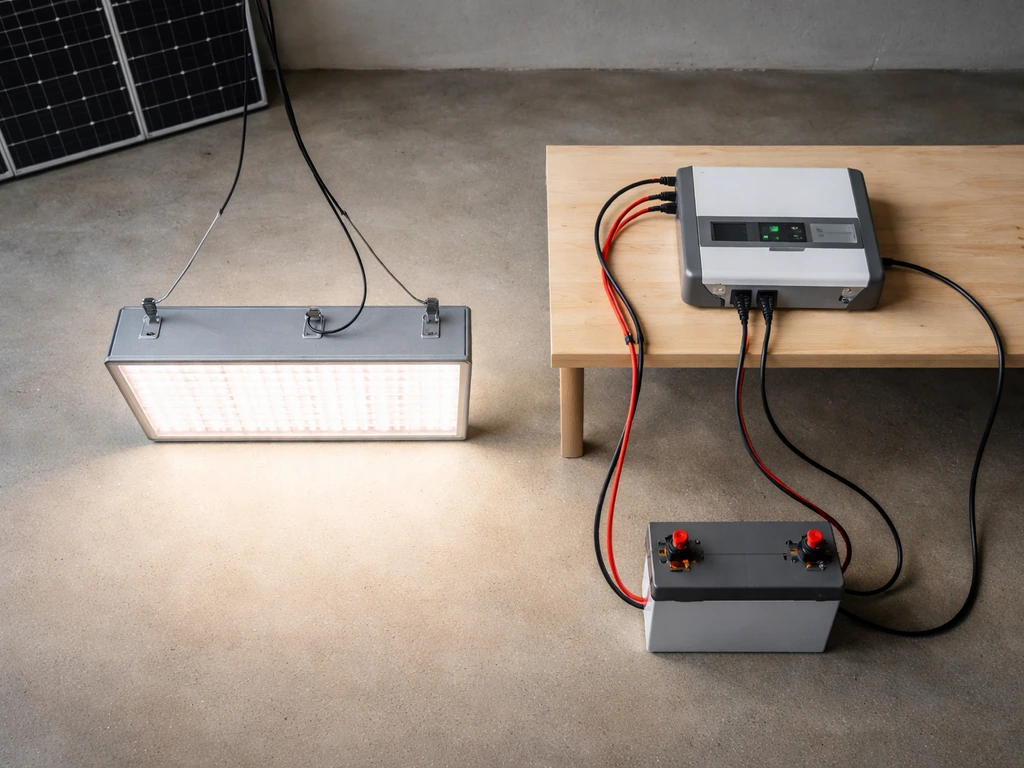
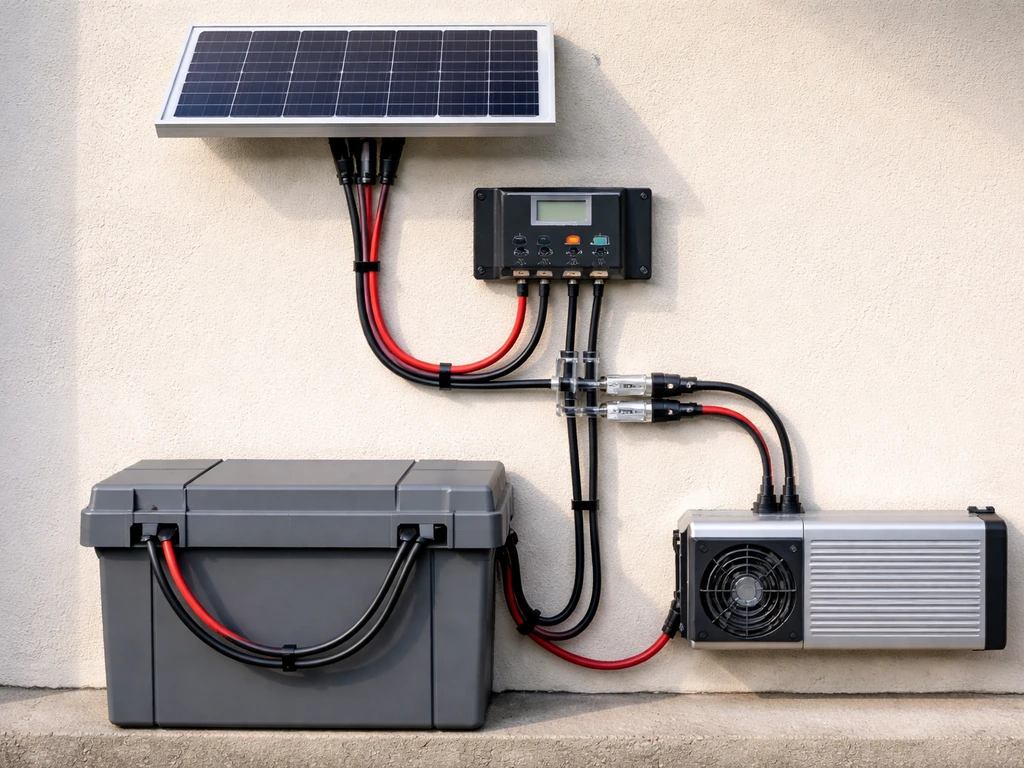
A solar grow light system has five core components. You need all five, and skimping on any one of them causes problems.
- Solar panels: the source of energy. Sized in watts (e.g., 200W, 400W). Monocrystalline panels are the most efficient per square foot and the best choice for limited roof or ground space.
- Charge controller: sits between the panels and the battery, preventing overcharge and damage. MPPT (Maximum Power Point Tracking) controllers harvest 10 to 40% more energy than older PWM types, especially in low-light conditions and temperature extremes. For a grow light system, always use MPPT.
- Battery bank: stores the energy so your lights run at night and on cloudy days. Lithium iron phosphate (LiFePO4) batteries are the most reliable and longest-lived, with a usable depth of discharge (DoD) around 80 to 90%. Lead-acid batteries are cheaper upfront but only usable to 50% DoD and degrade faster.
- Inverter: converts DC battery power to AC for your LED grow light. A pure sine wave inverter is required for grow lights with electronic drivers. Modified sine wave inverters can cause buzzing, flickering, and damage to sensitive electronics.
- Wiring, fuses, and disconnects: correctly sized cables, inline fuses or circuit breakers between every major component, and a disconnect switch for safe maintenance. Undersized wire and missing fuses are the number-one cause of fire risk in DIY solar setups. The CPSC specifically flags lack of minimum wire sizing and overcurrent protection as shock and fire hazards.
Optional but useful additions include a battery monitor (shows state of charge in real time), a programmable timer (plugs into the inverter output, controls your photoperiod), and a temperature/humidity sensor inside your grow space.
Size the system so it actually powers your lights
This is the section most DIY guides skip or gloss over. Get the sizing wrong and everything else is irrelevant. Here's the math, step by step.
Step 1: Calculate your daily energy use
Multiply your grow light's actual draw (in watts) by your daily photoperiod hours. That gives you watt-hours (Wh) per day. Add about 20% for inverter losses and other small loads (fans, timers). Example: a 200W LED running 16 hours = 3,200 Wh/day. Add 20% = 3,840 Wh (roughly 3.84 kWh) per day needed from your battery and panels.
Step 2: Size your solar panels using peak sun hours
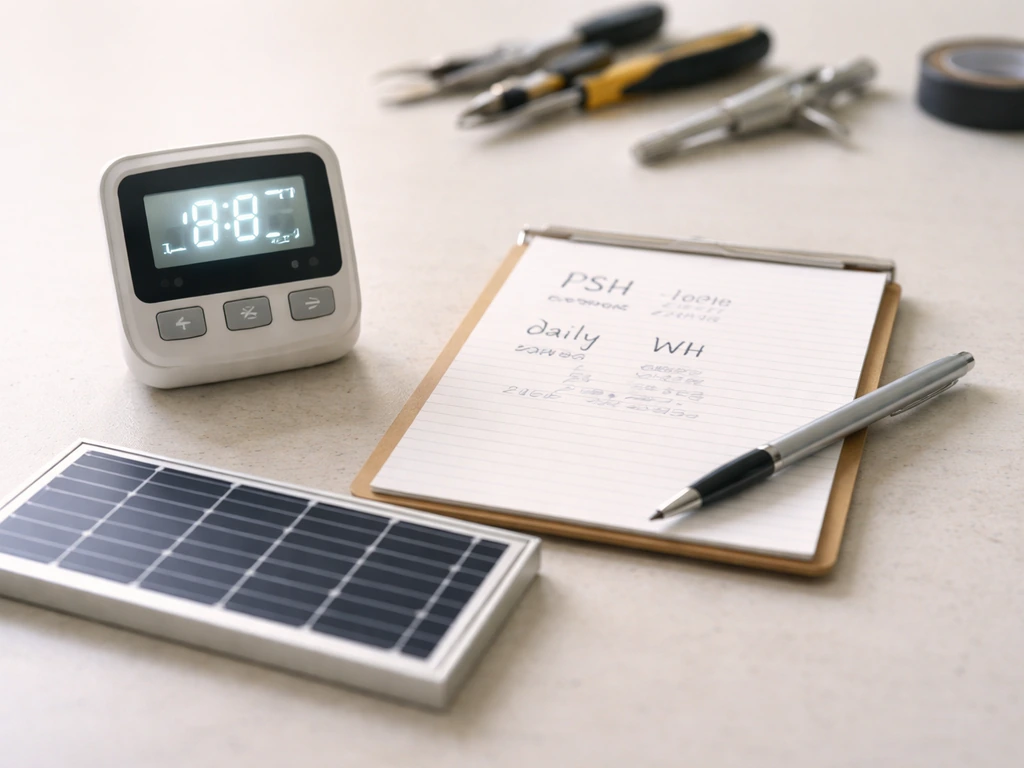
Peak sun hours (PSH) is the average number of hours per day your location receives sunlight at full solar intensity (roughly 1,000 W/m²). This varies hugely by location and season. A home in Phoenix might average 5 to 6 PSH in winter. A home in Seattle or the UK might see 2 to 3 PSH in December. Look up your location's peak sun hours for the worst month of the year (usually December or January), and size your panels for that, not the summer average.
Divide your daily energy need by your peak sun hours to get your required panel output. Using the example above: 3,840 Wh ÷ 3 PSH = 1,280W of solar panel capacity needed for a cloudy winter location. That's a lot. This is exactly why LED efficiency matters so much in a solar grow setup, and why many growers either accept a smaller grow space or add a small grid backup for winter.
Step 3: Size your battery bank for autonomy
Battery sizing comes down to how many days without sun you want to survive. One day of autonomy is the bare minimum for most setups. Two days is more realistic if you live somewhere with cloudy stretches. The formula: battery capacity (kWh) = daily energy use × autonomy days ÷ (DoD × system efficiency). Using our example with 1 day of autonomy, LiFePO4 at 90% DoD, and 95% system efficiency: 3.84 kWh × 1 ÷ (0.90 × 0.95) = roughly 4.5 kWh of battery capacity. For two days, double it. This is why grow light setups with long photoperiods get expensive on battery storage quickly.
| Grow Stage | Target PPFD | Typical LED Draw (4x4 ft) | Daily Energy (16 hr schedule) | Daily Energy (12 hr schedule) |
|---|---|---|---|---|
| Seedling | 200–400 µmol/m²/s | ~100–150W | ~1.9–2.9 kWh | ~1.4–2.2 kWh |
| Vegetative | 400–600 µmol/m²/s | ~200–250W | ~3.8–4.8 kWh | ~2.9–3.6 kWh |
| Flowering | 600–1000+ µmol/m²/s | ~250–350W | ~4.8–6.7 kWh | ~3.6–5.0 kWh |
How to wire and install the system safely
Follow this order. Connecting components in the wrong sequence is the most common mistake, and it can damage your charge controller or cause a short circuit.
- Mount solar panels first. Angle them toward true south (in the Northern Hemisphere) at a tilt angle roughly equal to your latitude. Do not connect them to anything yet.
- Install the battery bank in a ventilated, non-freezing location. If using lead-acid, keep them upright and away from sparks. LiFePO4 batteries are more forgiving but still need protection from extreme cold.
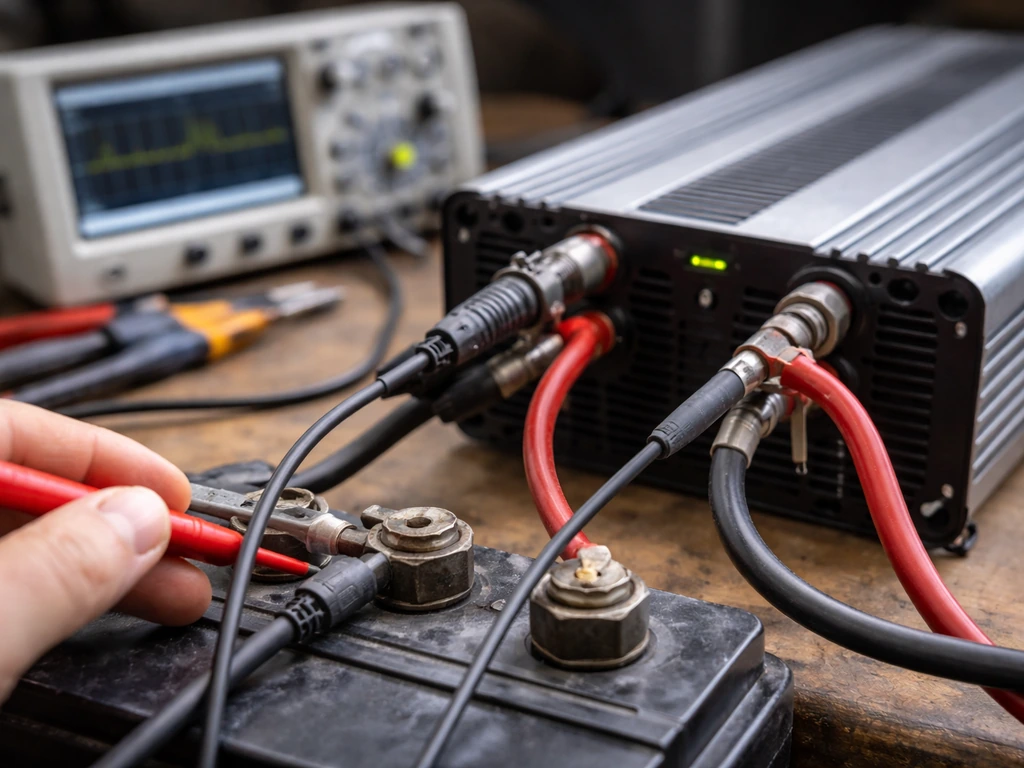
- Connect the battery bank to the charge controller first (always battery before panels). Use correctly rated cable: for a 12V/200Ah system, 6 AWG or larger wire is typical for runs under 10 feet. Add a fuse within 18 inches of the battery's positive terminal.
- Connect the solar panels to the charge controller's PV input. Double-check polarity. Use MC4 connectors on the panel side. Add a fuse or breaker on the PV line.
- Connect the inverter to the battery bank with heavy-gauge cable (often 2/0 AWG or 4 AWG depending on inverter size) and a dedicated fuse sized per the inverter's manual, within 18 inches of the battery.
- Plug your grow light into the inverter's AC output. Do not plug it in yet.
- Turn on the charge controller and confirm it reads battery voltage correctly. Then turn on the inverter and confirm it shows AC output voltage (should read 120V AC in North America, 230V in Europe).
- Plug in and power on the grow light. Confirm the controller shows the panels charging and the system is drawing power from the correct source.
Every connection between major components needs its own fuse or breaker sized for the wire, not the component. Use a multimeter to verify voltage at the battery terminals, at the inverter input, and at the AC output before connecting your light. Spend 10 minutes on this verification step and you'll save yourself a frustrating diagnosis session later.
Placement, light distance, and heat management
Once the system is running, hang height is where most beginners burn (literally) their first round of seedlings. LED grow lights vary by model, but as a general starting point: hang seedling lights 24 to 36 inches above the canopy, vegetative lights 18 to 24 inches, and flowering lights 12 to 18 inches. Always check your specific light's manufacturer recommendation and watch plants for signs of light stress (bleaching, leaf curl, or unusually dark green color from too much light).
Heat management is critical in a solar setup because you can't afford to waste power fighting heat you generated yourself. Modern quantum board LEDs run cool enough that most home setups need only passive airflow, but any enclosed space still needs a small circulation fan. A 6-inch clip fan running off the inverter alongside your light adds very little wattage load but keeps the canopy temperature from stratifying. Aim for canopy air temperature between 70 and 85°F (21 to 29°C) during the light period.
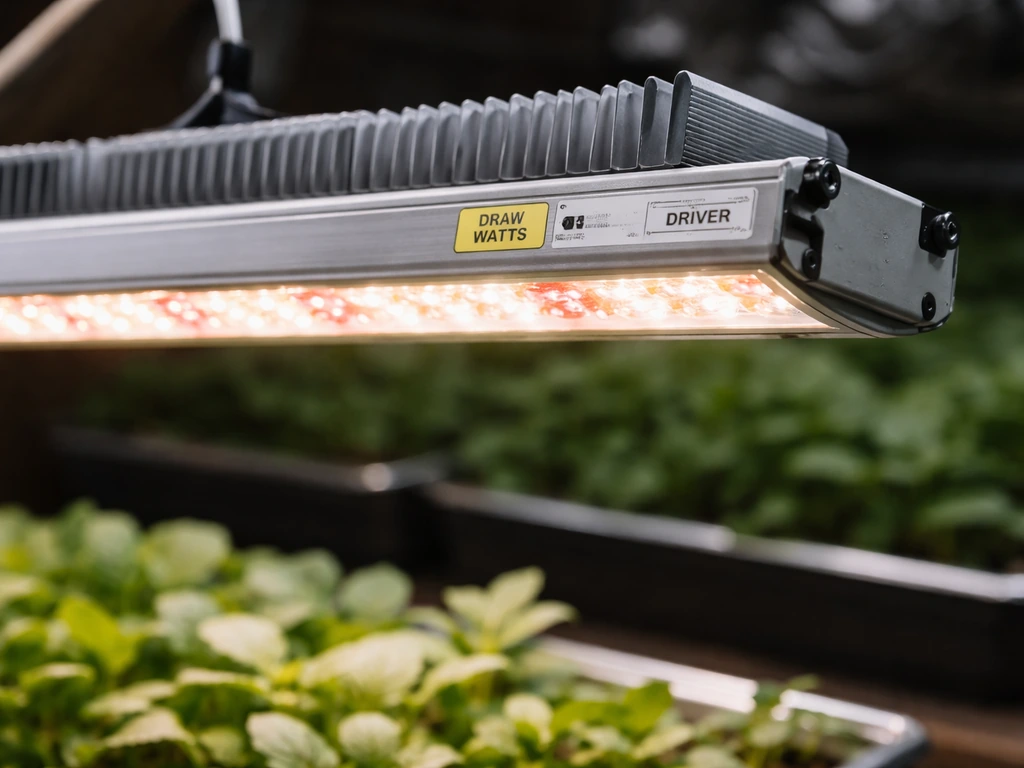
Keep the grow light's driver (the power brick, usually at the end of a separate cord) outside the grow tent if possible. Drivers generate the most heat of any LED component, and housing them inside raises ambient temperature unnecessarily and shortens their lifespan. Most quality LED panels have long enough driver cords to allow this.
Scheduling: make the most of every sunlight hour
The smartest scheduling strategy for a solar grow light setup is to sync your light-on period with your solar charging window as much as possible. A solid t5 grow light setup can be scheduled the same way so your lights run during peak charging hours while staying within your battery limits solar grow light setup. If your panels charge peak between 9am and 4pm, run your lights from 8am to midnight (for a 16-hour schedule) rather than midnight to 4pm. You'll draw from the battery for the evening hours and let the panels top up the bank during the day while the lights are already running.
Use a simple plug-in timer (an outlet timer or a smart plug) between the inverter's AC output and the grow light. Set it and forget it. For strict 12-hour flowering schedules, consistency within 15 minutes day to day matters more than the exact start time. Pick a schedule that overlaps maximum solar hours and stick to it.
On cloudy days, your battery bank is doing all the work. If you have a battery monitor, check state of charge each morning. If it drops below 30% (for LiFePO4) or 50% (for lead-acid) before sunrise, you don't have enough panel capacity or battery storage for your current photoperiod. The honest short-term fix is to temporarily shorten the light schedule by two hours to stretch battery reserves. The right long-term fix is adding more panels or battery capacity.
If you live somewhere with genuinely short winter days (under 4 PSH), consider a small grid-tied backup. A simple grid outlet as a secondary charging source on a smart switch, or a small AC battery charger, can keep your bank from hitting dangerous low states during a multi-day cloudy stretch. Running a mostly solar system with grid backup on cloudy days is far better for your plants than a pure solar system that starves them of light in February.
When things go wrong: diagnosing and fixing common problems
Lights flickering or pulsing
Flickering almost always means one of three things: the inverter is outputting modified sine wave (not pure sine wave), the battery voltage is sagging under load, or there's a loose connection somewhere. Swap to a pure sine wave inverter if you haven't already. Check all cable connections at the battery, inverter, and fuse holders. Check battery voltage under load with a multimeter. If it drops below 11.5V on a 12V system during startup, your battery is undersized or degraded.
Light is dimming or running at lower intensity than expected
Many modern LED grow lights automatically dim when input voltage drops slightly. If your battery bank is chronically low, the light may be running at 70 to 80% intensity without any obvious sign other than slower plant growth. Monitor your battery voltage during the light-on period. If it's consistently below nominal, you need more solar charging capacity or less daily runtime.
Battery depletes overnight even when panels charged during the day
This usually means you sized the battery for fewer hours of autonomy than your schedule actually requires, or your daily energy load is higher than calculated (don't forget fans, timers, and other small loads). Check your charge controller's daily energy log if it has one. Subtract the energy consumed from the energy harvested. If consumption regularly exceeds harvest, you need more panels or a shorter light schedule.
Panels aren't producing the wattage they should
A 400W panel array rarely delivers 400W in real-world conditions. Shade, soiling, sub-optimal tilt angle, and high ambient temperature all reduce output. A panel running hot (above 77°F / 25°C) loses roughly 0.3 to 0.5% of output per degree above that baseline. Clean panels monthly. Check for partial shading at peak sun times. If one panel in a series string is shaded, it pulls down the whole string's output significantly. Consider rewiring shaded panels in parallel rather than series.
Breaker or fuse keeps blowing
A fuse blowing once might mean a fault in the connected device. A fuse blowing repeatedly means the circuit is overcurrent and the fuse is correctly protecting you. Do not simply swap in a larger fuse. Instead, verify that your wire gauge matches the fuse rating, and check the connected load's actual current draw with a clamp meter. If your grow light is drawing more than its rated wattage (which can happen with failing drivers), the light itself may need to be replaced.
Overheating in the grow space
If canopy temperature creeps above 85°F (29°C), add a second circulation fan before adjusting anything else. If the room itself is hot, consider running lights during the cooler evening and night hours and relying more on battery storage. This is one trade-off where plant health outweighs optimal solar harvest timing. A temperature-triggered exhaust fan controlled by a thermostat is a low-cost fix that prevents most heat emergencies.
Safety red flags you should not ignore
- Any wiring that feels warm to the touch under normal operation is undersized. Upgrade the wire immediately.
- Corrosion or darkening at any terminal means a poor connection creating resistance and heat. Clean and re-torque the connection.
- A burning smell from the inverter or charge controller means shut down the system now and inspect before restarting.
- Batteries that swell, leak, or get very hot during charging indicate a charge controller fault or a battery that has reached end of life.
- Never leave a solar grow setup running unmonitored for days at a time until you've observed at least one full charge/discharge cycle and confirmed all temperatures are normal.
FAQ
How do I confirm my inverter can handle the solar panel grow light setup without voltage sag or shutdowns?
Most setups should be sized on actual light draw and then checked against the inverter’s continuous output rating (not peak), because the inverter must handle the full watts plus any starting surge. If your inverter is only rated to run the light briefly, you can get shutdowns or voltage sag that looks like dimming or flicker.
What’s the most common wiring issue in a solar panel grow light setup, and how do I size cables correctly?
If you use a 12V system, you typically need very thick cables for LED loads, because current is high, voltage drop is real, and heat losses grow quickly. A practical rule is to design for minimal voltage drop on the DC run (commonly under a few percent) and size fusing and conductors by wire gauge and ampacity, not by “it fits.”
Can I mount the LED driver outside the tent, and what should I watch out for?
If your light driver is outside the tent, you still need to keep cords protected from abrasion and moisture, and you should use strain relief at the driver connection so vibration does not loosen plugs over time. Also confirm driver cords are rated for indoor use where they pass through ventilation or ducting.
Should I use solar panel charging automatically to turn the lights on and off, or should I stick to a fixed schedule?
Yes, but it changes your control strategy. Instead of relying only on photoperiod, use a battery monitor (and ideally low-voltage cutoff) to prevent repeated deep discharges, then reduce runtime on cloudy weeks. “Auto” on/off dimming from the light can hide the problem while growth slows.
Is it better to shorten the daily light schedule gradually or to switch it off entirely on cloudy days?
For many growers, it is better to set up a stable schedule and adjust runtime only when battery state is trending low, such as consistently hitting low SoC before sunrise for multiple days. If you start-and-stop lights too frequently, you can also create temperature swings that stress plants.
How accurate do battery monitors need to be, and how can I double-check readings?
A battery monitor helps, but you still need to verify with a multimeter because some monitors are inaccurate, especially after temperature changes or if shunts are installed poorly. Check battery voltage under load and compare it with the monitor reading to confirm both agree.
What should I do if my battery frequently hits low SoC even after reducing runtime?
Avoid running LiFePO4 to extreme low states repeatedly. If you see the battery reaching your cutoff too often, it usually means you need more panel capacity, more battery, or fewer hours on the light cycle, because “it still turns on” is not the same as “it is healthy long-term.”
How does humidity and airflow change when using a solar panel grow light setup?
To prevent condensation and mold, verify the grow area humidity and airflow separately from the light. Use a small circulation fan to even out temperature, and if your humidity spikes when lights are off, consider a timed exhaust or dehumidification during the dark period rather than changing hang height first.
What are the best step-by-step checks for flickering lights in a solar powered grow setup?
If you get flicker, don’t assume the light itself is faulty. First confirm inverter type (pure sine preferred for sensitive drivers), inspect all inline fuses and connectors, and measure battery voltage while the light is running. If voltage droops, the fix is usually more battery or thicker cables, not swapping lights.
Do fans and timers meaningfully affect battery sizing, or can I ignore them?
Underestimating small loads is a classic mistake. Even a few watts from fans, an exhaust controller, and a circulation fan can matter over a 14 to 16 hour cycle, and those loads reduce available runtime during cloudy days.
How do I tell if my solar panel grow light setup is giving even light across the whole canopy?
Use your PPFD targets to validate intensity, but also confirm uniform coverage across the canopy. If only the center is bright, you may need to spread the fixtures, change driver output, or adjust hang height to avoid hotspots that look like bleaching while edges starve.
How does battery temperature affect runtime and what’s the easiest way to protect battery performance?
For battery longevity and consistent performance, keep batteries in a moderate temperature range and avoid letting them sit at very low or very high charge for long periods. In cold climates, capacity drops, so you may need extra autonomy planning or a slightly longer panel array to maintain the same light schedule.
If I add a grid backup for winter, should it run the lights or just charge the battery bank?
If you expect under 4 peak sun hours in winter, a small grid-tied backup can be sized as “top-up charging,” not “running everything from grid.” A practical approach is to keep your solar and battery primary, then use grid only when SoC trends low, which reduces utility use while protecting plant schedule stability.
Next Article
Full LED Grow Setup Guide: Plan, Install, Run, Troubleshoot
Step-by-step full LED grow setup plan: choose lights, mount safely, manage power and airflow, run schedules, fix common