The VIVOSUN VS1000 is a solid 100W LED grow light, but like most grow lights, the included instructions are thin on real-world detail. This guide walks you through the full process: unboxing, hanging, wiring, powering on, dialing in your settings, and running a proper schedule. If something isn't working right, the troubleshooting section has you covered too.
Vivosun VS1000 Grow Light Instructions: Setup to Troubleshoot
Marcus Tillman
12 Apr 2026
Unboxing and checking your parts
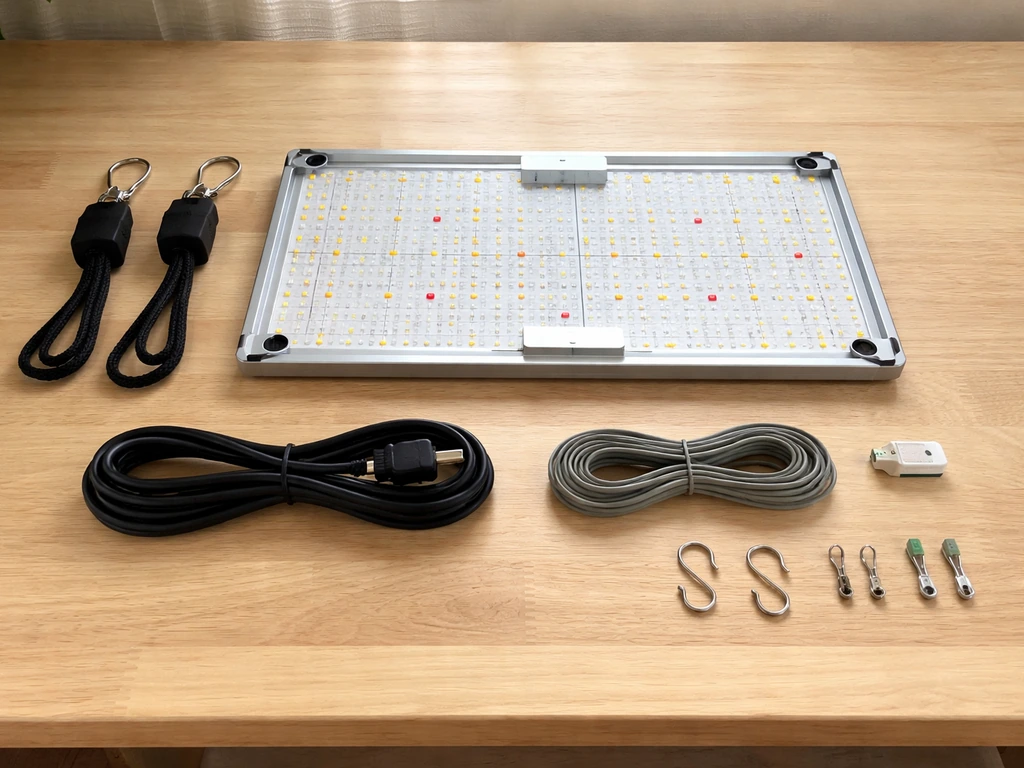
Before you hang anything, lay everything out and confirm it's all there. Depending on which version of the VS1000 package you have, you should find either of these combinations:
- 1x VS1000 100W LED grow light
- 2x adjustable rope hangers (US-patented)
- 1x 120V power cord
- 1x RJ11 3-way cable splitter (in some packages)
- 2x RJ11 network cables (in some packages)
- 1x pair of grow room glasses (in some packages)
Some VS1000 retail packages include the RJ11 splitter and cables for daisy-chaining multiple lights, while the simpler 3-page instruction sheet version just ships with the rope hangers, power cord, and glasses. Either way, the rope hangers and power cord are the two things you absolutely need to get started. If either is missing, contact VIVOSUN support before proceeding. Also check that the light panel itself has no cracked corners or bent frame from shipping.
Assembly and setup: hanging, wiring, and controller
Hanging the light
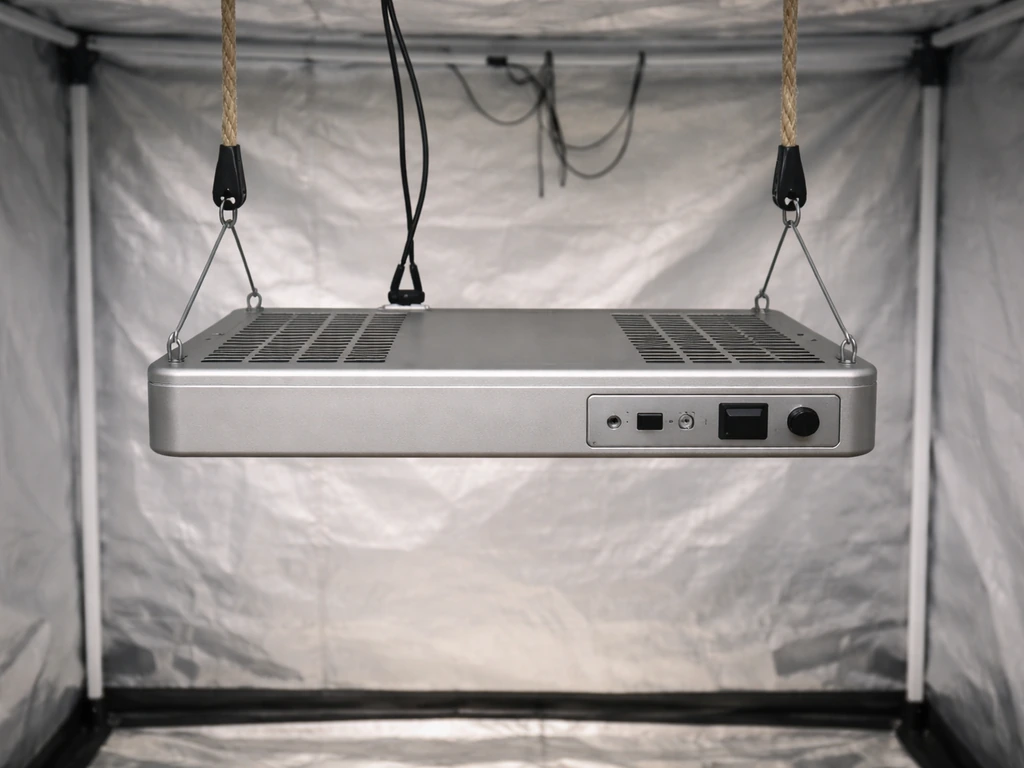
The VS1000 uses adjustable rope hangers, and they're the easiest part of this whole setup. Each rope hanger has a small plastic clip that locks the rope at whatever length you set. Here's how to hang the light properly:
- Thread each rope hanger through the metal hanging hooks on either end of the VS1000 panel.
- Secure the top loop of each rope hanger to a sturdy overhead support: a grow tent crossbar, ceiling hook, or grow tent frame. Make sure whatever you're attaching to can handle the weight (the VS1000 is light, around 5 lbs, but don't use flimsy hooks).
- Alternatively, pass the rope hangers through the LED's hooks, then remove the hooks from the LEDs, fit them onto a ceiling bracket, and reinstall the hooks back onto the light. This gives a cleaner, more secure mount if you have a fixed bracket.
- Adjust the rope length using the sliding clip on each hanger so the light sits at the right height for your current plant stage (see the placement section below for exact distances).
- Make sure both ends are at the same height so the panel hangs level. An uneven panel means uneven light distribution across your canopy.
Plugging in and basic wiring
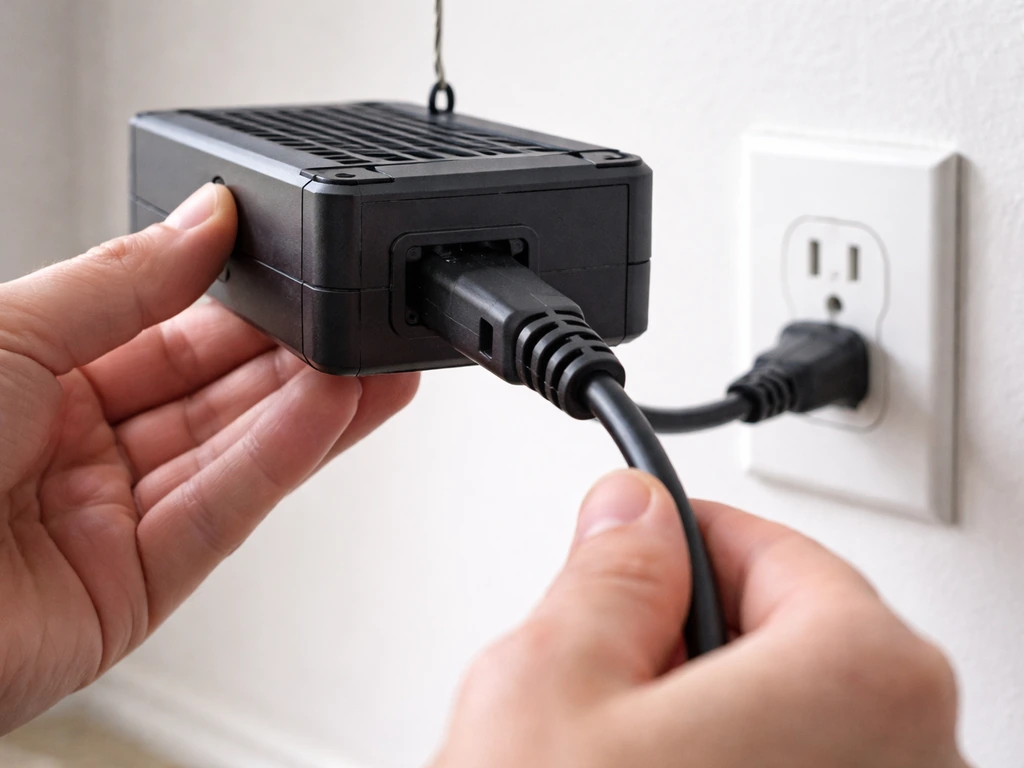
Once the light is hanging, plug the included power cord into the VS1000's power input port and then into a standard 120V wall outlet or power strip. The VS1000 accepts 120–277V input at 50–60Hz, so it works on standard North American outlets without any adapter. That's all there is to basic single-light wiring.
Daisy-chaining multiple lights with a controller
If you have more than one VS1000 and want to control them all from one dimmer or a VIVOSUN GrowHub controller, use the RJ11 cables and splitter. Pick one light to be the Master (light A). Connect the other lights (B, C, etc.) to the Master using RJ11 cables run through the 3-way splitter. Then on every non-master light, turn the dimming knob to the "EXT" position so it takes its signal from the master instead of its own dial. The VS1000's EXT port supports up to 20 lights when paired with a compatible controller like the E42A. If you're connecting to a VIVOSUN GrowHub, plug into the controller's RJ11 port and again make sure every VS light in the chain has its knob set to EXT. The GrowHub controller itself draws power through the control cable from an AeroLight or AeroZesh unit, so you won't need a separate power cable for the controller in that setup.
Powering on and using the dimmer knob
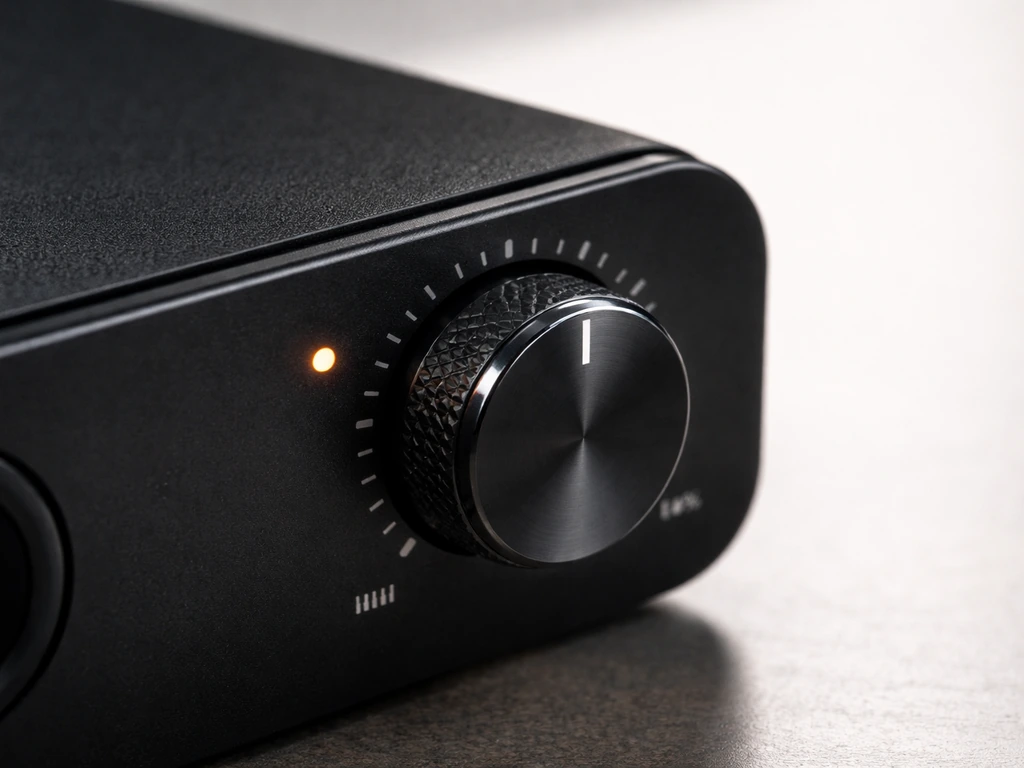
Once it's plugged in, turn the dimming knob on the VS1000's top or side panel. This knob is the primary control. The positions are: OFF, 25%, 50%, 75%, and 100%. There's no remote control on the standard VS1000, just this single rotary knob. Here's what each setting is actually for:
| Knob Setting | Output Level | Best For |
|---|---|---|
| OFF | 0% | Light is off but plugged in |
| 25% | 25W | Early seedlings and germination |
| 50% | 50W | Mid-seedling and early vegetative |
| 75% | 75W | Vegetative growth and early flowering |
| 100% | 100W | Full bloom and fruiting |
| EXT | Controlled externally | Daisy-chain or GrowHub controller mode |
Turn the knob to your desired setting and the light turns on immediately at that intensity. There's no warm-up time needed with LEDs. If you're running a single light without any controller, you'll never need the EXT position. Just leave it on the percentage setting that matches your plant stage.
How high to hang it: placement for different plants
This is where a lot of beginners go wrong. Hanging the VS1000 too close burns leaves. Too far away and plants stretch toward the light and grow spindly. The VS1000 covers a primary area of 2x2 feet (up to 2x4 feet at the edges), and the hanging height changes depending on what stage your plants are in. Use these numbers from the manual as your starting point:
| Growth Stage | Hanging Distance | Dimmer Setting |
|---|---|---|
| Germination | 24–30 inches (61–76 cm) | 25%–50% |
| Seedling | 24 inches (61 cm) | 50%–75% |
| Vegetative | 18–24 inches (46–61 cm) | 75%–100% |
| Flowering | 12–18 inches (30–46 cm) | 100% |
These are measured from the top of the plant canopy to the bottom of the light panel, not from the floor. As plants grow taller, raise the light to maintain the correct distance. With seedlings especially, start at 24–30 inches even if they look fine closer. Young plants are much more sensitive to intensity than mature ones. For houseplants that aren't going through a strict growth stage cycle, treat them like vegetative plants and start at 18–24 inches at 75% power, then watch how they respond over a week or two.
Light schedules: how long to run the VS1000
The VS1000 doesn't have a built-in timer, so you'll need a plug-in outlet timer (any cheap mechanical one works fine). Set your on/off times based on what stage your plants are in. Here are the schedule targets from the VS1000 manual:
| Growth Stage | Hours ON Per Day | Hours OFF |
|---|---|---|
| Germination | 18 hours | 6 hours |
| Seedling | 16 hours | 8 hours |
| Vegetative | 18 hours | 6 hours |
| Flowering | 12 hours | 12 hours |
Don't just slam the light on at full intensity and 18 hours right out of the box if your plants haven't been under a grow light before. Start at one step below the target intensity and a couple hours shorter than the target schedule, then ramp up over 5 to 7 days. Plants that have been under natural window light especially need this gradual transition. Watch for curling leaves, bleaching near the tips, or plants leaning away from the light as signs of too much intensity. Slow, upright growth with deep color is what you're aiming for.
If you're running the VS1000 alongside other lights or scaling up your grow, it helps to understand how different grow light setups handle timing and scheduling. For example, the approach used for setting up a sunraise grow light schedule is pretty similar, and seeing another brand's framework can help you think through your own timing choices more confidently.
Troubleshooting common VS1000 problems
Light won't turn on
Check these things in order before assuming the light is defective. First, make sure the power cord is fully seated at both ends: the light and the wall outlet. A partially connected cord is more common than it sounds. Second, confirm the dimming knob is not set to the OFF position. It's easy to leave it there after unpacking. Third, plug something else into the same outlet to confirm the outlet actually has power. If the outlet is dead, that's your problem. If the outlet works and the cord is fully connected but the light still won't turn on, try a different outlet or power strip before contacting support.
Flickering or inconsistent brightness
Flickering usually comes down to one of two things: a loose RJ11 connection (if you're daisy-chaining) or a problem with the dimmer knob position. If you're running a single light, check that the knob is firmly clicked into a percentage position and not sitting between two settings. If you're daisy-chaining, reseat every RJ11 cable connection and make sure all secondary lights have their knobs set to EXT. Also confirm that the total combined wattage of your daisy-chained lights doesn't exceed your controller's rated limit.
Light feels very hot or smells unusual

The VS1000 uses a passive heatsink design with no internal fan. Some warmth is completely normal. What you want to check is whether there's enough air circulation around the light itself. Don't press it up against the tent ceiling or cover the ventilation holes on the top. The light also has an IP65 water-resistance rating, but if there's been any moisture near the unit (from misting plants directly underneath, for example), let it dry out fully before running it again. A burning smell that isn't just the normal LED warm-up smell on first use means shut it off and contact VIVOSUN. If you've been curious about how other brands handle thermal management by comparison, the juhefa grow lights manual covers a fan-cooled design that works differently and is worth a look.
Knob set to EXT but nothing is controlling it
If you switched a light to EXT expecting a controller to run it and nothing happens, double-check that the RJ11 cable is fully inserted at both ends (they click in like a phone cable), that the master light's knob is set to an actual percentage and not also on EXT, and that the controller itself is powered and connected. The GrowHub controller only gets power through the connected AeroLight or AeroZesh unit, so if neither is in your setup, you'll need to supply the controller with power separately.
VS1000 vs other VIVOSUN models: which one do you actually need?
The VS1000 is rated at 100W and covers a 2x2-foot footprint effectively. If your space is larger than that or you're running a serious flowering operation, you'll outgrow the VS1000 quickly. VIVOSUN's lineup scales up from here: the VS2000 covers 3x3, the VS4000 covers 4x4, and so on. If you're already reading about bigger setups, the VIVOSUN 4000 grow light instructions follow the same overall format as this guide but with more coverage area and different distance/intensity specs. For anyone curious how the watt-for-watt older panel-style units compare, the VIVOSUN 600W LED grow light manual shows a different approach to dimming and control worth knowing about.
| Feature | VS1000 | Larger VS Models (VS2000–VS4000) |
|---|---|---|
| Rated Wattage | 100W | 200W–400W |
| Primary Coverage | 2x2 ft | 3x3 to 4x4 ft |
| Dimmer Control | Rotary knob (OFF/25/50/75/100%/EXT) | Same knob system |
| Daisy-Chain | Yes, up to 20 units via RJ11 | Yes, same RJ11 system |
| Cooling | Passive heatsink, no fan | Passive (some models vary) |
| IP Rating | IP65 | IP65 |
| Best For | Single tent, small grow, beginners | Larger tents, serious grows |
For most beginners with a 2x2 or 2x4 tent growing herbs, seedlings, or a small veggie crop, the VS1000 is plenty. Don't over-buy on wattage for a small space: too much light intensity in a small tent creates heat and stress problems that are harder to manage than the ones you're solving.
Safety, cleaning, and keeping it running long-term
The VS1000 carries ETL, CE, and FCC certifications, which means it's been tested to basic electrical safety standards. That said, a few habits will keep it safe and working well for years. VIVOSUN lists a 3 to 5-year warranty depending on which documentation came with your unit, so register it if you can.
- Always unplug the light before cleaning or adjusting its position.
- Wipe the light surface with a soft, dry lint-free cloth to remove dust. If needed, a slightly dampened cloth is okay, but wring it out completely first. Never spray water directly at the light.
- Do not use any water-based cleaners, detergents, or abrasive cloths. The manual is explicit: no water or detergent on the unit.
- Keep the ventilation holes and heatsink fins clear of debris, especially if you're growing in a dusty or soil-heavy environment.
- Never look directly at the LEDs when the light is on. The included grow room glasses exist for a reason: LED grow lights can damage your eyes without any warning sensation. Use them every time you're working with the light on.
- Don't run the cord under rugs, through pinch points, or coiled tightly. Heat builds up in tightly bundled cords.
- Even though the VS1000 is IP65 rated (water-resistant for normal indoor grow conditions), avoid direct water spray from misting bottles or irrigation systems hitting the unit.
- Check the rope hangers for wear every few weeks. The plastic lock clips can degrade over time, especially in humid environments.
One thing that surprises new growers: the passive heatsink on the VS1000 works well on its own, but only if there's airflow in the room or tent. A stagnant grow space with no circulation fan will get warmer than expected, and that affects both the plants and the light's long-term performance. A small oscillating fan or inline duct fan does double duty: it cools the space and strengthens plant stems.
If you're comparing how different brands handle their installation and safety specs, the likesuns LED grow light instructions walk through a different build style that some growers prefer for smaller shelving setups. And if you're ever working with a strip-light format instead of a panel, the sunblaster grow light garden instructions cover a completely different mounting approach worth knowing about as your setup grows.
The VS1000 is a genuinely beginner-friendly light once you understand the knob settings, the distance table, and the schedule. Most problems people run into come from one of three things: the knob left on OFF, the cord not fully seated, or hanging the light too close too fast. Follow the stage-based distance and intensity table, give plants a few days to adjust whenever you change settings, and you'll avoid 90% of the issues that send people searching for help.
FAQ
Can I use the VS1000 on a 240V outlet if I’m outside North America?
The VS1000 is rated for 120–277V at 50–60Hz, so in most regions it can work without a voltage converter, but you must verify your outlet is within that range and that your plug type matches what the included power cord expects. If your outlet is outside 277V, do not use it. If you are unsure, check the unit’s label or test with a proper outlet rated for the cord and load.
Do I need a separate fan for the VS1000 since it has no built-in fan?
You do not need a dedicated fan for the light itself, but you do need airflow in the grow space so heat can dissipate from the passive heatsink. If the tent air is still, the light will run warmer and plants may also feel stress. A small oscillating fan in the tent and keeping the top ventilation area unobstructed usually prevents most overheating problems.
What should I do if my seedlings look “almost right” but not thriving after changing the hanging height?
Give the plants time to respond before making another distance change. After you adjust height or brightness, wait about 5 to 7 days, then reassess. If you see bleaching or tip whitening, reduce intensity one step or raise the light slightly, and if plants look stretched and pale, bring the light closer gradually while staying within the manual’s starting distance for seedlings.
How exactly should I set the timer since the VS1000 has no built-in timer?
Use a plug-in outlet timer to control power to the light, and set the ON time window to match the target schedule for your plant stage. Do not use the timer to rapidly cycle the light every few minutes, LEDs do not need warm-up but frequent short cycling can still stress your setup. If you ramp intensity over 5 to 7 days, change the knob setting on the light, not the timer schedule.
Can I daisy-chain VS1000 lights beyond the EXT limit and just set the master correctly?
Do not exceed the EXT capacity of your controller or RJ11 chain design. The article mentions up to 20 lights with compatible controllers, but different controllers and cable setups can have lower practical limits. If you add more lights than the rated limit, you can get dimming inconsistency or flicker, so keep the total number within spec and reseat every RJ11 connection.
When using EXT mode, should the master light knob be on EXT too?
No, the master light should be set to a real intensity percentage, not EXT. Non-master lights should be set to EXT so they follow the master or controller. If the master is also on EXT, the system can appear dead because there is no active intensity source.
Why is the light flickering even though all cables look connected?
First confirm the dimming knob is fully clicked into one of the percentage detents, not resting between positions. If flicker continues and you are daisy-chaining, reseat each RJ11 at both ends until you feel the secure click, then confirm the knob on every secondary light is on EXT. Also try a different wall outlet or power strip, because intermittent outlet power can mimic a control problem.
What’s the safest way to clean or dry the light after condensation or misting?
If moisture gets near the unit, let it dry completely before powering it again, do not resume operation while it still feels damp. Avoid directing mist directly upward into the light’s housing. Once dry, check that ventilation openings are unobstructed so the heatsink can shed heat normally.
The light turns on but the brightness is lower than expected, what should I check?
Check three common causes: the knob position may not be fully engaged at 25%, 50%, 75%, or 100%, the light could be running in EXT mode unexpectedly (knob set to EXT on the unit you think is master), or the controller chain may be configured incorrectly. If you’re daisy-chaining, confirm the combined setup matches the controller’s rated capability and that every non-master unit is truly set to EXT.
Can I leave the VS1000 on continuously instead of using a stage-based schedule?
You should generally avoid continuous running unless you have a specific reason and you are following a proven crop plan, because most stages depend on day-night cycles or reduced photoperiod. If you want to experiment, start by using the manual’s targets as a baseline and change one variable at a time (timer window first, then knob intensity), so you can tell whether changes are helping or stressing your plants.
Next Article
Yadoker Grow Light Instructions: Setup, Height, and Troubleshooting
Step-by-step Yadoker grow light setup, height, coverage, dimming and timer use plus fixes for common issues.