HPS grow lights are some of the most effective tools you can use for indoor growing, but they do have a learning curve. Get the setup right and your plants will love you for it. Get it wrong and you are dealing with heat stress, light burn, or a ballast that keeps tripping. This guide walks you through the entire process, from understanding your components to dialing in your schedule and fixing problems when they come up.
How to Use HPS Grow Lights: Setup, Schedule, Fixes

Marcus Tillman
18 Apr 2026
Know your HPS components before you start
An HPS system is not a single unit. It has four main parts that work together, and if any one of them is wrong or mismatched, nothing works correctly. Before you plug anything in, make sure you can identify each piece.
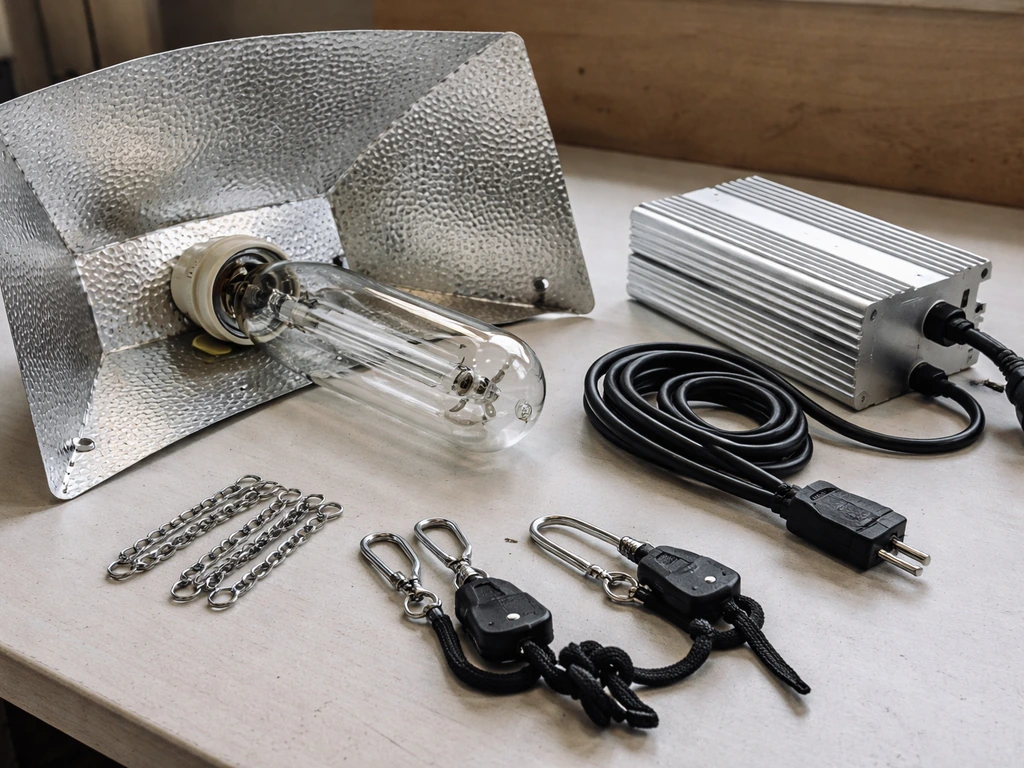
- Bulb (the HPS lamp): This is the high-pressure sodium lamp itself. HPS bulbs come in wattages like 150W, 250W, 400W, 600W, and 1000W. Each bulb has an ANSI code stamped on it (like S51, S52, or S66) that tells you exactly which ballast it needs. Do not skip this step. Matching the ANSI code between bulb and ballast is non-negotiable.
- Ballast: This is the brain of the system. It regulates the electrical current flowing to the bulb. Ballasts are either magnetic (older, heavier, cheaper) or digital/electronic (lighter, runs cooler, sometimes dimmable). Your ballast must match your bulb's wattage and ANSI code exactly.
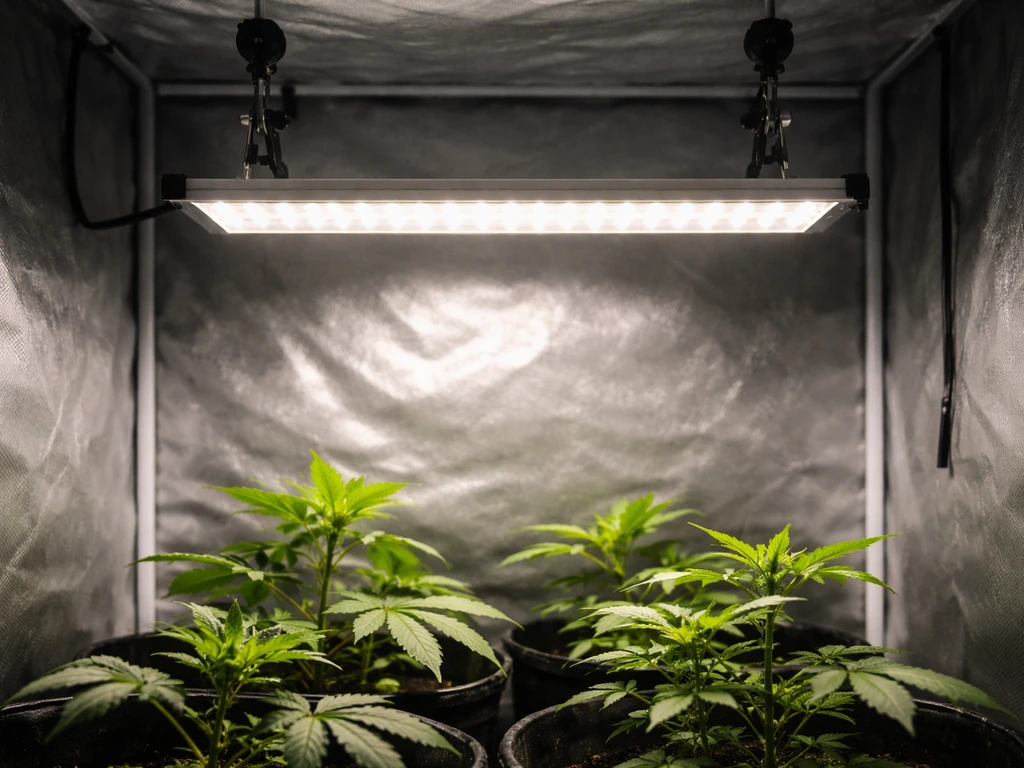
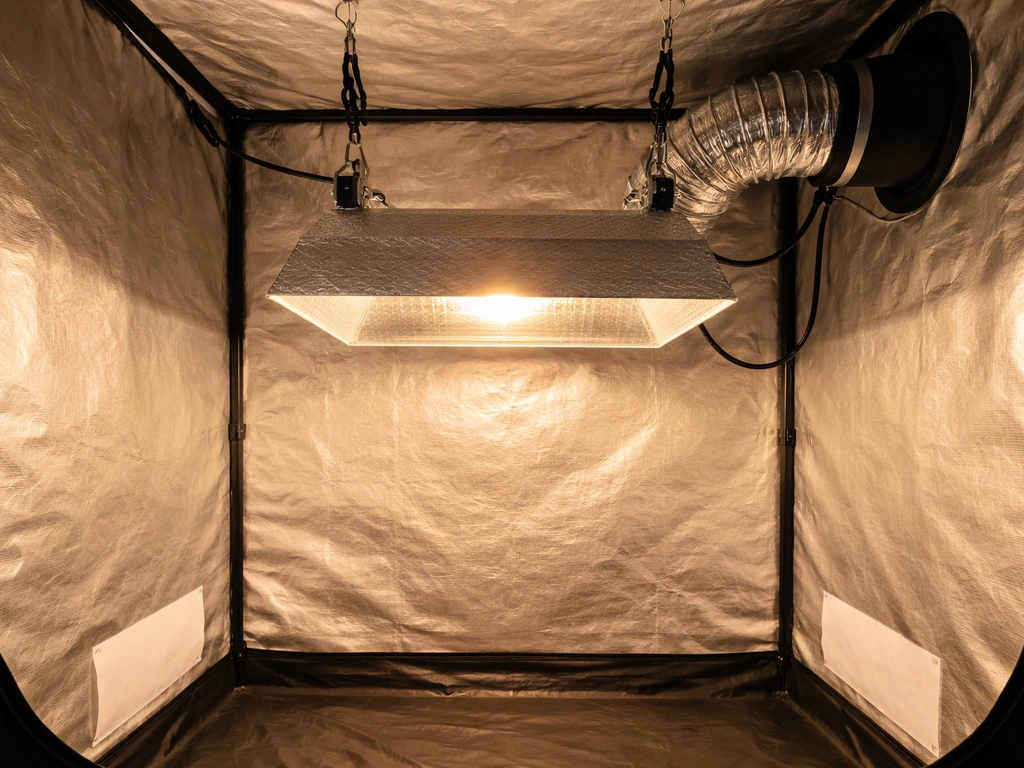
- Reflector/hood: This is the metal housing that sits above the bulb and directs light downward toward your plants. Reflector shape matters a lot for coverage uniformity. A wide-angle wing reflector spreads light over a larger area; a cooled hood (air-cooled reflector with glass) lets you run the light closer to plants by ducting heat away.
- Fixture/socket assembly: This holds the bulb inside the reflector and connects it to the ballast wiring. It includes the lamp socket (usually an E39 mogul base for most HPS bulbs), the cord or whip from ballast to lamp, and the hanging hardware.
One thing to double-check right away: if you bought a remote ballast kit (ballast mounts separately from the hood), the wire running from ballast to lamp socket must be rated for at least 600Vrms and 4kV pulse tolerance. Standard household extension cord wire is not rated for this. Use the manufacturer-supplied lamp cord or replace it with properly rated wire. This is a safety requirement, not optional fine print.
Safe installation, wiring, and ventilation
HPS lights run hot and they draw serious power. A 1000W HPS system can pull around 9 amps on a 120V circuit, so make sure your outlet and circuit can handle it before you start. Most growers run their HPS on a dedicated 20-amp circuit to avoid tripping breakers or creating fire hazards.
Wiring and grounding
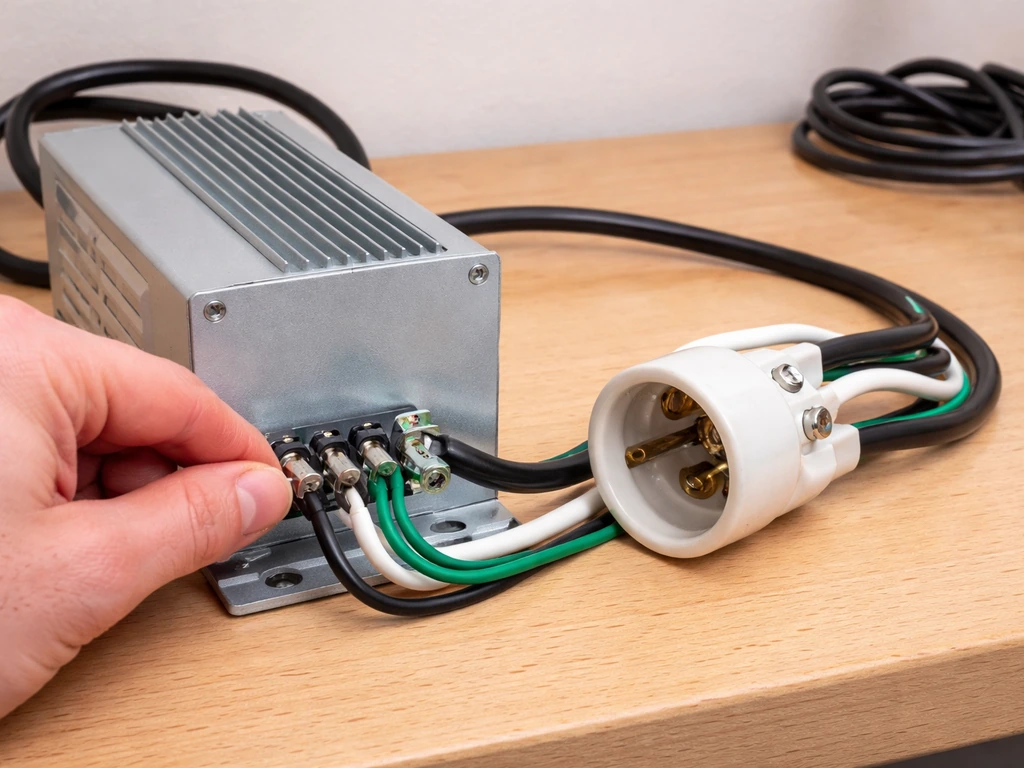
If your kit comes pre-wired, your job is simpler: just connect the ballast to the lamp socket using the supplied cord, plug the ballast into the wall, and you are mostly done. But here are the rules that apply either way. First, always ground your system. The reflector, ballast housing, and fixture should all be connected to a grounding conductor.
Grounding is not just about shock protection, it also helps the lamp start reliably and reduces electrical interference. Second, use strain relief at every connection point, meaning the cord should be clamped or secured where it enters the fixture so that any tugging on the cord does not pull on the terminal connections inside. If you are hardwiring anything yourself, follow your ballast manufacturer's wiring diagram precisely and confirm input voltage matches your supply before energizing.
Heat and ventilation basics
Heat is the biggest practical challenge with HPS lighting. A 600W HPS puts out roughly the same heat as a small space heater. Without proper ventilation, temperatures in your grow space will climb fast and stress your plants. Here is what you need to set up before the light even turns on:
- Inline fan and ducting: Run at least a 4-inch inline fan for setups under 600W and a 6-inch fan for 600W-1000W. Duct hot air out of the tent or room, ideally through a carbon filter if odor control matters.
- Air-cooled hood option: If space is tight, an air-cooled reflector with ducting attached pulls heat away from the bulb directly and lets you hang the light much closer to the canopy.
- Thermometer at canopy level: Place a digital thermometer at the top of your plants, not at the ceiling. Your target is 70-85°F (21-29°C) at canopy height during lights-on periods.
- Ballast placement: Keep the ballast off the floor if possible (it draws in cooler air) and make sure it is not enclosed in a tight space. Ballast case temperature must stay within the manufacturer's maximum at the hot spot location on the unit.
Also confirm that nothing combustible (fabric, cardboard, dry wood) is within the clearance distance specified on your fixture's label. UL-listed fixtures carry required clearance markings for a reason. Follow them.
Placement: how high to hang and how to position your reflector
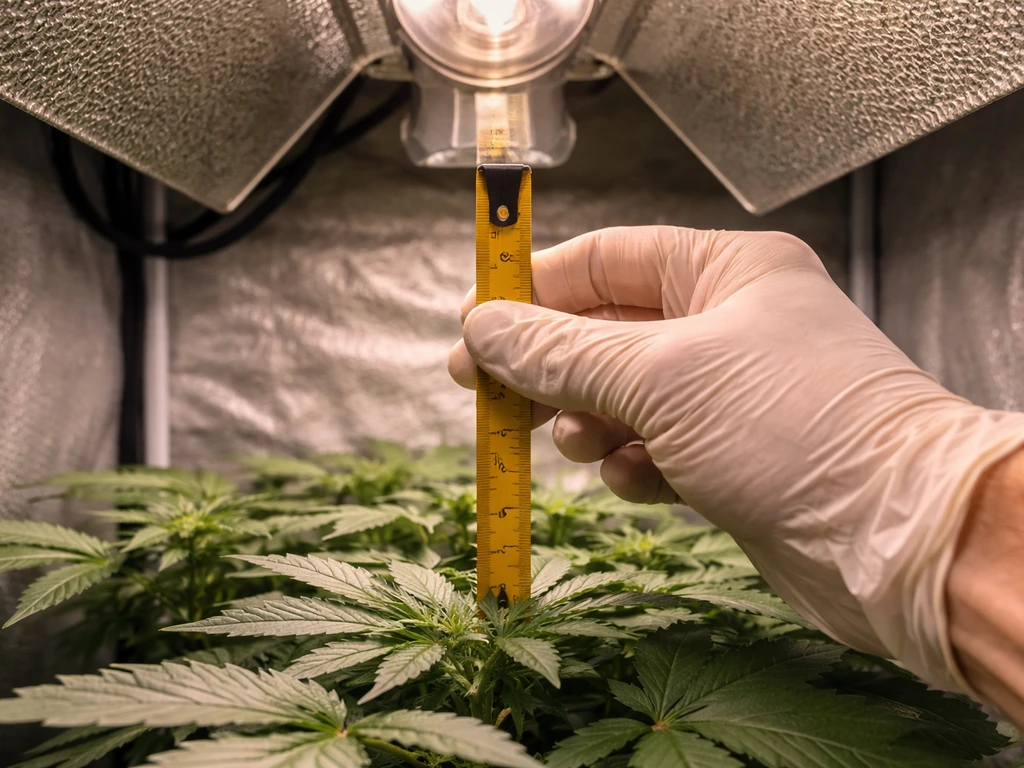
Getting your hanging height right is probably the single biggest factor in whether your plants thrive or suffer under an HPS. Too close and you get light burn and heat stress. Too far and plants stretch toward the light and never develop properly.
Starting heights by wattage
| Wattage | Minimum Height (seedlings) | Typical Height (veg) | Typical Height (flower) |
|---|---|---|---|
| 150W | 12 inches | 10-14 inches | 10-12 inches |
| 250W | 14 inches | 14-18 inches | 12-16 inches |
| 400W | 18 inches | 18-24 inches | 16-20 inches |
| 600W | 24 inches | 24-30 inches | 20-24 inches |
| 1000W | 30 inches | 30-36 inches | 24-30 inches |
These are starting points, not gospel. The real test is the hand check: hold your hand at canopy level directly under the light. If it feels uncomfortably warm within 10 seconds, the light is too close. With an air-cooled hood, you can push those minimums down by 4-6 inches because you are removing the heat from the beam path.
Coverage area and reflector positioning
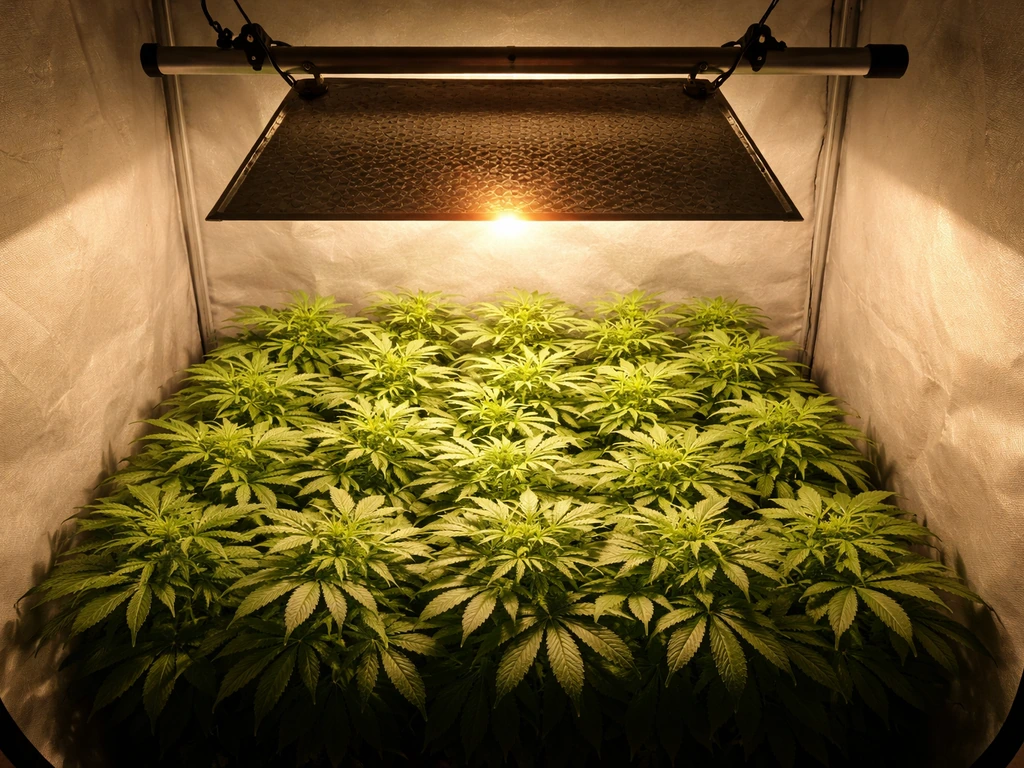
A 600W HPS covers roughly a 4x4 foot footprint well. A 1000W unit covers about 5x5 feet. Going wider than that causes the edges of your canopy to receive significantly less light than the center, which shows up as uneven growth. If you are covering a larger space, use multiple lights instead of trying to stretch one. Aim your reflector straight down unless your space is unusually long and narrow, in which case you can tilt it slightly to compensate. A PPFD intensity map from greenhouse lighting design references shows that mounting height and reflector angle work together to shape the light distribution across the canopy, and that the drop-off at the edges is real and worth planning around.
Light scheduling: seedlings, veg, and flowering
Plants at different stages of growth need different amounts of light per day. HPS lights are particularly effective for both vegetative growth and flowering, but the schedule you use has a direct impact on how plants develop. Here are the standard schedules to follow:
| Growth Stage | Light Hours (on/off) | Target PPFD (µmol/m²/s) | Notes |
|---|---|---|---|
| Clones / Seedlings | 18 hours on / 6 hours off | 100-250 | Keep light higher to avoid heat stress on young roots |
| Vegetative | 18 hours on / 6 hours off | 400-600 | Lower light gradually as plants establish |
| Flowering / Fruiting | 12 hours on / 12 hours off | 600-900+ | Strict dark period triggers flowering in photoperiod plants |
The 18/6 schedule for seedlings and veg is well established and supported by university supplemental lighting research, including work from the University of Arizona's controlled environment agriculture program. For flowering, the 12/12 switch is what triggers bloom in most photoperiod plants, and the dark period has to be truly dark. Even a small light leak during the off period can interrupt the flowering signal. Check your tent seams with the light off.
If you are growing non-photoperiod crops like tomatoes or peppers, you have more flexibility. Many growers run 16/8 or even 14/10 schedules for fruiting crops and adjust based on plant response. Check out guides specifically on using grow lights for tomatoes if that is your primary crop, since fruiting vegetables have their own PPFD requirements and schedule nuances. For tomato-specific setups, the best starting point is to follow a dedicated guide for how to use grow lights for tomatoes and then fine-tune height, timing, and intensity based on your plants.
Dialing in intensity: timers, dimming, and spacing
Every HPS setup needs a mechanical or digital timer. This is not optional. Manually switching lights is unreliable and plants respond badly to inconsistent schedules. A basic 24-hour outlet timer costs around $10 and does the job for single-light setups. For multiple lights or more control, a digital programmable timer lets you set exact on/off times to the minute.
Dimming with HPS ballasts
Most digital HPS ballasts have a built-in dimmer that lets you run the lamp at 50%, 75%, or 100% of rated wattage. This is genuinely useful for seedlings or during hot weather when you want to reduce heat output without changing your schedule. One important warning: do not use a standard wall dimmer or lamp dimmer switch with an HPS system. HPS ballasts are not compatible with residential dimmers and you will damage the ballast or lamp. Only use dimming controls built into or designed specifically for HPS ballasts.
Measuring PPFD to confirm intensity
The most accurate way to confirm your light intensity is with a quantum PAR meter, which reads PPFD (photosynthetic photon flux density) in micromoles per square meter per second (µmol/m²/s). Take readings at several points across the canopy: center, midpoint, and corners. If the corners are reading less than half of the center reading, your coverage is too uneven. Raise the light slightly or consider adding a second fixture. Smartphone apps like Photone can give you a ballpark PPFD reading using your phone camera, but treat the numbers as directional rather than precise unless you are using a calibrated diffuser accessory. They are useful for relative comparisons (is one spot dimmer than another?) even if the absolute numbers are off.
Keeping your system running: maintenance and longevity
HPS systems are durable, but they do degrade over time and need some basic maintenance to stay reliable. Most growers ignore this until something breaks. Do not be that grower.
Bulb replacement schedule
HPS bulbs lose output gradually. By the time a bulb reaches around 10,000-12,000 hours of use, it may still be glowing but producing significantly less usable light than when new. According to the Sylvania high-pressure sodium lamp datasheet, these lamps exhibit life characteristics such as about 12,000 hours at a 90% survival rate HIGH PRESSURE SODIUM LAMP SHP. Most serious growers replace bulbs every 10,000 hours or every growing season, whichever comes first. Do not wait for the bulb to fail completely. Declining output shows up as slower growth and stretching before the bulb ever stops working.
Reflector and lens cleaning
Dust, pollen, and residue build up on reflector surfaces and glass lenses over time. Even a light film of dust can reduce light transmission meaningfully. Wipe down the interior of your reflector with a clean, lint-free cloth every 2-4 weeks. If you have a glass-enclosed air-cooled hood, clean the glass panel with a streak-free glass cleaner. Let everything dry completely before turning the light back on. When handling the bulb itself, never touch the glass with bare hands. Oils from your skin create hot spots that can shorten bulb life dramatically. Use gloves or a clean cloth.
Checking connections and ballast condition
Every month or so, power down the system, let it cool completely, and check all your electrical connections. Look for any corrosion, melted insulation, or loose terminals. A connection that feels warm to the touch after operation (not just from ambient heat) is a warning sign. Digital ballasts typically last 5-7 years with normal use. Magnetic ballasts can last longer but run hotter. If your ballast is running unusually hot, buzzing louder than normal, or the case temperature feels excessive, those are early warning signs worth addressing before they become failures.
Troubleshooting common HPS problems
Things will go wrong at some point. Here is how to diagnose the most common HPS issues quickly.
Lamp won't start or takes a very long time
HPS lamps do not reach full brightness instantly. They have a warm-up period of several minutes to reach 90% of their rated output. That is normal. However, if the lamp is not starting at all or is cycling on and off rapidly, the most likely causes are: a faulty ignitor, a mismatched bulb and ballast, a bulb that has reached end of life, or a ballast that is failing. If the lamp recently turned off, you need to wait 15-30 minutes before trying to restart it. HPS lamps require a cool-down period before the internal pressure drops enough to allow restrike. Cycling the power immediately after shut-off will stress the lamp and shorten its life significantly.
Flickering or inconsistent output
Flicker during normal operation usually points to a ballast issue. Common causes include a failing ballast capacitor, a loose lamp-to-socket connection, or a lamp that is near end of life. Start by reseating the bulb in the socket firmly. If the flicker continues, swap in a new bulb first (it is the cheaper part to test). If a new bulb does not fix it, the ballast is likely the culprit. Dimming or inconsistent output that gets worse over weeks is almost always a bulb degrading toward end of life.
Plants showing light burn or heat stress
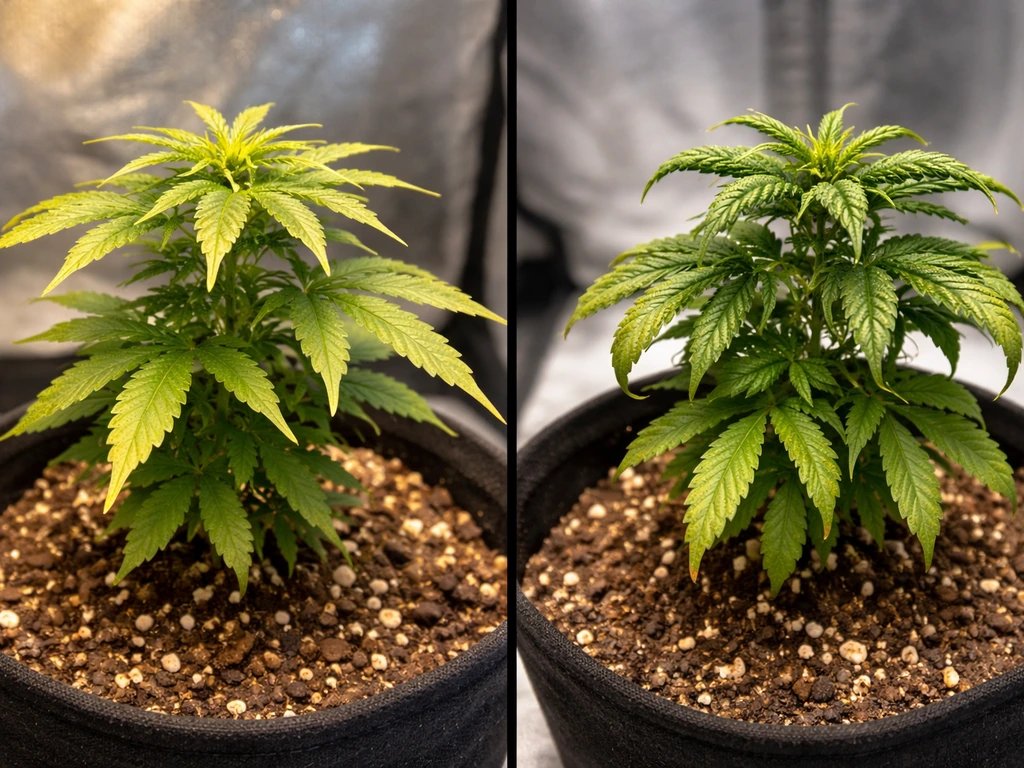
Light burn looks like yellowing, bleaching, or crispy tips on the leaves closest to the light. Heat stress shows up as leaves curling upward (taco-ing), wilting even with adequate water, or generally stunted growth. Both problems usually have the same fix: raise the light. Use the hand check again. If it is uncomfortable for your hand after 10 seconds, it is too hot for your plants. If heat is consistently elevated even with the light at the correct height, the problem is ventilation. Increase your exhaust fan speed or add a second fan.
Stretching and sparse growth
Plants that are stretching tall with long gaps between nodes are not getting enough light. Either the light is hung too high, the PPFD at canopy level is too low, or the light schedule is too short. Lower the light incrementally by 2-inch steps and watch for improvement over 3-5 days. If you are already at the recommended height and still seeing stretch, the issue may be a worn-out bulb or a coverage area that is too large for the wattage you are running.
Hotspots and uneven coverage
If plants directly under the center of the light are thriving while plants at the edges are lagging, you have a coverage uniformity problem. Solutions: raise the light to spread the beam wider, add a second light to cover the outer area, or use a light mover rail to sweep the light across the canopy. You can also rearrange plants so faster-growing ones are on the edges where light is lower, equalizing their development.
Quick symptom reference
| Symptom | Most Likely Cause | First Fix to Try |
|---|---|---|
| Lamp won't start | Ignitor failure, end-of-life bulb, or mismatched ballast | Wait 15-30 min, reseat bulb, check ANSI match |
| Lamp flickers on and off | Failing ballast or dying bulb | Swap bulb first; replace ballast if flicker continues |
| Slow warm-up (5-10 min) | Normal HPS behavior | No action needed |
| Yellowing/bleaching at tops | Light burn (light too close) | Raise light 2-4 inches |
| Leaves curling upward | Heat stress | Raise light and improve ventilation |
| Stretching / leggy growth | Light too far or too dim | Lower light or replace aging bulb |
| Uneven growth across canopy | Hotspot or poor coverage | Raise light or add second fixture |
| Ballast overheating | End-of-ballast-life or blocked airflow | Improve ballast ventilation; test/replace ballast |
Quick start checklist and your next steps today
If you want to get your HPS system set up correctly from the start, run through this checklist before you flip the switch for the first time.
- Confirm your bulb and ballast share the same ANSI code and wattage rating.
- Verify the lamp cord wire is rated for at least 600Vrms/4kV pulse if running a remote ballast.
- Ground your fixture and ballast housing via the equipment grounding conductor.
- Position the ballast in an open area with airflow, not in an enclosed box.
- Install an inline exhaust fan sized for your space (6-inch minimum for 600W+).
- Hang the light at the recommended starting height for your wattage (see the table above).
- Set your timer to the correct schedule for your growth stage (18/6 for seedling/veg, 12/12 for flower).
- Place a thermometer at canopy level and confirm temperature stays between 70-85°F during lights-on.
- Do the hand check under the light at canopy height to confirm heat is acceptable.
- Take PPFD readings at center and corners to check coverage uniformity.
- Note the date you installed a new bulb so you can track hours toward your 10,000-hour replacement target.
Once your system is running, check in on it daily for the first week. Look at your plants, not just your equipment. Leaves tell you a lot: are they pointing upward and open (happy) or curling, bleaching, or drooping (stressed)? Adjust height and schedule in small increments and give plants 3-5 days to respond before making another change. Growing with HPS is an iterative process and your instincts get sharper with each grow.
If you are working in a greenhouse instead of an indoor tent or room, the ventilation and scheduling dynamics are a bit different since you are supplementing natural light rather than replacing it entirely. If you want the best results in a greenhouse, focus on positioning, ventilation, and scheduling so the supplemental light fits your plants’ natural day length how to use grow lights in a greenhouse.
Similarly, if you are starting from seed using a starter kit, the seedling-stage placement and timing recommendations above are your most important reference point for those early weeks. Similarly, if you are starting from seed using a starter kit, you will still need to match the grow light distance and timing to the seedling stage for healthy early growth how to use seed starter kit with grow light.
And if you are debating whether to go with HPS or T5 fluorescents for a smaller setup, keep in mind that T5 lights run much cooler and suit seedlings and low-light plants well, while HPS wins on intensity and PAR output for vegetative and flowering stages. The right choice depends on what you are growing and how much space you have to manage heat.
The biggest thing to take away from all of this: HPS lighting is proven and effective, but it rewards growers who pay attention. Measure your canopy temperature, check your PPFD if you can, keep your reflector clean, and replace your bulb on schedule. Do those things consistently and HPS will deliver excellent results for years.
FAQ
How do I adjust hanging height if I’m seeing both heat stress and light burn?
Use the hand-check and canopy temperature checks in the article as your primary guide, then set height more precisely by targeting plant response. If you routinely see leaf bleaching on the newest growth or taco-ing even when airflow is strong, lower the fixture in 1 to 2 inch steps and reassess after 3 to 5 days. If only the edges are affected, the issue is often uneven coverage rather than a global “too close” problem.
Can I dim HPS grow lights with a normal household dimmer to save electricity?
Yes, but only with an HPS ballast that explicitly supports dimming. Don’t try to reduce output by using a regular dimmer switch on the wall or a plug-in lamp dimmer, those are not compatible with HPS ballasts and can damage the ballast or lamp. If your ballast has built-in dimming modes, start at 75% for veg and increase to 100% only when plants are staying healthy without stretching.
What counts as “dark” for photoperiod flowering, and how can I verify I’m not causing light leaks?
Set a true off period with the grow timer and minimize any stray illumination from outside your tent. For photoperiod plants, confirm that nothing is leaking at “lights off” (zippers, gaps in ducting, indicator LEDs from controllers, and reflective tape around view windows). If you can, cover or remove device LEDs that could create a visible light source inside the flowering space.
Is it safe to change hanging height while the HPS is running or just after turning it off?
Avoid moving the bulb or reflector while it is hot or recently powered off. If you need to change height, wait for a full cool-down, then make changes with the system off and verify all connections and strain relief are still secure afterward. For repeated adjustments, note that lamps can be slow to restrike, so plan changes around the 15 to 30 minute cool-down window after shutting down.
How can I tell if my bulb and ballast are mismatched when troubleshooting starting problems?
Always use the manufacturer-specified lamp and wattage for your ballast. Mismatched bulb type (for example, different system wattage or wrong lamp family) can lead to poor starting, cycling, flicker, or fast degradation. If you suspect a mismatch during troubleshooting, swap the bulb first only if it matches the ballast spec exactly.
What should I check if my HPS trips a breaker even on a 20-amp circuit?
Don’t assume a tripped breaker means the light is “too big” without checking the whole circuit load. A 1000W system can draw around 9 amps on 120V, but the circuit may already have other heaters, pumps, or fans. If you keep tripping, list everything on that breaker and either remove load or move the HPS to a dedicated circuit, and consider using a proper surge-protected outlet.
If the centers look great but corners lag, what’s the best order to troubleshoot my coverage problem?
For multi-light setups, create uniformity by matching each fixture’s on/off timing and then confirm coverage by measuring at several canopy points. If center is strong but corners lag, the article suggests raising the light for spread or adding a second fixture, but you can also reposition plants and use a light mover if the space and power wiring support it. Ensure both lights are aimed straight down (unless the space shape requires a slight tilt).
What wiring or placement mistakes most often cause overheating or melted insulation with HPS kits?
For safety and reliability, assume your system will not be handled like a “portable lamp.” Make sure the fixture is rated for the environment (humidity and grow-room temperatures), use strain relief at every cord entry, and route cables so they cannot contact the bulb or hot reflector surfaces. If you see melted insulation or a warm-to-touch connection after operation, stop and fix the wiring before using it again.
How reliable are smartphone PPFD apps for dialing in an HPS schedule and height?
Quantum PAR meters are ideal, but if you rely on an app, use it for relative comparisons, not absolute certification. Take readings in the same lighting conditions and at the same spots before and after changes (height, wattage, bulb age). If you can’t measure PPFD at all, use the stretch and leaf condition symptoms as the practical proxy and adjust in small steps over several days.
If plants look stressed, should I change the HPS schedule immediately or first adjust height and ventilation?
General schedule guidance is in the article, but the more practical rule is to keep the schedule stable once flowering starts, then avoid sudden changes in on/off times. If you’re trying to recover stressed plants, change height first (and ventilation if heat is the limiting factor), then adjust schedule only in small increments and give a few days for response. Fast schedule changes often create mixed signals that slow progress.
Next Article
Innova Grow Light Instructions: Setup, Use, and Troubleshooting
Step-by-step Innova LED grow light instructions: setup, mounting, distance, schedules, intensity, and fast troubleshooti